Since its release, PlayStation 5 has sold over 50 million units in just three short years, thanks in part to its fantastic hardware, 4K gaming abilities, and impressive capture capabilities. Whether you're looking to record your epic battles in Black Myth: Wukong or share your gaming highlights with friends, the PS5 offers several methods to capture your gameplay. In this guide, we'll walk you through six easy ways to record on PS5. You'll learn how to take screenshots, record gameplay for YouTube, and make the most of the console's built-in recording features. However, it's important to note that the PS5's recording capabilities do have some limitations.

In this article
Part 1: Why Record Your Gameplay on PS5
Directly recording games on this console undoubtedly has advantages, making it a fantastic gameplay recording option with all the essentials. These benefits include the following:
- You can record games in FullHD or 4K quality;
- Using it is remarkably straightforward;
- It provides decent customization options;
- You can take screenshots in just two steps.
Now that we know why the built-in PS5 recorder is such a beneficial feature, we can move on directly to using it to create fantastic gameplay recordings.
How to Record on PS5 - 5 Methods
PS5’s gameplay recording capabilities are miles ahead of its predecessor, the PS4. As a result, it has numerous recording options, so let’s dig into them immediately.
1. How to Record Gameplay on PS5
Whether it’s for a YouTube channel or anything else entirely, if you’ve reached a part of the game you want to record, you can follow these simple steps to capture PS5’s footage:
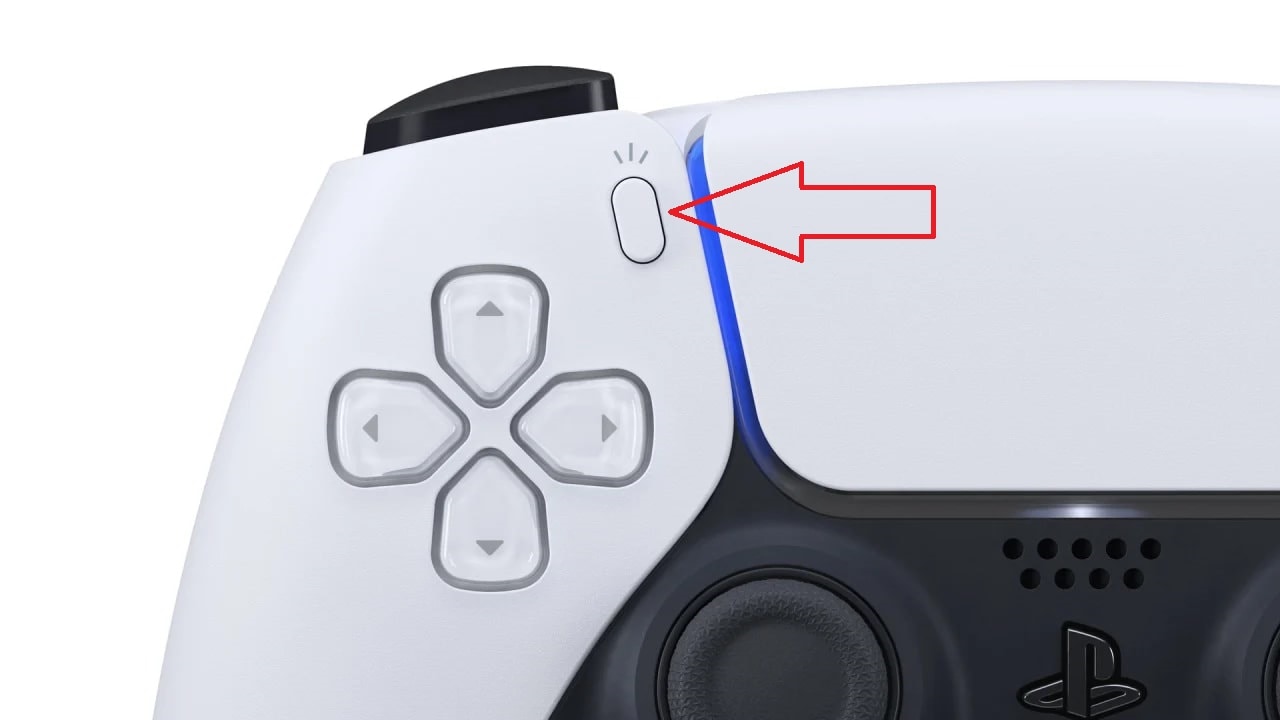
Step 1: Click the Create button on your DualSense controller.
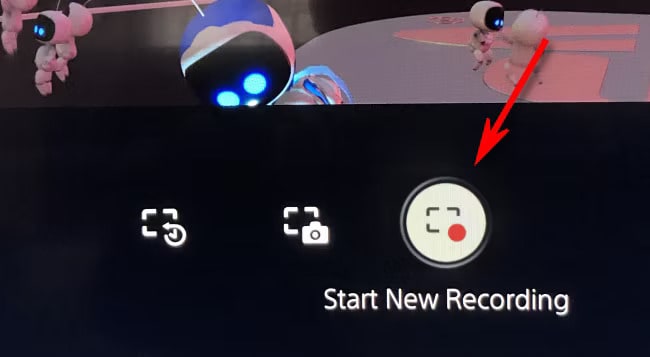
Step 2: Tap the Start New Recording button at the bottom center of the screen.
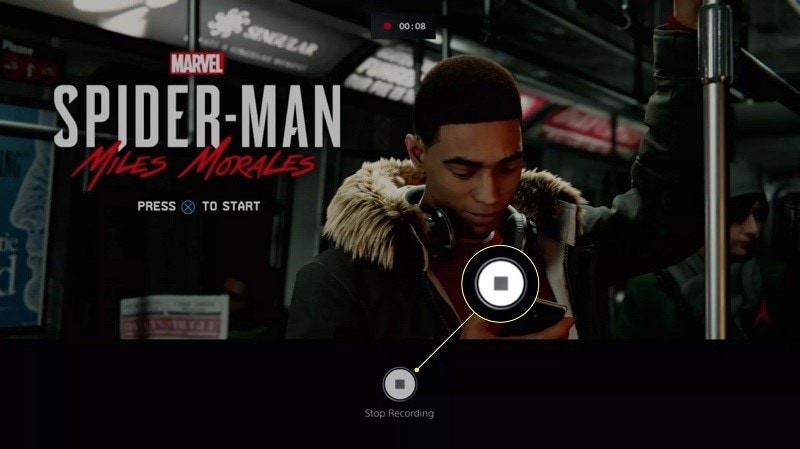
Step 3: When you’re done gaming or want to end the video, tap the DualSense’s Create button again and choose the Stop Recording option.
Your newly created PS5 recording will show up on the left side of the Create bar, and you can also find it in the console’s Media Gallery.
Related topic
2. How to Capture a Screenshot on PS5
You’d be right to assume that if you can record games, you can also take screenshots. Even better, you can capture PS5 screenshots in just two simple steps. Here’s how:
Step 1: Press the Create button on your controller.
Step 2: Tap the Screenshot icon in the bottom center of the screen.
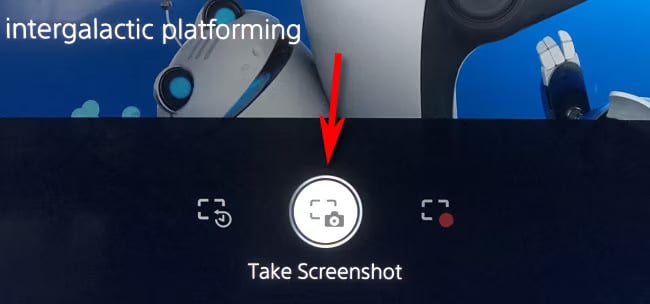
Like gameplay recordings, screenshots will also appear in the bottom left corner of the Create menu when you take them. You can also find them in PS5’s Media Gallery for later access.
3. How to Share/Copy Recordings/Screenshots on PS5
The console’s Media Gallery is home to all the screenshots and gameplay recordings you’ve ever taken. It lets you access, edit, share, and copy screenshots and recordings. Here’s how:
Step 1: PS5’s Media Gallery should be on your home screen if you’ve used it recently. If it’s not there, go to your console’s Game Library.
Step 2: Tap the R1 button to get to the Installed tab.
Step 3: Find the Media Gallery and open it.
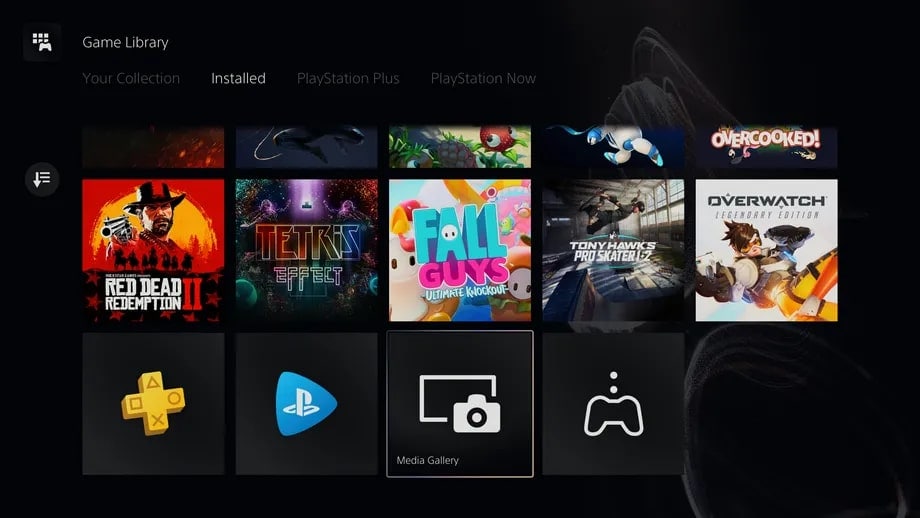
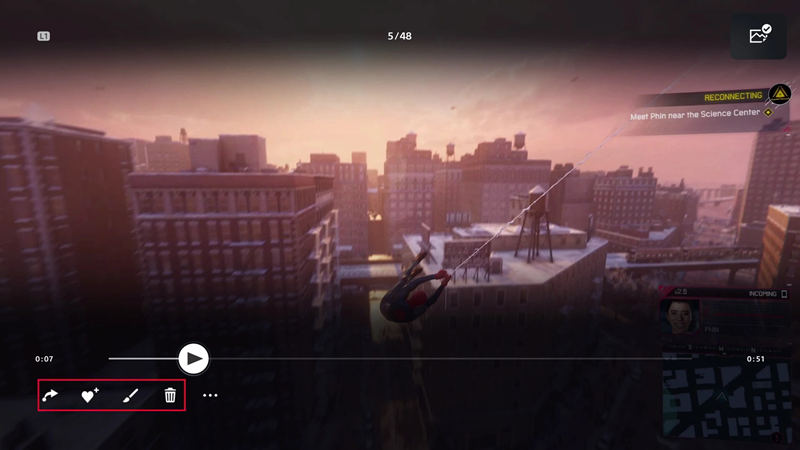
Step 4: Open a screenshot or a gameplay recording.
Step 5: At the bottom left, you’ll see buttons like Share, Favorite, Edit, and Delete. Tap the first button to share your PS5 gameplay recordings to connected social media accounts.
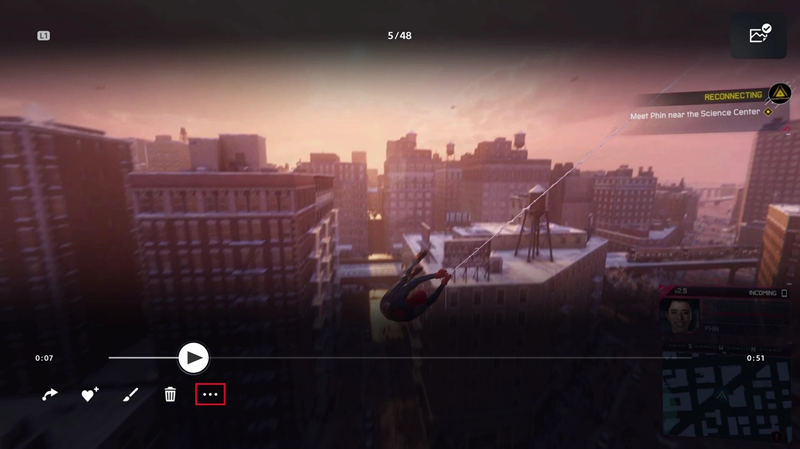
Step 6: Alternatively, tap the Three Dot button next to these icons to see additional options.
Step 7: Connect your USB drive or an external SSD/HDD and choose the Copy to USB Drive option.
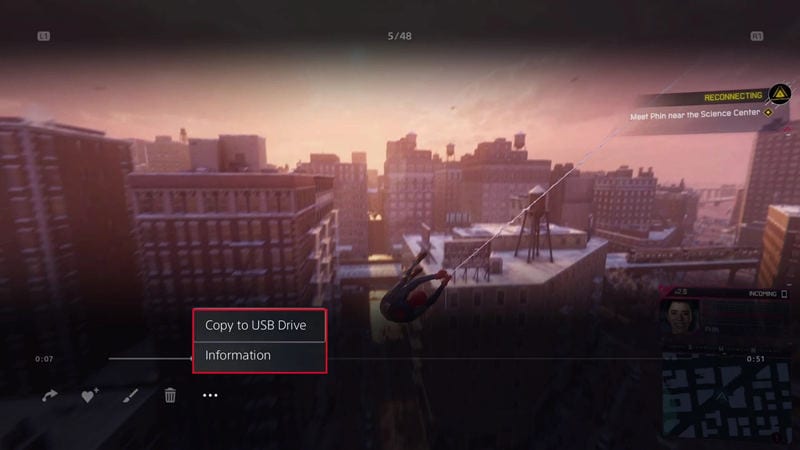
While copying screenshots should be quick, you should give the console a few minutes to copy the PS5 game recording, especially if it’s an hour-long footage of your gaming session.
4. How to Record Past Gameplay on PS5
One of the console’s most significant advantages is its ability to record footage retroactively. To be more precise, PS5’s capture engine constantly records gameplay. That allows players to click a button in the Create menu and save a short 15 or 30-second clip, a few-minute-long video, or a full-on recording of the past hour of their gaming session.
Let’s see how you can do that:
Step 1: Hit the Create button on your controller.
Step 2: Click the Save Recent Gameplay button at the bottom of the screen.

Step 3: Select between the Save Short Clip and Save Full Video options, and choose the length of the gameplay recording you want to save.

5. How to Change Record Settings on PS5
Creating a recording of your gaming session isn’t as limited as it might seem, as the console allows for a few customization options. To get to these options and alter your PS5 recording settings, follow these steps:
Step 1: Once again, press the Create button on your DualSense controller.
Step 2: In the bottom right corner of the Create menu, select the Capture Options.
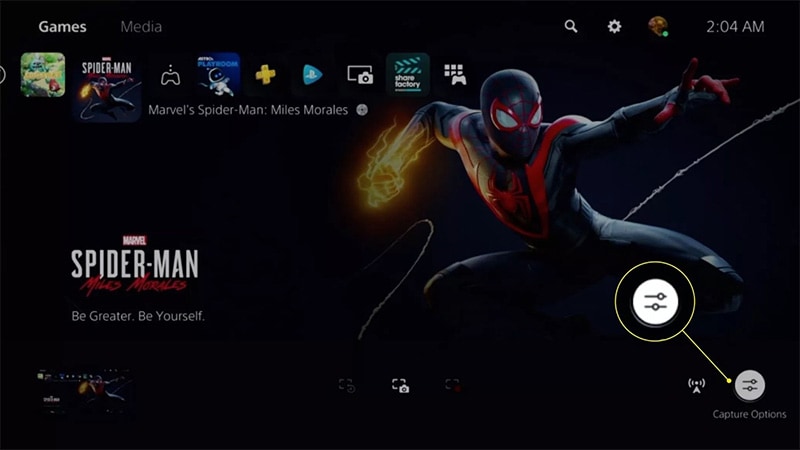
Step 3: Here, you can change the Manual Recording Resolution to 1920x1080 (Full HD) or 3840x2160 (4K), change the Video Clip File Type to WebM or MP4 formats, and alter the Screenshot File Type to JPG or PNG.
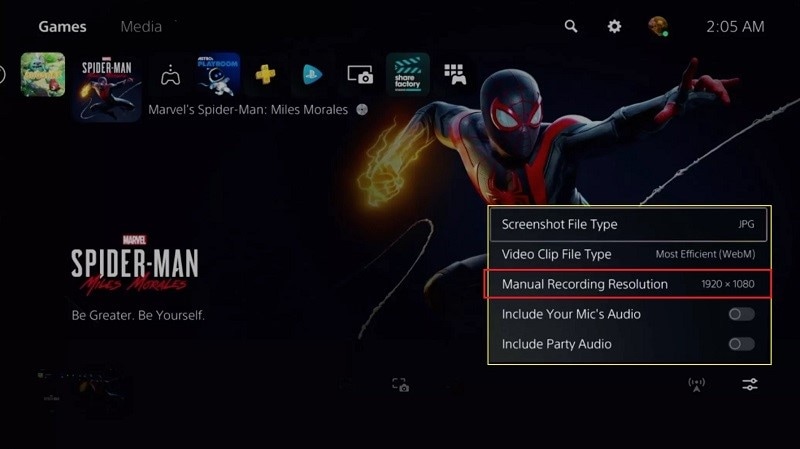
You can also choose whether to enable your mic’s audio or your gaming lobby’s sounds in your recordings by toggling the last two settings in the Capture Options menu.
Part 3: The Limitations of the Built-in PS5 Game Recorder
As you can see from the abovementioned notes, the integrated capture method could be better. Namely, the console’s feature has certain drawbacks, including the following:
- Limited Video Length – The built-in PS5 recorder can only save up to an hour of gameplay footage at once.
- Low Number of Video Formats – When you record a game on this console, it only supports two video file formats – WebM and MP4.
- Lack of Screenshot Formats – Image formats share drawbacks similar to video ones, with support for only JPG and PNG screenshots.
- Inability to Record Webcams – With a PS5 recorder, users can only capture footage of their screens and not themselves.
If these built-in recorder limitations bother you, you’ll be happy to hear there is a fantastic gameplay recording alternative.
Bonus: An Alternative Method to Record PS5 Gameplay
Third-party video recorders have advanced dramatically in the past few years. Today, they allow users to record, edit, and share footage with a few simple clicks, making them a tremendous alternative to the console’s built-in recorder.
Wondershare DemoCreator is one of those tools, and its recording capabilities are far greater than those of PS5. With six recording modes and zero limitations, you can effortlessly capture gameplay, edit it in the app’s built-in Video Editor, and share it directly to your connected social media accounts.
To get started with PS5 gameplay recordings on PC, you’ll need a Remote Play app, a USB cable, and a high-speed internet connection. Even with those requirements, using Wondershare DemoCreator to capture PS5 footage is still a far better option than the built-in tool. Here’s what you’ll need to do:
Step 1: Connect your PC and console to the same home network, and then connect them with a USB cable.
Step 2: Download Remote Play from the official website and follow the steps on how to control your PS5 console from a Windows PC .
Step 3: Download and Launch the Wondershare DemoCreator, tap Video Recorder, and choose the Game option.
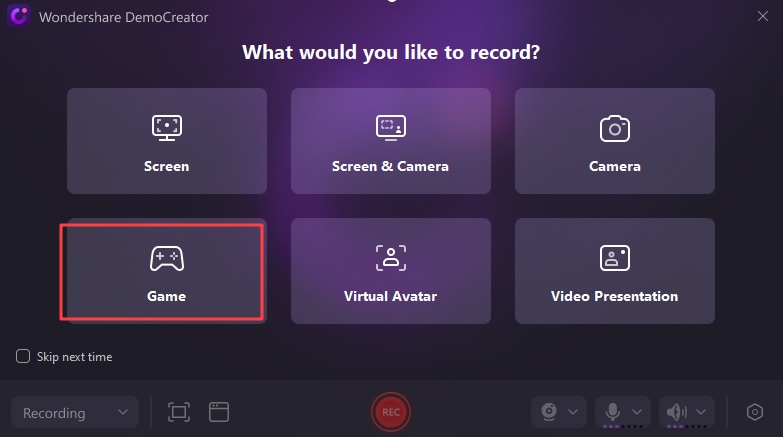
Step 4: Customize your recording settings by selecting a game from the PS5 and setting up your webcam and microphone.

Step 5: When ready, tap the red REC button to start recording and play for as long as you like.
Step 6: Once done, hit F10 to stop recording gameplay. Alternatively, tap F9 to pause or resume.

The created recordings will automatically be imported into DemoCreator’s Video Editor, where you can apply any AI-powered edits you like or tap the Export button in the top right corner to save the video.
- Record customized screens with audio and edit them in different tracks.
- Capture gaming videos, tutorials, and presentations and then edit them in one tool.
- Built-in unlimited editing templates, special effects, and other sources.
- Supported export to MP4, MOV, MKV, GIF, and other formats.

Conclusion
The PS5’s gameplay recording capabilities have drastically improved since the last-gen console. Users can now take screenshots in two steps or record their games in up to 4K 60FPS. The console’s capture feature also lets users record retroactively, saving up to an hour of footage even if they’ve never started recording.
However, the PS5’s lack of image and video format support, inability to record webcam footage alongside gameplay, and video length limitation of one hour led many users toward a better alternative – Wondershare DemoCreator.
Marked by six recording modes, including a limitation-free Game recorder, a built-in Video Editor, and integrated sharing capabilities, DemoCreator is everything the built-in recorder dreams of being. That makes it a better option and a fan-favorite among those who want to learn how to record gameplay on PS5 for YouTube.
FAQs
-
How to Capture Black Myth: Wukong Gameplay on PC?
On PC, you can use tools like OBS Studio or NVIDIA ShadowPlay to record Black Myth: Wukong. You’ll need to configure your recording settings like resolution, frame rate, and audio capture. OBS offers customizable options for both video and audio to ensure smooth gameplay capture.
-
How to Record Black Myth: Wukong Gameplay on PS5?
The PS5 has a built-in recording feature. Press the “Create” button on the DualSense controller, select “Start Recording,” and save your footage directly to the console’s media gallery. For advanced recording, you can connect an external capture device to your PS5.
-
What’s the Best Way to Screen Record Black Myth: Wukong on Mac?
On Mac, QuickTime Player offers built-in screen recording capabilities, or you can use third-party software like OBS Studio. If you’re playing a resource-heavy game, OBS might be better as it allows for more customization and better performance for recording high-quality gameplay.
-
Can I Record Black Myth: Wukong Gameplay with Audio?
Yes, you can record Black Myth: Wukong gameplay with audio. Whether on PC, PS5, or Mac, ensure you select the right audio input source, such as system sound or a microphone. In OBS Studio, you can adjust the audio channels separately to control game sound and mic input.


