

In the world of gaming, capturing your epic moments has become a rising trend, especially among Mac users. Whether you’re a pro or just getting started, knowing how to record gameplay on Mac is essential to share your gaming adventure. But why stop at just any recording?
High-quality game capture software for Mac ensures every detail of your gameplay shines. In this guide, you’ll delve into the importance of top-notch recording methods and explore the many options available, making it a breeze for you to showcase your gaming skills like a pro!
The comparison table below demonstrates the main features of three popular game recording software options for Mac: Screenshot, Quicktime, and DemoCreator.
In this article
-
- Recording gameplay on a Mac is straightforward, thanks to the powerful built-in tools available. This section will guide you through the steps of using these native tools to start recording high-quality gameplay footage without needing additional software. Let’s dive in and explore how to make the most of your Mac’s capabilities to record your epic gaming moments!
- Method 1: Use the Screenshot Toolbar
- Method 2: Use QuickTime Player
| Features | Wondershare DemoCreator | Screenshot Toolbar | QuickTime Player |
| Ease of Use | Excellent | Moderate | Good |
| Interface | Beginner-Friendly | Basic | Intermediate |
| Editing Options | Extensive | Limited | Limited |
| Audio Capture | Yes | No | Yes |
| File Formats | Wide range | Limited | Limited |
| Recording Quality | Excellent video and audio clarity | Very good recording quality | Intermediate video and audio clarity |
| Price | Free trial Offers paid subscription for unlimited recording export length and 4K export quality and access to more advanced features |
Free | Free |
Part I. Wondershare DemoCreator: Best Game Recording Software for Mac
If you’re looking for software to satisfy your gameplay recording needs, Wondershare DemoCreator is the ultimate solution for screen recording on a Mac. With DemoCreator, you can enjoy high-quality recordings with crystal-clear audio and a bunch of editing tools to enhance your content. Boasting an intuitive interface, DemoCreator stands out as the go-to game capture software for Mac users of all skill levels.
DemoCreator’s Key Features
DemoCreator offers everything you need to capture and enhance your gaming content easily. From high-quality recording to advanced editing tools, DemoCreator helps you unleash your creativity and share your gaming adventures like never before. DemoCreator offers:
- Intuitive interface
The interface has been designed to be user-friendly, with simplicity being the primary focus. With clearly labeled buttons and intuitive controls, you can focus on capturing epic gameplay moments without getting bogged down by complex settings.
- High-quality recording
DemoCreator ensures that every frame of your gameplay is captured in stunning detail. With support for high-definition recording, you can showcase your gaming skills in crystal-clear clarity.
- Audio capture
Capture every sound effect, background music, and commentary with DemoCreator’s built-in audio recording feature. Immerse your viewers in the gaming experience with crisp and clear audio.
- Advanced editing tools
Take your gaming content to the next level with DemoCreator’s comprehensive editing suite. Trim and cut footage, add transitions and effects, overlay text and annotations, and more.
- Customizable export options
Once you’ve perfected your gaming masterpiece, DemoCreator offers various export options to suit your needs. DemoCreator ensures that your gameplay videos look their best.
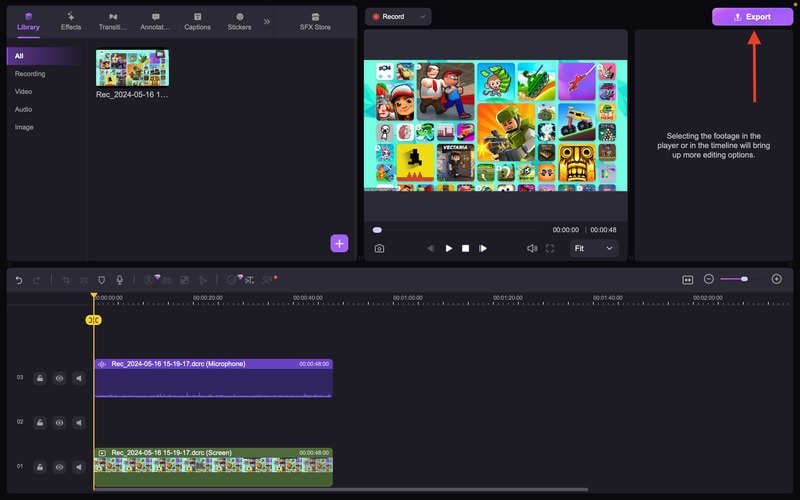
How To Record Gameplay on Mac With Wondershare DemoCreator
Let’s check out how to record your gameplay using DemoCreator:
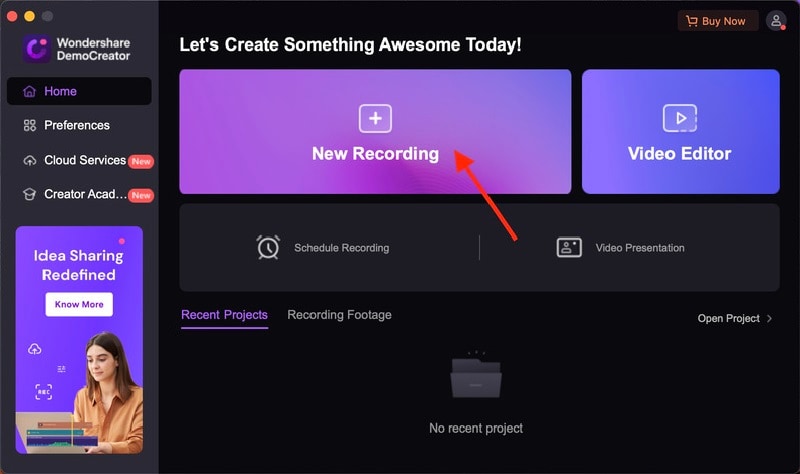
Step 1: Install Wondershare DemoCreator on your Mac. Launch the software once installed and click on New Recording.
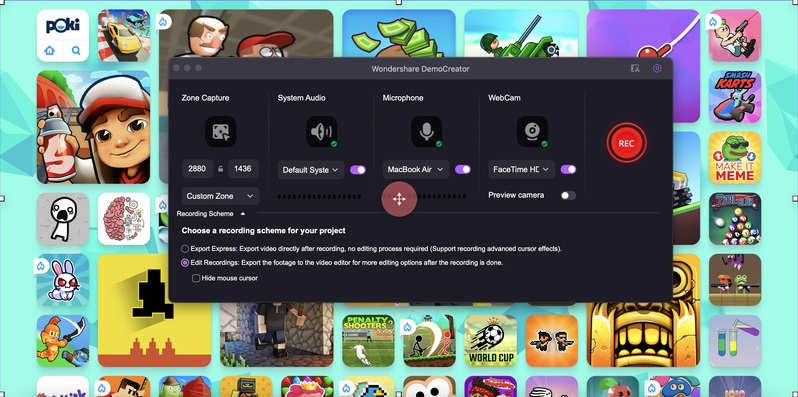
Step 2: Now, customize your recording settings according to your preference. You may modify the Zone Capture, Sytem Audio, Microphone, and WebCam. Once done, click on the REC button to start recording.
Step 3: Play your game as DemoCreator records your gameplay. If you want to end the recording, click the “Stop” icon found at the floating bar.

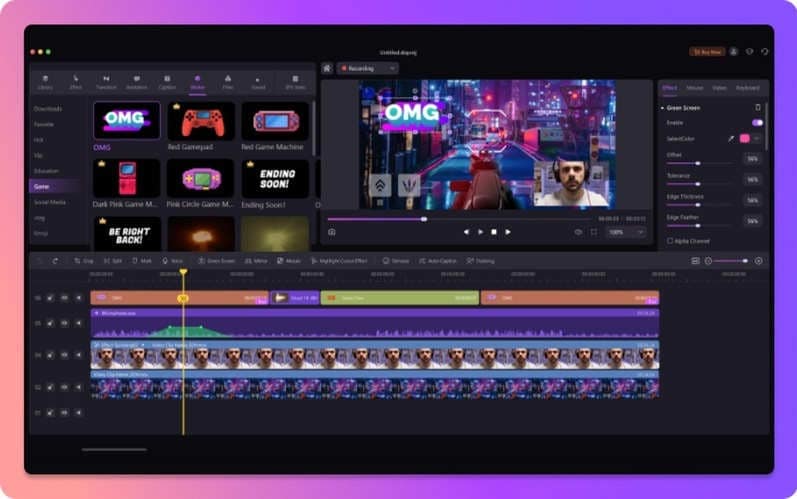
Step 4: DemoCreator will then lead you to your recorded video where you can edit it. With DemoCreator, you can:
- Edit many tracks at once. You can finish video editing faster and more effectively if you record your screen, microphone, and camera separately. Then, you can go back and forth between each track one at a time.
- Zoom and pan. It will be possible for users to highlight certain areas, provide dramatic zoom-in and zoom-out effects, and improve the overall visual experience by instantly altering the element’s length, width, and position.
- Make use of annotation tools. To improve comprehension and communication, dynamically annotate recorded games using text, voice boxes, shapes, lines, and arrows.
- Draw attention to the mouse. A variety of professionally made cursor effects are offered to highlight specific cursor motions and actions. Its functions include enlarge, highlight, spotlight, click sound, and click rings.
Step 5: Once you’re done editing your recorded video, click on the Export button found at the upper right corner of your screen.
Wondershare DemoCreator is the ultimate game recording software for Mac users. With its intuitive interface, high-quality recording capabilities, and advanced editing tools, DemoCreator empowers you to create stunning gameplay content easily. Whether you’re a casual gamer looking to share your adventures or a content creator aiming to engage your audience, DemoCreator has everything you need to bring your gaming content to life.
Part II. How To Record Gameplay on a Mac Using Built-in Tools
Recording gameplay on a Mac is straightforward, thanks to the powerful built-in tools available. This section will guide you through the steps of using these native tools to start recording high-quality gameplay footage without needing additional software. Let’s dive in and explore how to make the most of your Mac’s capabilities to record your epic gaming moments!
Method 1: Use the Screenshot Toolbar
Harness the power of your Mac’s built-in features to capture your gaming triumphs effortlessly. With the Screenshot toolbar, recording gameplay becomes a breeze, offering a simple and quick method to preserve your gaming moments.
How To Record Gameplay on a Mac Using the Screenshot Toolbar
Here are the easy steps on how to use the screenshot toolbar in recording your gameplay:
Step 1: Launch your game and position it on your screen.
Step 2: Press “Shift + Command + 5” on your keyboard to open the Screenshot toolbar.
Step 3: Select the “Record Entire Screen” or “Record Selected Portion” option.
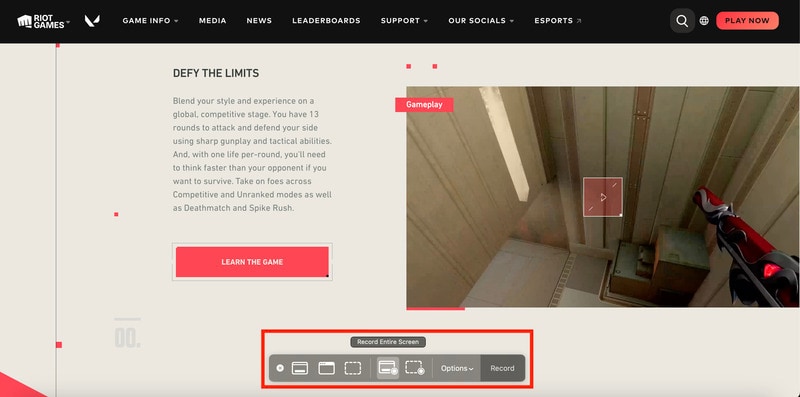
Step 4: Click Record to start capturing your gameplay.
Step 5: Once finished, click the “Stop” icon in the menu bar or type “Command + Control + Esc” to stop recording.
Limitations
While the Screenshot toolbar offers a quick and easy way to record gameplay, it lacks advanced features such as audio capture and editing options. Additionally, the recording quality may not meet the standards required for professional or high-quality content creation.
Method 2: Use QuickTime Player
Unlock the potential of QuickTime Player, a versatile tool pre-installed on your Mac. Whether you’re a casual gamer or a content creator, QuickTime Player provides a straightforward solution for recording gameplay easily and conveniently.
How To Record Gameplay on Mac Using QuickTime Player
The following simple instructions will walk you through using the QuickTime Player to record gameplay on Mac:
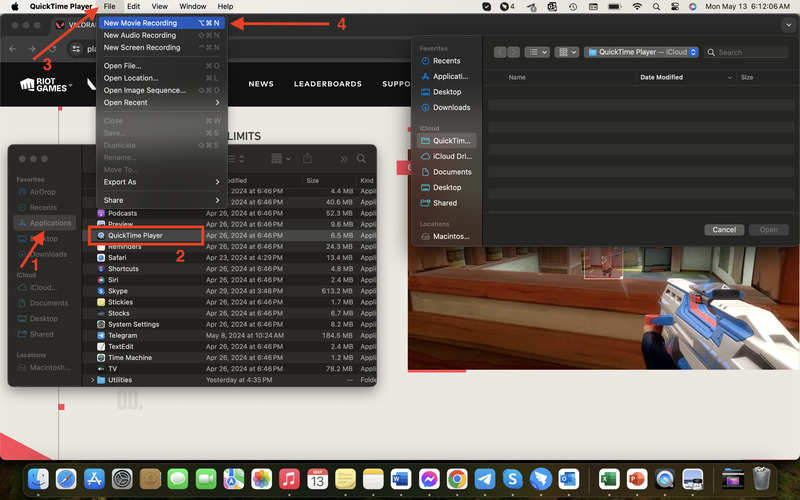
Step 1: Open QuickTime Player from your Applications folder. Click File in the menu bar and select New Movie Recording.
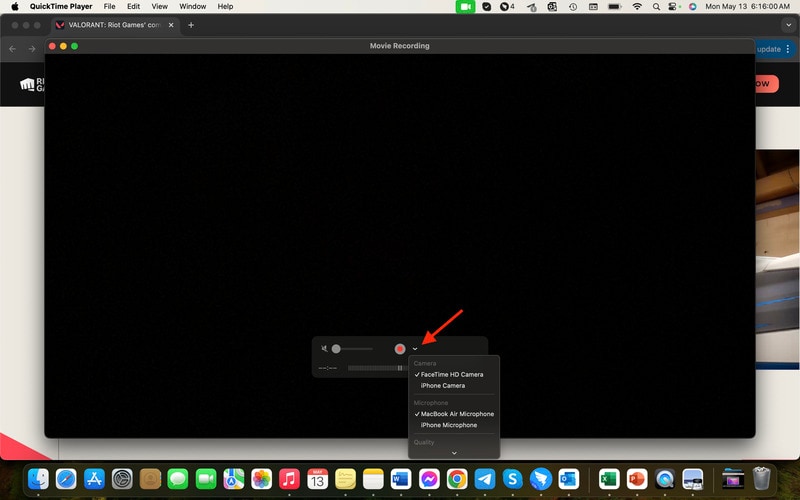
Step 2: Click the “arrow” icon beside the “Record” icon and select your Mac’s built-in camera or microphone if needed. Adjust the recording settings for quality and audio input.
Step 3: Click the red Record button to start capturing your gameplay. Once finished, click the stop button in the menu bar to end the recording.
Limitations
While QuickTime Player provides slightly better recording quality and audio capture compared to the Screenshot toolbar, it still lacks advanced editing features. It may not meet the needs of users looking for more customization options.
While the Screenshot toolbar and QuickTime Player offer basic recording capabilities, Wondershare DemoCreator emerges as the best alternative for Mac users seeking professional-quality gameplay recording with advanced editing features. Read on to the next section to learn more about Democreator.
Part III. Choosing the Best Game Capture Software for Mac
When selecting the best game capture software for your Mac, some important factors must be considered to make the right choice for your needs.

- Recording Quality. Look for software that offers high-definition recording capabilities to capture your gameplay in crisp detail. The higher the recording quality, the better your gameplay videos will look.
- Ease of Use. Opt for software with an intuitive interface that makes it easy to navigate and use. Whether you’re a beginner or an experienced user, a user-friendly interface ensures a smooth recording and editing process.
- Audio Capture. Consider software that allows you to capture in-game audio, background music, and commentary for a more immersive gaming experience. The ability to record audio adds depth to your gameplay videos.
- Editing Tools. Choose software that offers a range of editing tools to enhance your gameplay recordings. Look for features such as trimming, cutting, adding effects, text overlay, and more to customize your videos to perfection.
- Compatibility. Ensure the software is compatible with your Mac’s operating system to avoid compatibility issues. Look for software that is regularly updated to ensure optimal performance on your Mac.
By considering these factors when choosing game capture software for your Mac, you can find the perfect solution to suit your needs and create stunning gameplay videos to share with your audience. Remember, the right software can take your gaming content to the next level!
- Record customized screens with audio and edit them in different tracks.
- Capture gaming videos, tutorials, and presentations and then edit them in one tool.
- Built-in unlimited editing templates, special effects, and other sources.
- Supported export to MP4, MOV, MKV, GIF, and other formats.

Conclusion
Mastering the art of recording gameplay on Mac is now within your reach. In this comprehensive guide, you’ve explored how to record gameplay on a Mac. From exploring simple methods like the Screenshot toolbar and QuickTime Player to unlocking the full potential of Wondershare DemoCreator.
DemoCreator emerges as the standout game recording software for Mac, offering high-quality recording, intuitive editing tools, and seamless usability. Don’t miss out on the opportunity to elevate your gaming content with DemoCreator. Start capturing your gaming adventures in style. It’s time to level up your gameplay recording on Mac with DemoCreator!
FAQ
-
1. Can I Screen Capture a Video?
Yes, you can capture videos of your screen using software like QuickTime Player or DemoCreator. These tools allow you to record your screen activity, including gameplay, tutorials, and more. -
2. Where Do Screenshots Go on a Mac?
By default, screenshots are saved to your desktop. You can also choose to save them to a specific location by adjusting your Mac’s screenshot settings. -
3. Why Can’t I Screenshot on My Mac?
If you’re having trouble taking screenshots, it could be due to various reasons, such as incorrect keyboard shortcuts, system permissions, or software conflicts. Try troubleshooting by checking your keyboard shortcuts and ensuring your Mac’s settings allow screenshot capture.


