

Are you ready to learn how to screen record on Oculus Quest 2? Imagine the thrill of sharing your most epic VR moments with friends and followers. Maybe you are conquering a challenging level, immersing yourself in a virtual adventure, or showcasing your skills in multiplayer showdowns.
This article will explore how to record on Oculus Quest 2 for VR enthusiasts. Join us as we uncover the secrets to Oculus screen recording, from basic recording techniques to advanced tips and tricks. Whether you're a casual gamer looking to share your experiences or a content creator aiming to dazzle your audience, this guide has something for everyone. So, grab your Oculus Quest 2, and let's dive into the exciting world of VR recording like never before! Continue reading below to learn more.
In this article
How to Record on Oculus Quest 2 With Its Built-in Feature
Recording your Oculus Quest 2 gameplay is easier than you might think, thanks to its built-in recording feature. Here's a step-by-step guide to help you enable and utilize this convenient tool:
Step 1: To begin, put on your Oculus Quest 2 headset and navigate to the Home menu by Pressing the Oculus Button on your controller.

Step 2: Within the Home menu, select the Settings option using your controller.

Step 3: Scroll down and select the Sharing tab within the Settings menu.

Step 4: In the Sharing settings, toggle the Recording option to enable it. This will allow you to start recording your gameplay directly from your Oculus Quest 2 headset.

Step 5: You can Customize your recording settings by adjusting video resolution and microphone audio capture options. Remember that higher resolutions may result in larger file sizes, so choose settings that suit your preferences and storage capacity.

Step 6: Once you've configured your recording settings, return to your VR experience and press the Oculus button on your controller to access the menu. From there, select the Record option to begin recording your gameplay.

Step 7: When you're ready to stop recording, simply press the Oculus button again and select the Stop option from the menu.

While the built-in recording feature on Oculus Quest 2 offers a convenient way to capture gameplay footage, it's essential to be aware of its limitations. Currently, the built-in recording feature has a maximum recording duration of up to 5 minutes per clip. Additionally, the quality of recorded footage may vary based on factors such as available storage space and the complexity of the VR environment.
By following these steps and considering the limitations and settings of the built-in recording feature, you can easily capture and share your Oculus Quest 2 gameplay with friends, family, and followers.
While the built-in recording feature on Oculus Quest 2 offers convenience, you can take your screen recording capabilities to the next level with dedicated software like Wondershare DemoCreator. This powerful screen recording and video editing tool lets you capture, edit, and share your VR gameplay like a pro. With features like real-time editing, customizable overlays, and advanced effects, Wondershare DemoCreator empowers you to create stunning, professional-quality recordings that stand out.
How to Record on Oculus Quest 2 Using Recording Software
When recording Oculus Quest 2 gameplay with professional-grade quality, Wondershare DemoCreator stands out as a top choice. This versatile software offers a range of features specifically designed to enhance your recording experience and elevate your content to the next level.
Wondershare DemoCreator is an intuitive and powerful screen recording and video editing software that allows users to easily capture, edit, and share their VR gameplay. With its user-friendly interface and comprehensive tools, DemoCreator suits beginners and experienced users.

Features and Benefits
Wondershare DemoCreator offers a plethora of features tailored to meet the needs of content creators and gamers:
- High-Quality Recording: DemoCreator allows you to capture Oculus Quest 2 gameplay in stunning high definition, ensuring that every detail is preserved with clarity and precision.
- Real-Time Editing: With DemoCreator's real-time editing capabilities, you can add annotations, text overlays, and audio effects to your recordings as you capture them, eliminating the need for post-production editing.
- Customizable Effects: You can customize your recordings with a variety of effects, including transitions, filters, and animations, to create dynamic and engaging content that captivates your audience.
- Multi-Track Editing: DemoCreator supports multi-track editing, allowing you to easily combine multiple audio and video tracks to create professional-quality recordings.
- Easy Sharing Options: Once you've finished recording and editing your Oculus Quest 2 gameplay, DemoCreator offers seamless sharing options. You can upload your content directly to social media platforms or export it in various formats for sharing with friends, family, or followers.
Step-by-Step Guide
Using Wondershare DemoCreator to record Oculus Quest 2 gameplay is simple. But remember that before you can record Oculus Quest 2 on your computer, you must log in to the Oculus casting portal first. Here’s how to do it:
Step 1: Navigate to Meta's Oculus casting portal using your web browser and log in.

Step 2: On your Oculus Quest, press the Oculus button, then select the Sharing button. This action will display the gameplay video on your computer screen.

Step 3: After setting up on Oculus casting portal, download and install Wondershare DemoCreator on your computer.
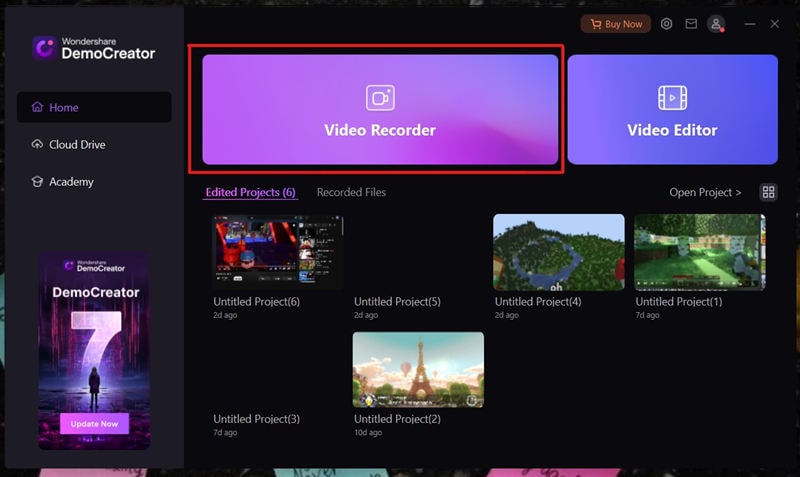
Step 4: After installation, launch DemoCreator and select Video Recorder.
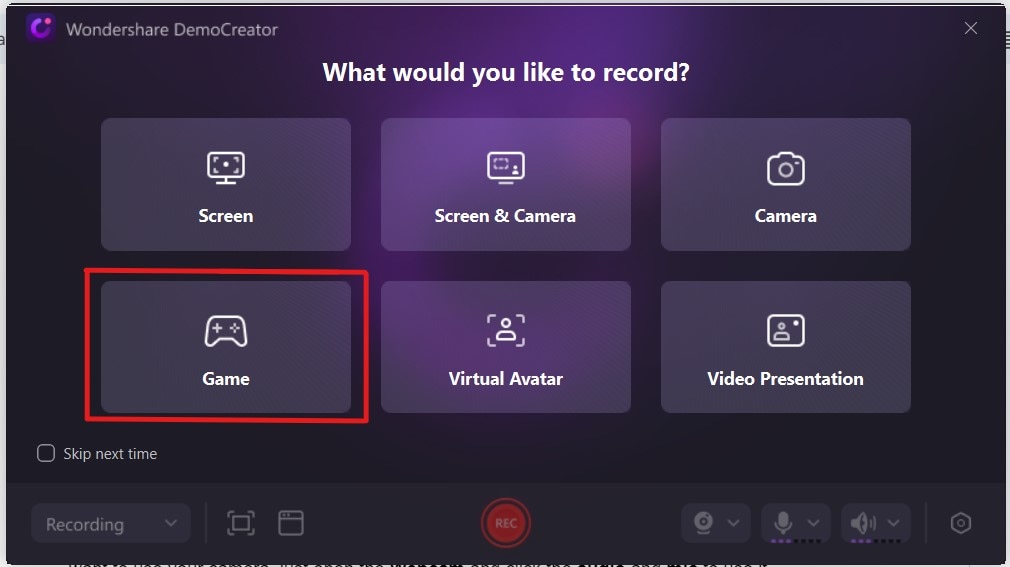
Step 5: In DemoCreator, choose the recording mode that best suits your needs—whether it's full-screen recording, custom region recording, webcam recording, or Game Recording.
Step 6: Choose the screen where the shared Oculus game is displayed. After that, customize your recording settings, such as resolution, frame rate, and audio input, to ensure optimal quality. Once configuring your settings, record your Oculus Quest 2 gameplay by clicking the Record button.

Step 7: After recording, use DemoCreator's Editing Tools to trim, cut, and enhance your footage with text, annotations, and effects.

Step 7: Finally, export your edited recording in your desired format and share it with your audience on social media platforms, websites, or video-sharing platforms.

By following these simple steps, you can harness the full power of Wondershare DemoCreator to create professional-quality recordings of your Oculus Quest 2 gameplay and take your content to new heights.
- Record customized screens with audio and edit them in different tracks.
- Capture gaming videos, tutorials, and presentations and then edit them in one tool.
- Built-in unlimited editing templates, special effects, and other sources.
- Supported export to MP4, MOV, MKV, GIF, and other formats.

Additional Tips for an Effective Oculus Quest 2 Screen Recording
Achieving high-quality recordings on your Oculus Quest 2 requires attention to detail and the implementation of best practices. Here are some tips to help you make the most out of your screen recording sessions:
- Optimize Lighting and Environment: Ensure that your VR play area is well-lit and free from distractions that could affect the quality of your recordings. Bright, evenly distributed lighting can help enhance the clarity and visibility of your gameplay footage.
- Adjust Capture Settings: Experiment with different capture settings, such as resolution and frame rate, to find the optimal balance between video quality and file size. Higher resolutions and frame rates can result in smoother, more immersive recordings but may require more storage space.
- Use a Stable Internet Connection: If you live-stream your Oculus Quest 2 gameplay or record multiplayer sessions, a stable Internet connection is essential to prevent lag and interruptions. Consider using a wired internet connection or a high-speed Wi-Fi network for optimal performance.
- Frame Your Shots Carefully: Pay attention to framing and composition when recording your gameplay. Position the camera or screen recorder to capture the action from the best angle, ensuring that important gameplay elements are visible to your audience.
- Minimize Background Noise: To ensure clear audio in your recordings, minimize background noise as much as possible. Consider using headphones with a built-in microphone or a separate microphone for voiceovers and commentary.
- Utilize Editing Software: After recording your Oculus Quest 2 gameplay, use video editing software to enhance and polish your footage further. Trim unnecessary segments, add captions or overlays, and apply visual effects to create a professional-looking final product.
Conclusion
Mastering the art of recording Oculus Quest 2 gameplay involves understanding the built-in recording feature's capabilities, implementing effective screen recording techniques, and exploring advanced options such as Wondershare DemoCreator. By optimizing lighting, adjusting settings, and framing shots carefully, you can enhance the quality of your recordings and create captivating content for your audience. However, Wondershare DemoCreator offers a comprehensive suite of features, including real-time editing, customizable effects, and easy sharing options for those looking to elevate their recordings to the next level.


