
![[2025] How to Use NVIDIA Shadowplay to Record Gameplay?](https://images.wondershare.com/democreator/article/capture-footage-with-geforce-screen-recorder-1.jpg)
As the gaming world rapidly turns away from the single-player experience into multiplayer game modes and streaming, the need for an effective screen-capturing tool has never been greater.
Here, gamers with NVIDIA GPUs have it easy, as the company’s GeForce screen recorder is a work of art. With it, Team Green users can employ ShadowPlay, a hardware-accelerated recording utility, to seamlessly record gaming sessions, take screenshots, and stream on various platforms.
Below, we will explore the app in detail, showcasing its many useful features and teaching you how to use it. We’ll also offer an alternative solution that some gamers prefer over NVIDIA’s screen recording apps.
In this article
What Is NVIDIA GeForce Experience?

From keeping your card’s drivers up-to-date to optimizing your in-game settings to capturing, live streaming, and sharing in-game footage, NVIDIA GeForce Experience does it all. It’s a well-rounded tool that handles most tasks related to Team Green’s video cards, significantly improving the user experience.
What Is NVIDIA ShadowPlay?
Available through the GeForce Experience app, NVIDIA ShadowPlay is a hardware-accelerated screen recorder for Team Green’s GPUs. The app represents an easy-to-use gameplay recording utility that can produce and help users share gaming screenshots and high-quality gameplay highlights.
It can even record continuously, allowing Team Green GPU users to save their gaming videos retroactively.
How to Use NVIDIA ShadowPlay to Record Your Screen
As you would’ve likely guessed, GeForce Experience and ShadowPlay are intended for users with Team Green GPUs. If your PC has an NVIDIA graphics card, you can follow these steps to start recording your screen with ShadowPlay:
Step 1: Download the GeForce Experience from GeForce Experience official website and install it. Then, update your GPU drivers.
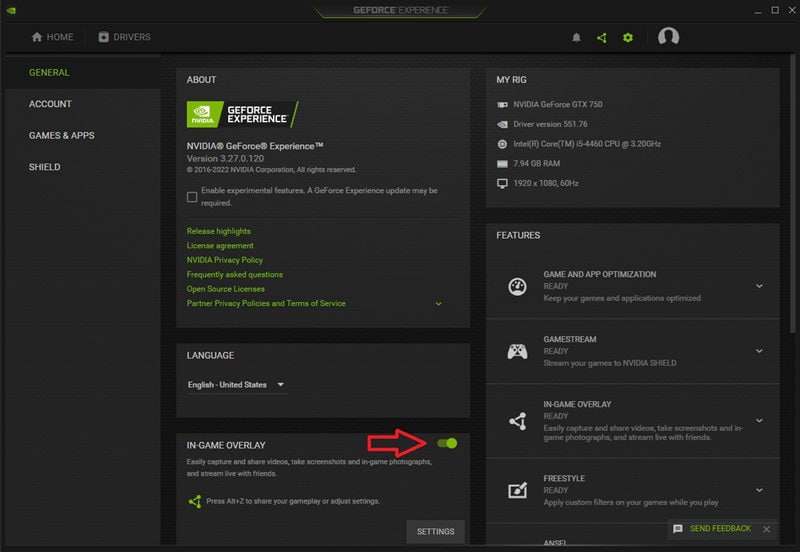
Step 2: In the app, navigate to the Settings button next to your name in the top right corner and ensure that In-Game Overlay is enabled.
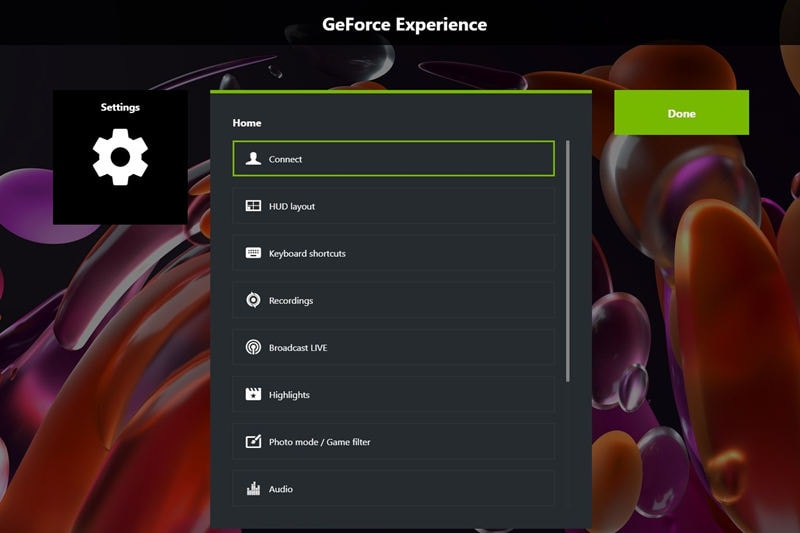
Step 3: Tap the Settings button underneath it to adjust your ShadowPlay settings. You can connect your streaming service accounts, adjust your HUD layout, configure video capturing quality, change your recording save location, and more. Play with these settings and adjust them to your liking.
Step 4: When ready, launch a game and open ShadowPlay by clicking ALT + . > Record > Start. Alternatively, tap ALT + F9 (or whatever keyboard shortcut you’ve set up in settings) to start recording your gameplay.
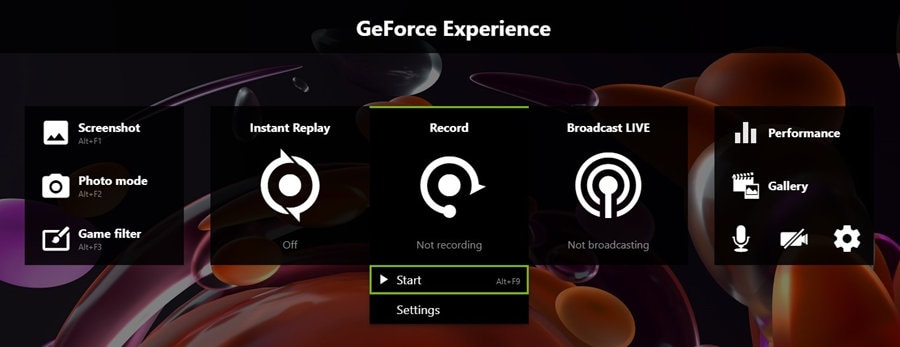
To stop the ShadowPlay recording, tap the same keyboard shortcut. A notification will appear in the corner, letting you know a recording has been saved.
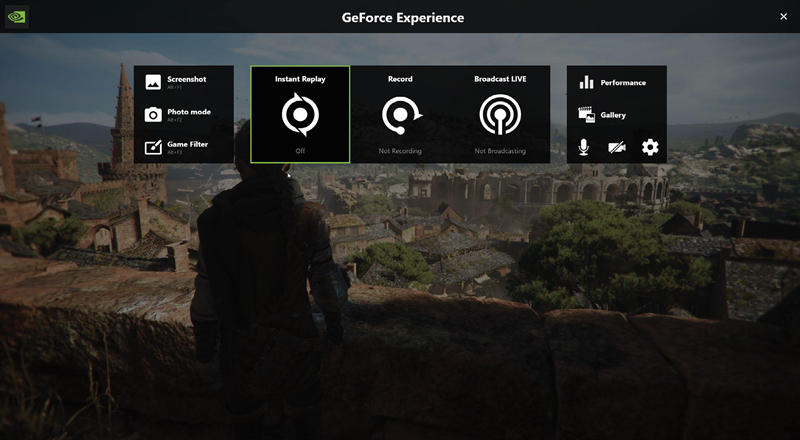
How to Use NVIDIA ShadowPlay for Instant Replays
What makes the software unique is its automatic screen recording mode, which lets users save gameplay footage retroactively with this feature. This tool constantly runs in the background and records your screen, saving up to 20 minutes of footage, depending on settings.
Once activated, it allows you to save the last 20 minutes of your gaming session, even if you haven’t started recording. Here’s how to use it:
Step 1: Open a game and hit the ALT + . keyboard shortcut to open NVIDIA ShadowPlay.
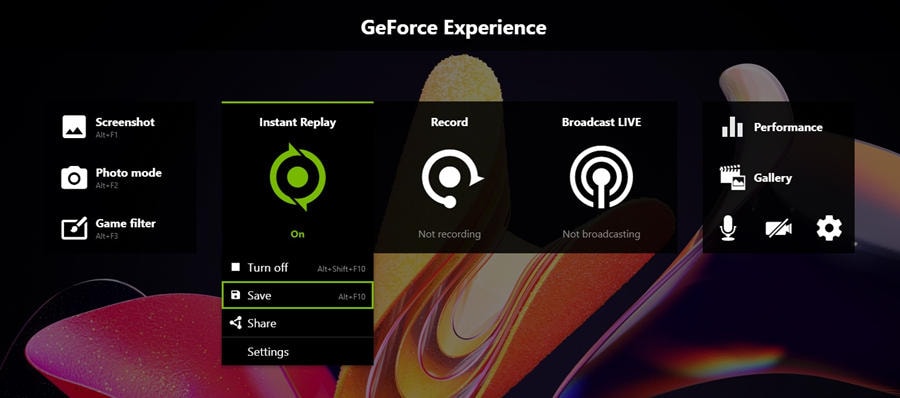
Step 2: Click the Instant Replay button and select Turn On. Alternatively, hit ALT + SHIFT + F10 from within the game to enable the feature.
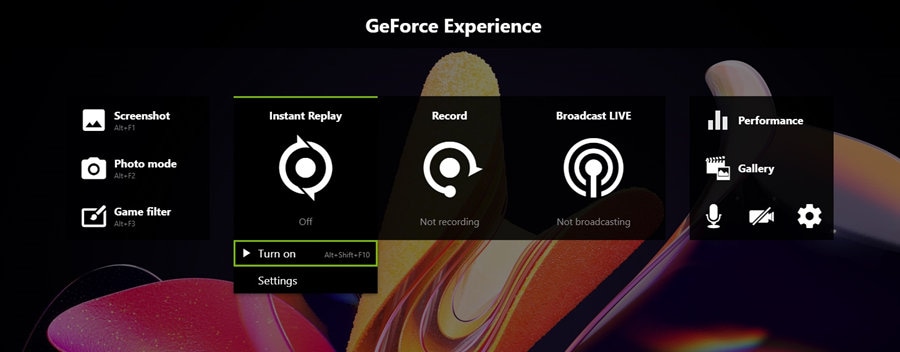
Step 3: If something worth sharing happens in the game, press ALT + F10 to save the last few minutes of your footage.
Suppose you don’t save the footage through the keyboard shortcut or the ShadowPlay app. In that case, the GeForce Experience utility will automatically remove these recordings once you finish the game, meaning it won’t take up additional space on your HDD/SSD.
How to Use NVIDIA ShadowPlay to Broadcast Live
Like many screen recording apps, ShadowPlay has built-in streaming capabilities, allowing you to connect Facebook, Twitch, and YouTube and start live streaming sessions from within the game. Here’s how:
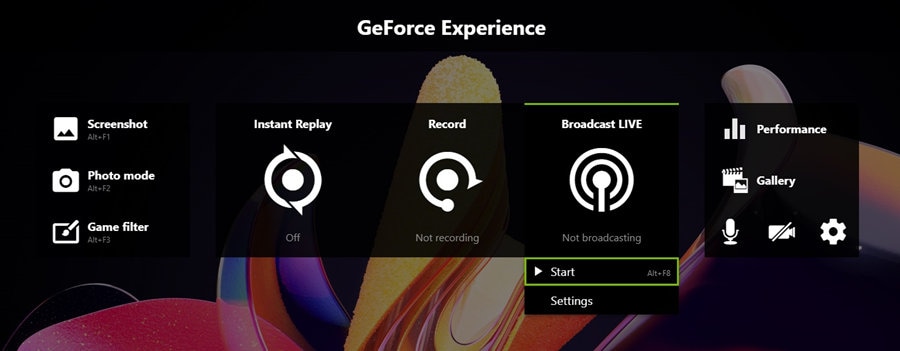
Step 1: Once inside a game, hit ALT + . to open ShadowPlay.
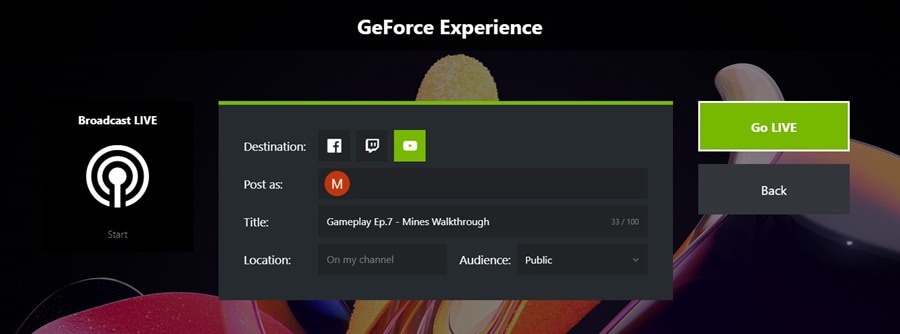
Step 2: Tap the Broadcast LIVE option, hit Start, and select the platform.
Step 3: Before you tap Go LIVE, you can add a video title, choose the location for the recording, and select your audience.
When ready to end your live stream, follow the first two steps and choose the Stop option. Alternatively, tap the ALT + F8 keyboard shortcut to end the stream.
How to Use NVIDIA ShadowPlay to Take Screenshots
While recording screens can be confusing when you’re new to Team Green’s GPUs and NVIDIA GeForce Experience, taking screenshots is exceptionally straightforward.
Step 1: Launch a game and find a scenic background or an object you want to screenshot.
Step 2: Hit ALT + . to launch ShadowPlay and tap the Screenshot button. Alternatively, you can press ALT + F1 from within the game.
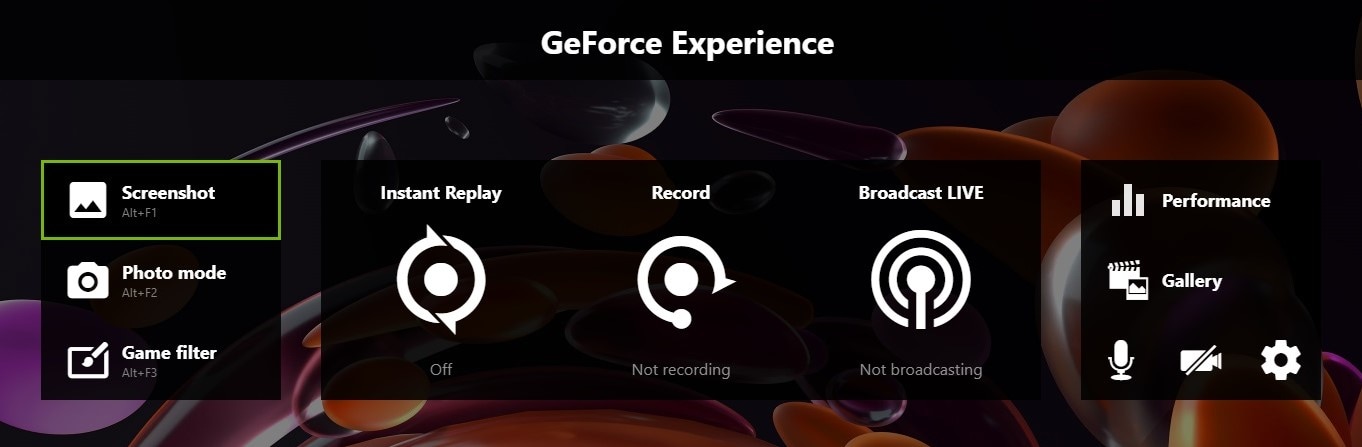
You can access these screenshots by tapping ALT + . and clicking Gallery on the right.
Common Issues With Using NVIDIA Game Capture
Despite all the fantastic tools GeForce Experience and ShadowPlay include, it’s not all rainbows and sunshine, as this app also has disadvantages. Gamers regularly encounter experience-ruining issues with this app, including the following:
- It’s only available to users with NVIDIA GPUs;
- The number of supported games is limited;
- Instant Replay can be a resource hog, often causing lag and stutters;
- The tool has limited customization options;
- The app’s sharing overlay doesn’t work outside of the game;
- GeForce Experience and ShadowPlay only work on Windows.
Knowing about these common disadvantages, you might wonder if there’s a better gameplay recording app you can use. Stick around to find the answers to the questions, “What are the alternatives?” and “Are they any good?”
An Alternative Screen Recorder to Consider - Wondershare DemoCreator
Although NVIDIA GeForce Experience is a well-rounded and polished app, due to its common issues, many gamers are turning toward alternative solutions, where Wondershare DemoCreator emerges as a top option for recording your screen and creating smooth and clear gameplay footage.
The app is easy to recommend because of its many powerful features, such as:
- Ability to work on Windows and Mac, regardless of your GPU;
- Face-to-screen connection with simultaneous screen and webcam recording;
- Higher user immersion thanks to the app’s Virtual Avatar Recorder;
- Inclusion of crystal clear sounds from your audio devices;
- Full, cross-screen, window, and custom area recording abilities;
- Smooth recordings of up to 8K resolution and 120FPS.
Geared with tremendous features and powered by AI technology, Wondershare DemoCreator is a lightweight screen recorder for all your video-capturing needs. Even better, it’s effortless to use, so let’s see it in action.
How to Record Your Screen Using DemoCreator
Thanks to its beginner-friendly design and remarkably straightforward user interface, recording footage with DemoCreator is a breeze. Here’s what you’ll need to do:
Step 1: Launch the app, select Video Recorder, and select the Game option to capture footage from your gaming sessions.

Step 2: If your game is opened and running in the background, you can quickly choose it in the app’s game selection menu.

Step 3: Choose whether you want to record your webcam footage, microphone, and speaker audio, and select the appropriate settings for each. Then, adjust the settings to fit your preferences.
Step 4: Tap the red REC button to start your game capture. Alternatively, press the F9 key on your keyboard, and remember that pressing in again pauses and resumes the recording process.
Step 5: When you’re done with game capture, tap the F10 key on your keyboard to stop the recording process completely. Alternatively, open the app and click the Stop button to end the recording.

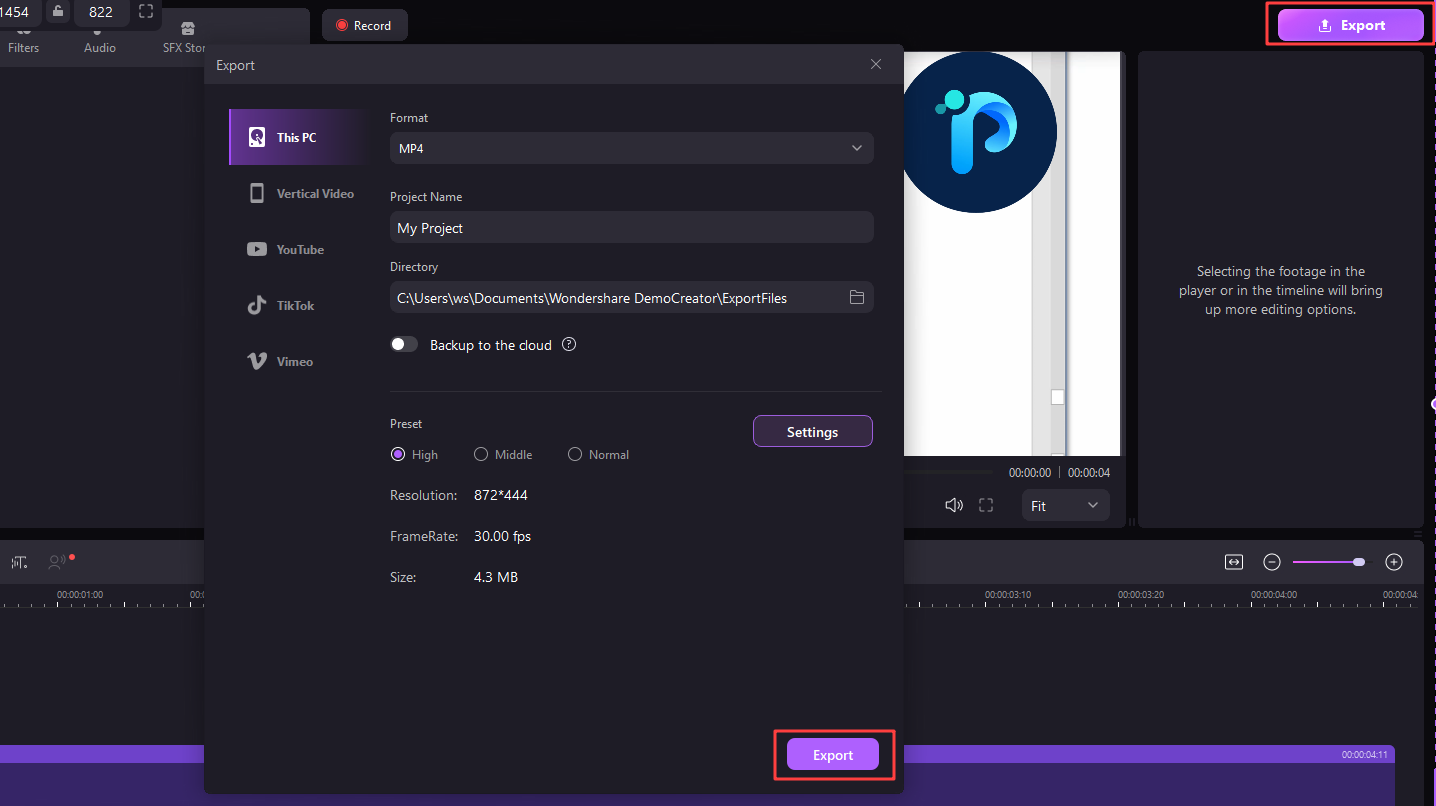
Step 6: Once you stop recording, Wondershare DemoCreator’s video editor will open with the imported clip of your game. Check the footage, and when you’re ready, tap the Export button in the top right and adjust your settings. Tap Export again to save the clip.
Add options like Virtual Avatars, Video Presentations, and a plethora of customization features, and you realize that Wondershare DemoCreator provides a much more comprehensive video recording and editing experience, complemented by efficient sharing features in an easy-to-use package.
Conclusion
Fueled by the rise of gamers and live streamers in the past decade, the need for competent, easy-to-use screen-capturing software has skyrocketed. Fortunately, NVIDIA was there to listen, and their gameplay recording ShadowPlay utility has emerged as a top solution for users with Team Green’s GPUs.
While it’s filled with effortless features and allows gamers to screenshot their favorite moments and scenes, save gameplay highlights, retroactively save footage they didn’t record with Instant Replay, and live stream their content on various social media and streaming websites, the app isn’t without issues.
Due to its disadvantages, many gamers have turned toward screen recording alternatives, of which Wondershare DemoCreator is the best option.
Thanks to its ability to work on Windows and Mac, regardless of the user’s GPU, 8K, 120FPS recording, seamless integration of screen, webcam, and sound recording, Virtual Avatars, and more, DemoCreator has become a go-to solution for any gamer looking to record their sessions and share them online.


