
Minecraft is a game that is played by creating buildings and structures and defeating enemies in the game, which can be played both online and offline. The game is popular all over the world.
It's no wonder that many gamers want to share their experiences and creations with others through live streaming. Open Broadcaster Software (OBS) is a popular choice for streaming Minecraft gameplay due to its user-friendly interface and free, open-source nature.
However, streaming Minecraft with OBS can sometimes result in lag and other performance issues, which can be frustrating for both the streamer and their viewers. This article aims to how to record Minecraft on obs, ensuring an unparalleled gaming experience for everyone involved.
Part1.How to Record Minecraft on OBS - Stepwise Guide
There are 4 steps on how to record Minecraft with OBS. Let’s check out this complete guide for an efficient and seamless experience!
Step1 Download and Install OBS
To begin, you can visit the [OBS website] and download the appropriate version of OBS for your operating system (Windows, macOS, or Linux). Once the download is complete, you can follow the on-screen instructions to install the software on your computer.
Step2 Name Minecraft
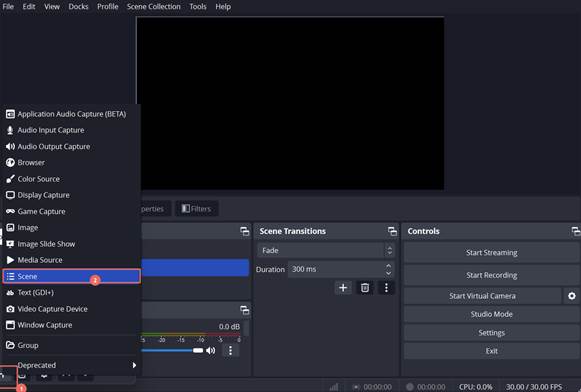
Launch OBS and click on scenes, go to the bottom left of scenes, and click on the plus bottom which will go and add a scene you can go and name this Minecraft and then press OK.
Step3 Configure OBS
Output Setting
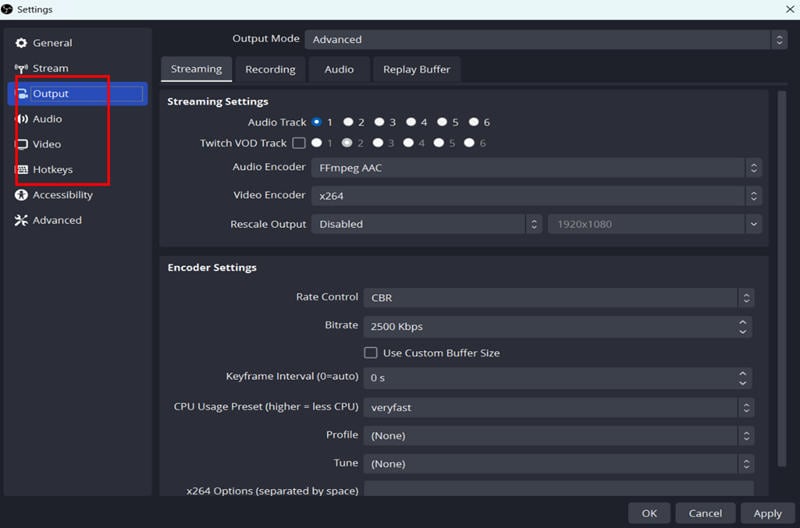
Open the "Files"-"Settings" menu. Click the "Output" tab, and set the "Output Mode" to "Advanced."
Recording Setting
Come down to the Recording section. First of all, choose the "Recording Path" where the files which you record will be saved. Then set the "Recording quality" to " High Quality, Medium File Size." Set the "Recording Format" to "MPEG-4(.MP4)".Finally, Set the"Video Encord" to "Hardware(QSV, H.264)."
Audio Setting
Go to the "Audio" menu, in the "Desktop Audio" dropdown menu, make sure that it’s set to default or you can go and choose your specific device. In the "Mic/Auxiliary Audio" dropdown menu, choose "Microphones."
Video Setting
Then go to the “Video”, and set the "Base (Canvas) Resolution" to "19201080." Set the "Output (Scaled) Resolution" to "19201080." Set the "Common FPS Values" to "60."
Hot Keys
Set up Hot Keys so you can start recording and stop recording with a button. Click on “Start Recording” and then choose the button you want to use, so do “Stop Recording.” Hit Apply and click OK” and then settings are set up.
Step4 Add Minecraft as a Source in OBS
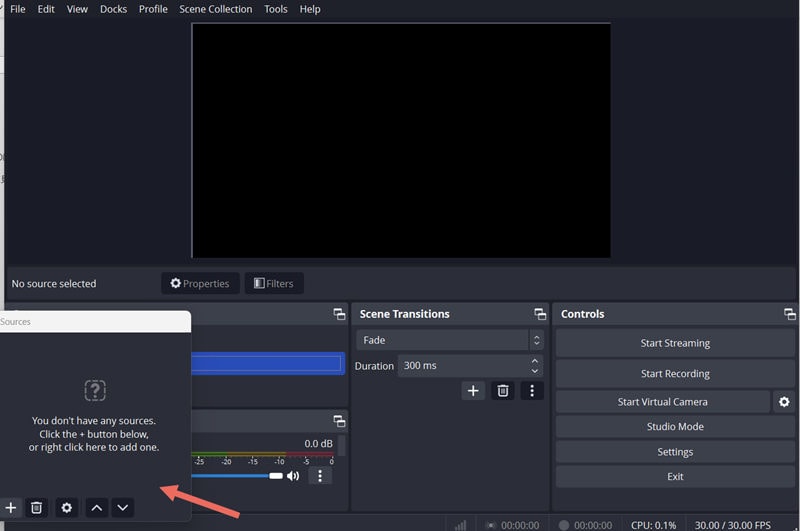
You'll need to add Minecraft as a source in OBS so that the software can capture your gameplay. Follow these steps to add Minecraft as a source:
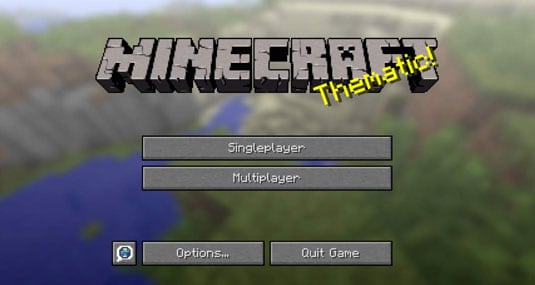
1. Launch Minecraft and ensure it is running in windowed mode.
2. Return to OBS and click the "+" button in the "Sources" box.
3. Select "Game Capture" from the list of available sources.
4. In the "Mode" dropdown menu, choose "Capture specific window."
5. In the "Window" dropdown menu, select the Minecraft window.
6. Click "OK" to add the source.
Part2: How to Record Minecraft with OBS without lag
In addition to configuring OBS, it's important to optimize your in-game settings to further reduce lag while streaming Minecraft. Follow these steps to adjust your Minecraft settings for better performance:
1. Launch Minecraft and open the "Options" menu.
2. Click "Video Settings." Set the "Graphics" to "Fast" and the "Render Distance" to a lower value (e.g. 8 chunks). Disable "Smooth Lighting," "Clouds," and "VSync." Set the "Max Framerate" to a value that matches your monitor's refresh rate (e.g., 60 if you have a 60 Hz monitor).
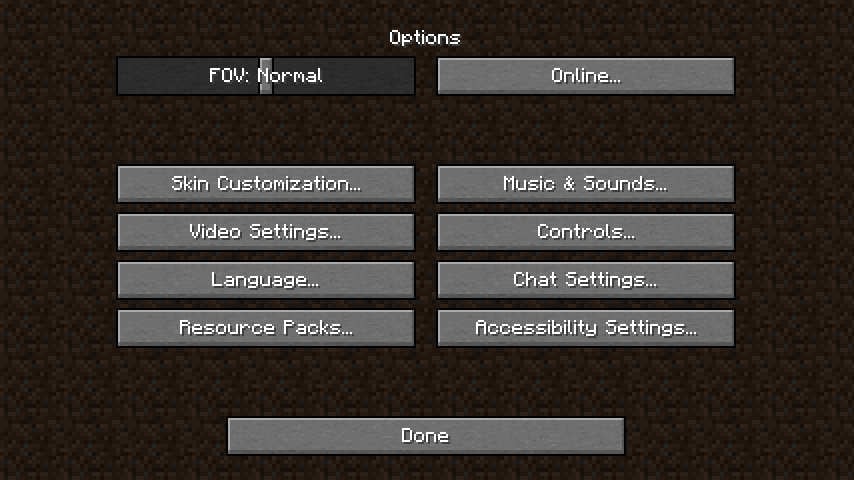
3. Click "Done" to save your settings.
And then test Your Streaming Setup Before you start streaming your Minecraft gameplay, it's essential to test your settings to ensure that everything is working correctly and without lag. To do this, simply click the "Start Streaming" button in OBS, play Minecraft for a few minutes, and then stop the stream. Review the recorded video to check for any performance issues or lag. If you're still experiencing lag, try adjusting the OBS settings and Minecraft settings as needed until you achieve smooth gameplay.
Through the above introduction, I believe you already feel that using OBS to record the setup process is too professional, and you need to do too many steps to record Minecraft without lag, so maybe you already find it difficult to give up. Let me introduce you to a much easier and more convenient screen recording software - DemoCreator.
Part 3. Best Minecraft recording software - Womdershare DemoCreator
With its user-friendly interface and powerful editing tools, DemoCreator enables users to record and edit their videos easily and efficiently.
Key features:
- Continuous and stable recording
- 4K/8K recording at up to 120 fps
- Recording No lag
- Integrated recording and editing
Comparing DemoCreator and OBS
What are the differences between OBS and DemoCreator, which have the capability to perform screen recording? Here is a summary of the differences between OBS and DemoCreator.
| Features | DemoCreator | OBS |
| Screen Recording | ✔ | ✔ |
| Live Transmission | ✔ | ✔ |
| Video Editing | ✔ | × |
| Recording Quality | High Quality | High Quality |
| Price | Partially Charged | Free |
How to Record Minecraft with Wondershare DemoCreator
Step1 Download and Install
To begin, visit the [Democreator website] and download the appropriate version for your operating system (Windows, macOS). Once the download is complete, follow the on-screen instructions to install the software on your computer.
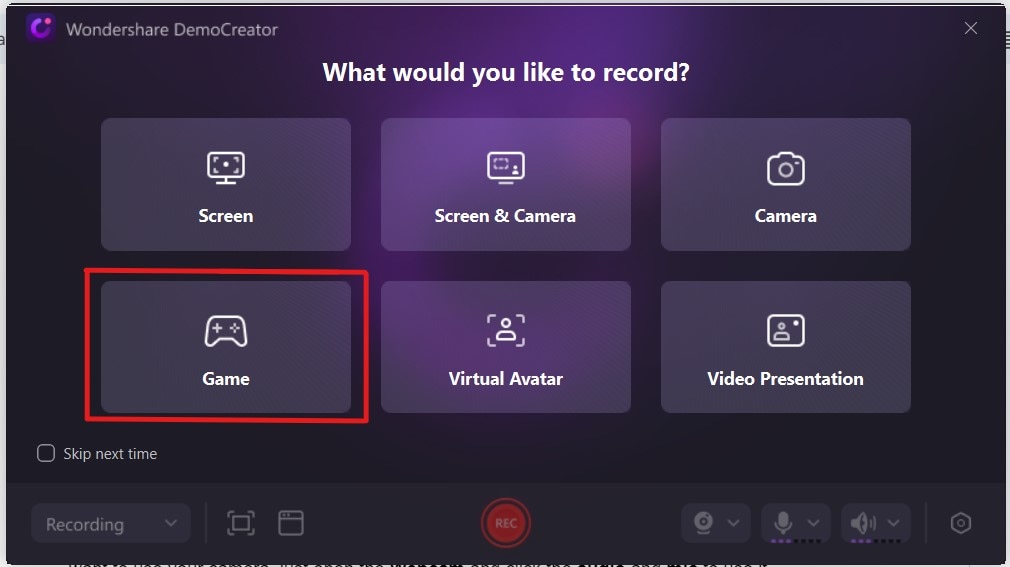
Step2 Choose the Record Game Option
Launch your favorite game also go to the Democreator interface to choose the Record Game option.
Step3 Configure Game Mode
Tap the Select a Game menu under Game Mode and select the game running on the computer that you want to screencast, webcam, microphone audio, and system audio recording are set to enable by default.
Step4 Start Recording
Click the red button to start recording the gameplay.
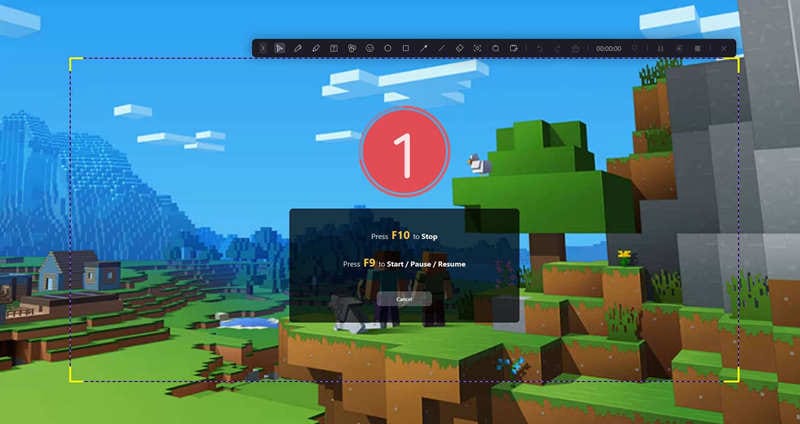
And you can press the F10 button to stop the gameplay recording. The gameplay recording will open in the video editor as you as you stop recording. Then you can edit the video according to your needs.
As mentioned above, Wondershare DemoCreator has more features available. If you want to record high-quality video effortlessly and video editing is part of your requirements, we suggest using DemoCreator.
- Record customized screens with audio and edit them in different tracks.
- Capture gaming videos, tutorials, and presentations and then edit them in one tool.
- Built-in unlimited editing templates, special effects, and other sources.
- Supported export to MP4, MOV, MKV, GIF, and other formats.

Conclusions:
We have outlined a technique for how to record Minecraft with obs in the article. However, We believe that Wondershare DemoCreator stands out as the optimal choice for individuals. This software boasts user-friendly features, and a diverse array of functions, and caters to a broad spectrum of users, ranging from novices to experts. Consequently, it is likely to meet the needs and expectations of all users.
With the right configuration, your gameplay will remain smooth and enjoyable for both you and your viewers, allowing you to share your Minecraft creations and adventures with the world. So, go ahead and start streaming your Minecraft sessions with Wondershsare Democreator or OBS, and enjoy an unparalleled gaming experience!
FAQ
-
Why does OBS not record Minecraft?
OBS might not record Minecraft due to outdated graphics drivers, incorrect OBS settings, or Minecraft running in a mode not supported by OBS. Ensure your drivers are up to date and try capturing the game in windowed mode. -
How to capture Minecraft on OBS with full screen?
To capture Minecraft in full screen on OBS, select 'Game Capture' as the source, choose 'Capture specific window', and select the Minecraft window. If this doesn't work, try running both OBS and Minecraft as an administrator. -
Why is Minecraft so laggy with OBS?
Minecraft may lag with OBS due to high CPU usage, insufficient system resources, or incorrect OBS settings. Lowering the video settings in both Minecraft and OBS, or setting OBS to a high-performance mode in your graphics settings, can help reduce lag.


