

How to Record Yourself Presenting a PowerPoint Presentation

Presentations are a very effective method of presenting and explaining an idea to the parties who cannot comprehend its ideology. While presenting, you may feel the need to record these videos for keeping a record. In other cases, your university instructor may have asked you to record your PowerPoint presentation to keep it as a record.
This article comes with detailed solutions on how you can record yourself while presenting a PowerPoint presentation. Users can easily record themselves while presenting their PowerPoint slides without facing any lags and delays.
Finding a screen recording tool for your PowerPoint presentation is a necessity. Considering the availability of various tools across the platform, it is important to be aware of the best option for covering your screen capturing. Wondershare DemoCreator features one of the best screen capturing systems for your desktop. It makes the complete process easy, providing users with a variety of features to enjoy
Wondershare DemoCreator comes with a toolkit that makes screen recording fun. If you wish to record yourself while presenting a PowerPoint, DemoCreator is the perfect place featuring easy recording, editing, and sharing, all across a single platform. Users can set up the frame rate of their recording along with the impressive AI-facial technology of the effective screen capture tool.
DemoCreator features a very easy and simple way of recording a video of yourselves while presenting a PowerPoint presentation. To understand how you can record yourself while presenting a PowerPoint presentation, you need to keep up with the following steps as explained below.
Step 1: Downloading and Installation
You need to download and install Wondershare DemoCreator across your device. Once installed, connect a webcam and microphone with your Windows PC or Mac.
 Secure DownloadSecure Download
Step 2: Select the Right Option for Recording
Launch Wondershare DemoCreator and select the "Screen + Webcam" option in the next window that appears on your front.

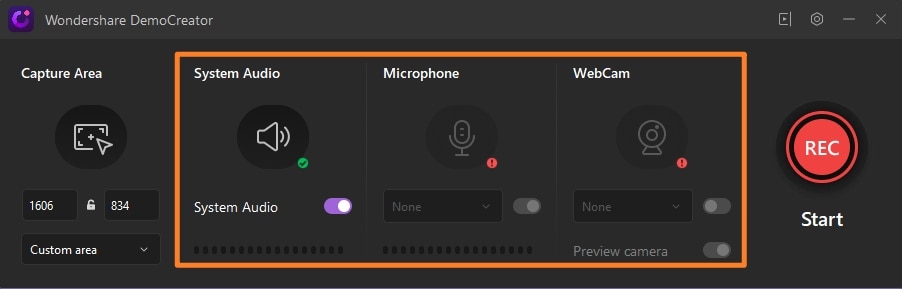
Step 3: Setting Up the Environment
Following this, you need to turn on the 'System Audio,' 'Microphone,' and "WebCam" from the toggle buttons available on the interface.
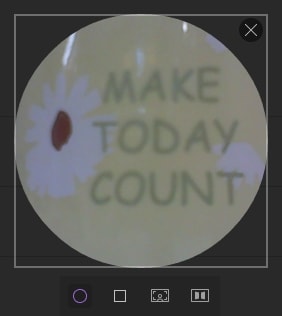
Step 4: Figure Out an Appropriate WebCam Style
Wondershare DemoCreator provides you with the ability to select the desired webcam recording style. It would be best if you put your cursor on top of the "WebCam" option to preview the options you can select. DemoCreator allows you to use a circle, mirror the webcam display, or use facial recognition.
Step 5: Open Presentation
Once you set up your screen recording settings, you need to open your PowerPoint presentation and start your presentation.
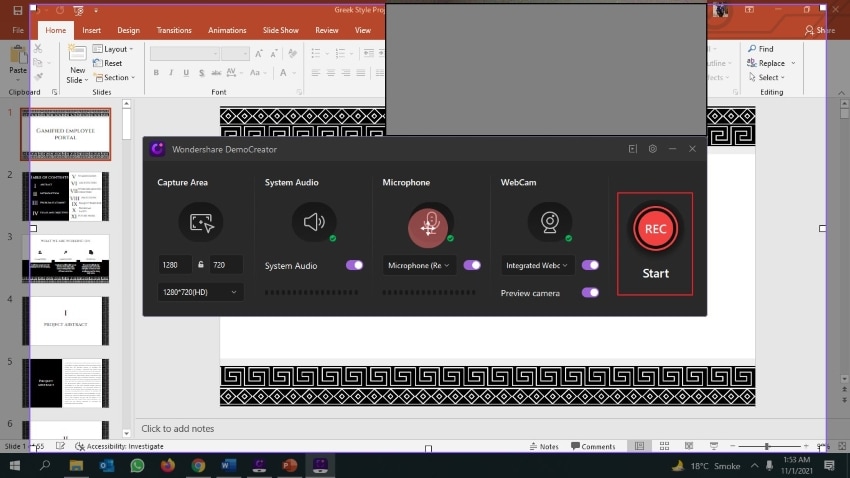
Secure DownloadSecure DownloadStep 6: Initiate Recording of Presentation
After starting the presentation, tap on the recording button across DemoCreator. Your face shall appear on the side of the PPT presentation screen.
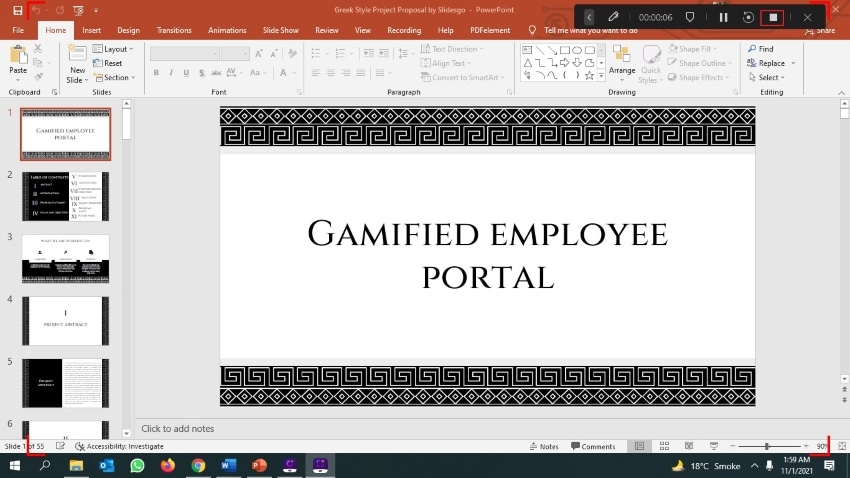
Secure DownloadSecure DownloadStep 7: Stop Recording
As the presentation concludes, tap on the "Stop" button or hit "F10" to end the screen recording
Step 8: Edit the Recording (If Required)
Wondershare DemoCreator provides you with the option of making your recording attractive. You can import the video directly onto its built-in video editor and perform multiple features. It includes trimming down the video, cropping unnecessary parts, adding effects, and including transitions across it.
Step 9: Export the Final Video
Once completed, you can easily export the video while setting up the location and the quality of the exported video. The formats can be MP4 (HLVC), AVI, MOV, WMV, MKV, TS, WEBM, MP3, M4A, and GIF.

Here are the pros and cons about recording yourself while presenting a PPT presentation.
Advantages
- The value of your presentation increases when you record some video along with the presentation. People would not get bored while looking into the presentation.
- Record yourself while presenting a PPT to explain the presentation in a better way.
Disadvantages
- There can be several distortions in the decorum of your environment while you record PPT with yourself. The quality of your webcam can be very poor, which would heavily affect the quality of the recorded video when you record PPT with a webcam.
Presenting a PowerPoint does not always require you to include your video recording. If you require turning your PPT into an MP4 or AVI video, you can utilize the "Screen Only" feature of Wondershare DemoCreator while recording the presentation. You can also seek to import your PPT files into the platform for exporting them as an MP4 video
You need to look into the stated methods in detail by following the steps as explained below:
Method 1: Use the "Screen Only" Mode to Record your PowerPoint Presentation
Step 1: Initiate and Select Mode
Launch Wondershare DemoCreator and tap on the option of "Screen Only" from the main interface.
Secure DownloadSecure DownloadStep 2: Set Up Audio Settings
If you wish to include system audio with the recording, tap on the "System Audio" icon present on the toolbar on the top of the screen. You can also add a microphone from the options present on the toolbar.
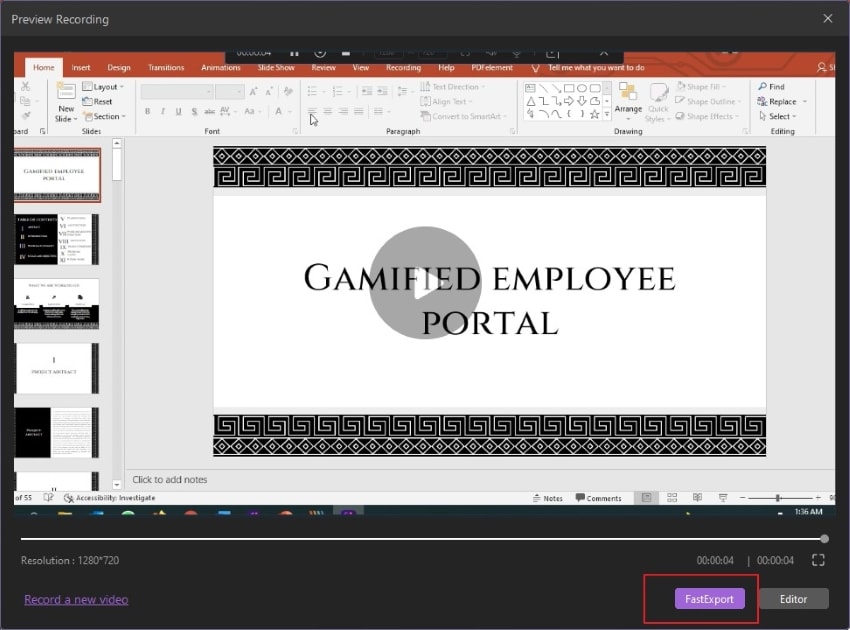
Step 3: Initiate Recording and Conclude
Tap on the "Start Recording" button to initiate screen recording. Once done, you need to select the "Stop" button or hit "F10" to conclude the screen recording. You can preview and "Fast Export" the recorded video after stopping the recording.
Method 2: Import your PPT Files to Export as MP4 video
Here is a simple and fast way to convert PPT files to video easily!
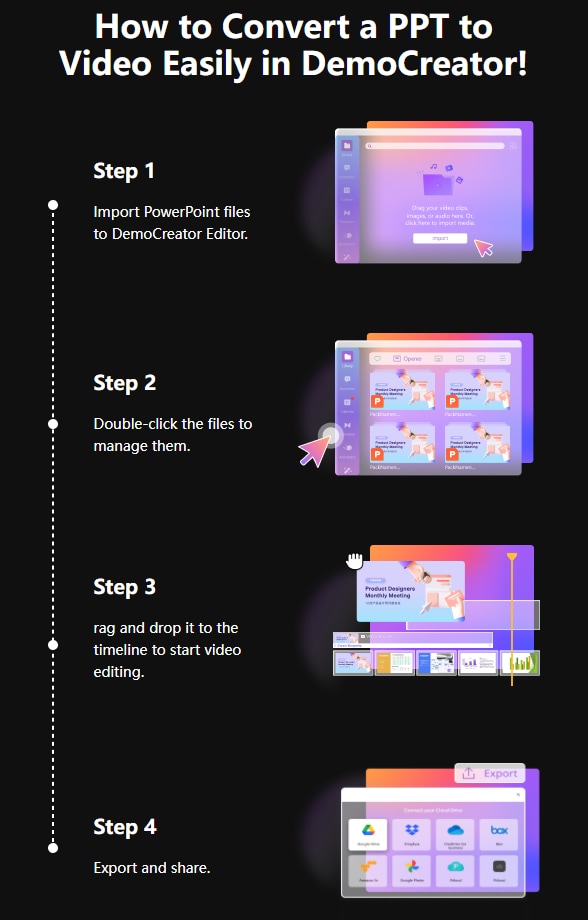
Secure DownloadSecure DownloadStep 1: Access Editor and Import PPT in Library
Open Wondershare DemoCreator on your desktop and select "Editor" from the main screen. Tap on the "+" in the Library section. Select "Import Media Files" to select the PPT file from your desktop.
Step 2: Add PPT in Editor
As soon as you import your PPT file into the library, drag the file into the timeline to convert the presentation into a video. Or you can double-click on the clip to make changes within it.
Step 3: Export PPT as MP4 or AVI
Tap on the "Export" button on the top-right section of the screen and select "MP4" or "AVI" as the file format. Set up the name and location of the video presentation and save it on your desktop successfully.
Secure DownloadSecure DownloadConclusion
It is very important to explain a presentation to your viewers, for which you may require an exceptional screen recording. Under such circumstances, you need to seek the best tool for this purpose. Wondershare DemoCreator provides you with an exceptional environment with an easy-to-use screen recording feature to help record yourself while presenting a PPT.
The All-in-One Screen Recorder & Video Editor
- Record desktop screen,audio and webcam simultaneously
- Edit videos quickly with a wide range of professional tools
- Built-in plentiful video effects
- Export to MP4, MOV, MKV, GIF and multiple formats
AI Presentation Maker


