2 Ways to Make Timed Recording - Schedule Recording
How do you set a timer for recording? Do you want to know how to start recording at a specific time and automatically stop recording after a set time? If so, you've landed at the right place! We have compiled every information you need to know about timed screen recording.
A screen recorder is an excellent tool for capturing all your PC's operations as they happen in real-time. Though little known, it may still be beneficial even when you aren't in front of your computer. Timed screen recording is preferable if you have a lot going on at work or if the video/audio file you want to record will take a long time.
It's a technique for automating the start and end of screen captures. You may program the screen recorder to shut off automatically when a certain amount of time has passed to make things even more convenient.
Part1. The Efficient Way to Set Timed Screen Recording (Win&Mac)
Screen recording may be started and stopped by using a timer. As a result, you don't have to spend all of your time in front of the computer. This is why we introduce the DemoCreator Screen Recorder.
It is compatible with both Windows and Mac computers. You can create video lessons or game recordings with ease through this program, also creating video demos is supported. One of the most excellent features is that it allows you to edit your recordings directly once you're done recording. The timed recording comes to the software show as "Schedule Recording". It supports you to start and end screen recording at a specific time automatically.

Wondershare DemoCreator
 Secure Download
 Secure Download
Here's the kicker: you can even record the screen in 4K now!
Follow the steps outlined below.
Step 1: Download and install the DemoCreator. Launch the software to start the recording process.
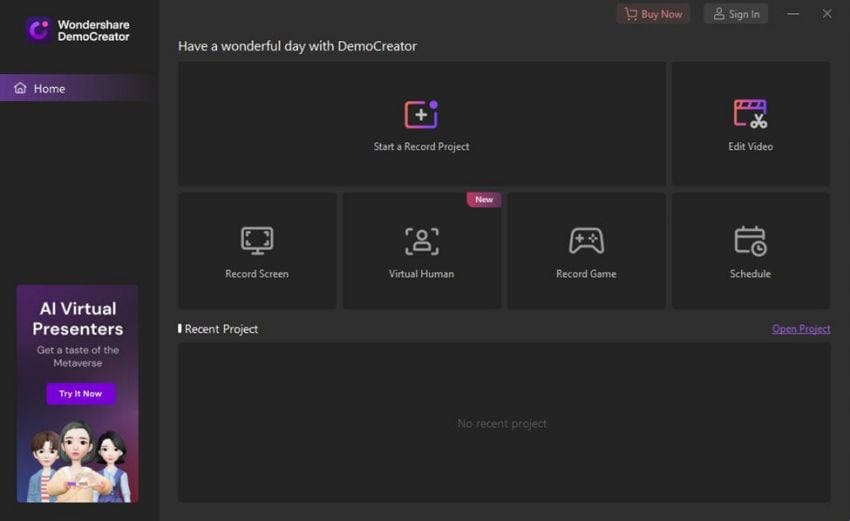


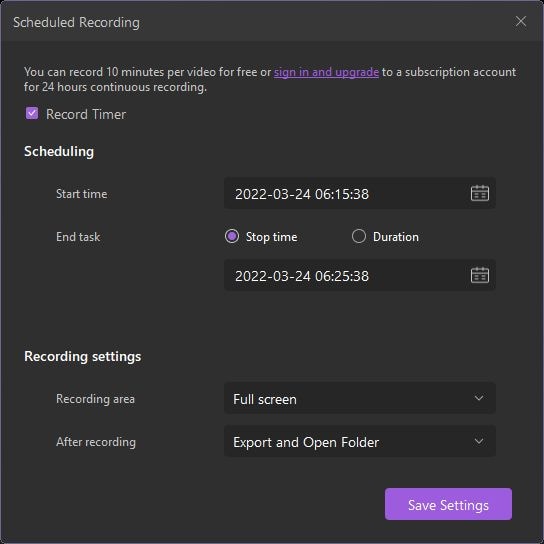
Step 2: Choose the Schedule option from the available features. A new window will open where you can set the start time and end task time.
 Note:
Note:- Start time: This option allows you to set the start time of the scheduled recording.
- End task: This option allows you to set the end time of the scheduled recording.
- Duration: This option allows you to set the duration of the scheduled recording.
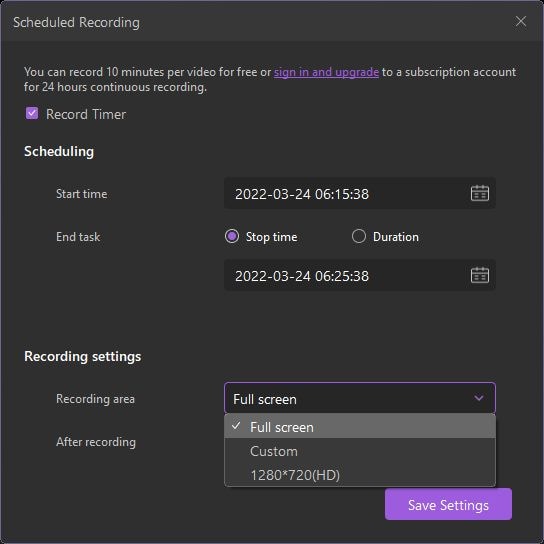
- Recording area: This option allows you to select the target recording area for scheduled recording.
- After recording: This option allows you to select whether to import to editor or export and open folder.
Step 3: You can also set the recording area after recording the action from this window. Click on save settings from moving further. The recording will be saved to the path/location provided.
FAQs
1. How do I record my computer screen for hours?
Wondershare Democreator's free version allows you to record the screen for 10 minutes/video. You can signup for Wondershare's account to record the screen with no time limit. Learn how to get a continuous recording.
However, the amount of recording time you can get may be restricted by the amount of free disk space on your computer's hard drive where you store the captured files. Also, keep in mind that recording for a more extended amount of time may result in larger files, which may cause the computer's performance to suffer while dealing with them during editing and transferring processes.
2. Can I automatically stop recording after a set time?
Yes, you can schedule a recording using the Wondershare DemoCreator. You can enter the start and end times to start and stop the recording. However, you can accomplish this manually as well.
Part2. How to use Bandicam timed recording?
Bandicam screen capture tool allows you to record your video games, your desktop screen, or other external sources such as the internet. It has been created for users who want substantial functionality and simplicity of usage. It is suggested for users that want to create short films, particularly instructive videos, for their YouTube channel or their Social Media department or team.
With Bandicam, you can pick the part of the screen that you want to record, and you can even opt to capture the sound with it if you want to make things a lot more real and simple for the viewers to understand. If you want to record your computer screen, as well as sounds from your mic, here are the steps:
Step 1: Install Bandicam and select the Schedule Recording option. Then, click on "add" to set the timer function.
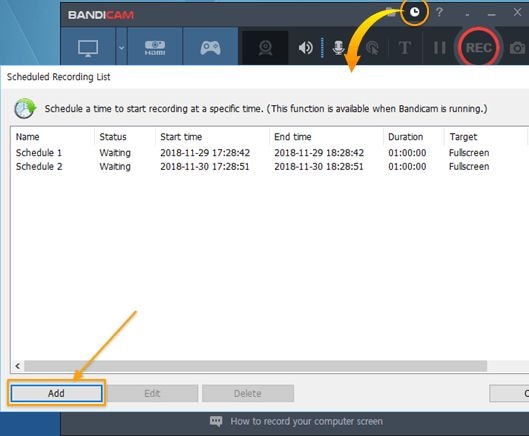
Step 2: Set the start time and end time for your screen recording. You can also set the recording target and after recording action.
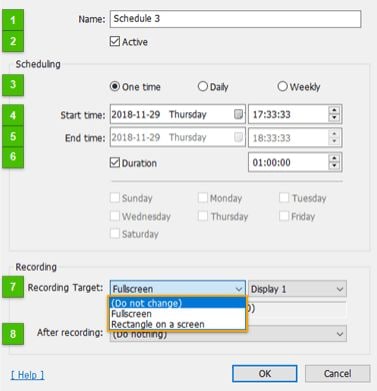
Step 3: The recording will be saved and exported to give path/location once completed.
Conclusion
This article examines two screen-timed recorders that allow you to record your computer activities even when not in front of your computer. The Bandicam emphasizes more in the recording, so if you only want to find a tool for your timed recording, then you choose Bandicam will be better. On the other hand, the DemoCreator is a comprehensive tool that can record and edit in one stop. So if you want to also edit your video after recording, the DemoCreator will be a better choice. Also, get the above instructions using DemoCreator to make timed screen recording seems easier.
 Secure Download
 Secure Download


