How to Video Record Yourself Presenting a PowerPoint

Creating PowerPoint slides is a great way to express content in both work and study. And turn your PPT files into videos is also an important way to show the content to your audience. Thus, how to record yourself giving a presentation with a webcam is the utmost concern for many people, regardless of the business they are in
We all know that Microsoft Presentation has its built-in video recording feature that converts slides into video without hassle. However, capturing the presentation and your face at the same time will not that easy. In the following content, we'll show you how to include yourself in the video clips while recording the Presentations.
Part 1: How to Record Yourself Presenting a PowerPoint
Mulling over this current, how about we figure out how to record PowerPoint introductions with sound and video for your business endeavors. So, here's the beginning and end you need to know to kick you off! To that extent, Wondershare DemoCreator is probably the best choice due to its helpful and simplistic interface while dealing with screen recordings of any sort. This screen recorder is highly compatible with most of the available USB webcam built-in microphones and standalone microphones as well, which makes it easy to record the audio input and the system sound accordingly.
Wondershare DemoCreator is the ideal PC screen recorder for instructors, office staff, bloggers, and gamers to make their PowerPoint projects done easily. You can record your on-screen introductions, demos, instructional exercises, running match-ups with slideshow sound, microphone sound, and console exercises. Aside from screen recording, in some cases, it is important to capture web camera film as well, particularly for online instructional exercises and ongoing interactions. Best of all, you can pick your favored resolutions and FPS rate before recording it.
Steps to Record Presentation with Face:
In this section, we'll discuss the complete step-by-step guide on how to record yourself giving a presentation with DemoCreator intuitive platform. So, if you're here to find out the solution guide, follow the steps below:
 Secure DownloadSecure Download
Step 1: Download and Launch DemoCreator.
Download and install the software on your computer, it will launch automatically after installation.

Step 2: Open Your Presentation
Now open the PowerPoint slide and ensure where you want to start. Normally from the first slide, but you can decide it as you want.
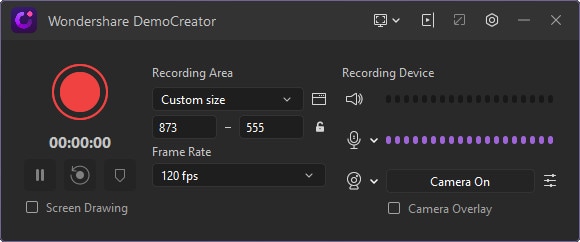
Step 3: Customize the Recording Area
Now you can click "New Recording" from the main interface to set the recording area, microphone, and webcam parameters. Remember to enable the webcam and audio options from DemoCreator at this step. Moreover, also enable screen drawing tools.
Step 4: Start Capturing Your Presentations
Just as you finish the recording, customization of your screen with the intuitive UI options. You can now hit the start recording button, which is visible in the recording window. Just as you hit the start recording button, it will eventually give you a short period of 3 seconds to open the presentation accordingly.

While the recording is going, you are recommended to use the screen drawing tools to add lines to important info from the slides, spotlight to highlight a specific part and text tool to add annotations. Press F10 to end the process.
Part 2: How to Make Your Presentation More Enhancing
Here's the kicker with the DemoCreator as it permits you to alter your recordings just as you recorded them with the webcam-enabled. Here in the video editor of DemoCreator, you can perform a variety of altering techniques that will polish your recorded PowerPoint presentations to the next level. Now, just as you've found out how to video record yourself presenting a PowerPoint, is time to begin editing the recorded content. So, follow the below steps to learn how can you do that hassle-free.
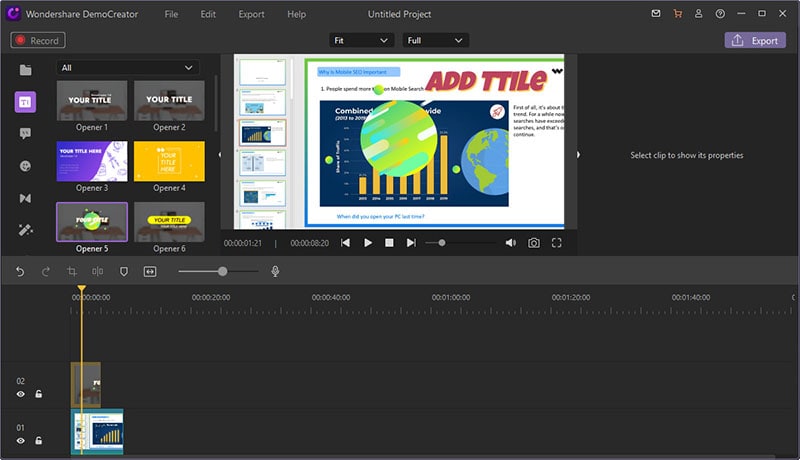
1. Basic Video Editing
The recording will be opened in the editor once the process completes. Now you can do some basic editing. Drag the video to the timeline first, and then click from the left column of the editor to drag a title or opener to your video. You are allowed to change the title text and adjust the position as you want.
2. Multi-Track editing:
Once the clip is dragged into the timeline, you will find your screen recording video and audio are on a different track. It's very useful for you to edit them because you don't have to pitch them from one track.
3. Advanced Presentation Editing
Now with your recorded files inside the timeline, you can edit them with a variety of features. From the menu bar situated on the left side of the screen interface as follows:
- Captions: You can add a title to your PowerPoint presentation by clicking the Captions menu from the menu bar.
- Annotations: If you've missed the live annotation by screen drawing tool, you can add them from the Annotations menu.
- Transitions: If your original PowerPoints slides don't have any transition, you can add some eye-catchy ones from the DemoCreator transitions menu
- Effects: If you want your recorded PowerPoint presentations with a webcam to look eye-catchy, then you need to bring some effects to it via Effect's menu bar
- Cursor Effects: You can also introduce various styles to your mouse pointer. To do that, simply go to the Cursor menu bar to pick your favorite one to introduce in your presentation accordingly.
- Pan and Zoom: You can also focus on special events of your presentation by utilizing this special effect from the Effects menu, as shown below:
- PIP effects: For the Picture-in-Picture effect, you can drag the webcam recording to the proper size and then add it over the presentation.
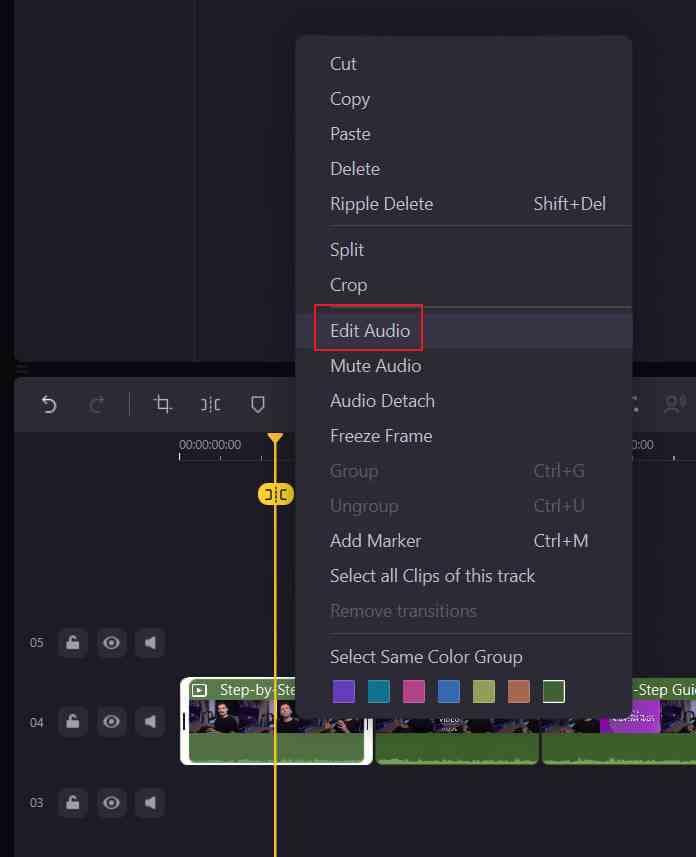
- Voice-over: If you forgot something to say or want to redo your voice in a section of your recording, you can click on the "Microphone" icon to re-record your audio narrations. Furthermore, you can also edit the audio files with the audio editor DemoCreator has embedded inside the editor interface.
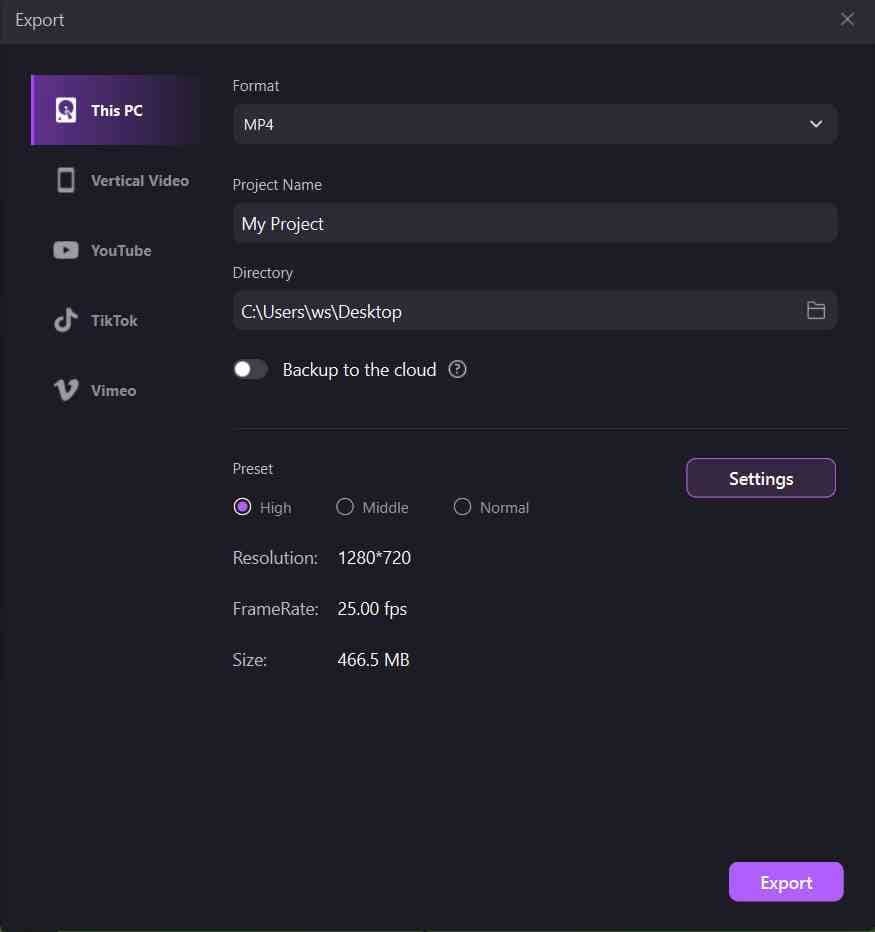
4. Export and Share
After you're done with all the editing to your PowerPoint recordings, now is the time to export them to your specified location. You can select your desired option from the Export window as well. To begin with that, you can save it to your system directory with the customization settings including format, dimensions, and desired codecs techniques from the pile of options available as follows:
If you want to share your polished PowerPoint recording the YouTube directly, then you can do it as well. You simply need to go to the YouTube menu bar within the Export window as follows and sign in to your YouTube channel and from there, you can directly share your recorded PowerPoint presentation to your YouTube audience with a single click.
In case you're conveying your introduction as opposed to giving it before a group of people, yet you feel adding a vocal clarification would better assist with conveying the message, record a voice-over portrayal. Here we've explained the manner required to perform how to record yourself giving a presentation in PowerPoint. That's made simple by the DemoCreator featured platform. So, we recommend trying this toolkit for free, so you can have a better overview on your own.
AI Presentation Maker
Frequently Asked Questions
Can you record a PowerPoint presentation as a video with audio?
Yes, it's very easy to capture presentation videos and audio at the same time. You can use the PowerPoint built-in features, there are video and audio recording functions. However, if you think it's complex, you can use DemoCreator, it will record the screen, system, and microphone audio at the same time.
How do I publish a PowerPoint presentation as a video?
When you finish a presentation, select File > Export > Create a video. Then select the quality of the video and decide you want to use the timings and narrations or not, select the default time and then “Create Video”.
How to record PowerPoint on Mac?
Mac has 2 ways to capture videos, one is using its built-in recorder, another way is to use QuickTime Player to record video


