People have become fervent about specific platforms like Snapchat amid the increase in social media users for a variety of reasons. In response to the hoopla, Snapchat created Snap Cam, a program that makes the same filters and lenses available on PC and Mac.
Snap Camera also has support for multiple platforms including Google Meet, Skype, and OBS Studio. Snap Camera may spice up our online meetings, presentations and livestreams by adding filters that have a quirky, or humorous vibe and engaging your audience!
But exactly how are we going to use Snap Camera in our meetings and presentations?
Let’s begin and see how we are going to use Snap Camera in one of the top live streaming applications, OBS Studio.
In this article
How to Use Snap Camera in OBS Studio:
Before learning how to use Snap Camera in OBS Studio, let’s find out more about Snap Camera and why a user would love to use it combined with OBS Studio.
What Is Snap Camera?
Snap Camera, an application created by Snapchat lets you enhance the output of your webcam and add a variety of intriguing and creative-looking Snapchat lenses and filters to your face by using your computer or laptop's webcam as a virtual camera.
Why do you need to use Snap Camera in OBS Studio?
As the majority of our daily interactions now take place online and live streaming and broadcasting games, shows, lectures, etc. have become increasingly popular, Snap Camera has proven to be a fantastic way to turn those routine daily video streams into something fun and more appealing because these filters and effects are now available for PC.
Steps to Use Snap Camera in OBS Studio:
Here’s how to install Snap Map and use it with OBS Studio and other applications to provide you with all the funky filters and lenses.
Step 1Download Snap Camera Application
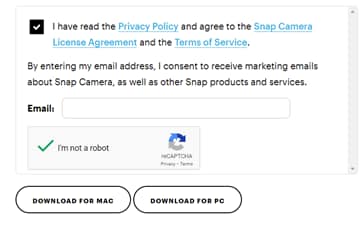
The initial step in using Snap Camera is to go to the website, go through and agree to the Privacy Policy, Terms of Service, and system requirements before downloading the installation package.
Step 2Install the Snap Camera Application
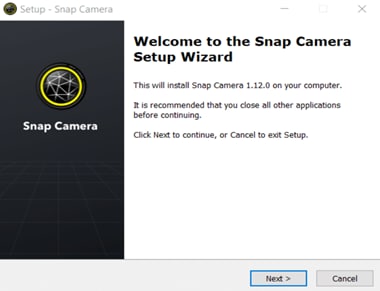
Run the installation setup that you downloaded, then install it by going through the setup wizard's instructions.
Step 3Open Snap Camera and select webcam
Following the completion of the installation process, Snap Camera will launch automatically. You may just look for the application in the start menu and run it there if it doesn't launch automatically.
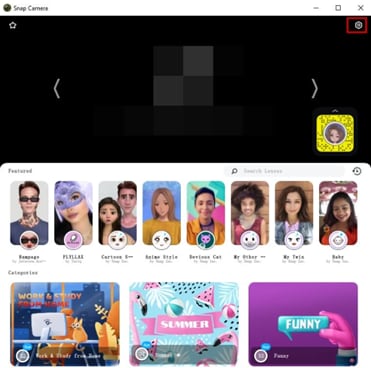
As soon as the application is opened, the camera will start, and you will be able to choose one of the many lenses that are shown on the screen.
Step 4Open Settings and Select Webcam
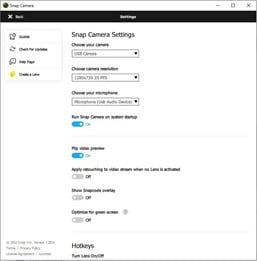
Go to Snap Camera's settings by clicking on the gear icon on the top right corner of the screen to select any built-in webcam or USB camera as the camera input.
Step 5Open OBS Studio
After you have launched Snap Camera, leave it open in the background and open OBS Studio as it is important for both applications to run simultaneously in that exact order.
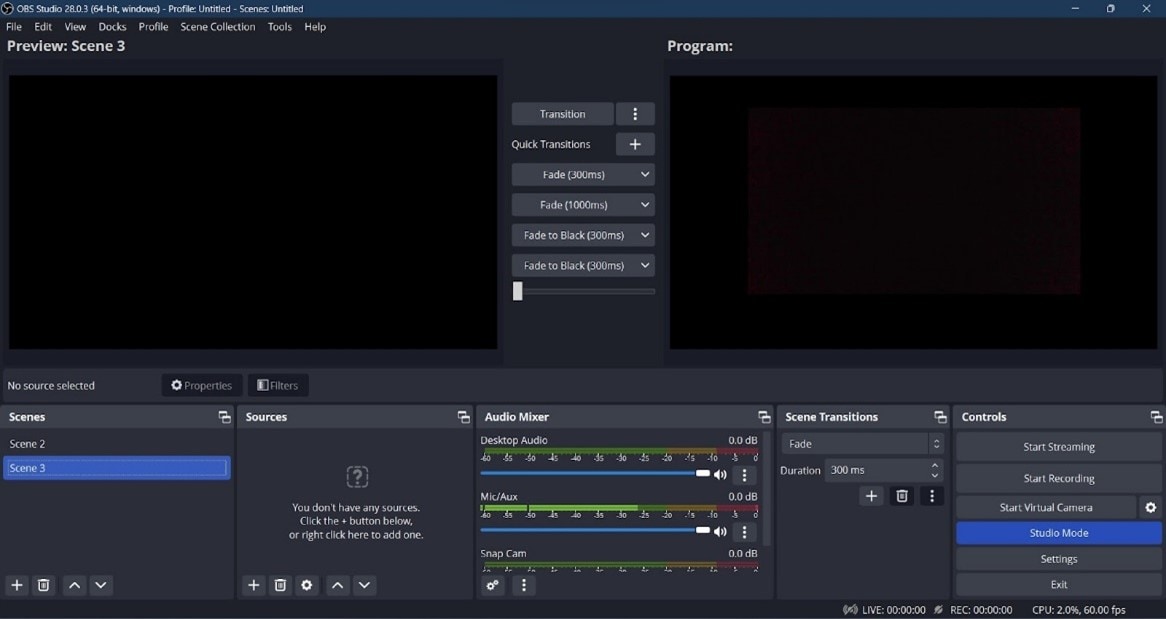
Step 6Click on the + button in the Source panel
On the lower part of the screen, under the Source tab, click on the + icon to open settings, then click on Video Capture Device.
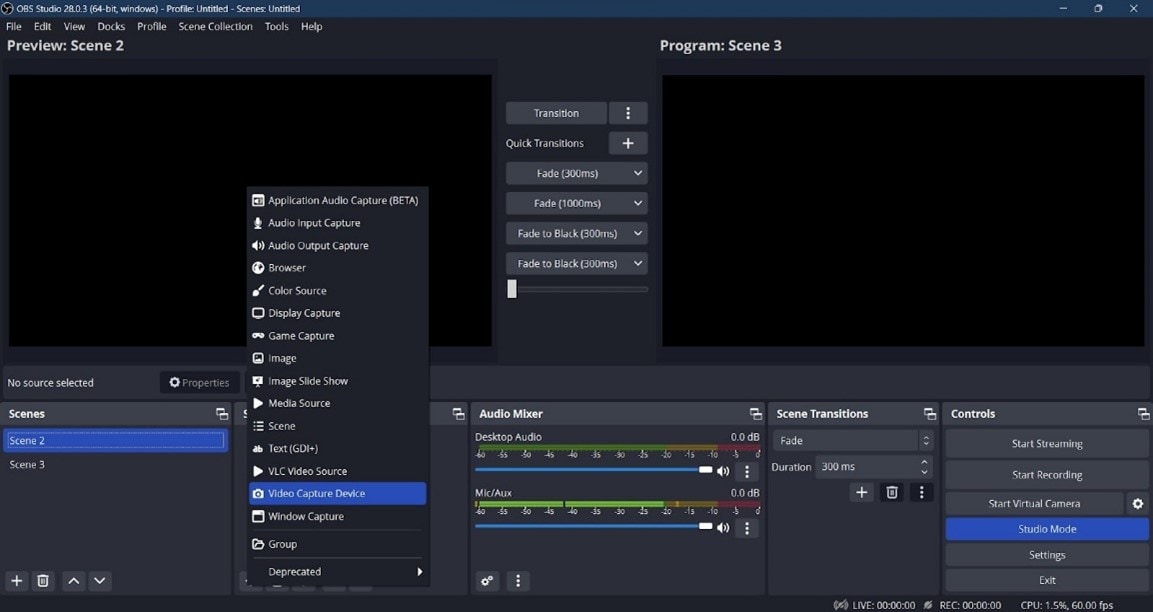
Step 7Create a Camera Source
Once you select the "Video Capture Device" option, it will navigate you to another prompt box. Create a new camera source and name it as "Snap Camera". Make sure that the check box below is checked so the source is visible.
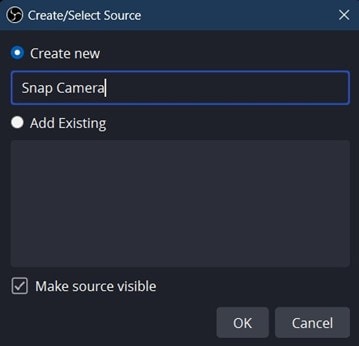
Step 8Select a Camera Source
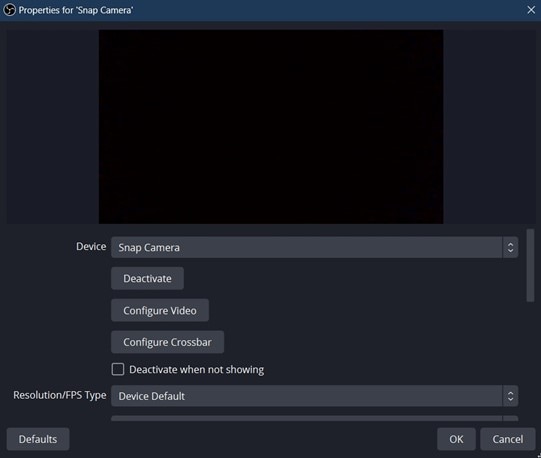
After you have created a new source, properties will open automatically so click on "Device". It will open a drop-down menu from where you can select Snap Camera as the source of video input and can also change the resolution to desired limit.
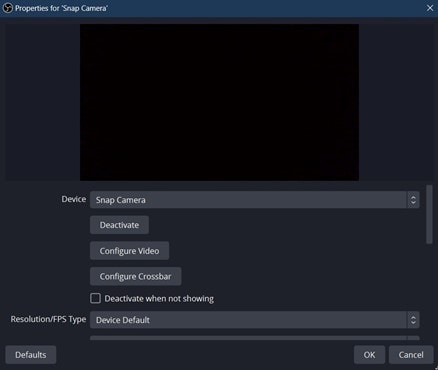
You'll be all set to go when you're done. You can now use Snap Cam to add some uniqueness to your livestreams and video recordings by selecting from the many Snapchat lenses and effects.
Additionally, you can use it with other applications for webcam recordings, live streaming, and other webcam-related tasks.
Continue reading to learn more about WonderShare DemoCreator and its amazing features and how they may help you create unique videos and livestream on OBS Studio creatively and distinctly.
Improve your OBS Studio Videos with DemoCreator
Before learning how to combine WonderShare DemoCreator with Snap Camera and OBS Studio to have the ultimate experience of quirky and cool looks mixed with a background of your choice while recording and streaming your videos live to anyone and anywhere, let's take a deeper look at what WonderShare DemoCreator has to offer.
An essential demo-making tool that helps learners, educators, freelancers, and gamers to take idea-sharing to the next level.
What is DemoCreator
One of the best screen recorder, video editor, and presentation maker application on the market right now is DemoCreator. You can broadcast your videos and content directly to other platforms with this tool. These videos can also be rapidly and simply edited using the robust built-in video editor. The updated features added in the latest version of WonderShare DemoCreator are as follows.
One plus factor of combining both applications is that OBS Studio does not have a video editor so DemoCreator can act as the patch that can help you edit videos from OBS Studio and take it to new heights with its minimal yet intuitive User Interface and editing power.
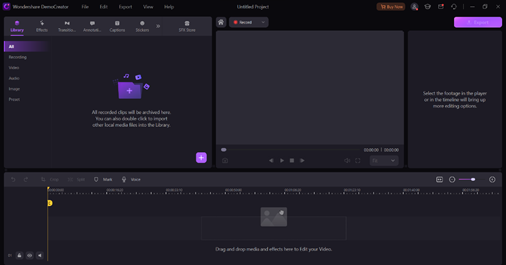
Video Editing
You can edit raw footage and videos with the world directly from your computer screen. You can use a variety of tools to create the best catchy videos you have ever given by using the multiple features of DemoCreator including avatars, backgrounds and annotations and stream them directly to any audience.
Its UI is very simple and timeline is quite user-friendly for beginners so you should have no trouble editing videos.
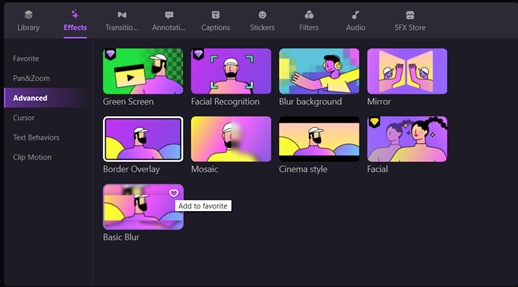
Graphics and Effects
WonderShare DemoCreator is in a different league as it allows you to efficiently create and communicate unique graphics, transitions, titles and what not without the need of any other software.
There is a wide variety of built-in transitions, effects, and webcam effects with 3D support, background blur, overlays, cinematic video, pan and zoom, cursor effects along with text control as well.
There are multiple audio effects available as well and you can also download all kinds of video and audio effects, transitions and graphics from the built-in SFX store as well.
Now that you understand DemoCreator and know what you are missing out on OBS Studio alone, continue reading to learn how it will help you improve and make your OBS Studio experience better.
Best Features of Demo Creator
Here is a list of features that you will get in the package that WonderShare DemoCreator provides:
- Powerful Video Editor
- Screen Recorder
- Green Screen
- Webcam support and features
- Background change
- Avatars
- Annotations
- Filters, transitions, audio packs, stickers
- Effects and Captions
- SFX store that contains a huge collection of audio packs, stickers, transitions, effects and much more.
Target Users for DemoCreator
Here is a list of people who can use DemoCreator with ease due to its multiple features and variety of unique options
- Gamers
- Livestreamers
- YouTubers and content creators
- Video Editors
- Teachers and students
- Business personnel
How Can You Improve Your Livestreams and Videos With DemoCreator?
You may use DemoCreator to enhance your OBS Studio experience in a variety of ways. It includes several features and tools that are described in further detail.
Live Stream Online Meetings
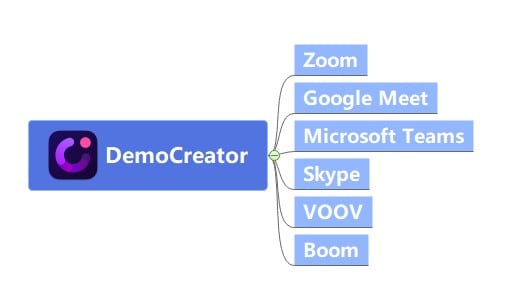
You may connect to a variety of streaming platforms, such as Twitch, YouTube, Discord, Skype, and OBS Studio using DemoCreator. You may easily broadcast virtual events, games, business meetings and any information on your PC screen regardless of the size of the audience.
Avatars and CAM Effects
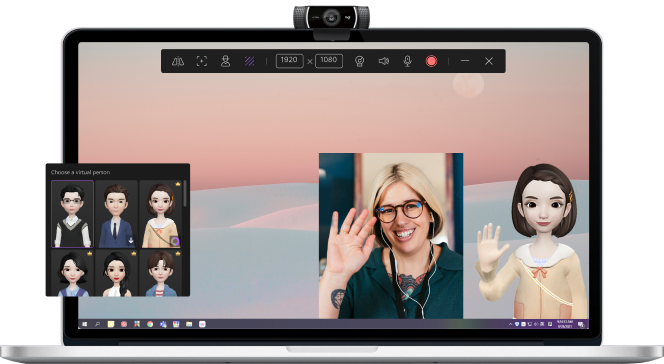
More than 10 virtual presenters can be substituted for your own face in the webcam in your livestreams and videos. If you don't want to use avatars, you can still use the "Beauty Face" option, which will capture a portrait and automatically modify the webcam to provide a more visually pleasing result.
Backgrounds
You can also upload any individual image or video of any resolution to be used as the background of your webcam video if you are in an undesirable place and wish to conceal your background.

SFX Studio
There is a built in store that allows you to select from thousands of stickers, transitions, effects, audio effects and what not, the library is amazing.
Annotations
You can also draw the audience's attention by using a range of annotations, text styles, transitions, and editing options.
It's time to integrate these excellent DemoCreator capabilities with Snap Camera and OBS Studio.
How to Connect Snap Camera and Demo Creator with OBS Studio
Here is how to mix all three programs to get the most out of OBS Studio and WonderShare DemoCreator by creating the perfect combination with Snap Camera.
Step 1Launch OBS Studio and Select Snap Camera
First of all, launch Snap Camera and then OBS Studio. Select Snap Camera in OBS Studio as Video Source using the aforementioned steps.
Step 2Start recording
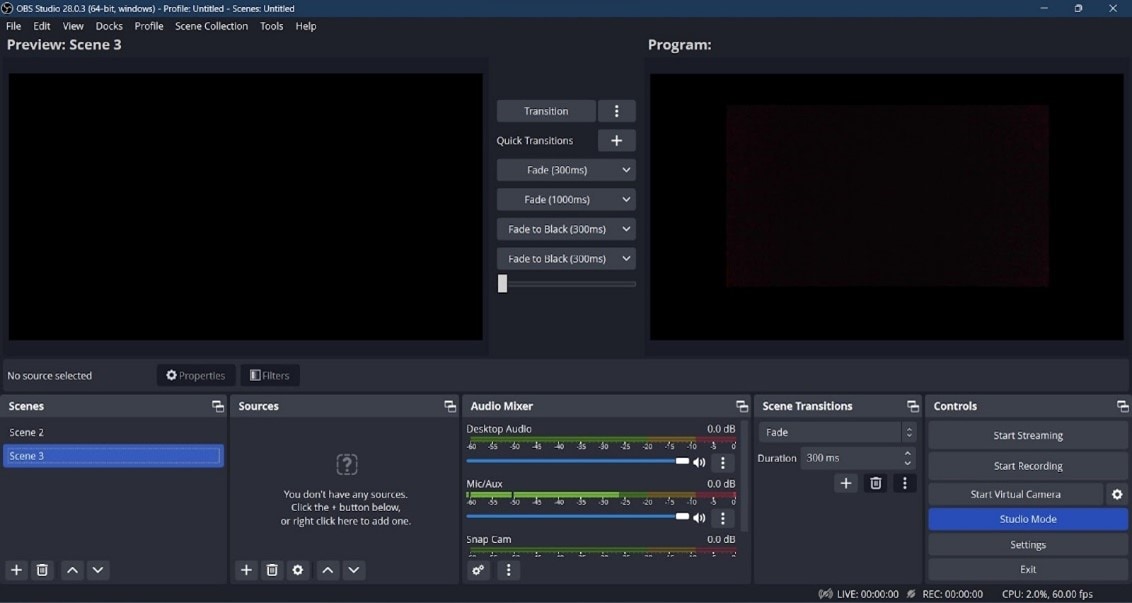
After you have set up Snap Camera in OBS Studio, start recording your video by clicking on the recording button. You can adjust your audio input, transitions and cuts in OBS studio as well.
Step 3Launch DemoCreator
Launch the DemoCreator app on your PC and click on "Video Editor". This will take you to the video editing interface. Load up the videos you recorded with OBS Studio and add them to your timeline.

Step 4Start Editing
Now that everything is in place, you can finally start editing your recorded videos. You can add cuts, trim out the parts that are not necessary, add transitions, text overlays, captions, titles and what not using the power of WonderShare DemoCreator.
DemoCreator and Other Meeting Platforms
You can broadcast games, educational material, or anything else you want to, using one of the many Meeting and Streaming platforms that DemoCreator offers. These platforms contain well-known brands from around the world like:
- YouTube Live
- Facebook Live
- Discord
- Twitch
- OBS Studio
- Skype
- OBS Studio and many more.
WonderShare supports all these platforms and many more so you can directly broadcast your content on these platforms and create a different audience with unique and intuitive content.
Frequently Asked Questions:
Why does Snap Camera not work on OBS Studio?
Make sure that the most recent version of Snap Camera is installed and all apps are started in the correct order as Snap Camera needs to be opened before connecting it to OBS Studio.
If the problem persists, restart your computer and check if the problem goes away. It can also be due to an installed antivirus or firewall on your PC.
How do I use the Snap Camera on my laptop?
From the Snapchat website, Snap Camera may be downloaded and installed. The Snapchat filters are incorporated with the camera stream from your PC. To get started, you simply need to download and install it. After that, you're ready to go!
How do I look attractive on OBS Studio?
Snap Camera is the way to go as its unique and quirky filters and effects will instantly make you look much better than the normal webcam you currently have.
Why use DemoCreator with OBS Studio?
The main reason for using DemoCreator with OBS Studio is that OBS Studio does not have a built-in video editor. WonderShare DemoCreator not only allows you to edit those recorded videos as you wish but its minimal yet powerful User Interface is very user-friendly and is great for even beginners.
Final Words
The ideal trio now consists of Snap Camera, OBS Studio, and WonderShare DemoCreator. Now that DemoCreator has significant functionality, you can edit videos from OBS Studio and make sure your videos look as good and professional as you want them to be.


