


It has become essential for content creators to create and upload their visual content on different websites. However, if your video is unedited and does not include variation, the viewers do not find it compelling.
To make your videos more engaging and visually appealing, you can enhance the overall visuals using the right resources. In this article, we will learn how to edit YouTube videos conveniently using the right resources.
In this article
Things To Consider While Editing a YouTube Video
While editing a video to make it of high quality, there are a few things that you must consider before starting:
1. Write a Compelling Script with Editing in Mind
Before starting the shooting and editing process, formulate a script and then shoot the video. Keep in mind that an engaging script can lead to flawless post-production editing. You can describe the transitions and visuals within the script for a specific shot.
2. Make Editing Strategies
Before starting the editing process, outline the steps that you will take. You can start by organizing the footage, specifying the key components, and how you will apply different effects and transitions to the video.
3. Elect for the Right Tools
The most important thing when learning how to edit a YouTube video is to choose the right video editing resource. Browse the reviews and testimonials for different resources and pick the one that best fits your requirements.
Using YouTube Studio for Flawless YouTube Video Editing
One of the best resources for creating compelling videos for your YouTube subscribers is YouTube Studio. It is an extensive platform that helps you optimize and manage your YouTube channel by providing various functionalities. Moreover, this tool's feature-rich dashboard offers a comprehensive overview of your channel’s performance:
Key Features
- YouTube Studio provides insight into how your videos are performing by providing in-depth analytics.
- Users can respond to the comments on their videos directly within its interface.
- The tool provides the ability to access and manage your monetization, such as ad revenue and channel memberships.
Advantages
- YouTube Studio offers a suite of tools to optimize your visual content, such as planning the content calendar and ensuring the videos are published timely.
- You can monitor your channel's health, including copy claims alerts, performance issues, and community guideline strikes.
- It also provides the ability to add subtitles to your videos to boost the engagement of your visual content.
Steps for Editing YouTube Video Using YouTube Studio
Step 1. After accessing the YouTube Studio website, head to the top right corner of the interface and click on the “Create” button. Next, opt for the “Upload Video” option to add the video from your device.
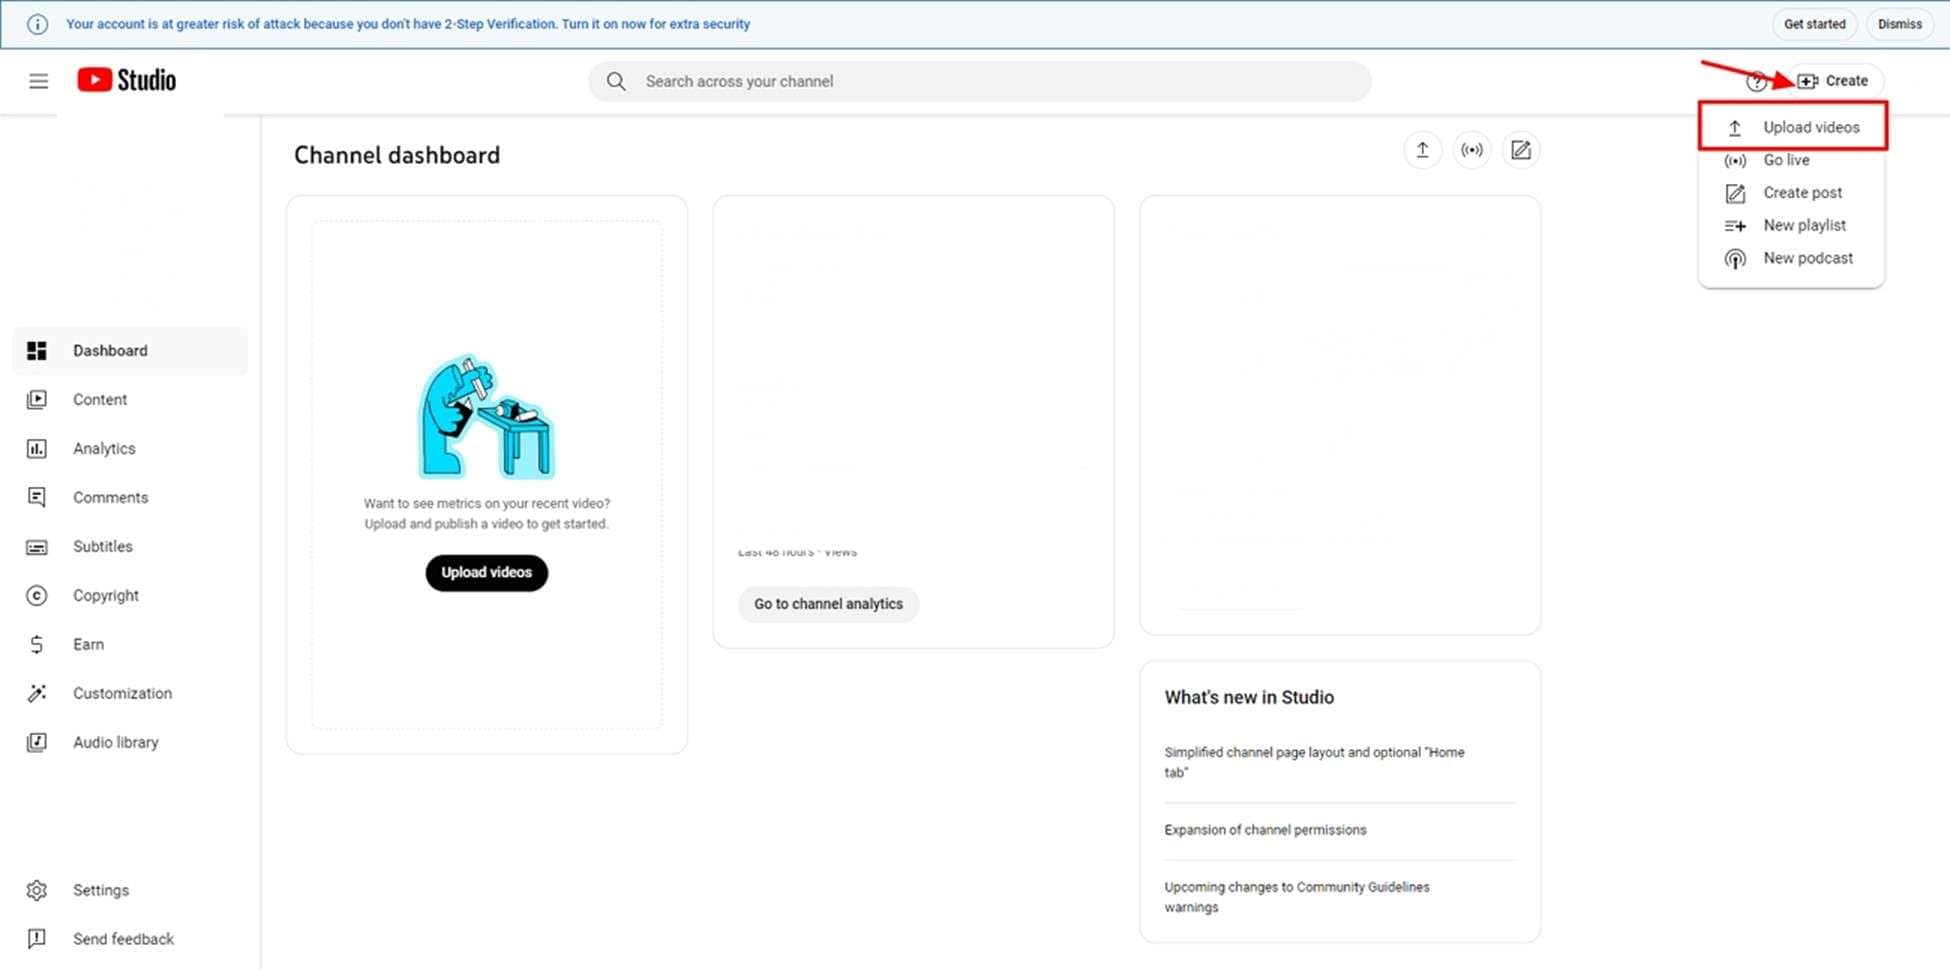
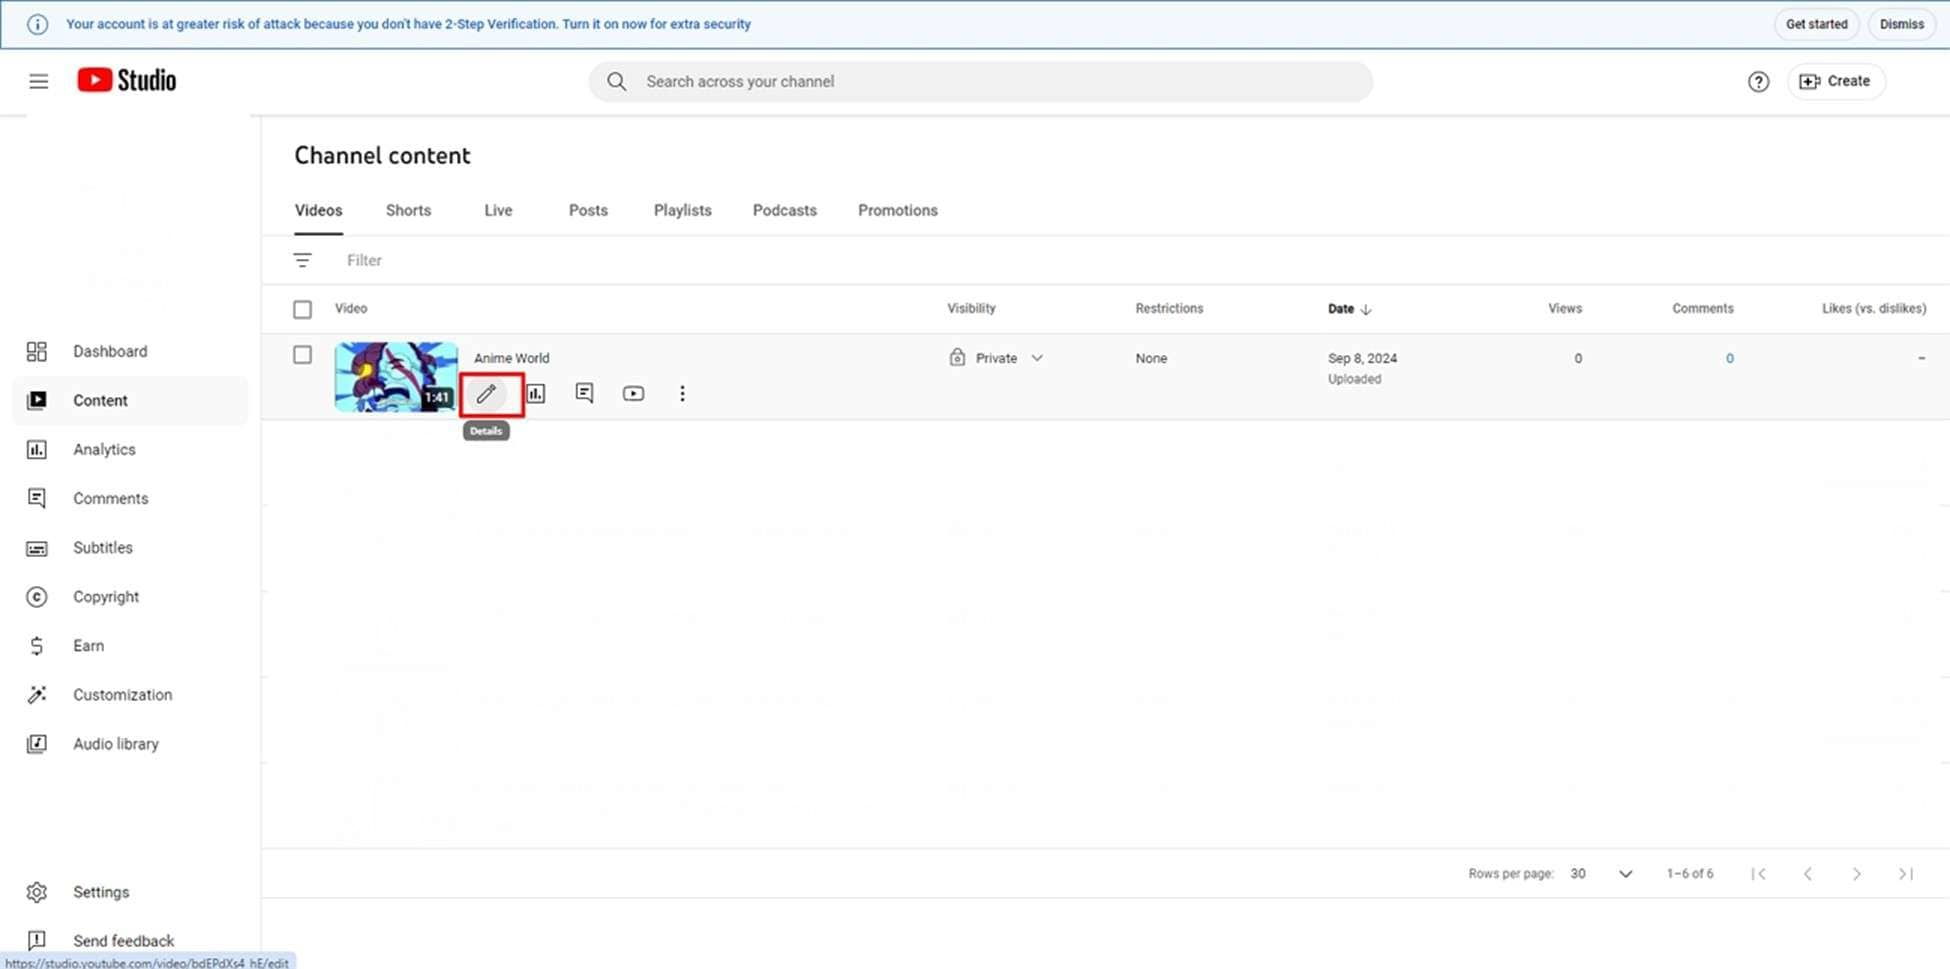
Step 2. Once the video is uploaded, it will appear within the “Channel Content” section. From there, select the “Details” icon to proceed forward with the process.
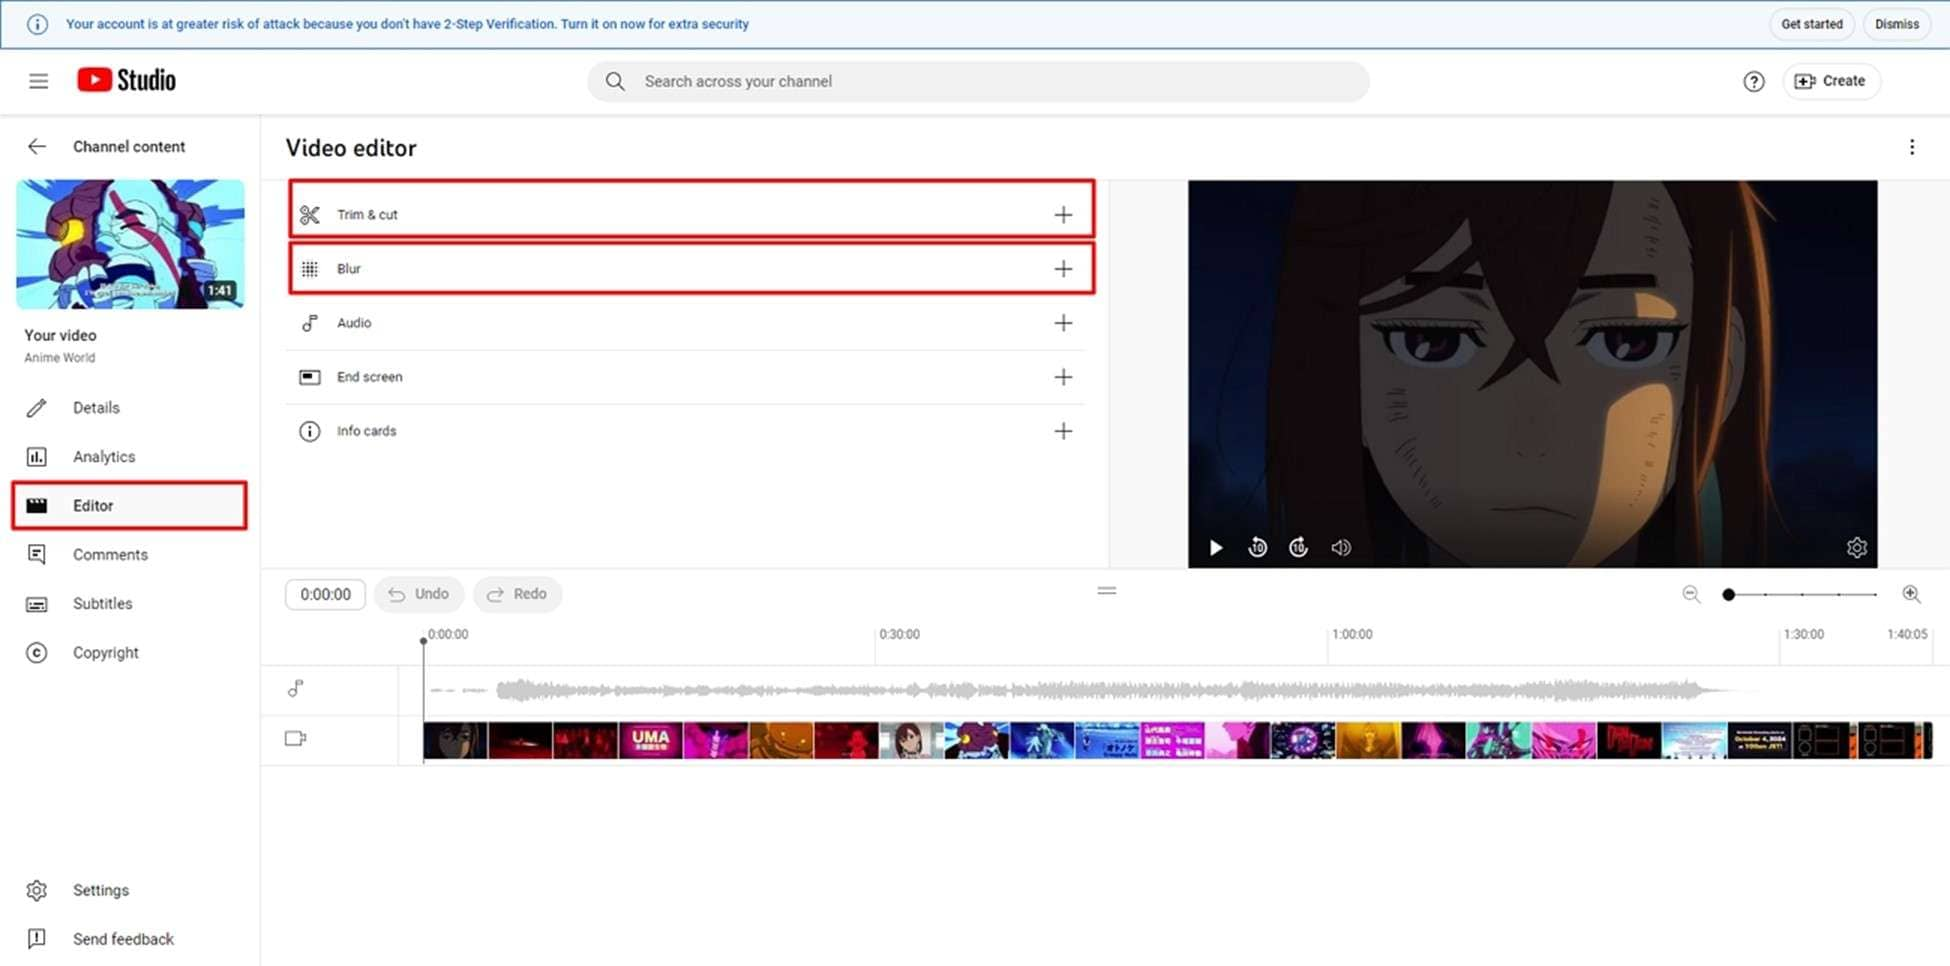
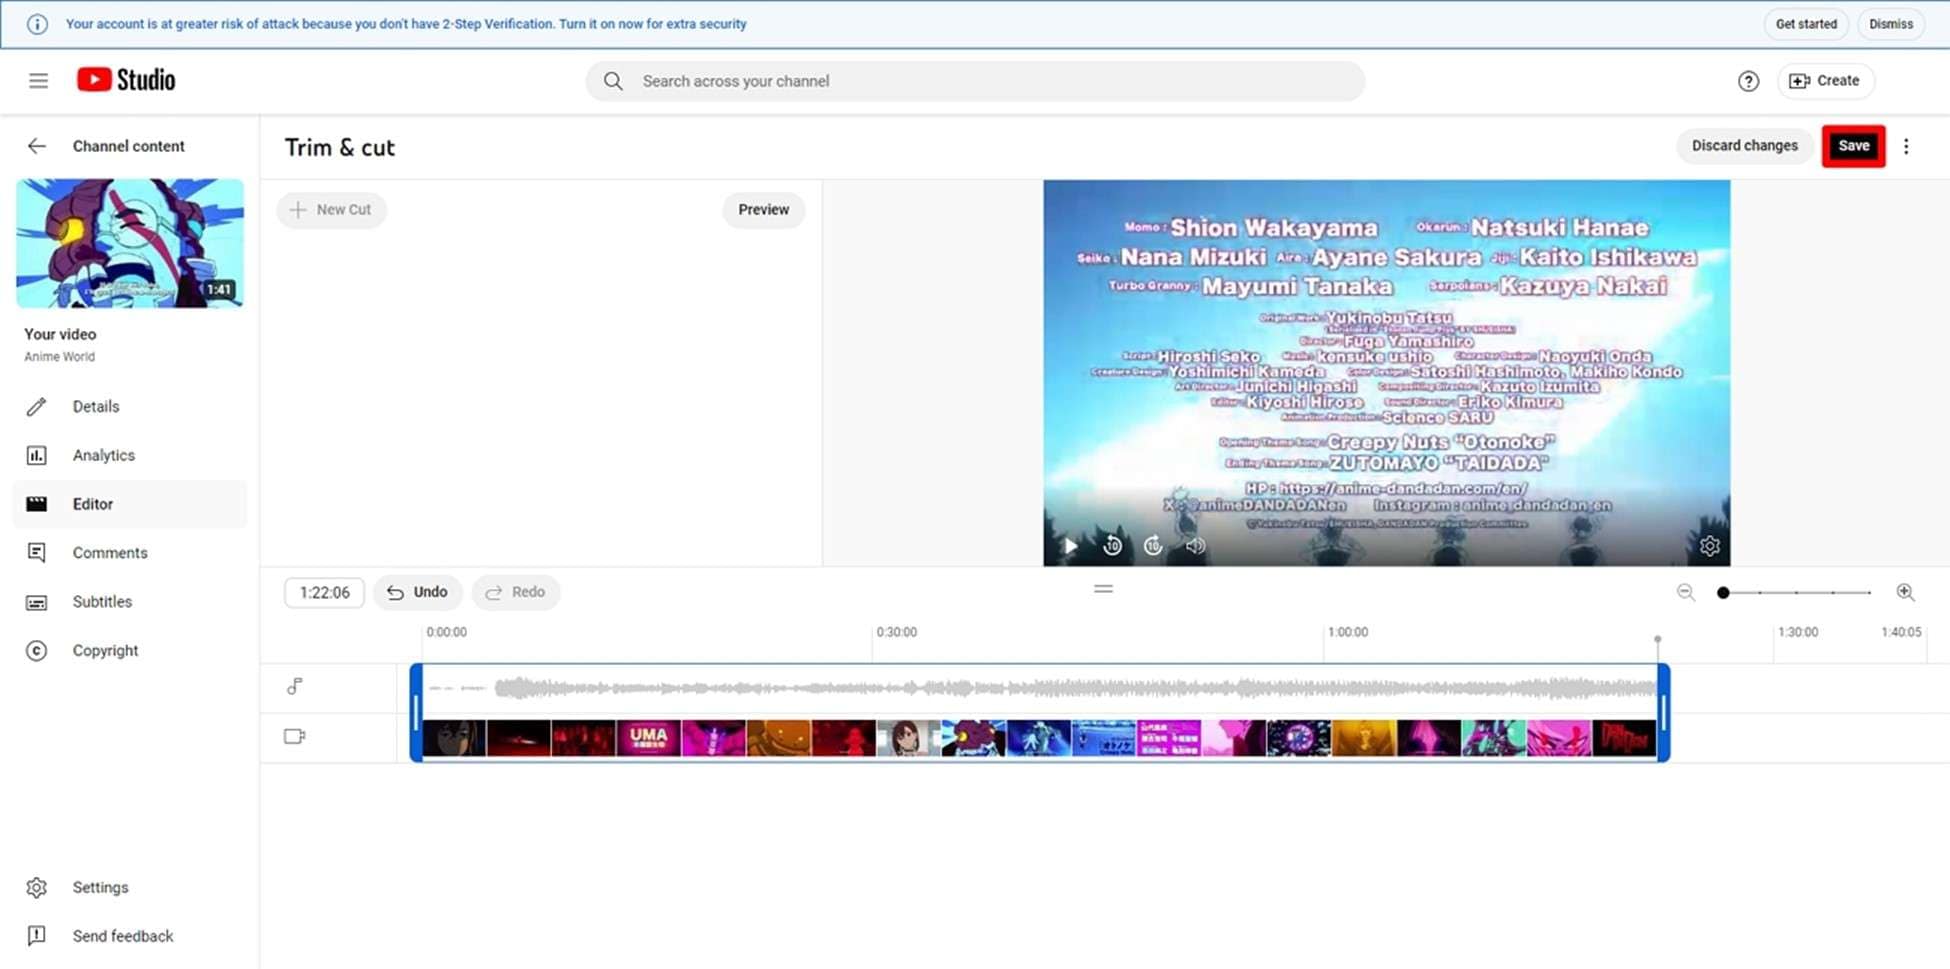
Step 3. Moving forward, access the "Editor" option from the left side panel to enable the video editor. Here, you can apply the “Blur" effect or cut your video using "Trim and Cut" according to your preference.
Step 4. Once the editing process is completed, save the changes by clicking the "Save" button from the top right corner.
Other Video Editing Tools That You Can Try
If you are still wondering, how do I edit videos for YouTube, try these other incredible tools that let you modify your content according to your preferences:
1.iMovie
Compatibility: Mac
Rating: 3.5/5
Operation Difficulty: Difficult
Best For: Editing on MacBook
If you are a Mac user, you can conveniently edit your visual content using the iMovie app provided by Apple. This extensive tool lets users edit their videos in up to 4K resolution. You can also integrate the project with your iPhone and iPad to streamline the editing process. Besides video editing, the tool offers organization of images and videos within your MacBook.
Key Features
- Users can improve the accessibility of their videos by adding titles and transitions using iMovie.
- The tool adds slow motion to your videos to give them a cinematic touch.
- You can remove jitters and shakiness from the video using the video stabilization functionality.
Steps for Editing a Video Using iMovie
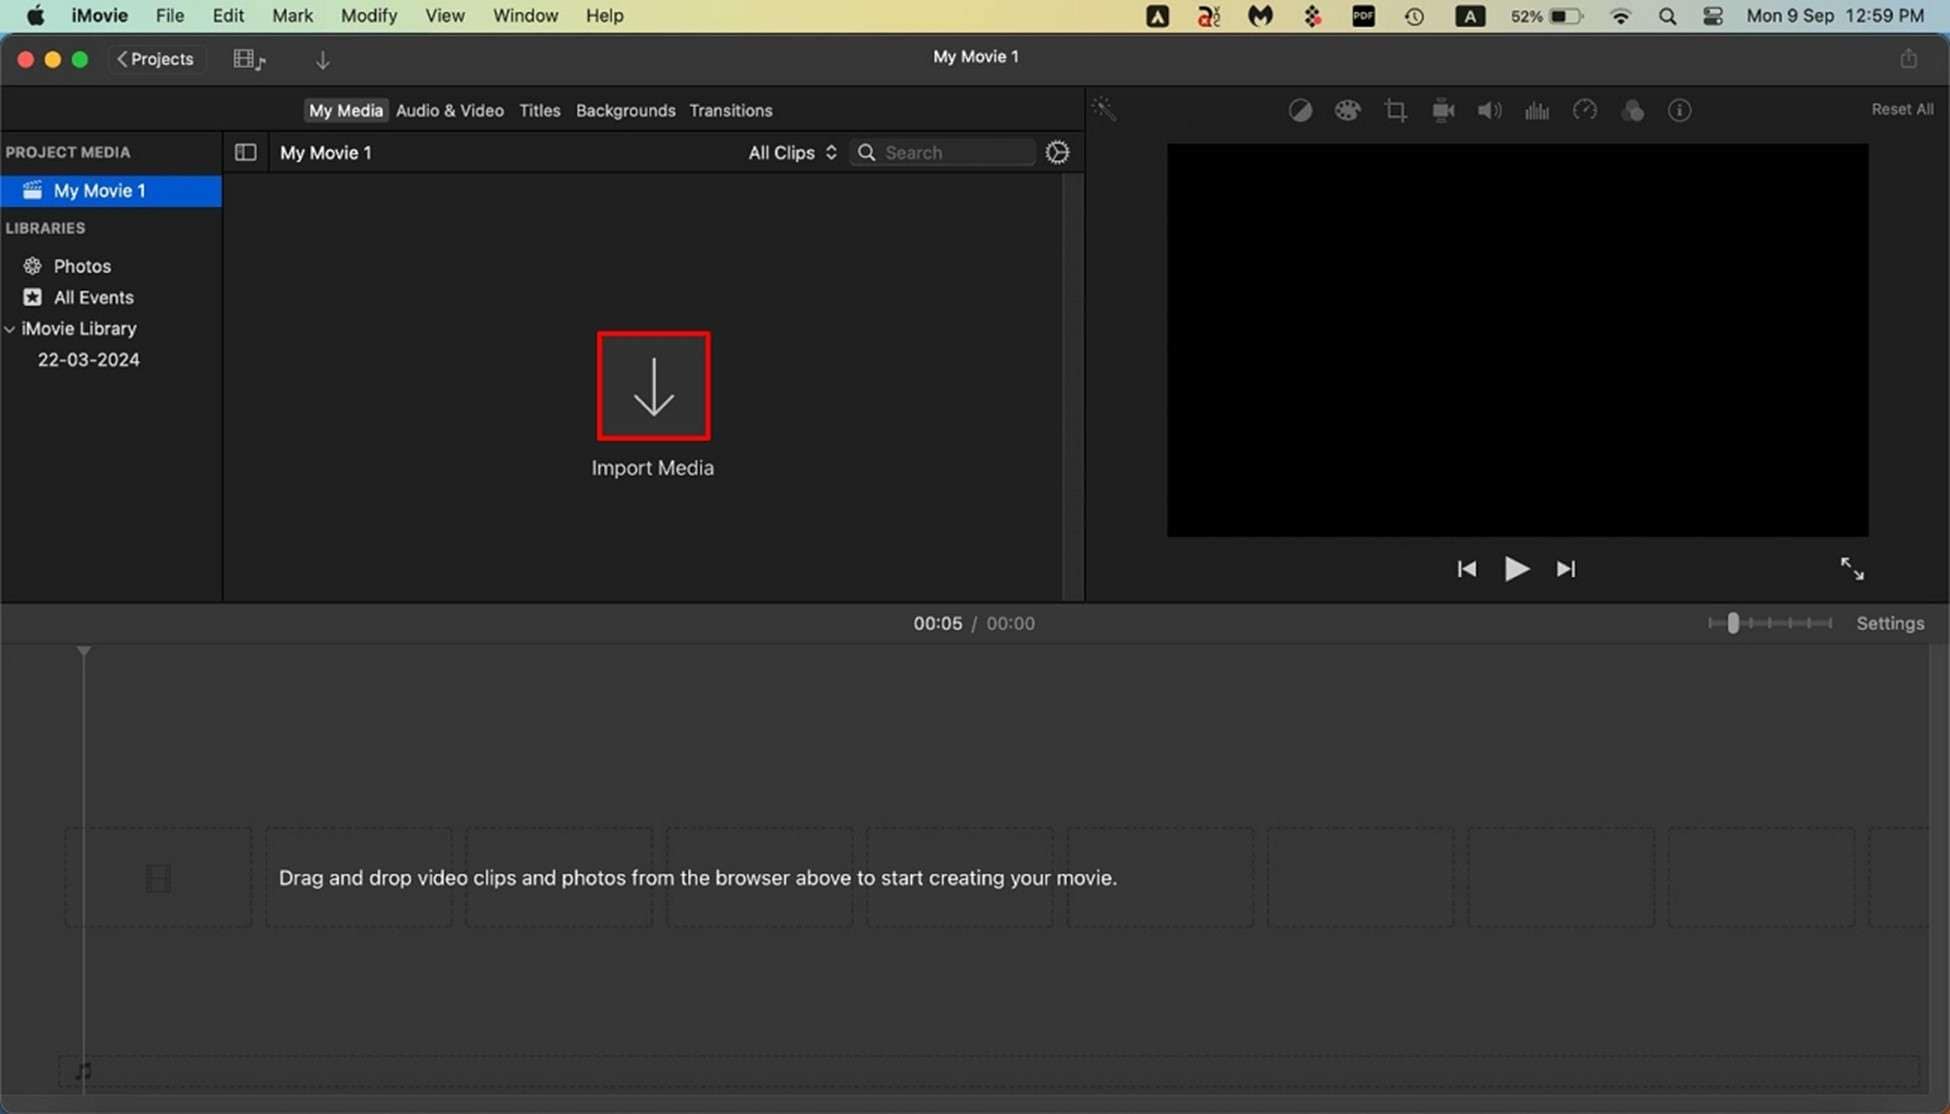
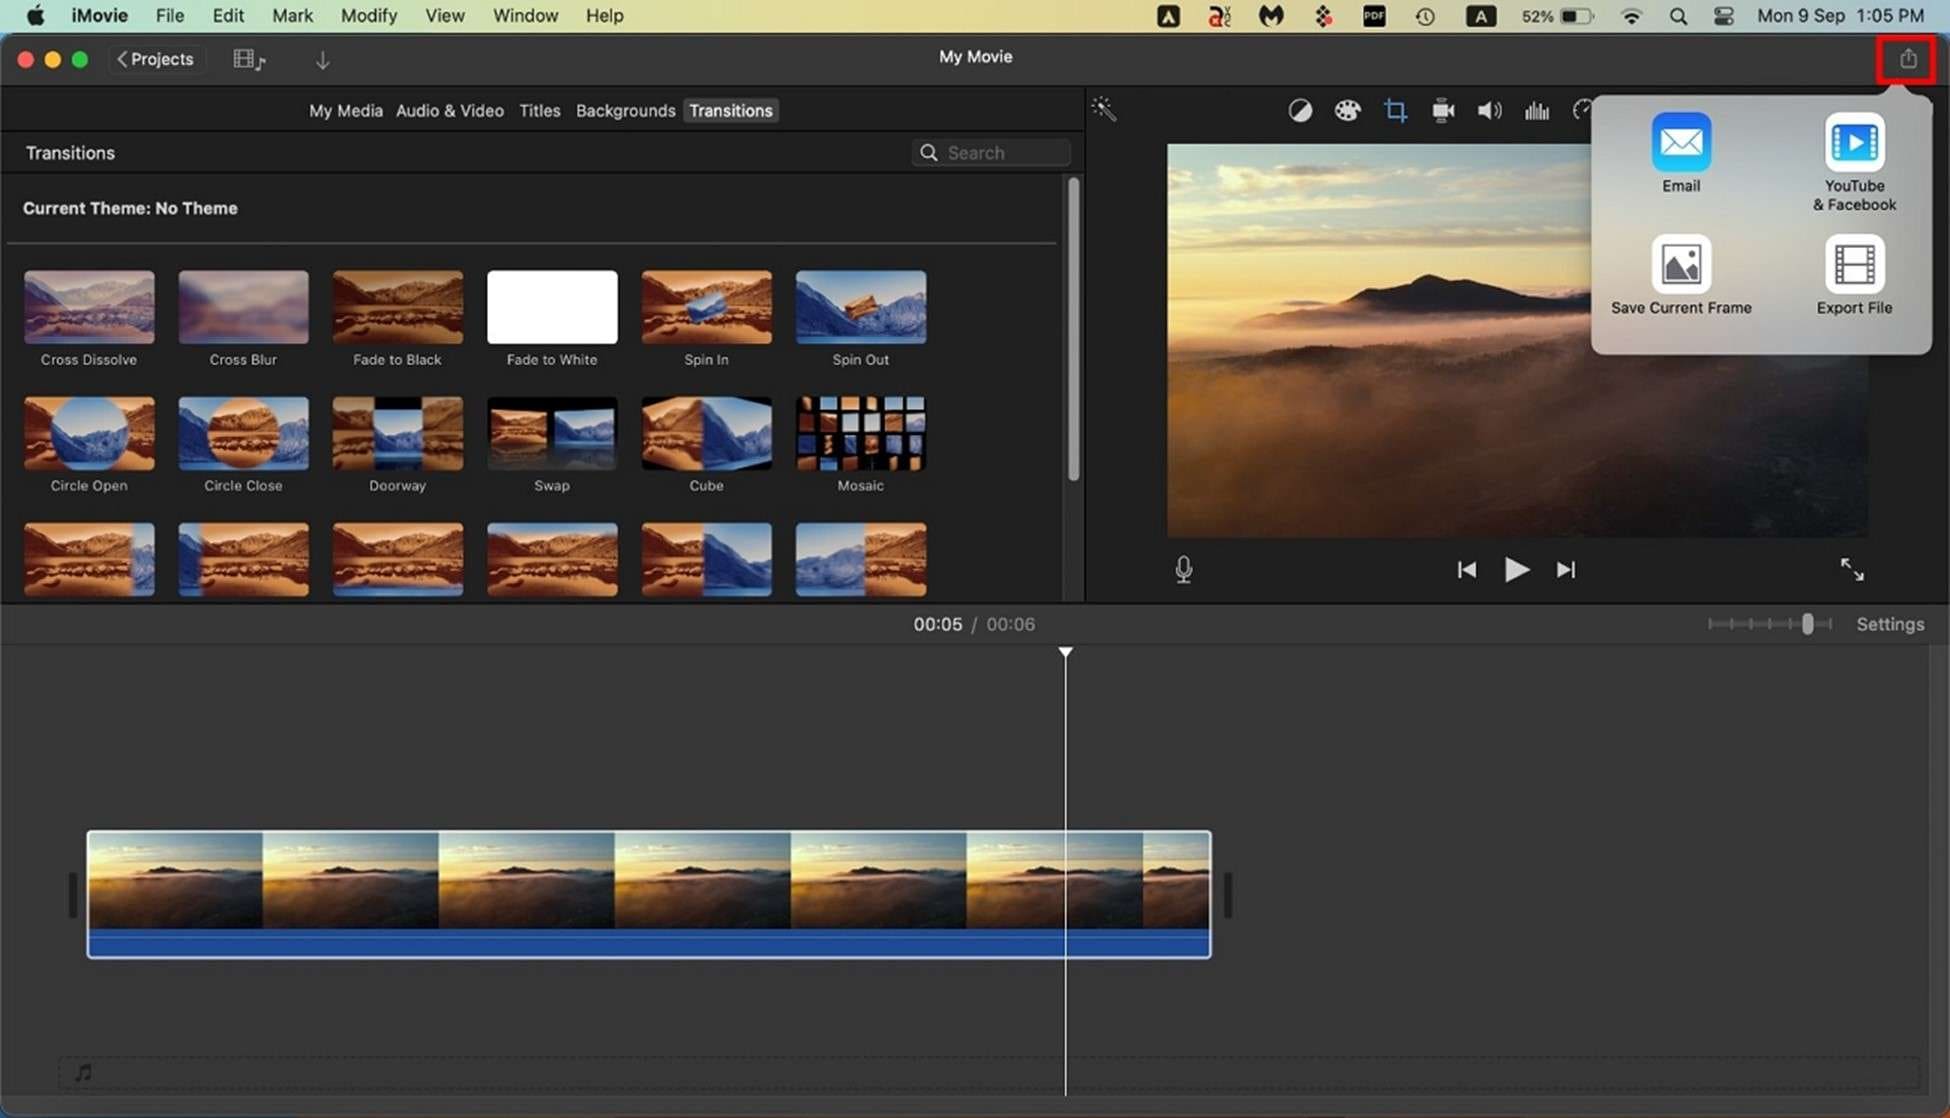
Step 1. To learn how to edit YouTube videos, access the iMovie app on your Mac device and add your video using the “Import Media” button.
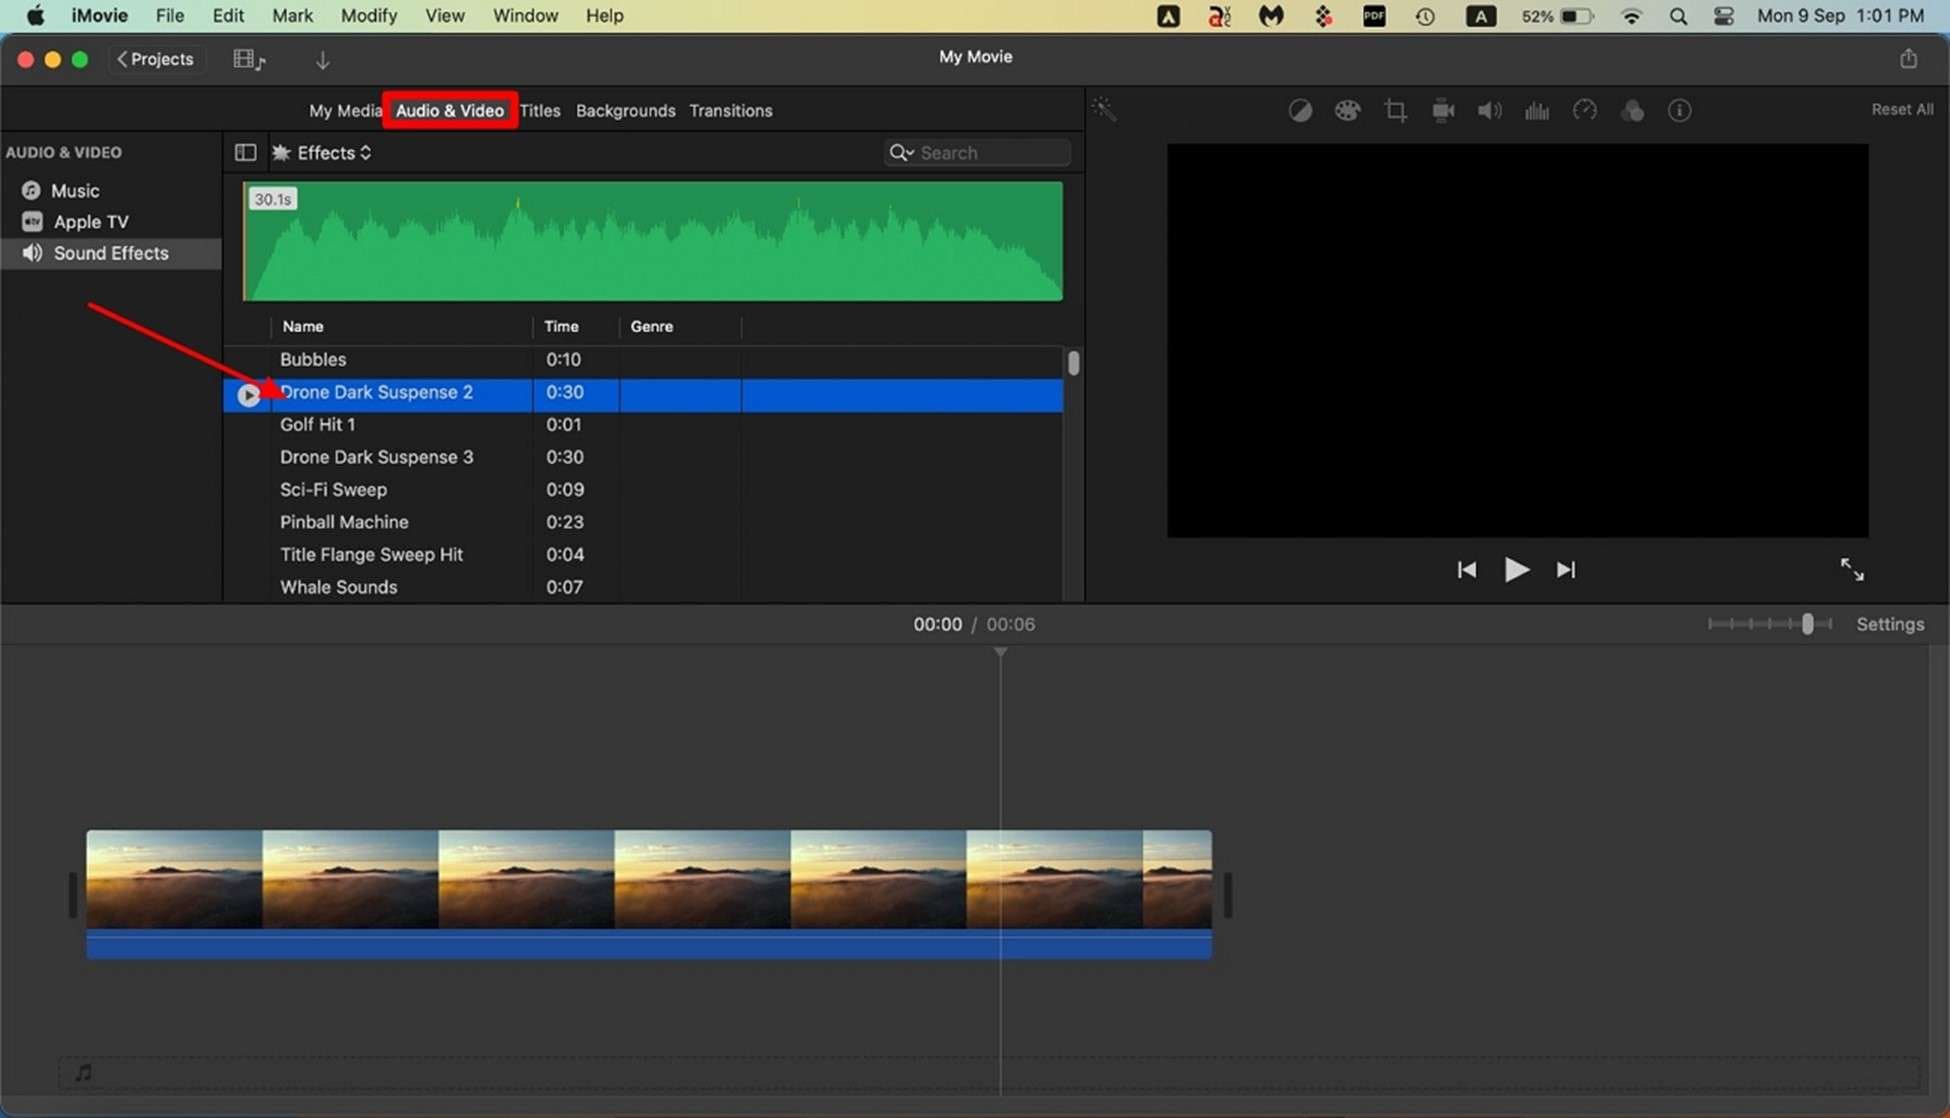
Step 2. To add a video effect, access the “Audio and Video” tab and select the effect of your choice from the list provided.
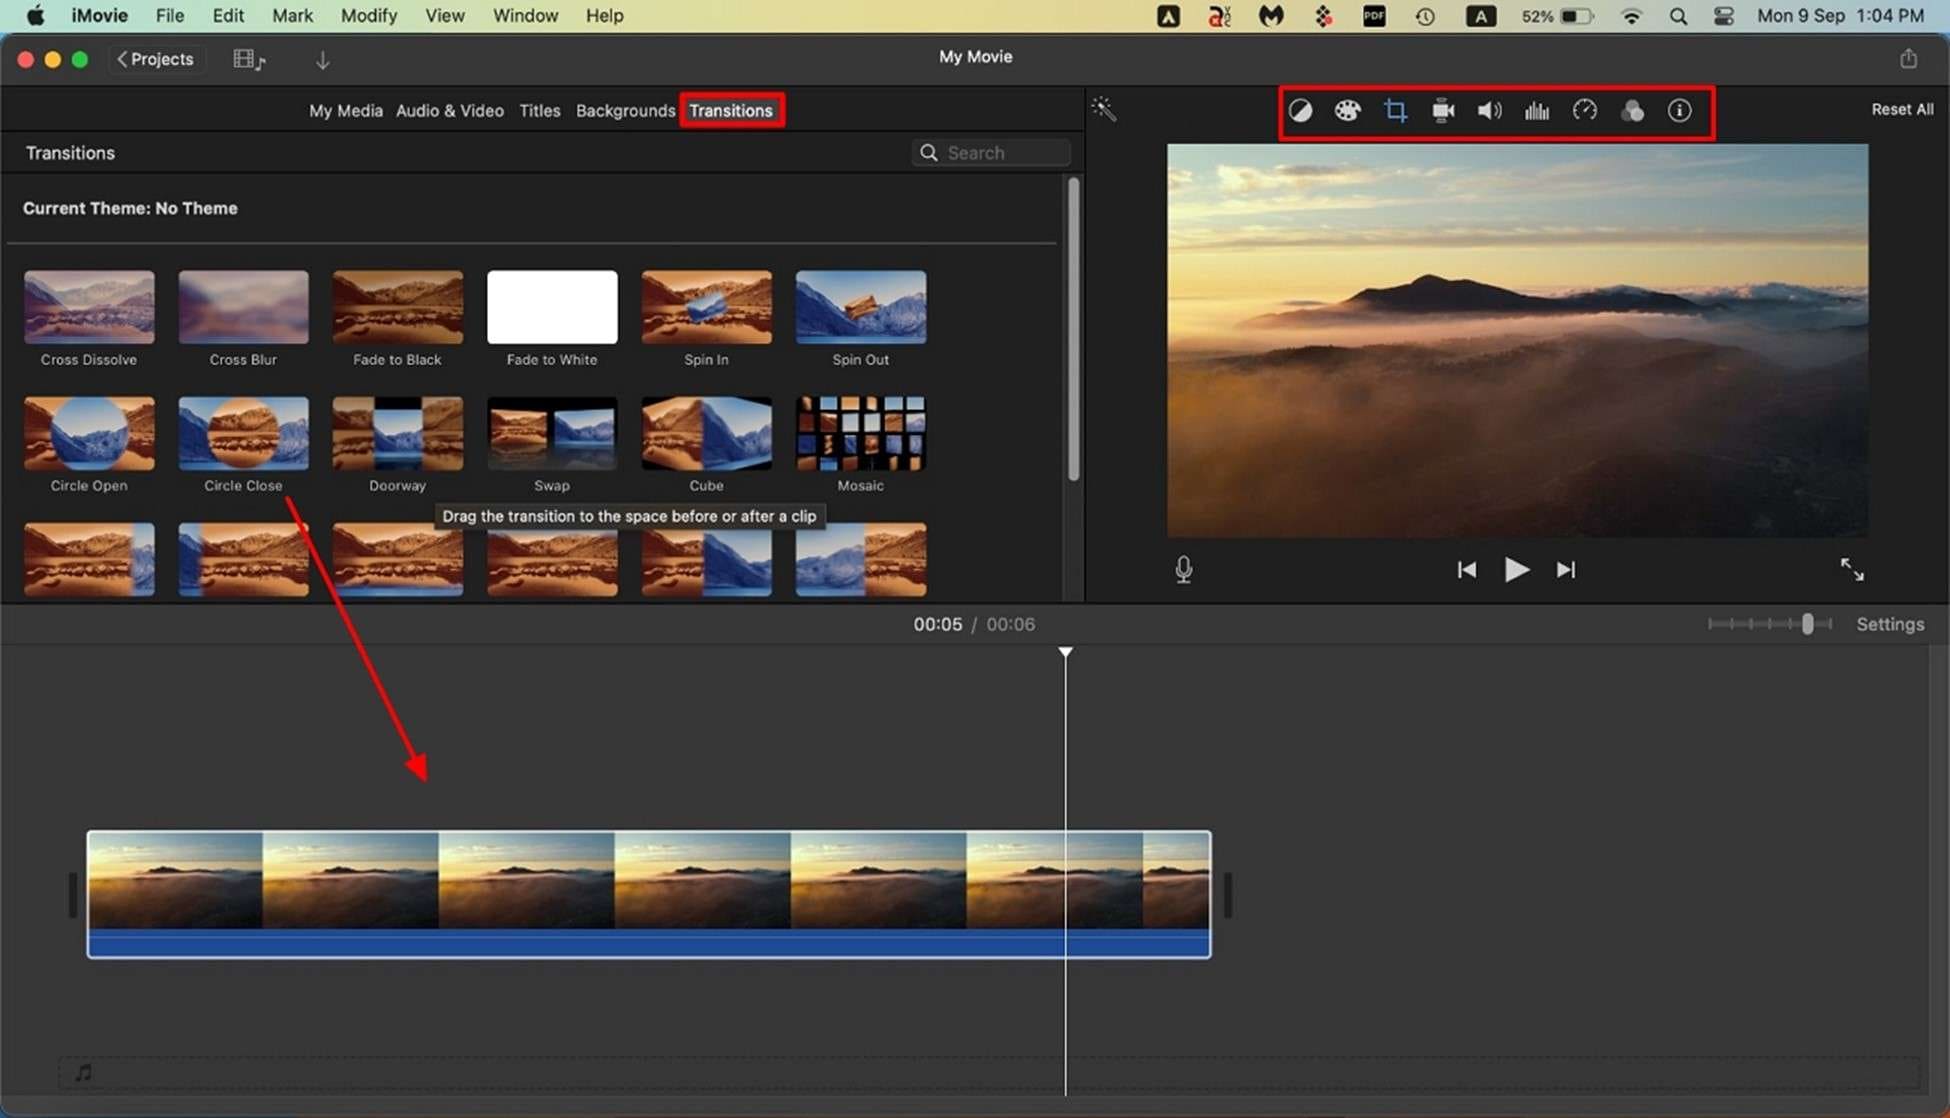
Step 3. Add transitions to your videos by expanding the “Transition” tab and choosing your preferred option. You can also modify the color and other elements by accessing the toolbar above the preview window.
Step 4. Finally, export the edited video by clicking on the "Export" icon located in the extreme top right corner of the interface.
2.Microsoft Photos
Compatibility: Windows
Rating: 4.3/5
Operation Difficulty: Average
Best For: Image Viewing and Organizing
If you are searching for how to edit your YouTube videos on a Windows device, try using Microsoft Photos. It is a pre-installed tool that lets Windows users display images and videos on their computers. This extensive tool also provides the functionality of editing videos and images with only a few clicks.
Key Features
- The tool automatically categorizes your images and videos to organize them in folders.
- Using this tool, you can conveniently trim your video according to your preference.
- It also lets users capture a picture within the video and save it as a separate frame.
Steps for Using Microsoft Photos To Edit YouTube
Step 1. Access the Microsoft Photos software on your computer device and browse through the video you want to edit. Now, select the video and click on the “Edit” icon located at the top of the interface.
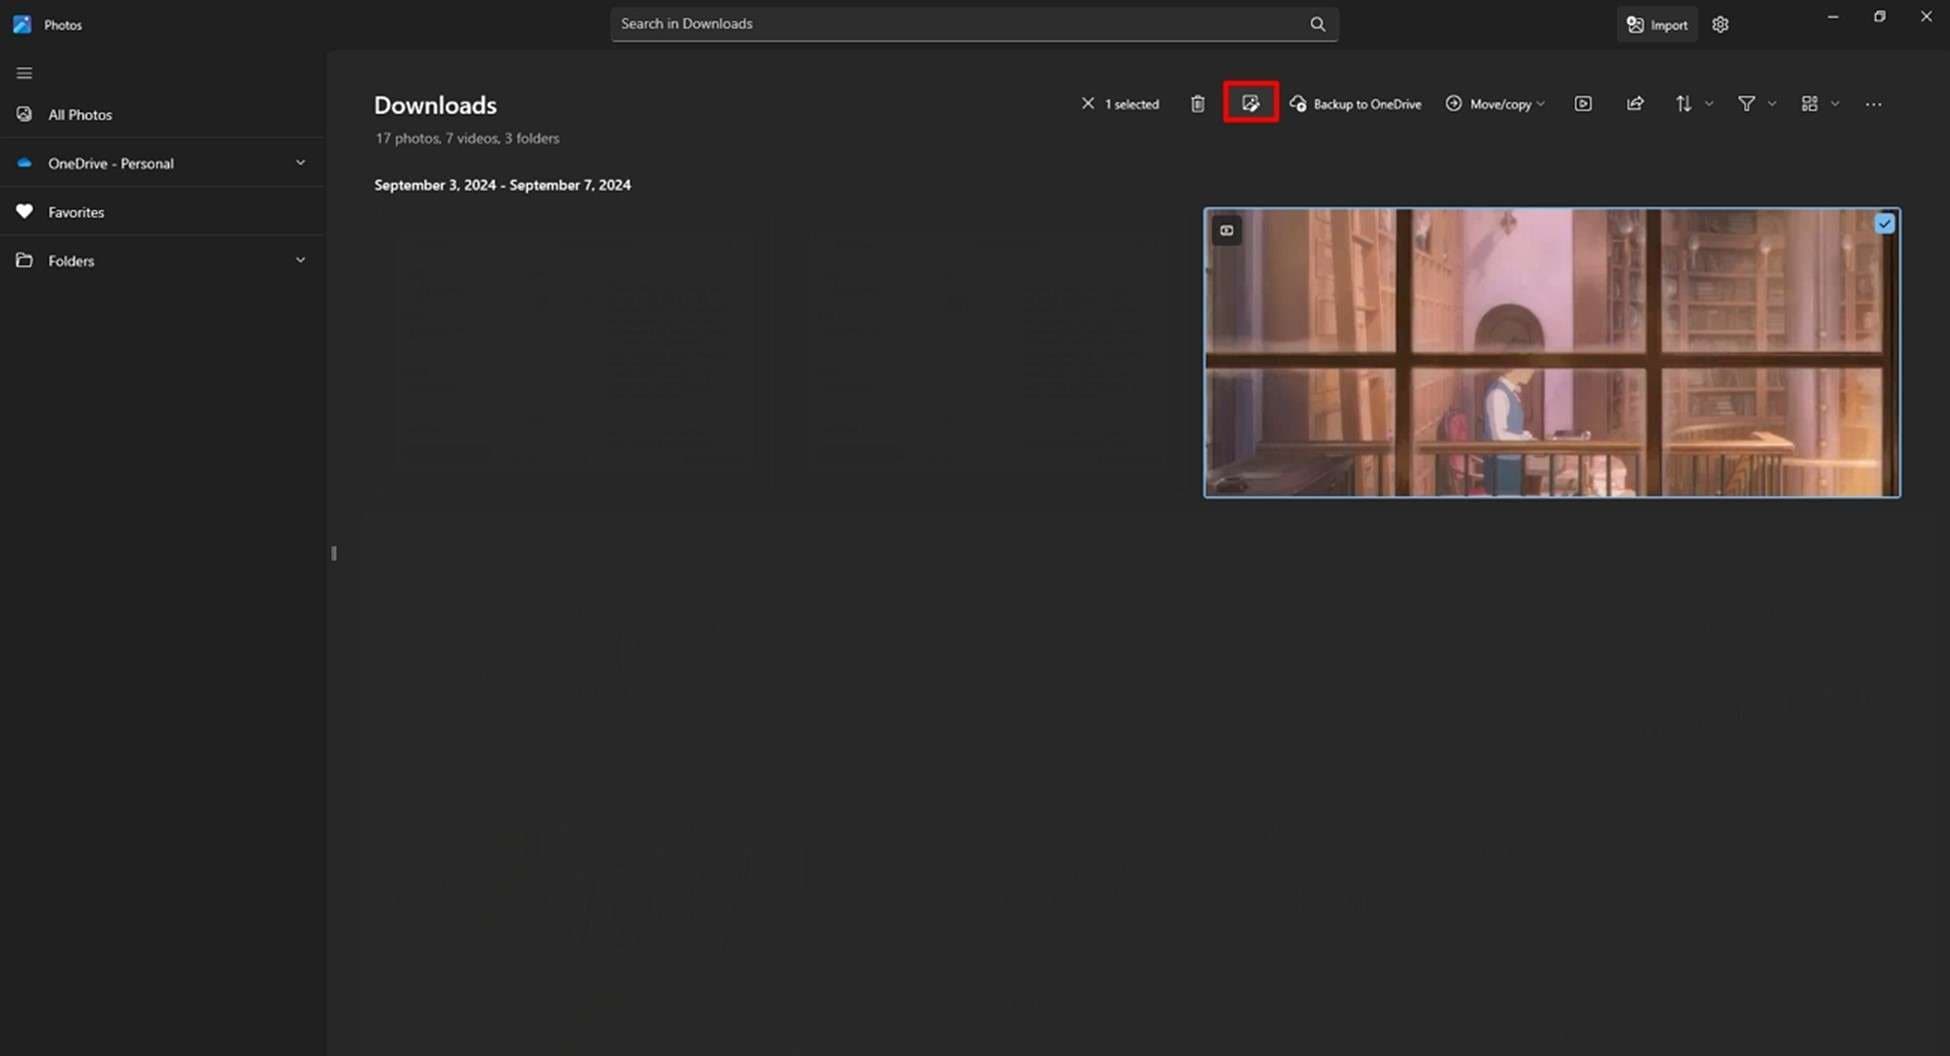
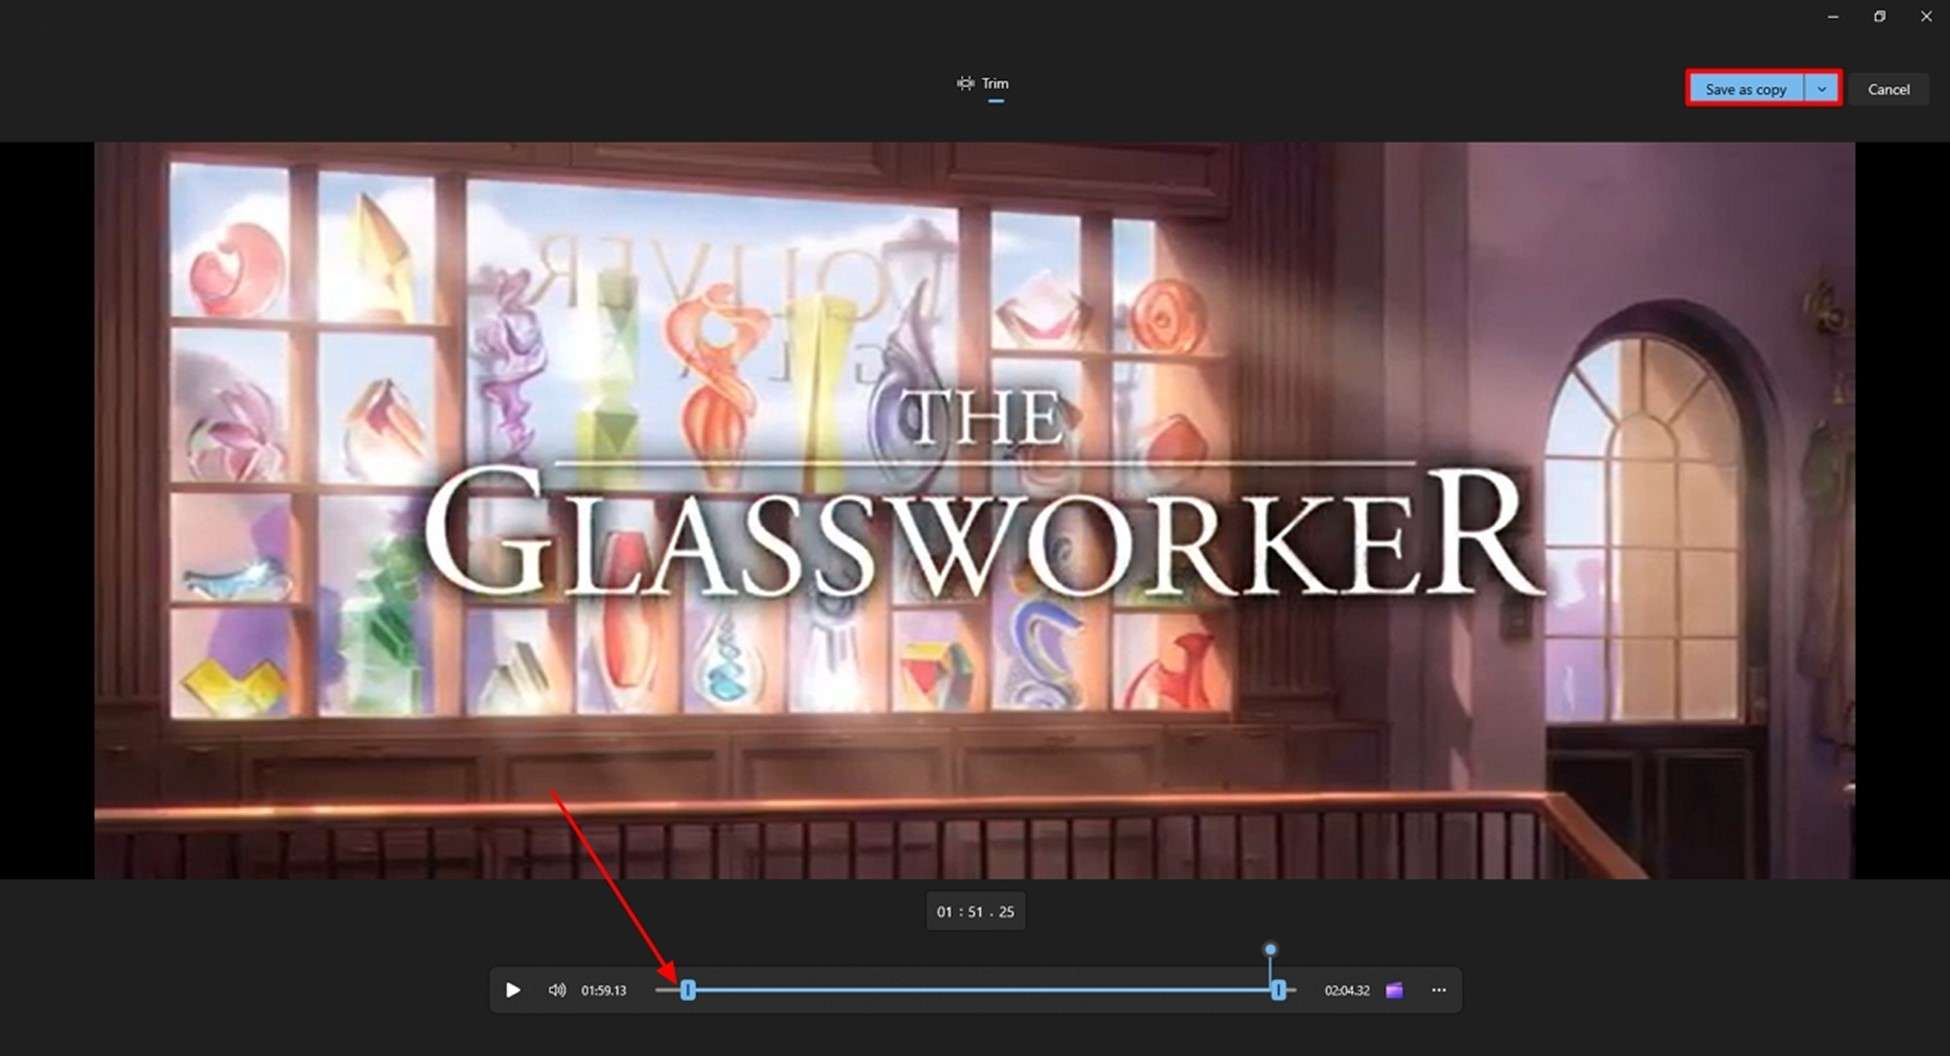
Step 2. To trim the video, slide the trimming bar available at the bottom of the video and adjust it according to your preference. Once the video is trimmed accurately, head to the top right corner of the interface and press "Save As Copy" to export the video to your device.
3.DemoCreator
Compatibility: Windows, Mac
Rating: 4.7/5
Operation Difficulty: Easy
Best For: Screen Recording and Detailed Editing
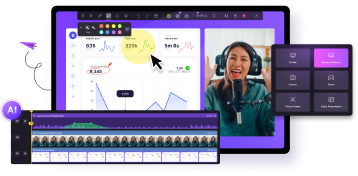
DemoCreator is one of the most reliable resources that lets users learn how to edit a YouTube video. This incredible tool uses AI to analyze your content and apply the selected effects accurately. With multiple customization options, users can enhance the visuals of their videos according to their preferences.
Moreover, DemoCreator allows users to add automated captions to their YouTube videos for increased engagement. Besides video effects, the tool also provides various features to fine-tune the audio of your media with only a few clicks.
Key Features
- Add Annotations: To make your content comprehensible or to emphasize or highlight a key moment within the video, you can add different annotations provided by DemoCreator.
- Pan and Zoom Effects: Another amazing feature of DemoCreator is the Zooming and Panning effects. Users can add focus on a particular moment using this effect.
- AI Voice Changer: This effective functionality lets you change the voice of the speaker in the video using the power of AI.
- AI Object Remover: The tool uses advanced artificial intelligence to let users select an unwanted object within a video and remove it seamlessly.
Comprehensive Steps for Editing YouTube Videos With DemoCreator
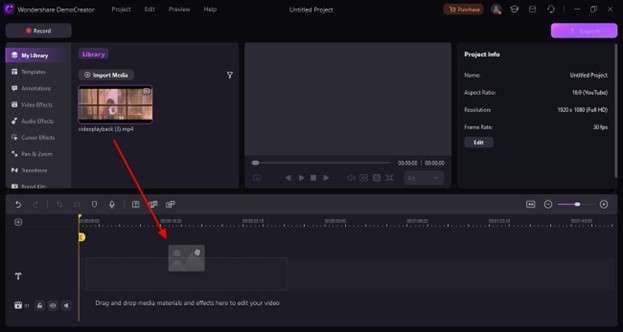
Step1Add Your Visual Content to DemoCreator’s Interface
After selecting the Video Editor feature from the homepage of the tool, import your video using the “+” button. Once the video is added, drag it to the editing timeline to apply further effects.
Step2Choose the Video Effects
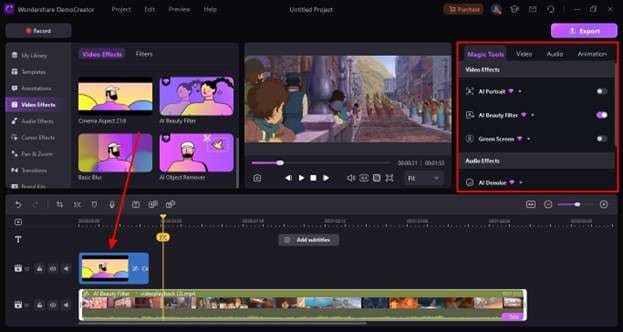
To add unique video effects, expand the "Video Effects" section from the left side of DemoCreator's interface. A library of effects will be opened, and the desired effect will be selected and dragged to the timeline to apply to your video. You can also access the "Magic Tools" windows on the right to add more effects to your video.
Step3Save the Edited Video to Your Device
After all the features are successfully applied to the video, save it to your computer device using the “Export” button located in the top right corner.

Tips and Tricks for Editing YouTube Videos
Modifying and fine-tuning your videos can effectively enhance the overall experience of your content. Provided next are a few of the hacks you can utilize while modifying your videos.
- Include Subtitles and Captions: Captions and subtitles make your video understandable for a larger audience, so add them to your videos to increase understandability. This not only increases engagement but also makes your visual content look complete.
- Make a Consistent Style: Another tip for how to edit YouTube videos is to make your video style consistent. Including an intro or outro to your videos will also help you build a brand identity for your channel.
- Add Compelling Filters: Various effects and persuasive filters can be applied to the video to enhance the visuals. These effects not only improve the visuals but also give your videos a professional look.
- Expand the Audio Quality: Besides visual enhancement, you must refine the audio of your content because a video with good visuals and bad sound is not appreciated by the viewers.
- Export in The Correct Format: Choosing the proper format for video export plays a significant role. If you select a universal format, you can make your video accessible to a broader audience.
Conclusion
All in all, this article discusses various solutions for how to edit YouTube videos. However, one of the reliable options that lets you edit your videos is Wondershare DemoCreator. The tool provides advanced AI-powered features to create and edit high-quality visual content for its users.
FAQ
-
Is it possible to edit an existing YouTube video?
Yes, you can edit an already existing video using the YouTube Studio tool on your web browser. -
Is it free to edit videos on YouTube?
To perform basic editing on your YouTube video, you do not have to pay any amount. -
Can I make changes to my video using my phone?
Yes, you can access the YouTube studio on your smartphone and edit the video according to your convenience. -
Can I modify my visual content on YouTube after uploading it?
The YouTube Studio tool lets you edit your video after uploading it to your channel. However, if you are looking for a resource to edit videos before uploading, try using Wondershare DemoCreator.


