Best Fraps Screen Recorder Review and Alternative
If you have been looking for a good gameplay screen recorder, you've probably come across Fraps screen recorder. It is one of the most popular PC tools for gamers to record their screen and share the videos online. The main reason so many gamers will choose Fraps is because it is one of those screen recorders that doesn't complicate the recording process. It comes with all the necessary premium tools that you need to record your screen, but they are all easily accessible and even easier to use.

But Fraps is not exactly golden and as this detailed Fraps screen recorder review will take an in-depth look at this program and how it works. It is our hope that this review will help you decide if Fraps is the right tool for you or if you should keep looking.
The Fraps Screen Recorder Interface
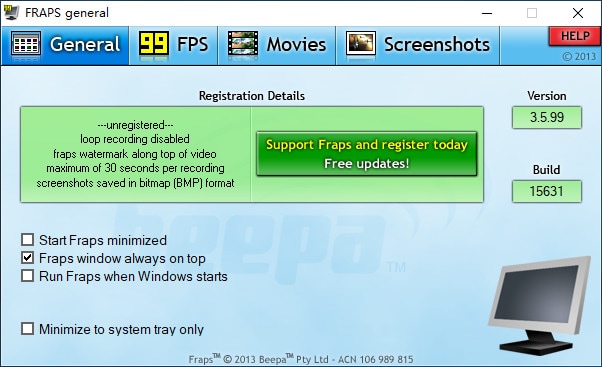
The one thing you will notice when you first open Fraps is that the interface is not very pleasant to look at. But what it lacks in aesthetics, the Fraps interface makes up for inaccessibility. On the main interface, you will see four tabs that are all you need to run the program. These tabs are General, FPS, Movies, and Screenshots.
Under the "General" tab, you can set the programs to startup at launch. You can also set the program to "minimize to system tray only" a feature that will activate when you hit the "X" button at the top of the program during the recording. This feature will, however, allow you to keep running Fraps in the background.
In the FPS tab, you will find Fraps benchmarking tools. The frame rate counter will always appear on the screen when recording the screen. You can also hit "F11" on your keyboard if you want to record a certain benchmark although it is a good idea to set your preferences in FPS > Settings section.

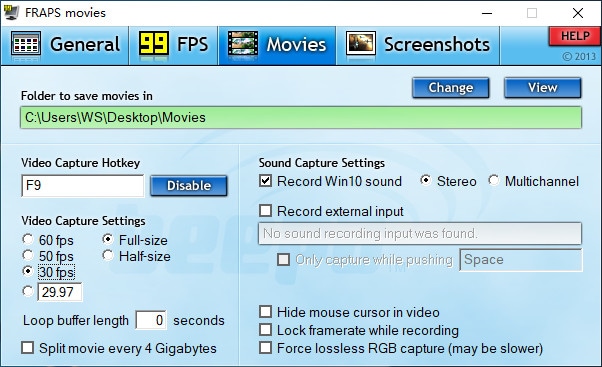
As the name suggests, the “Movies” tab is there to allow you to record the screen. The settings on this tab are different if you are using the Fraps Screen Recorder free version. For example, the buffer length setting is not there in the free version. In this tab, you can set whether you would like to record the whole screen or just a section of the screen. You can adjust several other recording features including the sound settings, whether to turn on the microphone or nor, to hide or unhide the mouse and whether you want to lock in the frame rate or not.

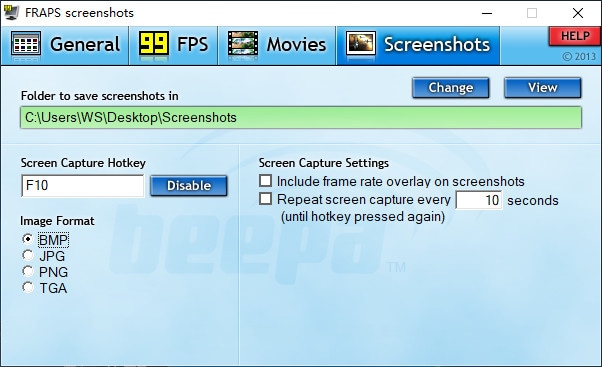
Finally, the screenshots tab is used to take still shots of the screen. It is quite self-explanatory and there aren't too many settings to tweak in this regard.

The Fraps Screen Recorder Performance
We wanted to test Fraps screen recorder's performance and like most people who have used to record gameplay in the past, we found that it probably uses more resources than any other similar tool. The more we used it, the quicker the frame rate fell. In fact, we would say there was a sharp increase in performance, up to 13% after just a few minutes r recording.
13% may not seem like much, but in a practical sense, it is significant enough to require reducing the original game settings to the lowest point to avoid interfering with the gaming process. This means that you may have to play the game at the lowest resolution possible in order to use Fraps to record the screen.
While it is capable of recording 120 frames a second, it only comes with 1 video recording codec. It also doesn't compress the video, meaning that you are likely to go through a large chunk of your storage after only a few minutes of gameplay recording.
How to Record Games with Fraps
Despite the many performance shortcomings that Fraps exhibits, it still remains one of the easiest to use gameplay recorders in the market. The following is a simple guide to help you use Fraps to record your game;
Step 1: Download and Install Fraps on your Computer
To begin using the Fraps screen recorder downloader to install the program on to your computer. Keep in mind that you can choose to download the free version of the program or the full version.
If you choose to use the free version, you should know that it is fairly limited, allowing users to record only about 30 seconds of video. It will also add a watermark to the video once recorded.
Step 2: Launch the Program and Begin Recording
Once the installation and registration process is complete, launch Fraps and hit the "F9" button your keyboard to commence the recording.
The "F9" key is the default hotkey for the recording process. But if it fails to work for you, click on "Video Capture" and set "F9" or any other preferred hotkey to make the recording process that much easier.
Note: It is a good idea to choose a hotkey that you will not use when playing the game.
You can then minimize Fraps and use your preferred hotkey to control it.
Step 3: Open the Game to Record
Now all you have to do is open the game you want to play and begin recording. If you hit "F9" or your chosen hotkey, you will see a number at the top corner of the game.
This number indicates, the Fraps benchmarking and current frame rate of the recording.
You will know that Fraps is recording when the frame rate overlay is red.
Hit "F9" again to stop the recording when you're ready.
Pros and Cons of Fraps Screen Recorder
Pros
- One of the best things about Fraps is that it is very easy to use. As we have seen, the user interface is self-explanatory and the recording process can be controlled using one key.
- It allows for numerous customizations including video settings, hotkeys and even the frame rate that you want to use
- It comes with a free version that you can use to test the program's capabilities
- It has a screenshot feature
Cons
- You may notice a dip in the performance of your system, especially if you are running Fraps on a challenged system
- The free trial version of the program is severely limited and adds a watermark to the recorded video
- The interface is a little outdated and not very pleasant
The Best Fraps Screen Recorder Alternative
Most gamers would rather not see their systems slow down while running their game. If you are a gamer who values the speed and performance of your system, but you still need to record your games, there is a better screen recorder than Fraps. Wondershare DemoCreator is a simple to use screen recorder that is designed to make it easy for you to record your gameplay without tasking your system too much.

To begin with, DemoCreator allows you to keep a high frame rate of up to 120 FPS and since the video being recorded can be compressed, your system will keep recording as you keep playing. It can also allow you to record both your webcam and screen simultaneously and even add callouts and other annotations during the recording. The quality of the recorded video will remain as high as you want and you can use this screen recorder to convert the video to a number of different formats to make it easy to upload the video to sharing sites like YouTube. It also comes with a number of very useful and very effective video editing tools that you can use to trim, cut, delete, and even split the recorded video.
 Secure Download
 Secure Download
There are a lot of reasons why you would want to choose Fraps as your gameplay recorder. One of the most attractive of these reasons is that it is very easy to use. The way the program is set up makes it the simplest tool of its class and the hotkeys certainly make the whole recording process very simple. But Fraps may not be a good solution if you are running a game that is tasking your system's resource. The combination of a high-resolution game and Fraps is one we found very unfavorable in our tests.
The good news is, however, that there are a lot of options in the market that can offset Fraps shortcomings. One of the best options is Wondershare DemoCreator. It marries ease of use and effectiveness to give you the best tool whether you are simply recording a screen audio, presentations or high intensity, resource guzzling game.


