- 1. Record your computer screen and webcam simultaneously.
- 2. Allow you to customize screen capture and frame rate .
- 3. Powerful editing tools and effects to enrich your video clips.
How to Record a Zoom Meeting
Recalling each and every point that was discussed during a meeting can be difficult, especially if you covered more than one topic. Instead of taking notes, you can record your Zoom meetings and watch them whenever you need an important piece of information.
Moreover, recording a Zoom meeting will enable you to share the details that were discussed with your colleagues who couldn’t attend the meeting. You don’t have to be tech-savvy in order to record a Zoom meeting, because a video recording session can be started or stopped with a single click. So, in this article, we are going to show you how to record a Zoom meeting.
- Part 1: How to Record a Zoom Meeting on a Mac or PC
- Part 2: Record Zoom Meeting with Third Party Software
- Part 3: Record a Zoom Meeting on iPhone & Android
- Part 4: Record Zoom Meetings to the Cloud
- Part 5: FAQ about Zoom Meeting Recording
You may also like: Free Video Conferencing Software for Windows and Mac
Local Recording: How to Record a Zoom Meeting from a Mac or PC?

When in need of a recording for meetings, Zoom has two methods to choose from. Both free and paid versions of Zoom offer the local recording feature that enables its users to store the recorded footage on their local hard drives. The local recording is offered for free. Whereas its counterpart cloud recording is available for a price beginning at $14.99/month/host for the Pro size, works well for small teams. Have a medium size business starting with 10 hosts, that offer is $19.99/month/host for Business. And finally the top offer is Enterprise for $19.99/month/host starting at 100 host for the larger enterprise.
Settings for Recording Zoom Meeting
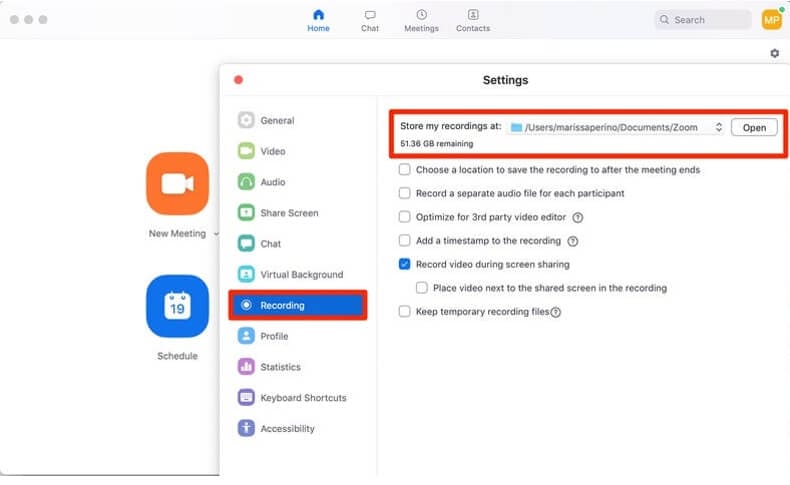
You should designate the folder where your file is going to be saved before you start recording a meeting in order to avoid searching for folder Zoom created automatically for this purpose. After you launch the Zoom Desktop Client you should click on the Gear icon to gain access to the Settings window.
Go to the Recording tab and click on the Open button that is located next to the Store My Recordings At option.(Note: on Windows, you will see it as Local Recording) Optionally, you can also enable the Record Video During Screen Sharing option if you want to capture videos while different participants are sharing their screens.
If you’re using the Zoom Web version, you will have to make sure that the local recording option is enabled before you can start recording a meeting. Head over to the Personal menu and click on the Settings tab in order to check if the Local Recording feature is disabled.
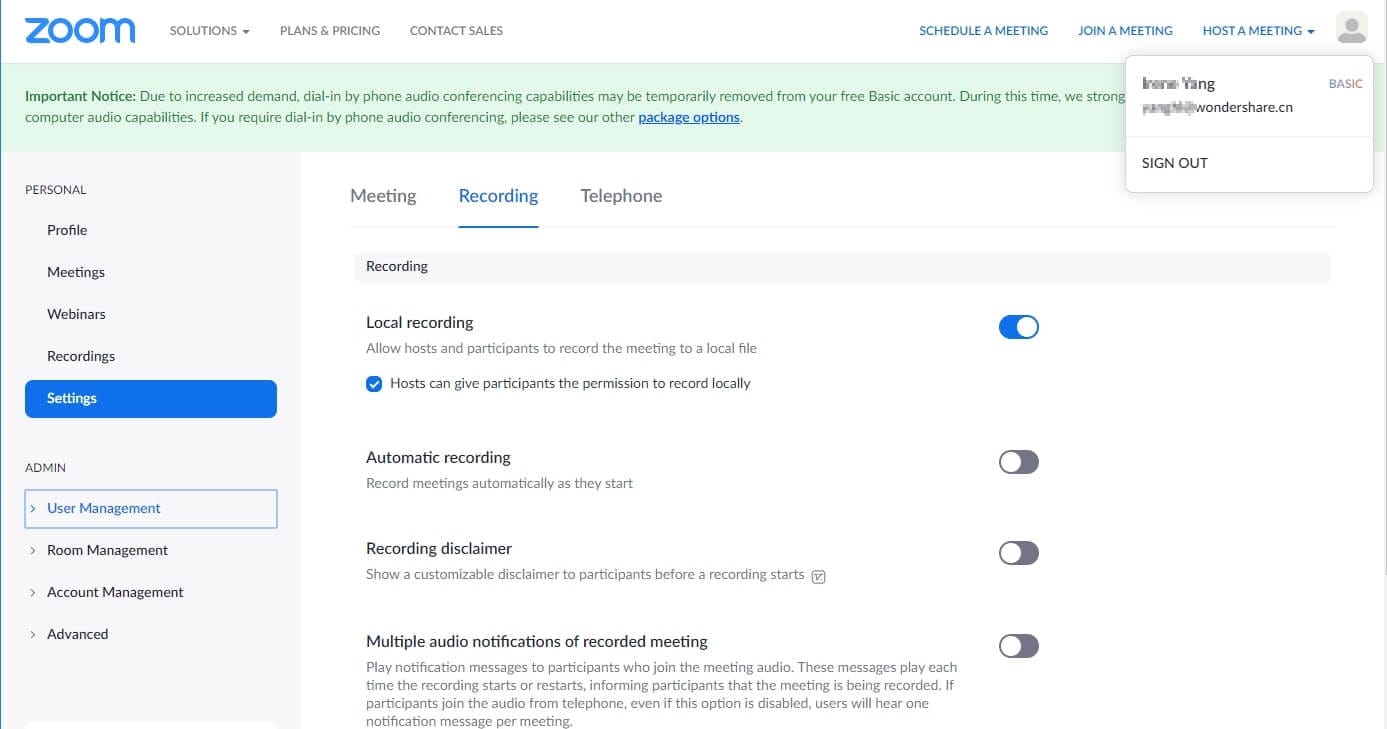
Click on the toggle button next to Local Recording option if the feature wasn’t activated.
Zoom also allows you to enable this feature in all groups you create with it. Click on the Group Management icon, locate the group in which you would like to enable this option and go to the Settings tab. Open the Recording tab and turn on the Local Recording option if it was disabled.
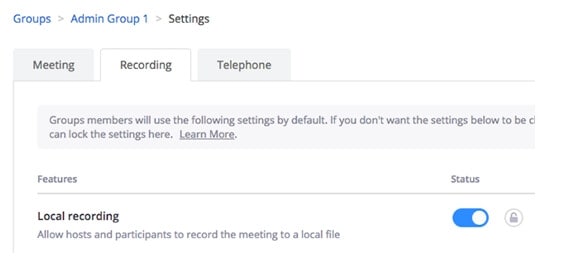
If you are an account administrator you can enable the local recording option by clicking on My Meeting Settings, while account members can perform this task from the Meeting Settings menu. In either case, you should open the Recording tab and then check if the local recording option is enabled.
How to Record Zoom Meetings to Local
Start a Zoom meeting when ready, and click on the Recording button. In case a menu pops up on your screen you should choose the Record on this computer option and a small recording bar is going to be displayed in the lower right corner of your screen.
After you stop recording, Zoom will convert the meeting recording in order to make the file accessible to you. Once the conversion process is completed the destination folder is going to appear on the screen so that you can quickly preview the video.
- Locate the menu bar and select the Record button.

- When the need to pause or stop recording occurs, just simply click on the Pause / Stop button.
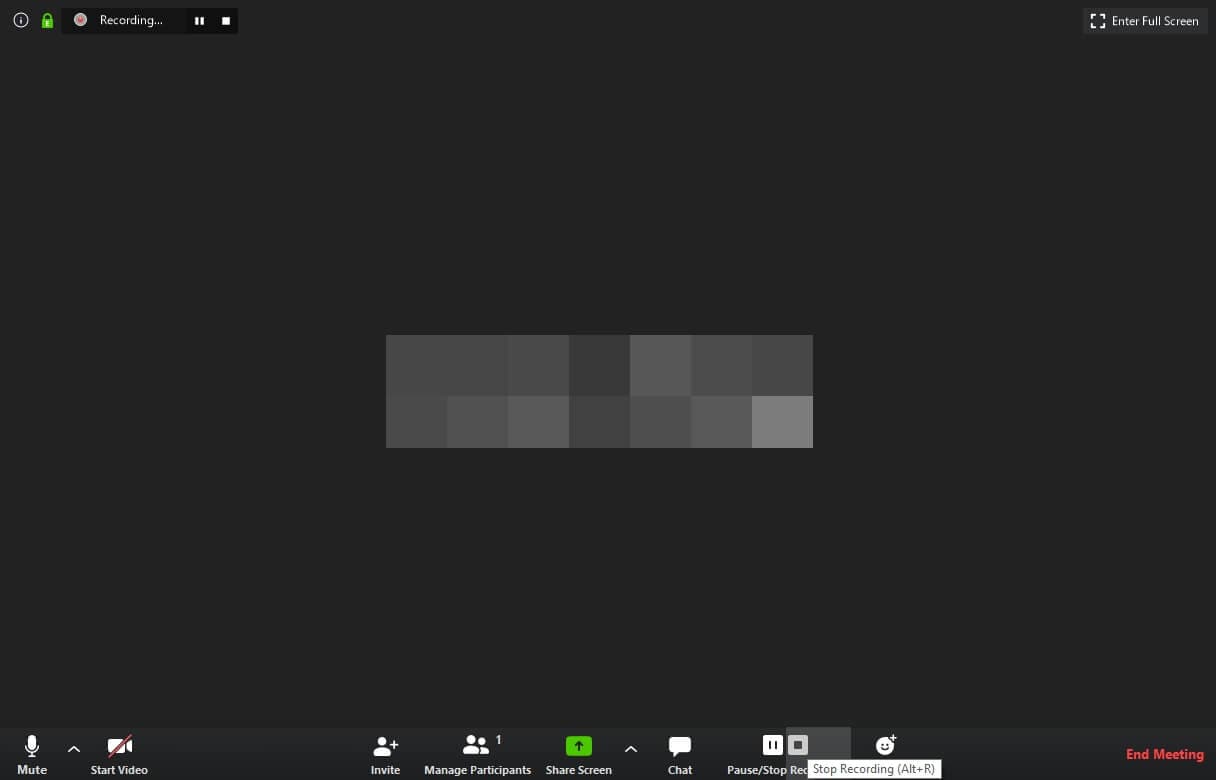
- Once recording is complete, the file will be converted and saved in mp4 format. The recorded files will also pop up under Zoom folder.
- Unable to locate your file? Open up the software, find and click on Meeting. Select the Recorded option, once it opens you will find the recorded files.
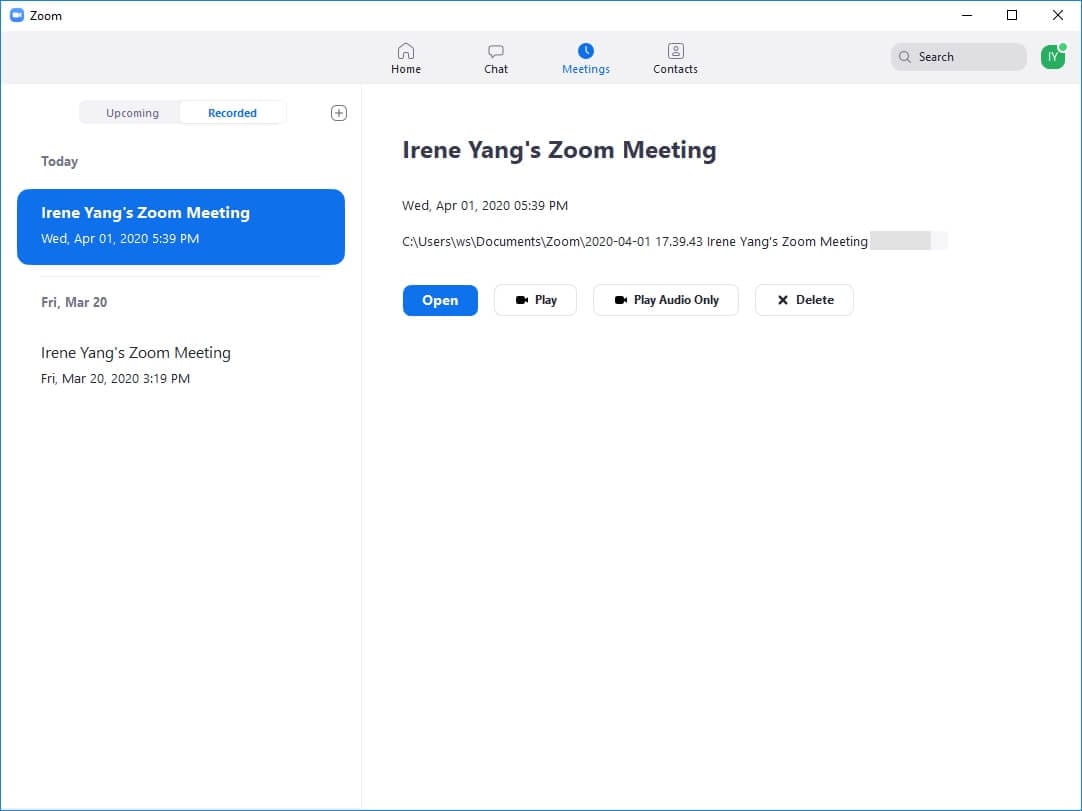
- Managing your recorded files is simple. You can choose to open the foler or play the recorded video directly, or just play the audio.
Record Zoom Meeting with Third-Party Software: DemoCreator
Utilizing DemoCreator to record a zoom meeting is an option, especially when you failed to record the Zoom Meetings with the built-in Recording tool in Zoom. Be it a small meeting or getting into the larger scale, this screen recording tool allows another avenue to utilize both for Windows and Mac platforms.
Recording Zoom Meetings with DemoCreator
1. To start with, download and install DemoCreator.
2. Once you start the program, you will have to choose "Screen" to begin your recording.

 Secure Download
 Secure Download
3. Then you can customize the recording settings, such as recording area, video fram rate, course highlight.
4. Click the red circle button to start recording. Once the process ends, you can edit the video with the editing tools.
Part 3: How to Record a Zoom Meeting from an iPhone or Android?
Recording meetings locally from iPhones and Androids is not possible and you must purchase one of the available subscription plans in order to gain access to Zoom’s cloud recording feature. With the cloud recording option, you will be able to share, view or download recordings directly from your Zoom account.
Click on the More icon, once you start a meeting from your iPhone and chose the Cloud Recording option from the menu.
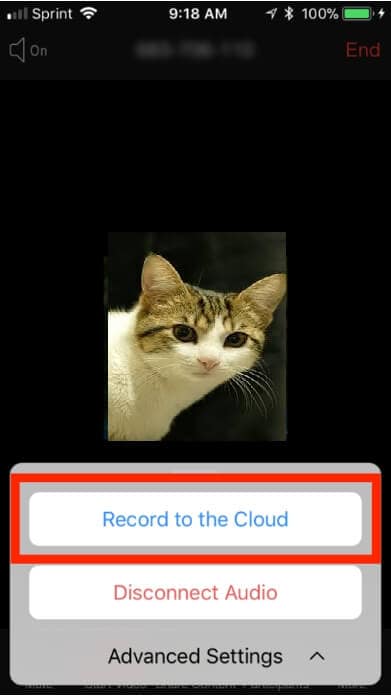
The Recording bar will appear in the upper right corner of your screen notifying you that the recording session is in progress. You can stop or pause the recording by tapping on the More icon, and your videos are going to be located in the My Recordings folder that can be accessed from the web browser.
The process of recording a Zoom meeting from an Android phone is similar to the process we just described. Once a Zoom meeting has started you should tap on the More icon and choose the Record option. Tap on the same icon whenever you want to stop or pause a recording session and go to the My Recordings folder to preview the video you made.
Check more Video Screen Recorders for iPhone & iPad
How to Record Zoom Meetings to the Cloud?
Licensed users of Pro, Business, and Enterprise accounts can record their meetings and store them on the cloud. Zoom also offers several different recording layouts such as Active Speaker, Gallery View or Shared Screen, which enables you to choose the one that best fits your current needs.
However, the cloud storage capacity is limited to just 1GB or 0.5GB for most subscription plans and you must make an additional purchase if you want to have more storage space. The Cloud recording option may be disabled by default, so if you want to enable it on your account, in a group you created or for end-users you must go through the following steps.
Sign in to your account as an admin that has the permission to change the account settings, and click on the Account Management option in the navigation panel. Go to Account Settings, open the Recording tab and switch on the Cloud Recording feature. Optionally, you can turn off the Cloud Recording Downloads option if you don’t want anyone to download your videos.
In case you would like to turn on the Cloud Recording feature in a group you created, you should click on the User Management menu and then choose the Group Management option. Find the group in which you would like to enable this option, click on it and then click on the Settings button. Go to the Record tab and switch on the Cloud Recording feature.
End-users can activate Cloud Recording by clicking on the Settings button in the navigation panel and opening the Recording tab. Afterward, you should just turn on the Cloud Recording option and confirm the changes you’ve made.
Zoom allows you to customize the Cloud Recording settings once you enable the option so that you can choose a recording layout, decide if you want to record just audio or save the chat messages from a meeting. Furthermore, you can transcribe audio recordings automatically, add timestamps to video recordings or opt to display the names of participants in the recording.
When ready you should start a new meeting, but keep in mind that only hosts and co-hosts can start a new cloud recording session. Click on the Record button and choose the Record to the Cloud option from the drop-down menu.
You can click on the Stop or Pause buttons if you want to stop recording a meeting at any point, while recording is going to stop automatically after a Zoom meeting ends. Zoom will start processing your video as soon as a recording session ends, and the app is going to send you an email notification once your video becomes available.
Frequently Asked Questions about Zoom Meeting Recording
Understanding how Zoom’s video recording features work may take you some time, although this process of recording Zoom meeting is rather simple for the most part. Here are some of the most common issues that trouble Zoom’s users.
1. Why can’t I record during a Zoom meeting?
Participants in Zoom meetings can only access the Recording feature if a host gives them permission. So, if you can’t see the Record button in Zoom’s toolbar that means that you don’t have permission to record a meeting. However, you can use some third-party Zoom Meeting Recorders like DemoCreator to capture your computer’s screen and record a Zoom meeting.
Click on the Record drop-down menu after you launch DemoCreator and create a new project. Choose the Record Screen option and then proceed to adjust the settings for your screen capturing session. The video editor allows you to choose a frame rate, select the quality of the recording and specify the period of time after which the software is going to stop recording automatically.
Moreover, you can designate the area of the screen that is going to be recorded, change the resolution of the video and select if you want to record computer audio, microphone audio or both. In addition, DemoCreator lets you change the destination folder in which your screen recording is going to be saved. After a screen capturing session is over, the video file you created is going to be imported into the editor where you can edit it before exporting the recording.
Below is a video tutorial about how to record Screen with DemoCreator. Download this screen recorder & video editor to have a try.
 Secure Download
 Secure Download
Keep in mind that recording Zoom meetings without the host’s permission is not advisable, and you should consult with the host before using DemoCreator or any other third party app to record a Zoom meeting. If you're looking for some free solution to record Zoom Meetings on Windows/Mac/iOS and Android, please check our picks of the best free Zoom Meeting Recorders List.
2. How to provide permission to record meetings with participants?
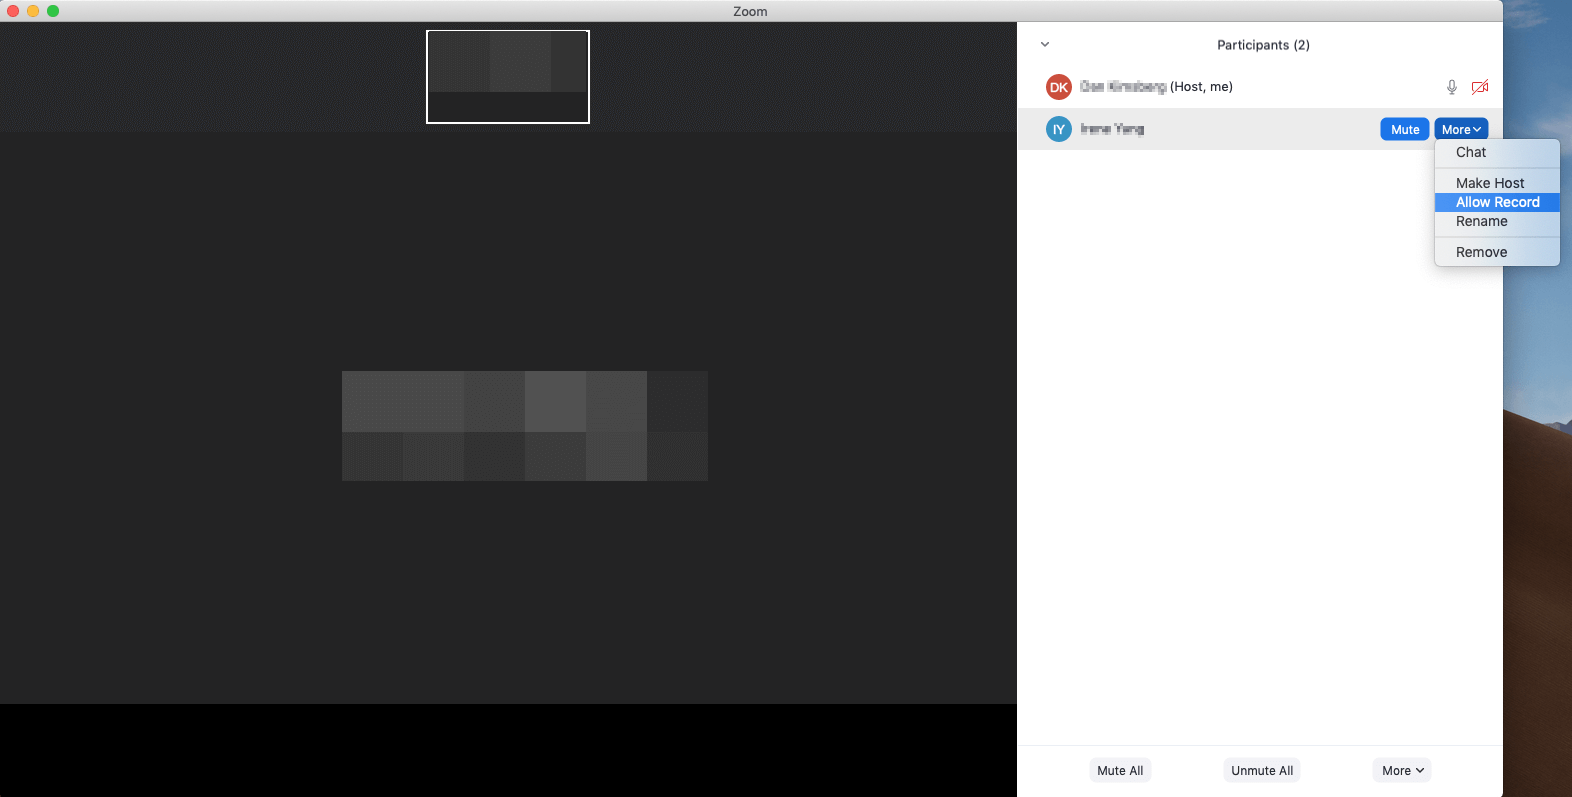
A host can grant permission to record a meeting to any participant in just a few clicks. While the meeting is in progress, you should click on the Manage Participants icon in the Zoom’s Meeting toolbar and then browse through the list of participants. Once you find a participant to whom you want to grant permission to record a meeting, you should simply hover over their name until you see the Unmute and More buttons. Click on the More button and select the Allow Record option from the menu.
Moreover, hosts of Zoom meetings can record a separate audio file for each of the participants. You can enable this feature by clicking on Settings after you sign in to your account, and opening the Recording tab. Simply click on the checkbox next to the Record a separate file for each participant to enable it.
3. Where are the recordings of the meetings stored?
Zoom users who decide to record their meetings locally can find their videos in the destination folder they specified. In case you were using Zoom’s Cloud Recording feature you can view all of your files by clicking on the Meetings icon and opening the Recorded tab.
As we already noted in this article, the videos recorded from iPhones and Android phones are going to be available in the My Recordings folder that can be accessed via the Zoom web client.
4. What are the most common file formats of Zoom meeting recordings?
Zoom can only record videos in MP4 file format, which means that all meeting recordings you make with this video conferencing software is going to be saved in this file format. The audio files recorded with Zoom are going to be saved in M4A format, while text files are saved in the standard TXT file format.


