DemoCreator User Guide
How to use Wondershare DemoCreator? Learn the step by step guide below
DemoCreator User Guide
-
Drawing Tools
-
Install & Uninstall Extension
-
Record Browser Tab
-
Get Started
-
Video Recorder
-
Video Presentation
-
Video Editing
- Import Media
- Basic Video Editing
- PIP (Picture in Picture) Mode
- Transition Effects
- Annotation
- Caption (New Auto-Caption)
- Stickers
- Filters
- AI Text-to-Speech
- AI Object Remover
- AI Vocal Remover
- AI Voice Changer
- AI Beauty Filter
- DemoCreator Templates
- Brand Kits
- Thumbnail Maker
- AI Text-Based Editing
- AI Clips Generator
-
Audio Edit
-
DemoCreator Effects
-
Export & Share
-
Keyboard Shortcuts - Windows
DemoAir User Guide
-
DemoCreator Cloud Service - Get Started
-
Video Creation Mode
-
Export&Share
FAQs
Recording Plug-In (DemoCreator Spark)
Wondershare DemoCreator has recently introduced its dedicated recording plug-in DemoCreator Spark for influencing ease and accessibility for users looking to perform quick screen recording and screen clipping. Whether it is a tool you want to screen record or a presentation you are looking forward to presenting to the jury, it is possible with this recording plug-in offered by DemoCreator.
Following this, you can take a quick screenshot of any screen to send it to your colleague or friend. This guide will cover the functions of this new recording plug-in and will be directing users on how to utilize it properly.
Index
1. Recording Plug-ins as Standalone Processes
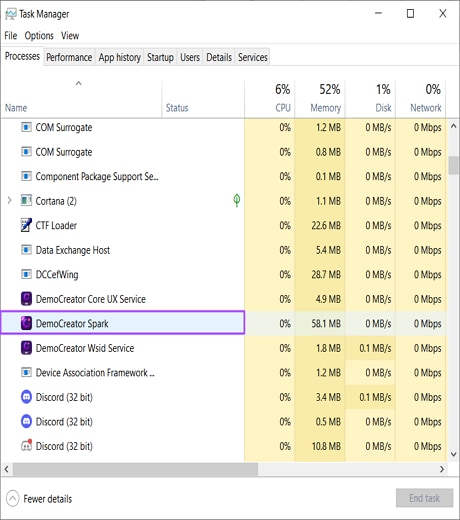
The recording plug-in offered by Wondershare DemoCreator is installed alongside the software. However, after installation, it can be dealt with separately and is not affected if you ever consider uninstalling DemoCreator from your computer. You can also observe the separate plug-in process by opening it across the Task Manager and observing the process running separately.
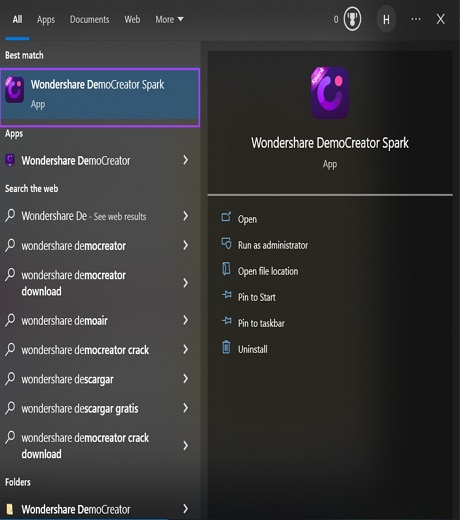
If you intend to start the recording plug-in separately on your computer, continue to open the Start Menu by clicking on the menu bar provided on the taskbar. Type “Wondershare DemoCreator” and observe the option of “Wondershare DemoCreator Spark” appearing on the window.
2. Separation of Screen Recording and Screenshot Function Entrances
The previous version of the recording plug-in by Wondershare DemoCreator provided the screen recording and screenshot function under the same toolbar. In contrast, the new version has a separate entrance for screen recording and screenshot functions. While directed into a new toolbar, you can utilize the connected features coherently for the specific function.
Step 1: As you access the recording plug-in on the side of your computer’s window, you can select the left option to initiate the screen recording function. Conversely, select the other button to start the screenshot function.

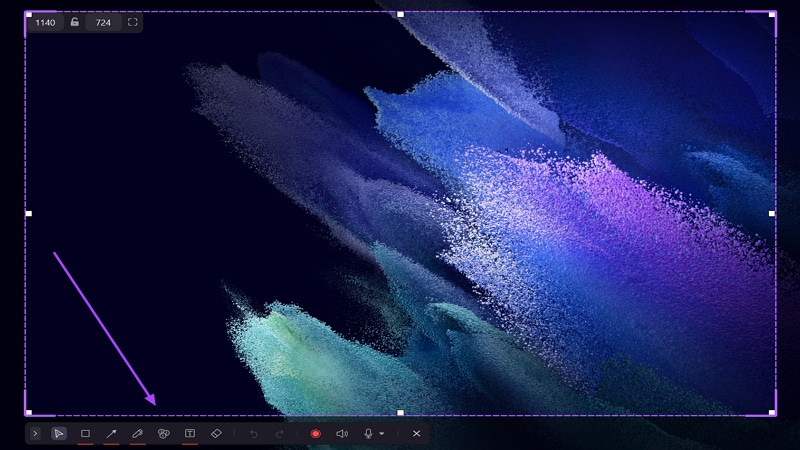
Step 2: On selecting the “Screen Recording” button, you will be navigated into selecting the screen that you want to record. Using your mouse, stretch across the screen to be recorded.

Step 3: After selecting the screen, a solid window will be present on your front with a toolbar appearing adjacent to it. With the added options of using pens, serial numbers, and erasers within your recordings, you can make them more interactive with the viewers. Set up the sound and microphone settings for your recording as per requirement, and tap on the "Record" button to start the process.
Step 4: Conversely, if you are going to take a screenshot of your screen, select the specific option and continue to select the screen that you want to capture. After that, as you are directed to the next screen to define some settings for the screenshot, you can add shapes, use the pen, add serial numbers and text, and erase content easily.
Use the "Save" button on the toolbar to save the screenshot on your computer. You can also perform advanced functions like adding mosaic on the screenshot and copying it to the clipboard.

3. Optimized Recording Plug-In Novice Guide
For those who are new to this function or using this recording plug-in for the first time after downloading Wondershare DemoCreator on their computer, they will interact with a simple novice guide for using the plug-in.
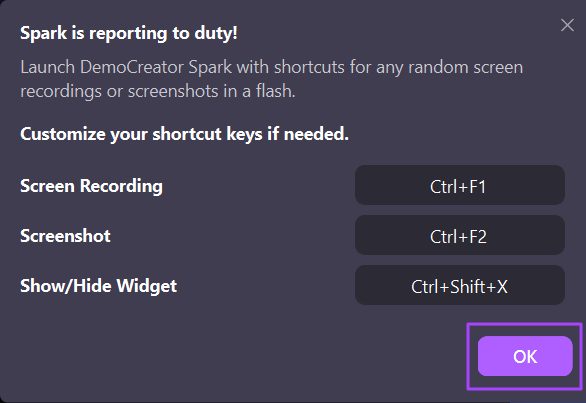
Step 1: As you access the plug-in for the first time, a pop-up appears showing the introduction to the specific tool.
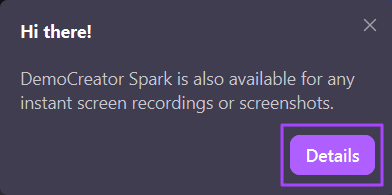
Step 2: On clicking "Details," you will be directed to another pop-up window where you can define the recording shortcut keys. To conclude the guide, click "OK" to close the pop-ups.
4. Other Tips
A few other optimizations have been targeted across the Wondershare DemoCreator recording plug-in. Following are the optimized features of the recording plug-in that you can enjoy.
4.1 Addition of Bootstrap Buttons in Plug-ins
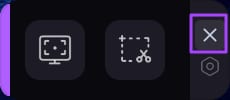
You can easily hide the recording plug-in from your computer screen using the "x" icon present adjacent to the pop-up. This removes it from the computer screen but does not close it down.
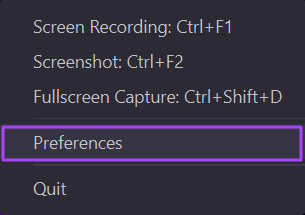
To open the plug-in on your computer’s screen again, access the “Wondershare DemoCreator Spark” icon from the taskbar and right-click to select the option of “Preferences” from the menu that pops up.
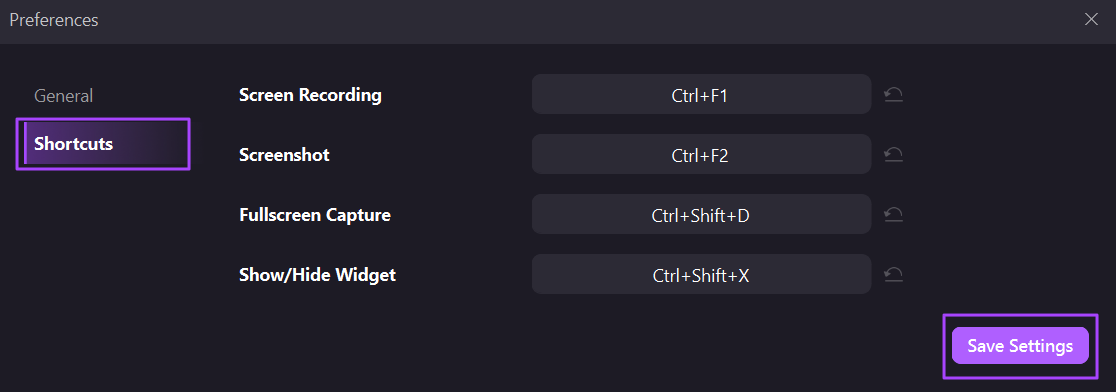
Continue to checkmark the option of “Show widget (recording shortcuts still work) from the “General” section. Proceed to click “Save Settings” to execute the selected functions.

4.2 Addition of Undo/Redo Shortcut Keys (Ctrl+Z/Ctrl+Y) for Drawing Tools
You can also find "Undo" and "Redo" buttons on the screen recording or screenshot toolbar. This can help you easily revert to a situation without tampering with the recording screen. You can also utilize the shortcut keys of CTRL + Z or CTRL + Y to execute the respective functions.

4.3 Box Menu Optimization
Whenever you select a particular screen for recording or take a screenshot of it, a box menu helps you select the region. The new updated version of the recording plug-in allows you to cancel the frame selection with the right-click of your mouse.
4.4 Shortcut Key Optimization
The shortcut key section of the recording plug-in is also optimized after the significant update. As you access the “Preferences” settings of your tool, lead into the “Shortcuts’ section and observe the shortcut keys available. You can also change the shortcut keys if needed. If done, click the “Save Settings” button to change and optimize the settings.
4.5 Plug-in Upgrades
There are a few plug-in upgrades that have come along with this newly updated version. After downloading and installing it for the first time, you can download it independently for overwriting and installing the new plug-in version. Any upgrade that accommodates DemoCreator only accommodates it; the plug-in is not updated. If you own an old version of DemoCreator with a non-independent plug-in, you can update it by installing the latest DemoCreator version on your computer again.

