"Can I record a stream on my Mac?" Sure! In this fast-paced world, people might be busy at work and cannot watch the live streaming. If you don't want to miss a single moment from the stream, you can use a screen recorder to capture the whole moment for later watching.
To save you time, we have picked some tools to record a stream on Mac and give you a step-by-step guide each. Let's dive in.
In this article
Way 1: Use Streaming Recording Software: Wondershare DemoCreator
As a famous all-in-one screen recording and video editing software, when it comes to recording streaming videos, what comes to our mind first is Wondershare DemoCreator. It is an exceptional free offline tool that comes with several exciting features, including video/image editing, live video recording, and audio recording features. Using this software, you can instantly capture, customize, and share videos and images for personal or commercial purposes.
Key Features:
- 6 different screen recording modes to meet all requirements: This exceptional tool allows you to record everything present on your screen and even allows you to add webcam footage. You can also record live TV on Mac and Windows devices.
- Offers several types of annotation tools: It even allows you to add annotation tools within your recorded video so you can add shapes, arrows, and text, which eventually allows you to emphasize essential points.
- Advanced Video Editing features: It offers various types of video editing tools, which you can use to add stickers, remove watermarks, blur backgrounds, and even add mosaic effects within a video or image.
How to Record a Live Stream on a Mac Using DemoCreator?
- First, download and install Wondershare Democreator on your Mac device.
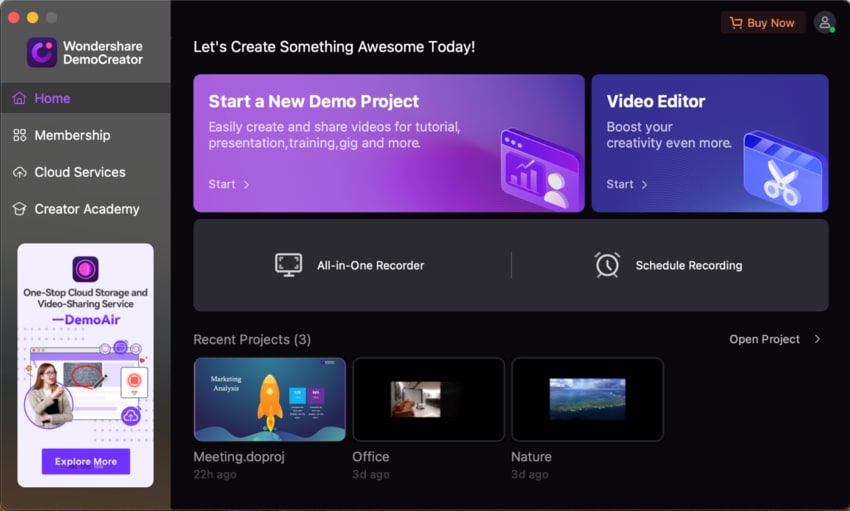
- Open the software and click on the "All-in-One Recorder" option.

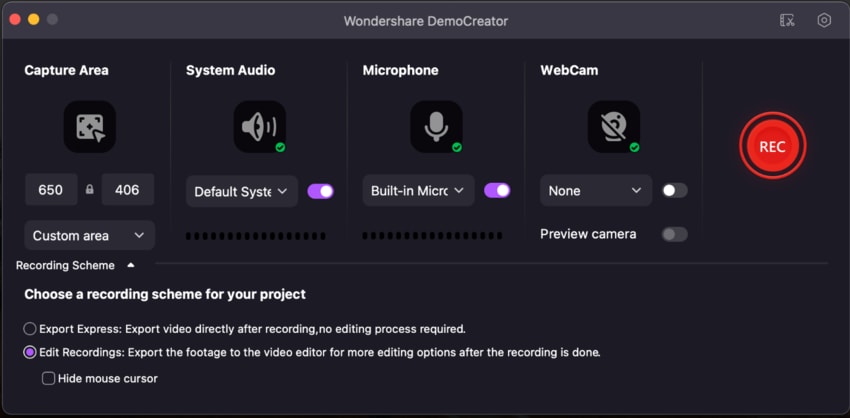
- Customize your recording settings.

- Either select the "Export Express" option or "Edit Recording" option as per your preference.

- After choosing the preferable option, click on the red "REC" button to start recording the live stream.

- Press Option+Command+2 or the Stop button to end the recording and export it. However, if you have chosen the "Edit Recording" option, you can continue editing after capturing the complete video.

Way 2: Record a Live Stream with a Built-in Streaming Video Recorder on a Mac
As a built-in streaming video recorder on Mac devices, QuickTime is a powerful tool if you don't need post-recording editing. Here are the steps to use QuickTime player to record a live stream:
- First, you need to go to the QuickTime Player application, and choose "File," and then click on the "New Screen Recording" option.

 Note: If you want to record streaming video on a Mac with audio, click on the small icon next to the record button and select the appropriate Microphone source.
 - After clicking on the "New Screen Recording" option, start the livestream video that you want to record.

- In this step, you need to choose whether you want to record your complete screen or a portion of the Macbook screen and finally click on the "Record" button to record a live stream on Mac.

- Finally, to stop the screen recording, you can either go to QuickTime's menu bar at the top and click on the black recording icon, or you can press "Command+Control+Escape" on the keyboard.

Way 3: Record a Live Stream on a Mac Using Hotkeys
Do you know that you can also use hotkeys to record a live stream on Mac? Let's see how it works today.
- First and foremost, you need to start the live stream that you want to record.
- Then press the Shift+Command+5 keys on the keyboard.

- Choose whether you want to record your complete screen or a portion of the Macbook screen.

- Click on the "Options" button, and from the "Save To" option, select the folder where you want to save the recorded video.

- Finally, click on the "Record" button to capture streaming video on Mac. Once the recording is finished, press the keys Command + Control + Escape to stop the recording procedure.

Way 4: Record a Livestream on Mac with Browser Extension
- Firstly, install the Loom app on your Mac device. After installing, open the app on your Mac device by clicking on the Loom option present at the top half of the screen.

- Log in with your details to utilize the Loom app.

- After logging in, select your recording and choose which livestream you want to record.
 Note: You can select the "Screen" option to record whatever is present on the screen. However, if you want to record whatever is on the screen along with webcam footage, select the "Screen+Cam" option. You can also choose the "Cam Only" option to record your webcam footage only.
 - Finally, click on the "Start Recording" option to record a live stream on Mac.

- After completing the recording, click on the red square button to stop recording.

- As soon as you stop the recording procedure, you will be directed to a webpage where you can preview the recorded video and even copy the link of your video, which you can share with other people and on different social media platforms.

Way 5: Record a Livestream with a Free Online Screen Recorder
Free Online Recorder is an online platform that allows you to record a Livestream on Mac devices. This platform has an intuitive and clean user interface so you can instantly start recording a YouTube live stream with the help of a few simple steps.
This is a fully secured website where you will not come across any annoying advertisements. Moreover, this website will also allow you to record anything present on your computer screen along with audio if you enable the Microphone icon.
- First and foremost, you need to visit the screen capture website:

- In this step, if you want to record the webcam and the microphone sound, click on the respective checkbox and select both options.

- After selecting the microphone and the webcam option, before clicking on the "Start Recording" option, start the livestream that you want to record.
 Note: By selecting the microphone option, you can record streaming video on a Mac with audio.
 - Click on the "Start Recording" button and eventually select the option "Entire Screen," "Window," or "Browser Tab."

- Share your webcam and microphone details with the website.

- Whenever you want to stop the recording process, you need to click on the green "Stop Recording" button.

- Download the screen recording to your Mac device.

Conclusion
In this informative article, we have shown you six different methods to record streaming video on Mac devices. In the six methods, you will come across an offline software Wondershare DemoCreator, an inbuilt streaming video recorder like QuickTime Player. Moreover, we have also used hotkeys and browser extensions to record live streams on Mac.
At the end, we have also discussed how to record streaming video on a Mac using a free online screen recorder. Now, go through all the methods thoroughly and effortlessly record the live streams.


