

I would like to use iMac's camera to record a short video of myself simply talking- EddieZW on Apple Forum.
This is one example of how Apple users are interested in using their iMac or MacBook cameras to record videos of themselves talking or making simple tutorials.
Whether you're an educator trying to create lectures for your students or a business person looking to make your presentations more engaging, you'll be pleased to learn you can record yourself on Macs with multiple apps.
How do you record yourself on a Macbook or iMac, you ask? Don't worry. This guide will teach you how to record a video of yourself on a Mac using six popular methods.
| Method | Effectiveness | Ease of Use |
| DemoCreator | 👍 High - Professional screen recorder that lets you create effortless screen, webcam, and audio recordings and enhance them in the built-in video editor. | 👍 High |
| QuickTime Player | Low - While you can record yourself on a Mac with QuickTime, it's primarily a media player for Macs that can only capture mic audio during a webcam recording. To record system audio with QuickTime, you must install a third-party plugin - Soundflower. | High |
| Photo Booth | Low - Although Photo Booth will let you record yourself on a Mac, as its name suggests, it's more of a photo app than a webcam recorder for Mac. | Medium |
| iMovie | Medium - iMovie can help you record yourself on a Mac, but it's more of a video editing tool than a recording app. | High |
| Online (DemoAir) | High - You can record webcam on a Mac straight from the browser without downloading any apps. | Medium |
| Via iPhone or iPad | Low - Apple's Continuity Camera can help you record a video of yourself on a Mac. However, it only works with newer iPhones/iPads running iOS 16 and Macs running macOS 13 or higher. | Medium |
How To Record Yourself on Mac With DemoCreator
With the ability to record Mac's screen, system sounds, and mic audio alongside webcam recordings, DemoCreator is the best tool for recording yourself on Macbooks. It seamlessly works on any Mac made in the last decade, regardless of the OS version, as it's supported by both Intel and Apple Silicon chips.
The app also has a beginner-friendly interface, efficient keyboard shortcuts for recording yourself on a Mac, and a built-in video editor for enhancing the recordings with AI-powered features. Using any aspect of the tool is a breeze, and here's a quick guide on how to record yourself on Mac with DemoCreator:
- Download, install, and launch DemoCreator on your Mac and select the All-in-One Recorder.

- Enable WebCam recording and set it to use Mac's built-in FaceTime HD Camera. Alternatively, use a third-party webcam if you have one.

- Turn on System Audio and Microphone recording and adjust their settings to record these elements alongside a webcam recording. Of course, you can also turn these off to create a simple webcam recording on Mac with no audio and add sound later.
- Under Capture Area, select the Don't record screen option to record only yourself. You can also turn it on and choose a resolution, a window, or a specific area to create a simultaneous webcam and screen recording.
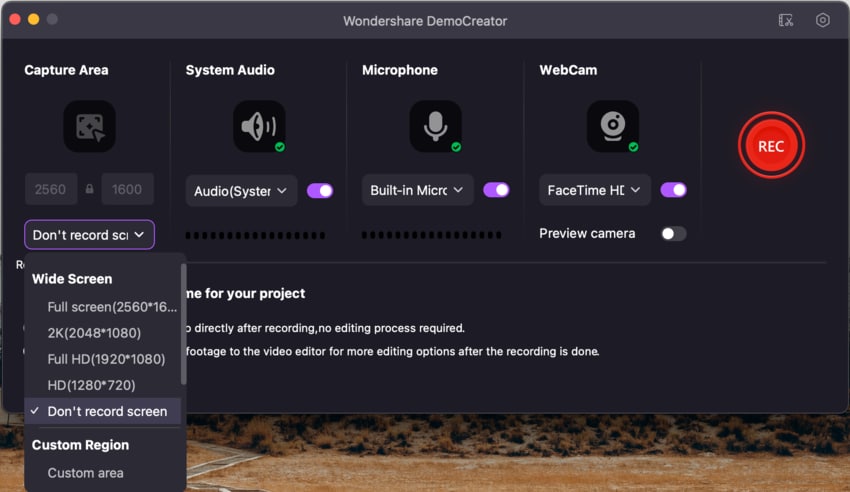
- When ready, tap the red REC button or hit the OPTION + COMMAND + 2 keys. You can learn the keys to record yourself on a Mac with DemoCreator. Press these keys again to pause or resume the recording.
- Click the End button or tap SHIFT + COMMAND + 2. to stop recording yourself on a Mac.
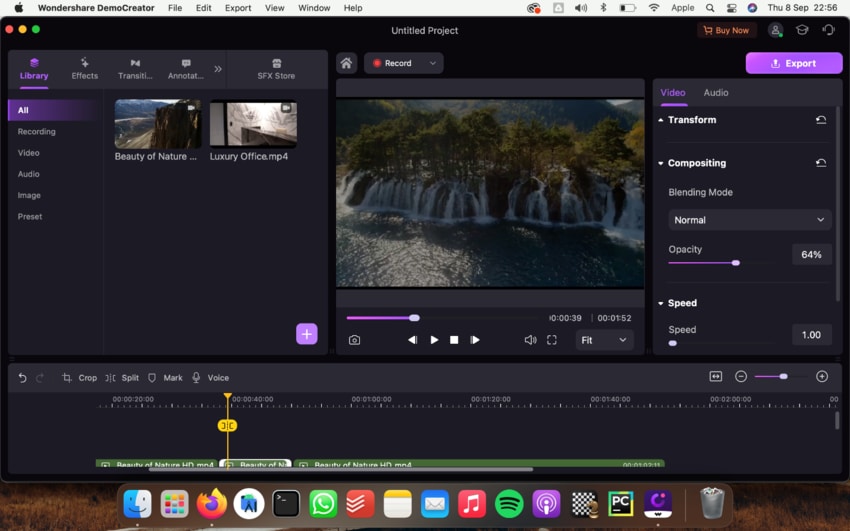
Depending on whether you've chosen Export Express or Edit Recordings settings under the Recording Scheme, DemoCreator will either save your webcam recording to Mac computer or import it into its built-in video editor and let you apply dozens of effects with AI-powered tools and ease. For example, you can cut and remove unwanted clips, use the Auto Subtitles feature to generate subtitles automatically for your recording, and remove background noise using AI Denoise if the recording environment is not that quiet.
How To Record Yourself on Mac With QuickTime Player
If you're wondering, "How can I record myself on my Mac with a built-in tool?" or you'd like to avoid third-party apps for any reason, Apple's included QuickTime Player is a terrific option. Here's a quick guide on how to record yourself on Macbooks with QuickTime Player:
- Head to Applications and open QuickTime Player.
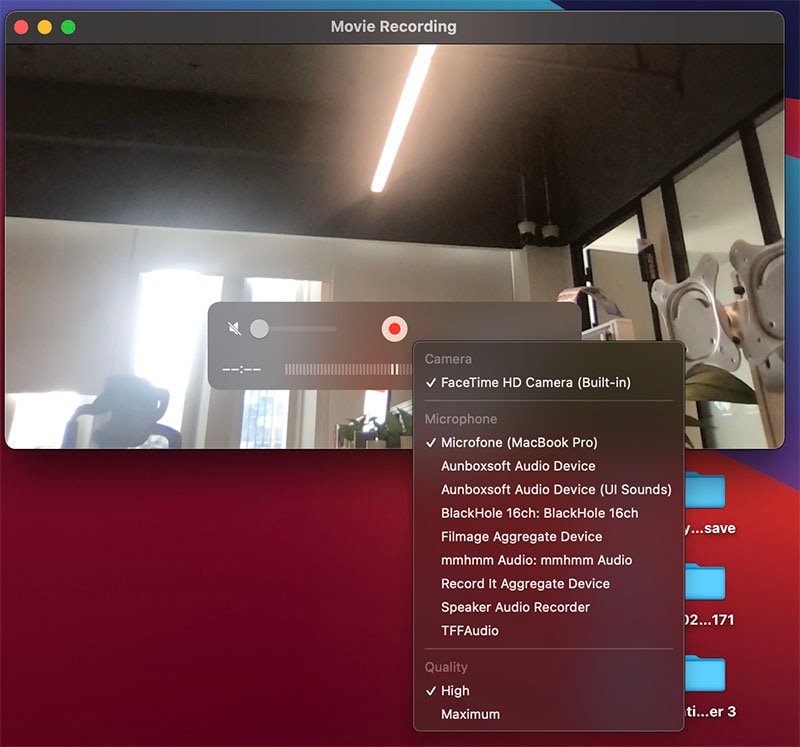
- Navigate to File > New Movie Recording.

- You should see the FaceTime webcam appear on the screen. Adjust the volume, tap the Arrow button for options. When you are ready, hit the red Record button to record yourself on a Mac immediately.
Now that you've seen how to record yourself on a Mac with an included tool, it's important to note that QuickTime Player isn't the only built-in app for recording yourself on Macs.
How To Record Yourself on Mac With the Photo Booth
Initially launched with Mac OS X Tiger in 2005, Photo Booth is an old macOS and iOS app that primarily does precisely what its name suggests - takes pictures. However, it can also record videos with your webcam on Mac, so here's a quick guide on how to record yourself on Macbooks with Photo Booth:
- Launch Photo Booth from the Applications folder.
- Switch from Camera Mode to Recording Mode in the bottom left corner.

- Tap the red Video button in the center, wait for the countdown, and start recording yourself on Mac with Photo Booth.

- When ready, click the red Stop button in the center to end the webcam recording.

- Once finished, you can drag and drop the recording from the Photo Booth app's preview window onto the desktop.

How To Record Yourself on Mac With iMovie
Although iMovie is primarily a simple built-in video editor for Macs, Apple users can record videos of themselves with this app by starting a new editing project. Here's how you can do that:
- Open the iMovie app through the Mac's Applications folder.
- Select My Movie in the Project Media section and tap the Import button.

- Select FaceTime HD Camera under Cameras in the top left corner.

- Press the Record button in the middle when your webcam preview shows up.
- Tap the same button again to stop recording yourself on a Mac.
With iMovie, your Mac webcam recordings are automatically imported into a folder chosen in the Import To menu. Of course, you can change it before you start recording.
How To Record a Video of Yourself on Mac Online
If you're looking for an online tool to record yourself on a Mac, DemoCreator's little cousin, DemoAir, is a fantastic option. Here's a simple guide on how to record yourself on Mac with DemoAir:
- Launch Chrome and head to DemoAir's home page.
- Tap the Online Video Recorder option.

- Follow the instructions to authorize DemoAir to access your camera and microphone, and choose the Webcam Only mode.

- Select your Mac's camera and microphone in the Recording Inputs field and tap the Start Recording button.
- Once done, click the Stop button and save your webcam recording as a WebM video.
You can also close the download window since you'll be taken to DemoAir's online Video Editor, where you can rename your screen recording, trim it, delete it, share it via links or YouTube, upload it to business tools like GitHub and Jira, and download it as MP4 or WebM.
How To Film Yourself on Mac With iPhone or iPad
If your Mac is running macOS 13 or newer and you have an iPhone or iPad with iOS 16, you can also use your mobile device's vastly superior camera instead of your Mac's built-in one. Here's how:
- Ensure you're signed in to all devices with the same Apple ID.
- Enable Wi-Fi and Bluetooth on both Mac and iPhone or iPad.
- Mount your mobile device or point it towards you.
- Launch FaceTime, QuickTime Player, or Photo Booth on your Mac. (We're using FaceTime for this example.)
- Your iPhone's camera should be recognized and opened automatically, but if it isn't, head to Video and select iPhone Camera.

- Follow the app's steps to record a video.
Tips for Recording Yourself on Mac
Besides including six different methods for recording yourself on a Mac, we've also decided to share some tips for creating better webcam recordings. They include the following:
- Film in a Well-Lit Environment - Whenever possible, use rooms with a lot of natural light when recording yourself on a Mac. After all, your Mac's built-in camera isn't that good, and you will benefit from filming in well-lit conditions.
- Set up a Light Source - Whether you use your Mac's built-in camera or iPhone/iPad through Continuity Camera, your recordings will appear much better if you have a light or a reflective surface pointed at you.
- Declutter the Space Behind You - The room you're in plays a pivotal role in making your recordings appear professional, so it's best to have a clean background behind you.
- Place the Camera at Eye Level - Framing yourself well and appearing natural is best achieved by keeping the Mac's camera at eye level. You can prop your device with a stand or some books or clip your iPhone/iPad to the top of your Mac.
By following these tips, your Mac recordings will look and sound better, and you'll appear more professional in your webcam clips.
Edit Your Video Recordings Before Sharing
While recording yourself on a Mac for a simple video tutorial or lecture should be enough for most users, you can achieve a far better effect by editing these webcam recordings before you share them online.
Your Mac's Photo Booth has a few fun filters, and iMovie has decent video editing features. However, if you want to make your webcam recordings more professional and engaging, it would be best to use Wondershare DemoCreator's built-in video editor.
Powered by a high-class AI engine, DemoCreator's video editing features can significantly enhance your webcam recordings, making them unique, stylish, and professional.
- Record desktop screen, audio, and webcam simultaneously
- Various annotation tools to emphasize important points
- Edit videos quickly with a wide range of professional tools
- Export to MP4, MOV, MKV, GIF and multiple formats

Conclusion
Recording yourself on a Mac is a vital feature for any businessperson, educator, or content creator, and this article has provided multiple answers to the question, "How do I video record myself on my Mac?"
You can record yourself on Macbooks and create engaging webcam-powered videos with multiple tools. These include built-in apps like QuickTime Player, Photo Booth, and iMovie, as well as the Continuity Camera feature for iPhones, iPads, and Macs running newer versions of iOS and macOS.
On the online side, Wondershare DemoAir is a viable option if you'd like a tool that doesn't require downloads or installations. However, the top spot undoubtedly goes to Wondershare DemoCreator for its ease of use, accessible keyboard shortcuts, built-in video editor, and the ability to record webcam, screen, mic audio, and system sounds simultaneously.
FAQs About Recording Yourself on Mac
-
How do I record a video of myself on my Mac?
There are many ways to record yourself on Macs. For newer devices, you can use Continuity Camera, while all Macs can use built-in tools, such as QuickTime, PhotoBooth, and iMovie, as well as online tools like DemoAir or a desktop program like DemoCreator. -
How do I record myself and a presentation on Mac?
The best method for recording yourself alongside a presentation on a Mac is with DemoCreator, and here's how:- Open the app and select All-in-One Recorder.
- Enable and adjust the WebCam and Microphone settings.
- Adjust the Capture Area to record the screen with the presentation.
- Tap the red REC button to start recording.
- Press SHIFT + COMMAND + 2. when you want to end the recording.
-
How do I record myself talking on my Mac?
You can create a video recording of yourself talking with a built-in tool - QuickTime Player. Here's how:- Open the QuickTime Player app.
- Head to File > New Movie Recording.
- Adjust the volume and tap the Arrow button to select your microphone.
- Press Record to record yourself talking on your Mac.
- Click the Stop button to end the recording.
-
Can I record myself and my screen on Mac?
Absolutely! The best way to simultaneously capture screens and record yourself on a Mac is with the Wondershare DemoCreator app. Here's how:- Launch the app and click All-in-One Recorder.
- Adjust the Capture Area to record your screen.
- Enable and adjust System Audio, Microphone, and WebCam settings.
- Click the REC button to start recording.
- Hit SHIFT + COMMAND + 2. to end the recording.
-
Can you record yourself on iMovie?
Yes, iMovie is a viable option for learning how to record yourself on a Macbook. The app lets users create a webcam recording with their Mac's built-in FaceTime HD Camera during the import step of a video editing project.


