

In today’s digital age, music lovers often want to save their favorite Spotify tracks for offline listening. If you’re looking to record Spotify on Mac, you’re in the right place. There are many ways to do this, from using specialized software like Wondershare DemoCreator to utilizing built-in Mac tools like QuickTime and GarageBand.
You can even find online solutions that make the process simple and straightforward. This article will guide you through the best methods to record music off Spotify, ensuring you can enjoy your music anytime, anywhere.
In this article
Part 1: How To Record Music Off Spotify on Desktop
Listening to music on Spotify is great, but sometimes, you may want to save your favorite tracks for offline listening. There are several effective methods if you’re looking to record music off Spotify on your Mac.
This article will walk you through the best options, including specialized software like Wondershare DemoCreator and built-in Mac solutions like QuickTime Player and GarageBand. Whether you’re tech-savvy or a beginner, you’ll find a suitable Spotify recorder for Mac that meets your needs.
Wondershare DemoCreator - The Powerful All-in-One Video Recorder and Editor
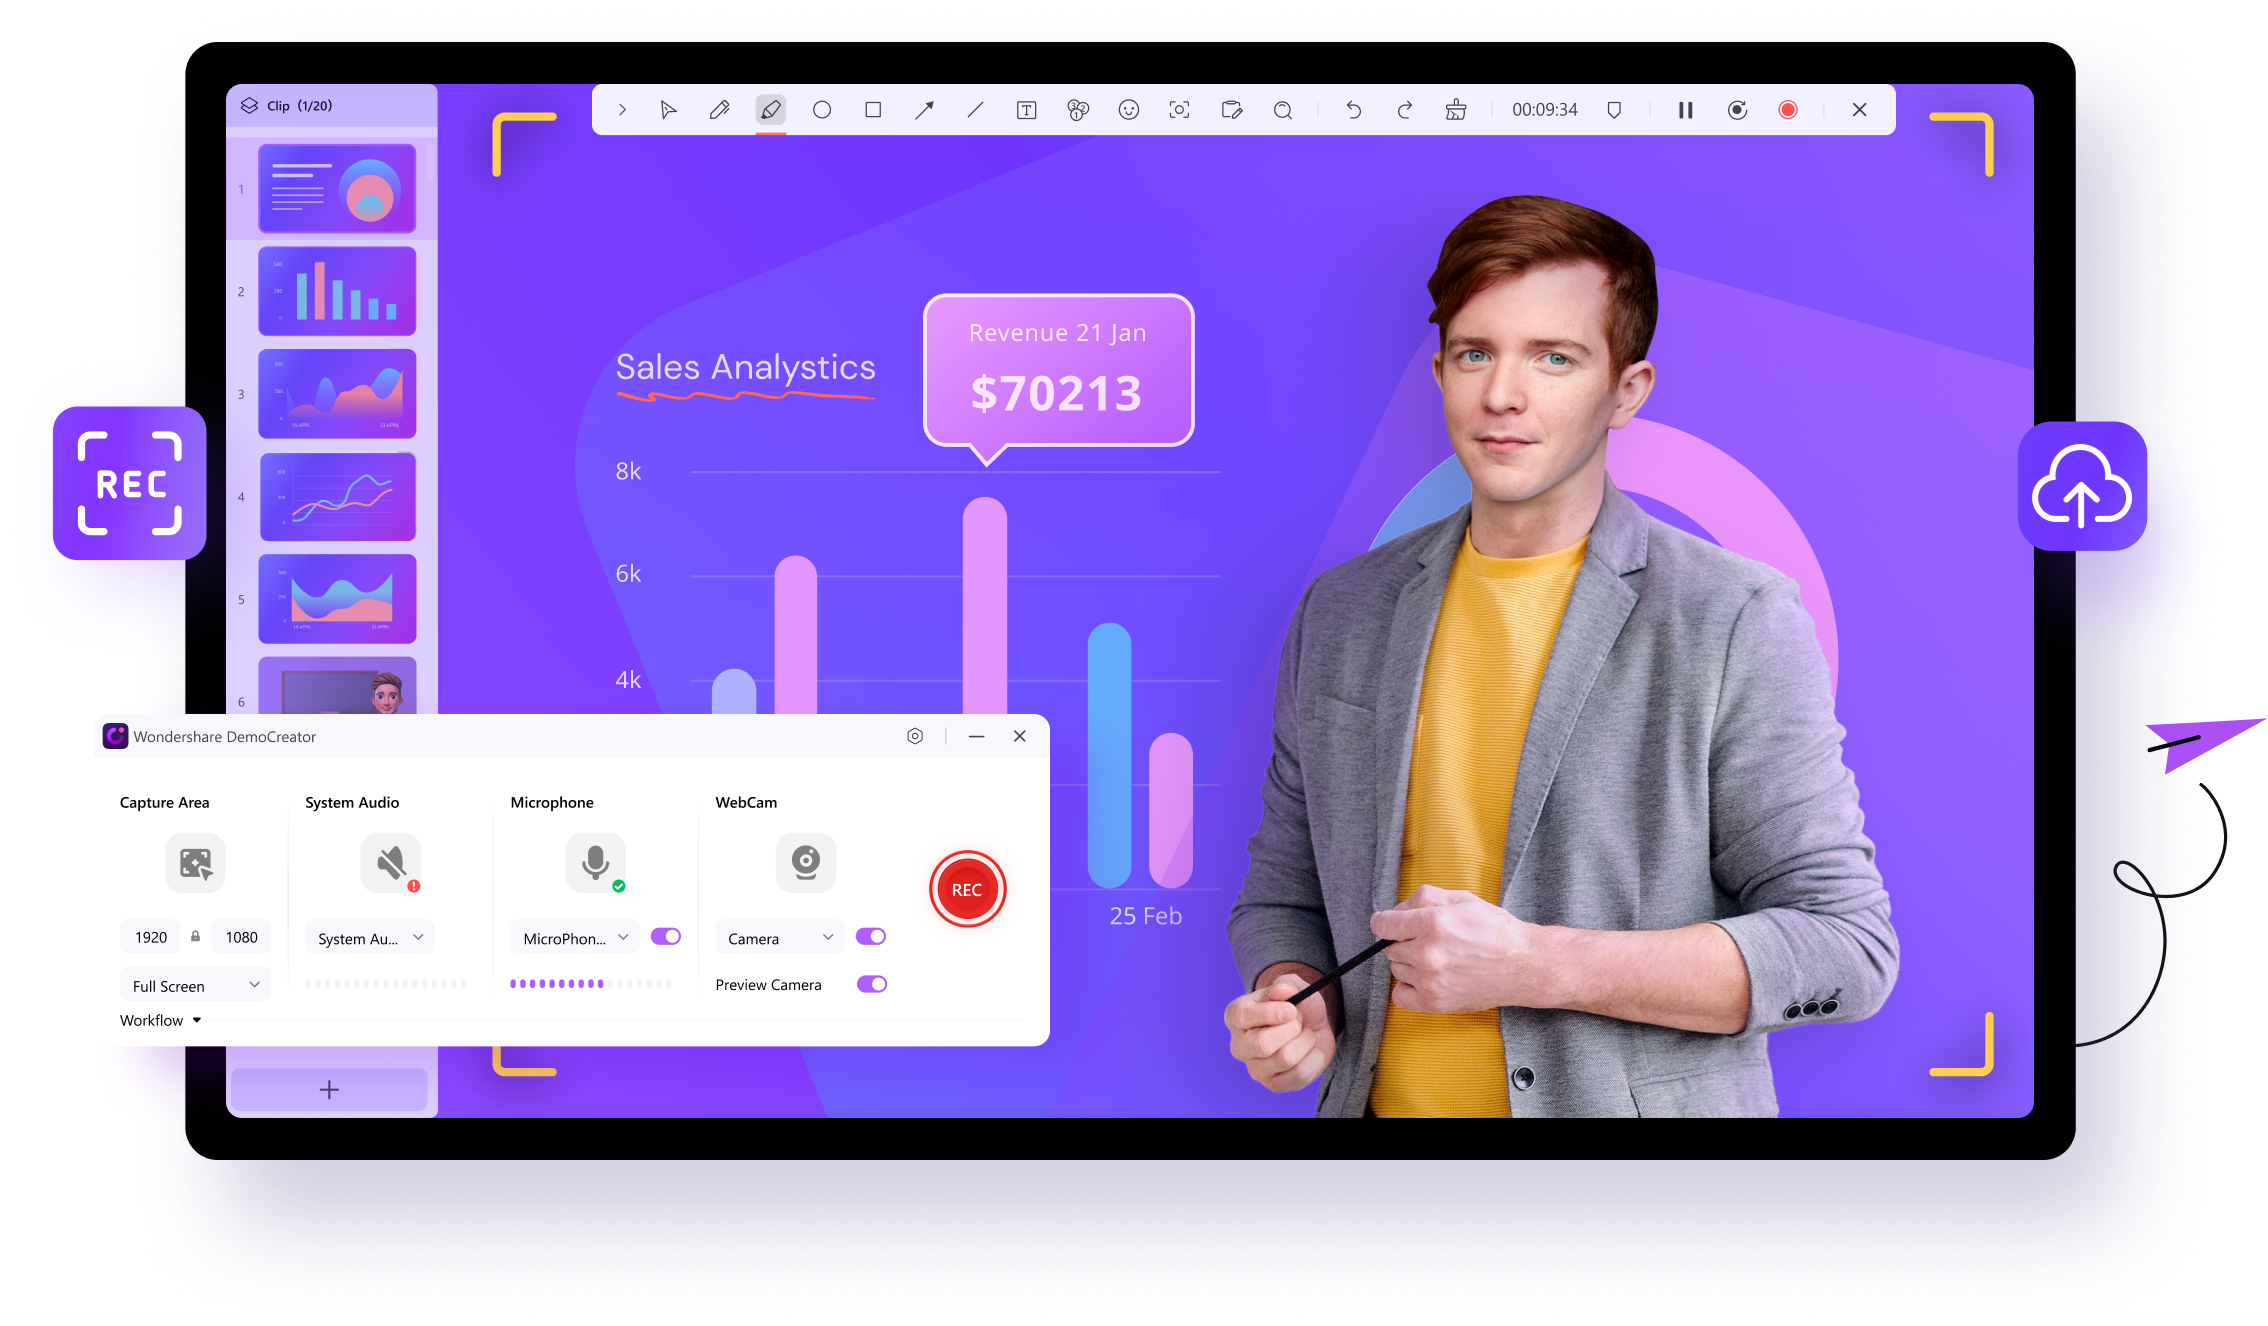
Wondershare DemoCreator is a versatile tool that goes beyond simple video recording. It’s an all-in-one video recorder and editor that is perfect for capturing high-quality audio and video. DemoCreator is designed for professionals and beginners, making it an excellent choice for recording Spotify music on your Mac.

Step-by-Step Guide to Using DemoCreator
Here’s how you can use DemoCreator to record Spotify on your Mac:
Step 1: Visit the Wondershare DemoCreator website and download the software. Follow the installation instructions to set it up on your Mac.
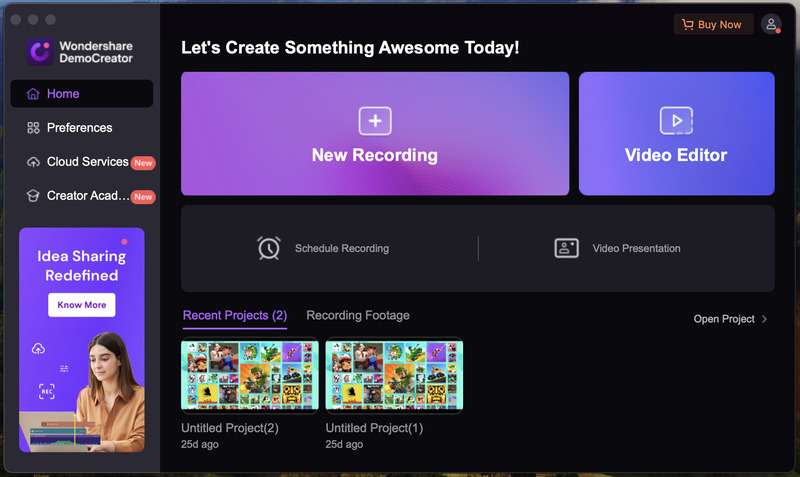
Step 2: Launch Wondershare DemoCreator from your Applications folder, then click the New Recording button.
Step 3: Select the area of the screen you want to record (full screen is recommended for audio recording). Ensure the System Audio option is enabled to capture Spotify music.

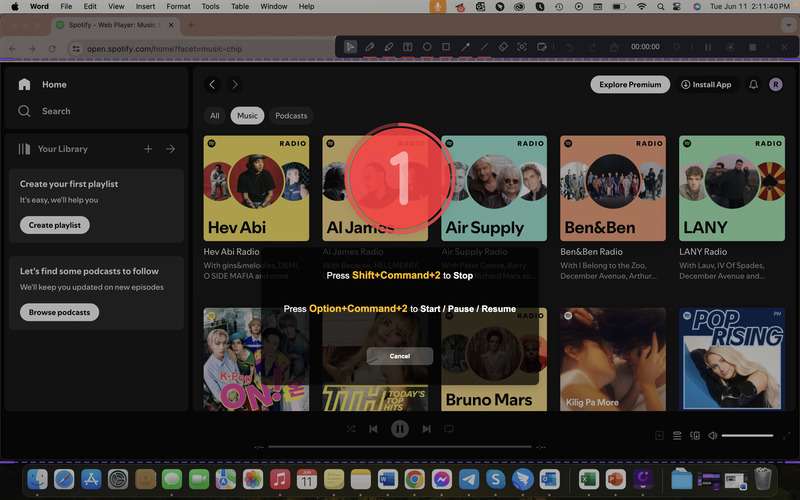
Step 4: Open Spotify and play the music you want to record. Open DemoCreator again and click on the red REC button.
Tip: You may also use “Option+Command+2” to start, pause, or resume your recording.
Step 5: When you are finished with the recording, you can stop it by pressing “Shift+Command+2” key on your keypad. DemoCreator will automatically save your recording, and you can use the built-in editor to make any necessary adjustments.
Pros and Cons of Using Wondershare DemoCreator
Explore the advantages and disadvantages of using Wondershare DemoCreator to record Spotify on your Mac.
| Pros | Cons |
| Comprehensive toolset DemoCreator’s versatility makes it a powerful tool for users who need more than just basic audio recording. High-quality audio recording DemoCreator captures audio with high clarity, ensuring that your Spotify recordings are crisp and free from distortion. User-friendly Interface Despite its advanced features, DemoCreator is designed with an intuitive interface that is easy to navigate. Advanced editing features The built-in editor allows you to trim, cut, add effects, and make other adjustments to enhance the quality of your recordings. Export options DemoCreator provides multiple export options, allowing you to save your recordings in various formats. |
Cost While DemoCreator offers a free trial, full access to its advanced features requires a paid subscription. This might be a drawback for users looking for a completely free solution. Learning curve for advanced features While the basic functions are easy to use, mastering the advanced editing tools can take some time. |
Wondershare DemoCreator is a powerful and versatile tool for recording Spotify on Mac, offering high-quality audio capture and a comprehensive set of editing features. If you need an all-in-one tool that goes beyond basic recording, DemoCreator is an excellent choice!
Built-In Mac Solutions for Recording Spotify
Explore using your Mac’s built-in tools to record music off Spotify. Learn step-by-step methods with QuickTime Player and GarageBand. These built-in applications provide straightforward solutions to capture and edit your favorite Spotify tracks without additional software. These built-in solutions can be very effective, but they may require a bit more setup compared to specialized software like DemoCreator.
Option 1: Using QuickTime Player
Discover how to use QuickTime Player, a built-in Mac application, to record Spotify music effortlessly. This guide gives instructions on how to set up and capture audio, along with the pros and cons of using QuickTime Player to record Spotify tracks.
Step-by-step Guide to Using QuickTime Player
Follow this easy, step-by-step guide to record Spotify music using QuickTime Player on your Mac:
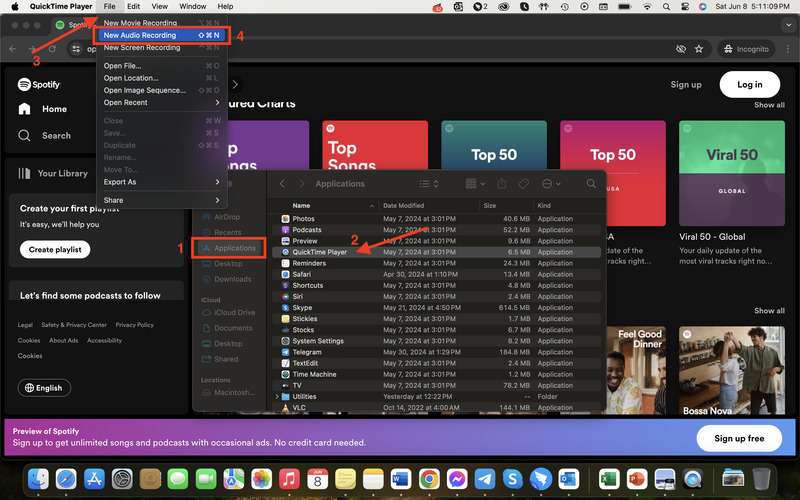
Step 1: Find QuickTime Player in your Applications folder and open it. Then, click File in the menu bar and select New Audio Recording.
Step 2: Click the arrow next to the record button in the audio recording window. Select Speaker Audio Recorder or an external microphone (ensure you have the correct input selected to capture Spotify audio).
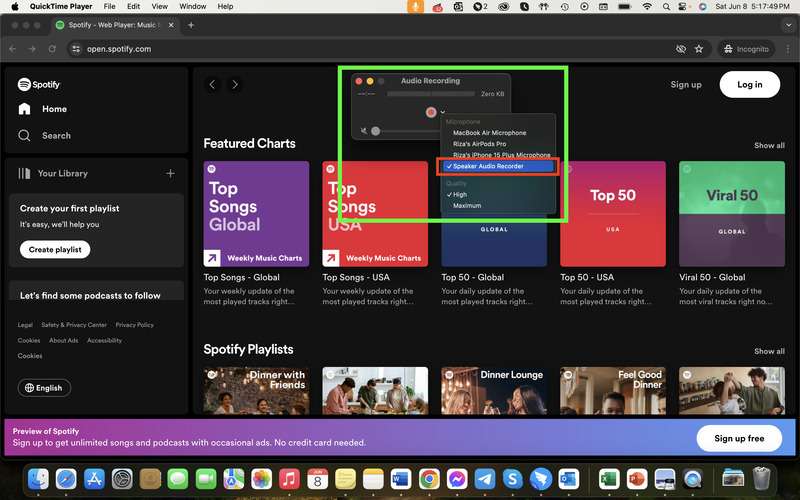
Step 3: Open Spotify and play the music you want to record. Press the “red record” button in QuickTime Player to start recording. When you’re done, click the stop button. Save your recording by clicking File and then Save.
Pros and Cons of Using QuickTime Player
Evaluate the benefits and drawbacks of using QuickTime Player to record Spotify music on your Mac.
| Pros | Cons |
| Built-in and free to use. This makes it readily accessible and convenient. Simple interface. It can be navigated by users with minimal technical skills. QuickTime Player is lightweight and doesn’t consume much of your Mac’s resources. Offers some basic editing functions, such as trimming the start and end of your recordings |
Unlike more comprehensive tools like DemoCreator, QuickTime Player lacks advanced editing features. While QuickTime Player allows you to save recordings, the export options are limited. Limited audio quality. This can result in recordings that are less crisp and clear. It requires you to manually start and stop recordings, which can be less convenient |
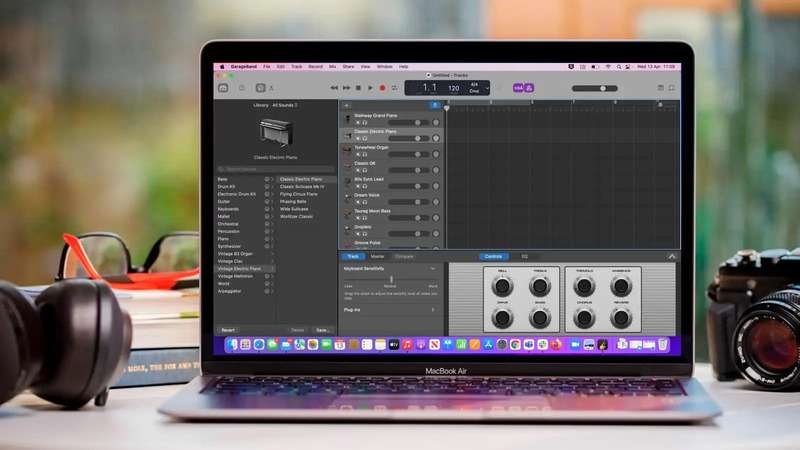
Option 2: Using GarageBand
Learn how to harness the power of GarageBand, a robust built-in Mac application, to record Spotify music. This section provides detailed instructions on setting up GarageBand to capture high-quality audio and tips for editing and exporting your recorded tracks. GarageBand offers advanced features, making it an excellent choice for those who want more control over their recordings.
How to Set Up GarageBand to Record Spotify Music
Discover how to configure GarageBand to record Spotify music on your Mac with this guide below:
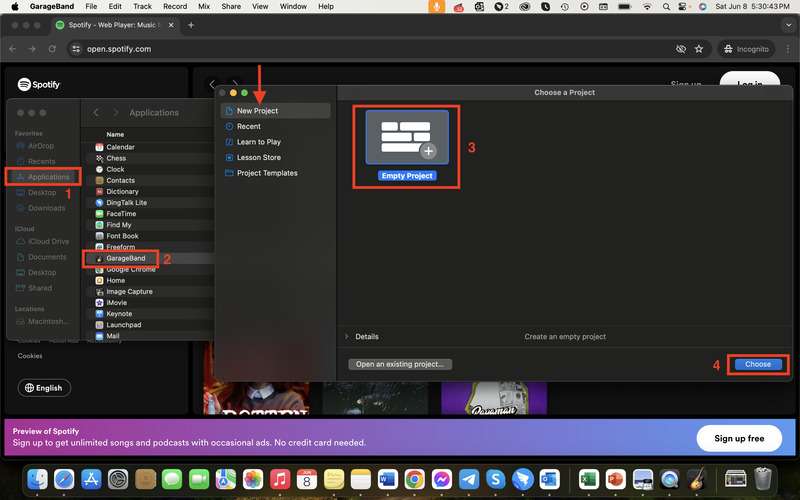
Step 1: Launch GarageBand from your Applications folder. Under the New Project tab, choose Empty Project to start a new recording session, then click Choose.
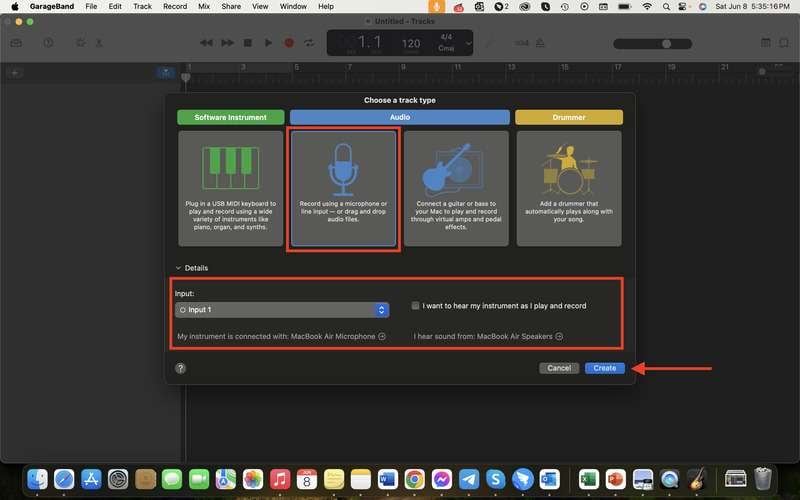
Step 2: Select Audio as your track type. Ensure the correct input device is selected (e.g., Built-in Input or system audio routing). Modify the recording parameters according to your preference, then click Create.
Step 3: Open Spotify and start playing the track you want to record. Click the record button in GarageBand to start recording the audio. Then, you can use GarageBand’s editing tools to trim and enhance your audio. Once done, export your recording by clicking the Save button.
Tip: You may also press the “R” key on your keypad to start the recording.

Pros and Cons of Using GarageBand
This section will help you decide if GarageBand is the right Spotify recorder for mac for your needs.
| Pros | Cons |
| GarageBand offers a comprehensive suite of editing tools to enhance your recorded audio to achieve professional-quality results. As a built-in application on Mac, GarageBand is free and readily available. GarageBand is designed to handle high-quality audio recordings. And despite its advanced capabilities, GarageBand maintains a user-friendly interface. |
The extensive features and options can be overwhelming for new users who just want to record Spotify music quickly. Additional configuration or third-party plugins may be required to capture the audio effectively. GarageBand can be demanding on system resources. Running this application alongside Spotify and other programs may slow down your Mac, particularly if you use an older model. |
Recording Spotify music on your Mac can be straightforward with the right tools. Wondershare DemoCreator stands out as a powerful and versatile Mac Spotify recorder, offering extensive recording and editing features. However, if you prefer built-in Mac solutions, QuickTime Player and GarageBand are excellent alternatives. Choose the method that best fits your needs and enjoy your favorite Spotify tracks offline anytime!
Part 2: Online Solutions To Record Spotify on Mac
If you’re looking for a quick and convenient way to record Spotify on a Mac without installing any software, online solutions like Wondershare DemoAir are a great choice. DemoAir is DemoCreator’s easy-to-use online screen recording tool that allows you to capture high-quality audio and video directly from your browser.
Key Features of DemoAir
DemoAir offers a range of powerful features to enhance your recording experience:
- Browser-based recording. No need to download or install software. Simply use it from your web browser.
- High-quality audio capture. Record clear and crisp audio from Spotify.
- Simple interface. User-friendly design makes it easy for anyone to use.
- Flexible recording options. Record the entire screen or just a specific tab.
- Easy sharing. Quickly share your recordings via a link or download them to your device.
Step-by-Step Instructions for Recording Spotify Using DemoAir
Here’s how you can use DemoAir to record Spotify on your Mac.
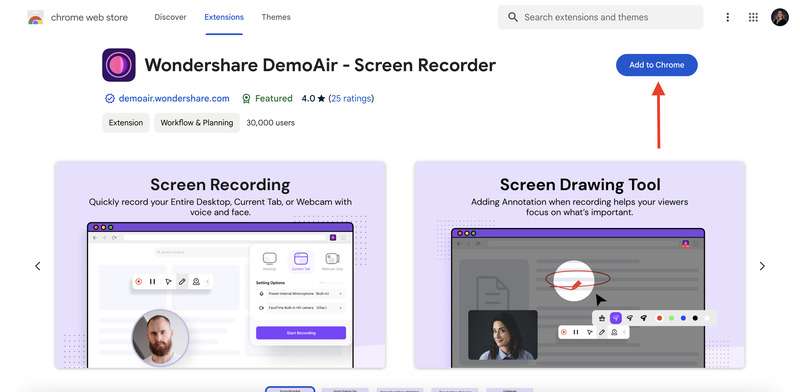
Step 1: Launch the Chrome browser on your Mac and go to the official DemoAir website. Click Add to Chrome from there.

Step 2: The Chrome web store will then direct you to the DemoAir addon. After selecting Add to Chrome, select Add Extension from the pop-up window that displays.
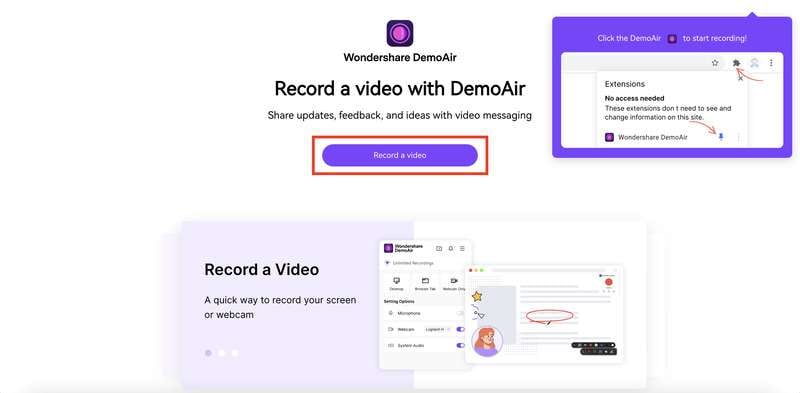
Step 3: A new tab will subsequently open. To begin recording, click Record a video. DemoAir will then prompt you to log into Wondershare. Click Create account if you don’t already have one.
Tip: You can also sign in using an Apple, Google, Facebook, or X (previously Twitter) account.
Step 4: Give DemoAir the permission to use your camera and microphone. After that, configure the parameters for recording. Choose from a Desktop, Current Tab, or Webcam Only recording. To enable or disable Tab Audio and Drawing Tools, click Show Advance Options. After you’ve finished adjusting the recording parameters, click Start Recording.
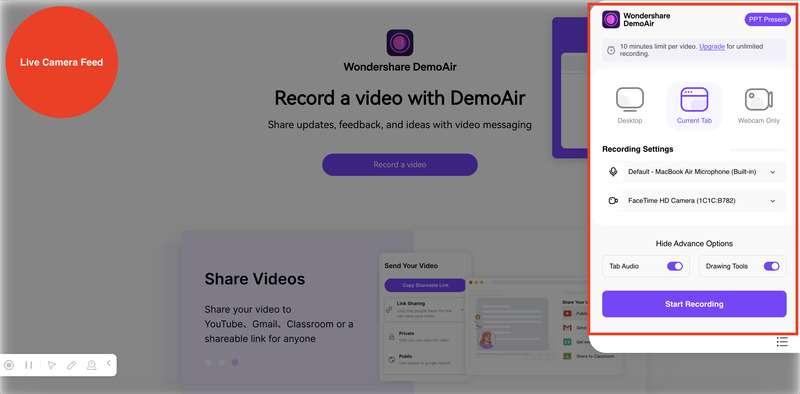
Step 5: Open Spotify on your Mac. Turn on your preferred music and let DemoAir record everything that happens on your screen. After that, select Stop Recording by clicking the symbol in the floating bar. You’ll receive a URL to the cloud-stored video. Just click Copy Shareable Link.
Generally speaking, using DemoAir is a simple and efficient way to record Spotify on Mac. With its online interface and high-quality audio capture, you can easily save your favorite Spotify tracks and listen to them anytime.
Conclusion
In this article, you explored various methods to record Spotify on Mac, including Wondershare DemoCreator, QuickTime Player, GarageBand, and an online solution: DemoAir. Each method has unique advantages, but DemoCreator stands out as a comprehensive solution with powerful recording and editing features.
Whether you’re a beginner or a pro, DemoCreator offers an intuitive and high-quality experience. If you want the best way to record music off Spotify on your Mac, download and try DemoCreator today for seamless and professional results!


