

Whether you're making YouTube tutorials, creating educational videos, training employees, or doing product demonstrations, learning to record screen and webcam simultaneously on a Mac can be a valuable skill.
By recording a Mac's screen and camera at the same time, you can create engaging videos that make your content more exciting and help your viewers better understand your point.
Today's guide will teach you how to record your screen and webcam on Mac using multiple tools. You'll learn to create them with a Mac built-in tool, third-party software, an online recorder, and a browser extension, so let's dig in.
| Screen and Webcam Recorder for Mac |
Ease of Use | Effectiveness |
| Mac Built-in Tool QuickTime Player |
Medium | Low - While you can simultaneously record a Mac's screen and webcam, the device's webcam preview in QuickTime Player can sometimes lag behind your screen recording actions, causing an unsynchronized video. |
| Desktop Software DemoCreator |
👍 High | 👍 High –This app makes it a breeze to record screens, webcam footage, system sounds, and microphone audio separately or simultaneously, along with various screen drawing tools. The built-in video editor adds even more value to the experience. |
| Online Recorder DemoAir |
High | Medium - DemoAir's Screen & WebCam recording mode is effortless. However, while it can record from the browser, you can perform only basic edits with the tool's online editor. |
| Browser Extension DemoAir Chrome Extension |
High | Medium - DemoAir's Chrome extension is also fantastic at recording Mac's screen and camera simultaneously. However, it can only be used with Google Chrome, as there's no extension for the integrated Safari browser. |
How To Record Screen and Webcam on Mac With a Built-in Tool
If you'd like to avoid downloading and installing additional software, you'll be pleased to learn that the Mac's built-in tool, QuickTime Player, can simultaneously record the Mac's screen and webcam. To do so, you must turn on and pin your webcam preview before recording your screen.
Here's a quick guide on recording the screen and camera at the same time on Mac with QuickTime Player:
- Access your Mac's Applications folder and launch the QuickTime Player app.
- Head to File > New Movie Recording to open a camera window.

- You can pin your webcam preview by navigating to View > Float on Top. Then, you can move it around and place it wherever you like.

- Set up simultaneous Mac screen and webcam recording by clicking File > New Screen Recording.

- Click the tiny Arrow for options, adjust the volume, and press Record to record the Mac's screen and camera together.

These options in QuickTime Player will create a simultaneous Mac screen and camera recording that you can later edit and share, but you'll need another app for these actions.
How To Record Screen and Webcam on Mac With Third-Party Software
Unfortunately, QuickTime Player's webcam preview can sometimes lag behind the screen recording, prompting many users to look for alternative solutions. That's precisely where third-party software such as Wondershare DemoCreator emerges as a fantastic screen and webcam recorder for Macs.
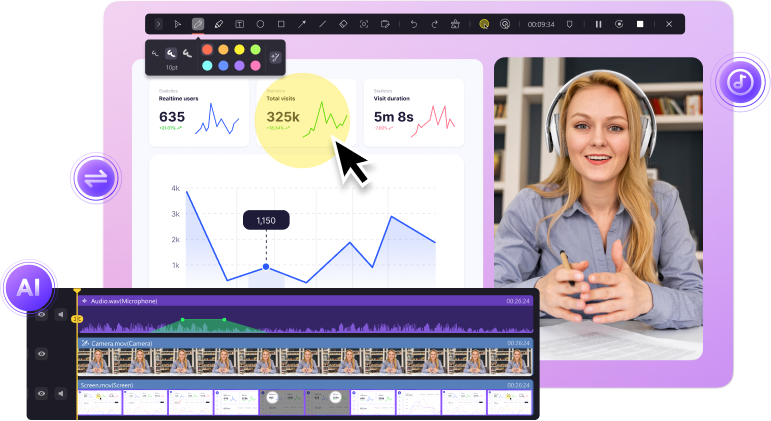
The tool effortlessly records screens, webcam footage, system sounds, and mic audio separately or simultaneously. Additionally, you can use various screen drawing tools to make your points easier to follow while recording. It's supported by both Intel Macs and Apple Silicon devices, and it works flawlessly on any Mac made in the last decade or more.
DemoCreator also has an intuitive, beginner-friendly interface and customizable keyboard shortcuts for screen recording with a webcam on a Mac. Its built-in video editor is fantastic for quickly and easily enhancing your recordings with various AI tools, such as auto subtitles, AI video background remover, AI beauty filter, and AI denoise, among others.
Recording Mac's screen and camera at the same time with DemoCreator is effortless. Here's how you can do it, too:
- Download, install, and launch DemoCreator for Mac and tap the All-in-One Recorder option.

- Under Capture Area, select one of the available resolutions or tap the Custom area option and adjust it manually.

- Turn on and adjust System Audio and Microphone to include these in your Mac's screen and webcam recordings.
- Enable the WebCam recording mode and set it to use your device's built-in FaceTime HD Camera. Alternatively, choose a third-party webcam if you have one.

- Hit the REC button or press the OPTION + COMMAND + 2 keys to screen record with a webcam on a Mac with DemoCreator. You can use the same key combination to pause and resume the recording.
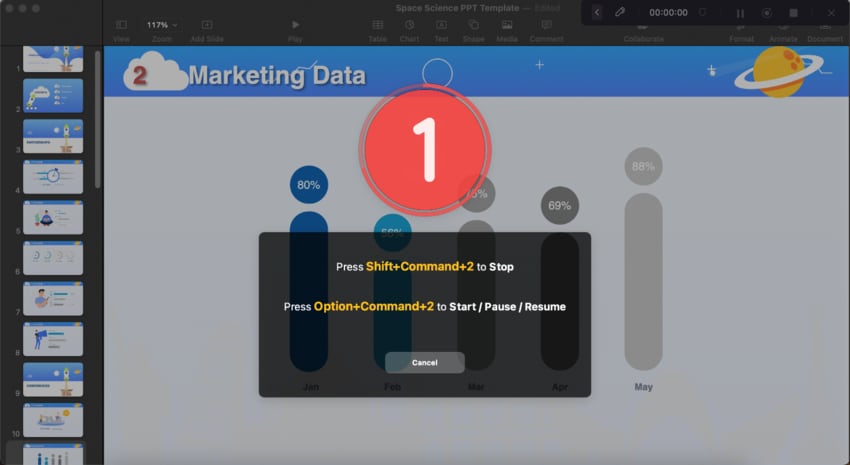
- When done, hit SHIFT + COMMAND + 2 to stop the recording entirely.
DemoCreator's All-in-One Recorder also has Recording Scheme settings, which you should adjust depending on whether you want to expressly export your recording or launch the app's built-in editor and apply video effects before sharing the clip.
How To Record Screen and Webcam on Mac With an Online Recorder
QuickTime Player isn't the only tool you can use without additional downloads and installations. An online recorder like DemoCreator's little cousin, Wondershare DemoAir, is also a fantastic option. This helpful tool was primarily created to record your browser's tabs but can also effortlessly record screens and cameras on Macs.
Using DemoAir's Online Video Recorder is as simple as it gets, and you can follow these steps:
- Open a web browser, head to DemoAir's home page, and select Online Video Recorder.

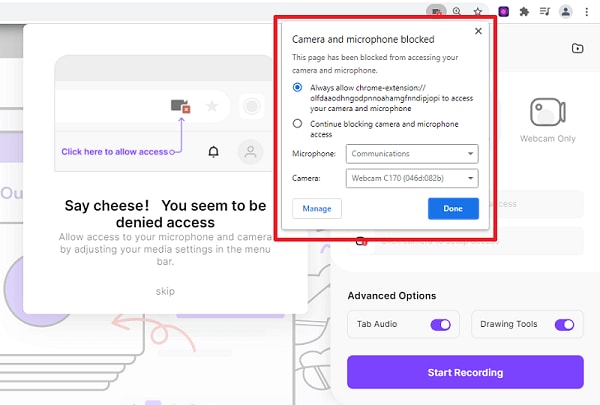
- Select the Screen & WebCam recording mode and follow the web app's instructions to grant it access to your camera and microphone.

- Once you grant access, select the Recording Inputs and tap the Start Recording button.

- When you're done recording, tap Stop and save your recording as a WebM video.
You can also close the browser's Save As dialogue and access DemoAir's online editor. Then, you can preview the recording, rename it, add it to Wondershare and Google Drive, download it, share it via Google apps, or send it to your colleagues through apps like GitHub, Trello, Slack, Jira, and Asana.
How To Record Screen and Webcam on Mac With a Browser Extension
Wondershare DemoAir also comes as a powerful browser extension for Google Chrome. While you can't use it with Safari, you'll love it as a Google Chrome user, as this browser add-on makes MacBook screen and webcam recordings a breeze. It can record your desktop, current Chrome tab, or webcam or work as a simultaneous screen and webcam recorder for Mac.
Screen recording with a webcam on Mac through the Chrome extension is as effortless as using DemoAir's online recorder. Here's what you'll need to do:
- Launch Google Chrome, head to DemoAir's home page, and tap Add to Chrome at the top right.

- Add the DemoAir Chrome extension to your browser through the Chrome Web Store.

- Click the DemoAir extension access and give it access to your camera and microphone.
- Right-click the DemoAir extension to pin it for easier access.

- Tap the Desktop recording mode, and select your microphone and webcam under Recording Settings. Then, tap Start Recording.

- Choose between the Entire Screen or a specific Window, tick the Share audio box, and tap Share to record the screen and webcam simultaneously on Mac.

- Press the Pause button to temporarily stop recording or hit the Stop button to stop entirely.
DemoAir will then prompt you to save the recording and open its preview window. You can then play the clip, name it, trim it, delete it, share it with colleagues or via Google apps, and export it as a WebM or an MP4 video file from this window.
Conclusion
Recording a screen and webcam simultaneously on a Mac can be a precious skill for any user trying to create engaging video content and improve the viewer's understanding of the clip. While this is one of the features of the built-in QuickTime Player, there's also a drawback to this method, as QuickTime Player's webcam preview can sometimes lag behind the screen recording and cause unsynced videos.
That's why third-party solutions like Wondershare DemoCreator make much more sense for users looking for a fully-fledged Mac screen and webcam recorder. After all, this powerful third-party app has an incredibly intuitive interface, flawlessly runs on any Intel and Apple Silicon Mac, and can effortlessly record screens, webcam footage, mic audio, and system sounds in a few steps.
DemoCreator's online version, DemoAir, is also a fantastic option for recording the screen and webcam at the same time on Mac. It's available as a web-based app for any browser and as a Chrome-only extension. It allows users to seamlessly record screens and cameras on a Mac or create engaging videos of their browser tabs.
- Record desktop screen, audio, and webcam simultaneously
- Various annotation tools to emphasize important points
- Edit videos quickly with a wide range of professional tools
- Export to MP4, MOV, MKV, GIF and multiple formats


