Audio recordings count as the most versatile method to create voiceovers for podcasts and documentaries. By incorporating audio into videos, you can live to a dull, moving visual. Using the advancing technology, anyone can record high-quality videos by enabling a microphone. Everything counts, from using high-quality equipment to relying on a good audio editor. The following article is about the methods to record audio from a computer.
In this article
DemoCreator
Rating: 4.7/5
Compatibility: Windows, Mac
Operation Difficulty: Easy
Best For: Recording professional-level audio and videos
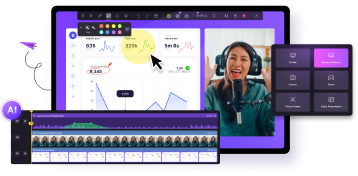
By allowing you to freely select the microphone and sound system as the audio sources, DemoCreator allows for smooth audio recording. Whether you are recording voice for a teaching video or a fun podcast, you can do it all on this tool. Users can record both audio and video at the same time and make drawings on them using this platform.
Key Features
- Record smooth gameplay for up to 24 hours and add commentary using the microphone and webcam.
- To get the audio in the volume of your choice, you can adjust the microphone volume.
- The teleprompter smoothly reads out a passage without having to read from a paper.
Advantages
- You can execute multiple audio editing features using this versatile audio editing platform.
- Due to its user-friendly interface and easy-to-navigate features, this tool is an easy-to-use option.
- The results generated by DemoCreator are always of high quality, and the processing is faster than most tools.
Detailed Guide to Recording Audio with DemoCreator
Using this high-quality audio editor, you can record and enhance audio to achieve perfection. The section below deals with the step-by-step guide on recording audio from a computer using DemoCreator:
Step1Use DemoCreator to Record Audio
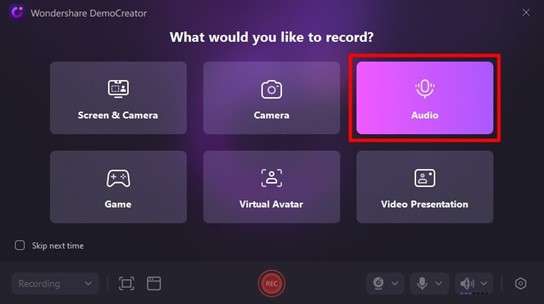
If you want to record audio for your podcast, open DemoCreator on your PC and click the “Video Recorder” option from the main interface. When the window changes, use the “Audio” option from the right side and initiate the audio recording.
Step2Enable Mic and Speaker Before Recording
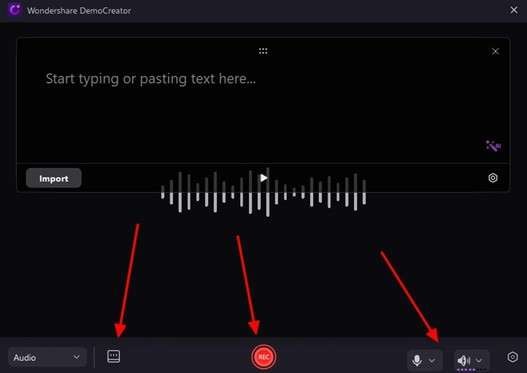
In the next window, use the “Microphone” and “Speaker” drop-down menus to enter the settings you want. From the bottom left, enter the text in the text field and click the “Teleprompter” button to read from the teleprompter. Continue to click the red “Rec” button from the center of the window and start recording your audio.
Step3Stop and Make Edits to Your Recorded Audio
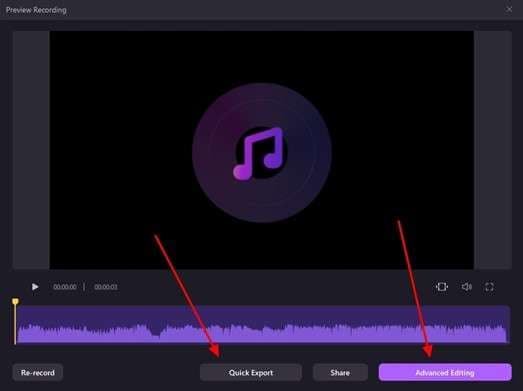
When you are done recording the audio, use the red "Stop" button to end the recording and access it in the next window. Here, you can either use the "Quick Export" option to export the recorded audio or make further edits using the "Advanced Editing" button.
OBS
Rating: 4.6/5
Compatibility: Windows, Mac, Linux
Operation Difficulty: Medium
Best For: Recording short podcasts
Known for its free and open-source system, OBS provides a proper system of video recording and live streaming. Where many content creators are known for using this platform for streaming and recording content, OBS Studio makes operations easier with its cross-platform abilities.
Key Features
- Setting your hotkeys, you can quickly start and stop recording audio using OBS.
- Control multiple monitors at the same time and smoothly transition from one screen to another.
- Other than audio recording, you can also record screens like games and meetings.
Advantages
- The audios recorded using OBS are of high fidelity, allowing you to create market-competitive content.
- Besides recording an audio, you can also edit one by adjusting the balance and fade in and out.
- The user-free interface allows users to efficiently execute all processes offered by OBS.
Understanding the Steps to Record Audio on OBS
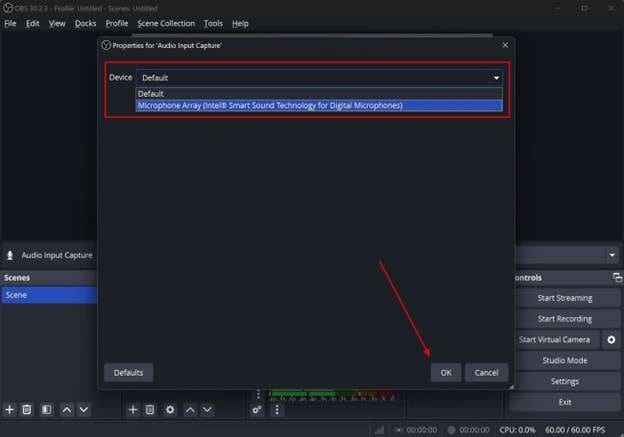
Step 1. If you want to record audio using OBS, start by opening the tool on your PC, then explore the main page. Press the "+" button from the "Sources" section on the left side panel to open a new pop-up and click the "Audio Input Capture" option.
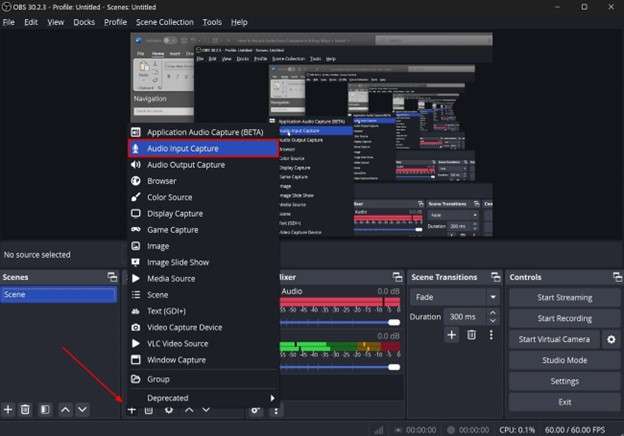
Step 2. After entering the microphone device in the next window, click the “OK” button to apply the setting.
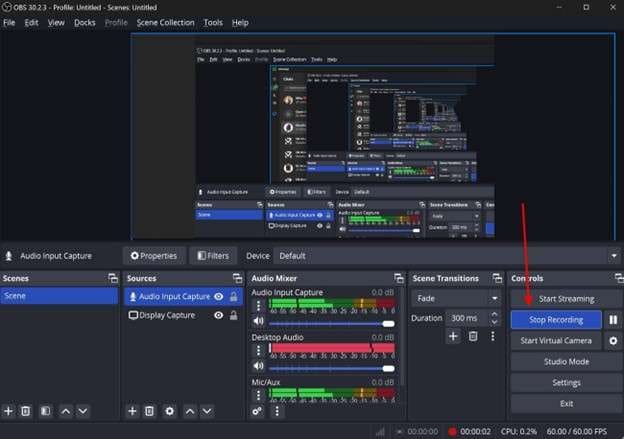
Step 3. After all the settings have been entered, go to the “Controls” section on the right side and click the “Start Recording” button to initiate recording. To end the process, click the “Stop Recording” button from the same location when the recording ends.
Audacity
Rating: 4/5
Compatibility: Windows, macOS, GNU/Linux
Operation Difficulty: Easy
Best For: Quickly edit or export audio
If you seek a free-of-cost open source for recording audio from a computer, Audacity is the best option. This platform features plugin support that enables you to enhance your audio with VST3, Nyquist, and many more third-party plugins. Moreover, its deep audio analysis tools, such as the Spectrogram View and Vamp Analyzers, assist users in uncovering new insights into sound projects.
Key Features
- For seamless recording, Audacity works smoothly with 32-bit/384kHz audio having built-in dithering.
- The tool features lots of editing options for trimming music tracks and sound effects.
- There is a batch processing capability that lets users record more than one audio simultaneously.
Advantages
- For users who seek cost-effective solutions, Audacity is free of cost and has an array of recording and editing options.
- Its latest updates support bar-beat grid amp-up music recording capabilities that easily align and edit tracks.
- In case you are far from the computer, there is a set timer tool that schedules recording after an interval.
Guide to Audio Recording With Audacity
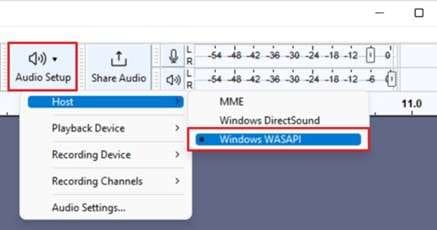
Step 1. To begin with, open the main Audacity interface and tap on "Audio Setup" to choose "Windows WASAPI" as the host.
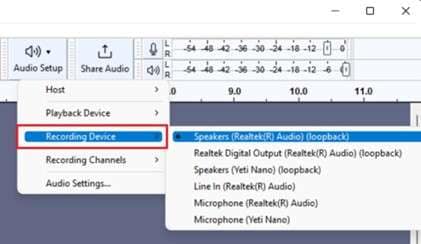
Step 2. After the host is selected, tap again on the Audio setup and hit the “Recording Devices” button to choose the output for your recordings.
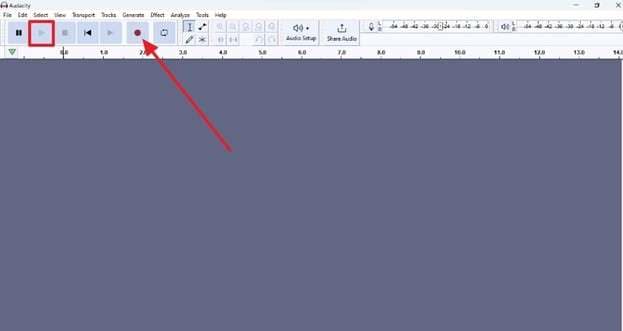
Step 3. After you are done with settings, click on the red colored "Record" icon and tailor the microphone level and other sound settings to your preferences. When you are done with the recording, pick the green-colored "Stop" icon to set the recording for further editing.
VLC
Rating: 4.5/5
Compatibility: Windows, Linux, macOS, Unix, iOS, Android
Operation Difficulty: Easy
Best For: Versatile media player with extensive format support
When checking a tool to record audio from a computer, it was advised to look for a platform that features numerous formats, just like VLC. For input formats, it supports UDP/RTP Unicast, UDP/RTP Multicast, HTTP / FTP, and many more. However, as far as output formats are concerned, there are MPEG (ES, PS, TS, PVA, MP3), AVI, ASF / WMV / WMA for the versatility of users.
Key Features
- VLC offers subtitle synchronization to users, which enables them to adjust subtitle timing easily.
- Its robust video and audio filters allow you full control over media playback to improve the visuals and sound quality.
- It offers a fully private experience because of VLC’s no spyware, ads, or user tracking features.
Advantages
- Without letting you download additional codecs, you can improve the quality of video and soundtracks on any device.
- It supports easy-access ZIP files, meaning you don’t have to unpack them to access the data.
- Users can tailor their media player with custom skins, and skin editors, and install extensions for improved functionality.
Detailed Steps to Recording Audio Using VLC
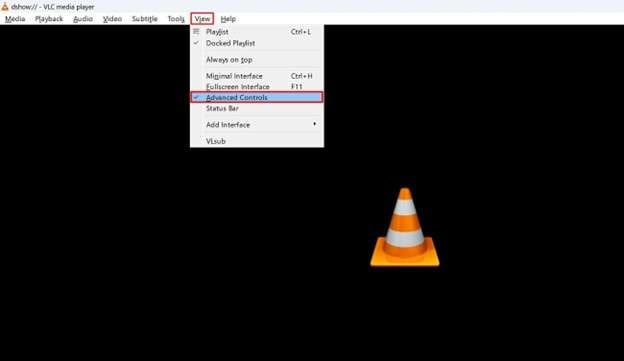
Step 1. To record on the VLC media player, access the interface on your device and tap the "View" button from the top of the screen. There, you will be directed to the drop-down menu where you have to choose the "Advanced Control" option.
Step 2. As a new list of controls appears on the screen, continue to click "Media" to choose" Open Capture Devices" to choose the audio source and microphone.
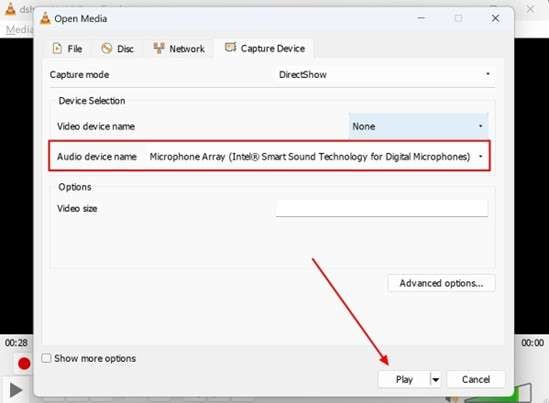
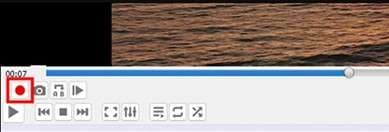
Step 3. When you are done with the parameters, use the “Play” button to start capturing and hit the red color “Record” button to start recording with VLC.
Windows Sound Recorder
Rating: 3.8/5
Compatibility: Mobile, PC, Surface Hub, HoloLens
Operation Difficulty: Satisfactory
Best For: Capturing and editing simple audio recordings
To learn how to record audio on a computer, Windows Sound Recorder supports an easily trimmed recording tool that enables you to keep only the parts you need. Moreover, users can delete unwanted sections for cleaner, more professional results after they are done recording. Plus, by making use of renaming tools, one can keep their audio files organized and easy to find.
Key Features
- The updated version supports a graphical waveform that offers a visual representation of audio.
- Ranging from quarter speed to four times, Windows Sound Recorder changes the playback speed.
- Without affecting the format and quality of the audio files, users can share and rename files directly from the app.
Advantages
- For saving recording, this app features MP3, AAC, and WMA formats all the way up to the lossless FLAC and WAV layouts.
- Users can also set the audio quality to highest, high, and medium to enhance the professionalism of the audio files.
- This app is designed with a simple interface that allows beginners to record audio in one tap.
Instructional Guide To Recording Audio With Windows Sound Recorder
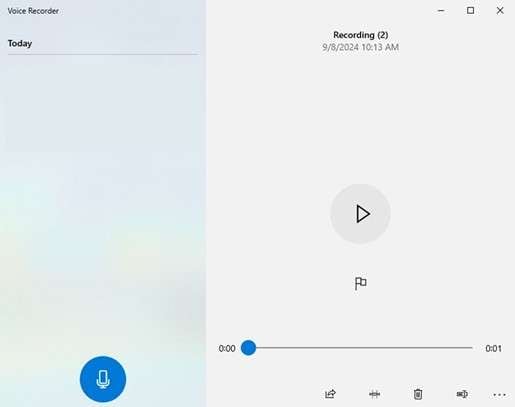
Instructions. To record audio with the Windows Sound Recorder, download and install it on the system and click on the "Microphone' button later on. As you tap, the audio recording will begin, after which you can either trim, delete, or rename the audio files for sharing across platforms.
Stereo Mix
Rating: 3.8/5
Compatibility: Windows 7/8/8.1/10/11
Operation Difficulty: Easy
Best For: Multiple audio source recording and editing on PC
The Stereo Mix app allows you to record audio from a computer to capture system sounds or in-app audio. It also includes an option to adjust recording quality for clearer, high-definition sound output. Additionally, the app supports record control options that allow users to pause, save, or stop the recording in just one click.
Key Features
- It features accessible editing options that let you tailor the audio speed, loop, or quality in a few taps.
- For recording in quieter places, the Stereo Mix features a silent recording mode, even when the PC is in silent mode.
- With a multi-source recording facility, this recorder captures audio from the user's computer system sounds, speakers, and microphones.
Advantages
- There are versatile recording options that record vocals, streaming music, and speeches with ease.
- For convenience and efficiency, there is an automatic recording control to make recording seamless.
- With high-quality audio management tools, users can tailor the volumes and save audio in desired formats.
Comprehensive Steps To Recording Audio in Stereo Mix
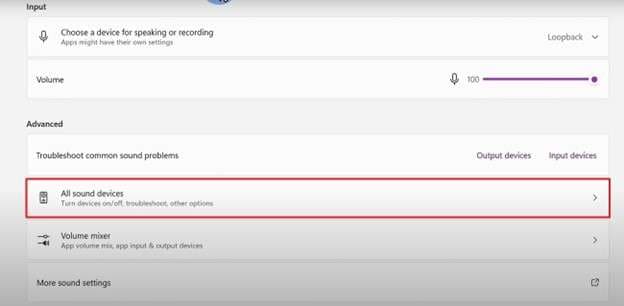
Step 1. Start by accessing “Settings” on Windows 11 and search for “Sounds," after which you have to click "All sound devices” to enable Stereo Mix from the list of options.
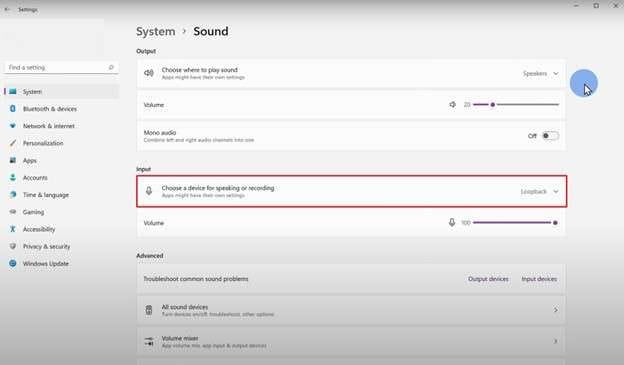
Step 2. As you click, enable the “Allow” button from the general setting of Stereo Mix and head back to the “Sound” settings. There, scroll down and pick Stereo Mix from the “Choose a Device for Speaking or Recording” option to initiate the recording process by using any recorder on the device.
Chrome Audio Capture
Rating: 4.6/5
Compatibility: Windows PCs and Laptops, Mac, Chromebooks, Linux-based systems
Operation Difficulty: Good
Best For: User-Centric Design
The Chrome Audio Capture extension enables seamless recording and editing features to record sound from a computer. This tool easily captures sound from any web-based source, such as videos, meetings, or streaming content. Moreover, its simple design ensures that recording audio is both efficient and hassle-free.
Key Features
- It can record sound from any browser tab, whether it's live conferences, music, or podcasts.
- There are pause and resume recording options to accommodate any interruptions during your sessions.
- With this, one can instantly download recordings with a straightforward process for easy access to files.
Advantages
- The Chrome Audio Capture has a simple interface that makes recording easier without requiring technical expertise.
- With innovative tools, users can achieve superior sound quality in WAV format for all their recordings.
- While maintaining privacy, it enables you to quickly access and download your recordings for enhanced productivity.
Step-By-Step Guide on Recording Audio on Chrome Audio Capture
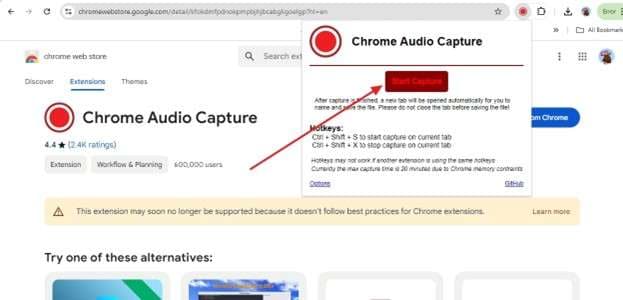
Step 1. On the Chrome Audio Capture extension’s webpage, click the “Add to Chrome” button to install the Record Audio extension and launch the tab from which you wish to capture audio. There, hover over to the extension tab and tap on Audio Capture to hit the "Start Capture" option.
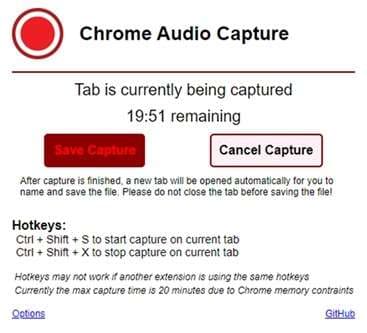
Step 2. After that, the audio of the desired tab will be recorded while the save or cancel capture options are displayed. Choose any based on your preference to record directly from Google.
Method 8. DemoAir
DemoAir
Rating: 4/5
Compatibility: Online
Operation Difficulty: Good
Best For: Edit and share high-quality screen recordings efficiently
DemoAir by Wondershare is a powerful online screen recording tool that offers seamless video capture and editing. With features like easy sharing options, customizable recording settings, and a user-friendly interface, DemoAir simplifies the process of creating high-quality video content. Whether for professional presentations or personal projects, it provides the tools you need for efficient and effective screen recording.
Key Features
- There is an accessible yet exceptional recorder that records your browser tab, desktop, or webcam with precision.
- Its workable editor tools feature real-time annotations and trim tools to remove unnecessary parts for polished results.
- For sharing, this platform features easy export and share recording options via Google Drive, YouTube, or direct links.
Advantages
- To emphasize or highlight the key points, there are drawing tools such as a focus mouse and a customizable pen.
- For clear presentation, users can adjust the thickness and color of the drawing tools for important information to stand out.
- Its smart folder management offers easy organization, renaming, and accessing of recordings.
How to Record Audio Using DemoAir?
To record audio from a computer with DemoAir, set up access to your Microphone and Webcam for voiceover and screen capture. This will allow you to enable System Audio and Drawing Tools (if needed) and click” Start Recording.” Note that “System Audio” and “Drawing Tools” are enabled by default, but you'll need to grant access to the Microphone and Webcam during your first recording session.

How do you record high-quality sound from a computer?
Since you know how to record audio on a computer with various methods, in this section, we’ll cover three techniques to ensure high-quality sound. With these methods, you can achieve crystal-clear audio by optimizing your recording settings:
1. Choose an Excellent Audio Recorder
Start by selecting a high-quality audio recording software that supports advanced settings like adjustable bitrate and sample rate. Moreover, ensure it offers features such as noise reduction and real-time monitoring to enhance your recording quality. With these tools, a reliable recorder will provide clear, professional-grade sound.
2. Use a Good Microphone
Choose a high-quality microphone, such as a condenser mic that suits your recording needs for studio settings or a dynamic mic for versatility. After that, focus on properly positioning the microphone to accurately capture sound while reducing the distortion. By selecting a high-quality mic, users can significantly improve the audio clarity and depth.
3. Create a Quiet Environment
Lastly, set your recording space in a quiet room that has minimal background noise to avoid interference while recording. For that, soundproofing materials or acoustic panels can be used to absorb sounds and echoes. Hence, having a controlled environment will ensure that your recordings are clean and focused.
FAQ
-
How to record internal audio?
To record internal audio, use audio recording software with system audio capture capabilities, such as OBS Studio or Audacity. Ensure you select the appropriate audio source in the software settings to record internal sound. -
How do I record audio on my Windows 10 computer?
To record on Windows 10, access the built-in Voice Recorder app from the Start menu or use third-party software like Audacity. Click the record button to start capturing audio from your microphone. -
How to record audio from a website on a PC?
To record from a computer, make use of software like OBS Studio or a browser extension that supports audio capture. Then, select the browser or tab as the audio source to record the sound directly from the website. -
How to record audio on a PC without a microphone?
To record without a microphone on software like Audacity, select "Windows WASAPI" or "MME" as the audio host. After that, choose your computer's output device as the recording source to record without a microphone. -
Can I record streaming audio on my computer?
To record streaming audio on your computer, consider using VLC Media Player. It allows you to capture all audio played through your system by configuring the appropriate settings. -
Does Windows 10 have an audio recorder?
Windows 10 includes a built-in audio recorder called Voice Recorder. Having this enables users to easily record audio using your computer's microphone. -
Can QuickTime record computer audio?
Unfortunately, QuickTime does not natively support recording system audio on a computer. It can record audio from a microphone but not internal audio from the system.
Conclusion
In conclusion, learning how to record audio on a computer is straightforward with the right tools. Whether you use built-in software, versatile options like VLC, or specialized tools like DemoAir, each method offers unique benefits to suit different needs. However, platforms like Wondershare DemoCreator offer the most diverse set of features that help create the perfect recordings.


