Many people choose Chromebook for its reliable and easy Chrome OS at a budget price. Chromebooks are great for work, studying, and even on-the-go entertainment. If you have one, you may wonder about different ways to capture a screenshot on a Chromebook. One simple way to capture the screen is to use the keyboard.
Another reliable method is using Wondershare DemoCreator to record and edit screenshots. You may edit the screen record for reference with various DemoCreator tools. Whether you want to capture a webpage for a recipe or are making a presentation, we’ll discuss the best ways to capture the full screen or part of it based on your needs.
In this article
How to Take a Screenshot of Your Entire Chromebook Screen
You can capture the entire page by taking a screenshot. Learn how to take screenshots on a Chromebook screen.
Using the Keyboard Shortcut
Follow these easy steps to capture screenshots on your Chromebook.
- Press Ctrl and show Windows on your keyboard at the same time.
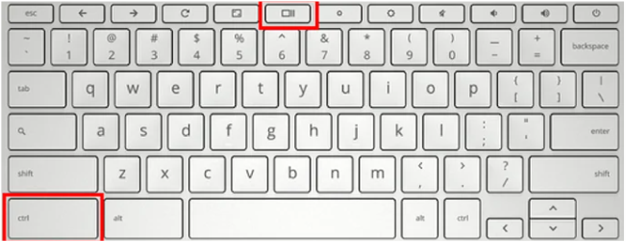
- You’ll see a notification of screenshot capture on the bottom right of the screen.
- The screenshot will be saved to the folder.
When using an external keyboard:
If you’re using some other keyboard, you won’t have the Show Windows key. Press the F5 key along with Ctrl to capture the screenshot.
Screenshot using the settings menu:
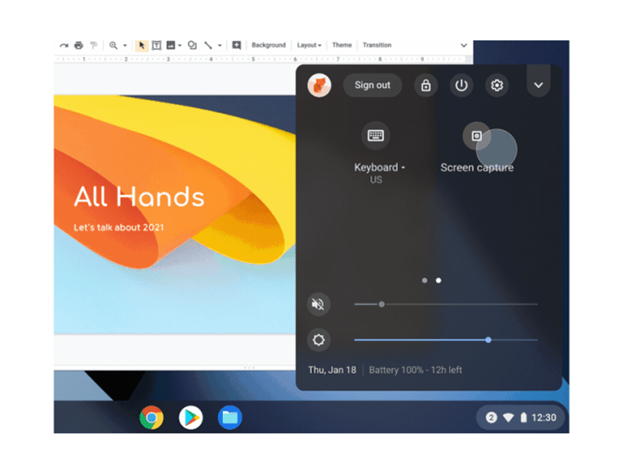
Another method is to type screenshot on the Chrome OS app launcher and select Take Screenshot. To skip using the keyboard to capture screenshots, you can just go to the Quick Settings menu and press the Screen Capture toolbar for a screen grab.
How DemoCreator Can Help
DemoCreator is a user-friendly screen-capturing software that can help you create advanced screenshots and screen recordings. Whether you want to add text to the screenshot or highlight a specific area, DemoCreator tools come in handy.
You may also use the features for annotation and cropping as needed. It's an all-rounder tool to capture and edit screen recordings. DemoCreator ensures high-definition output, perfect for systems with compromised output quality.
The dynamic screen drawing tools are great for adding your ideas to the screen grabs. You can magnify important sections or blur out unnecessary details. The software has several elements that make the result engaging and interactive.
Wondershare DemoCreator is an excellent choice for Chromebook users who want to take their screenshot capabilities to the next level. With this powerful tool, you can easily record your entire screen or specific areas, allowing for detailed documentation and presentation creation. Whether you're capturing a recipe, a tutorial, or any other important information, DemoCreator offers seamless editing options to enhance your recordings.
How to Take a Screenshot of a Specific Part of Your Chromebook Screen
Here are two methods to capture a specific portion of your Chromebook screen.
Using the Screenshot Shortcut
Easily capture a screen grab on Chromebook for a specific part of the screen with the following steps:
- Press these keys–Shift + Ctrl + Show Windows.
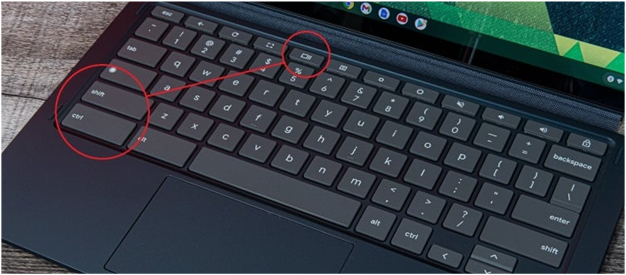
- Select the part of the screen using the cursor.
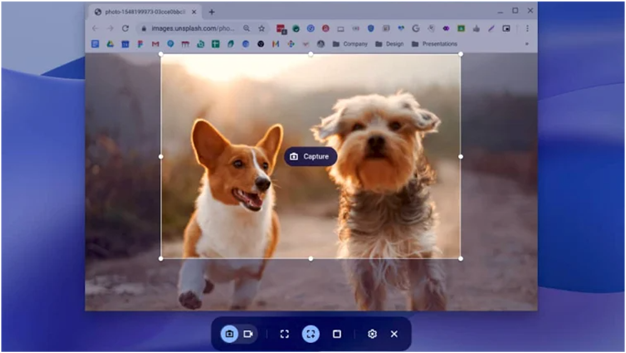
- Drag the cursor across the screen.
- Releasing the cursor will result in the screenshot.
- Check the files app to see your screenshot.
These steps work when you need a snipping tool Chromebook. You may edit the screenshot from the files app. Crop, adjust brightness, or rotate the screenshot. Since there are limited editing options, you’ll need advanced software like Democreator for more features.
Fine-tuning Screenshots with DemoCreator
DemoCreator offers various tools to edit your screenshot as needed. Some of its editing features include:
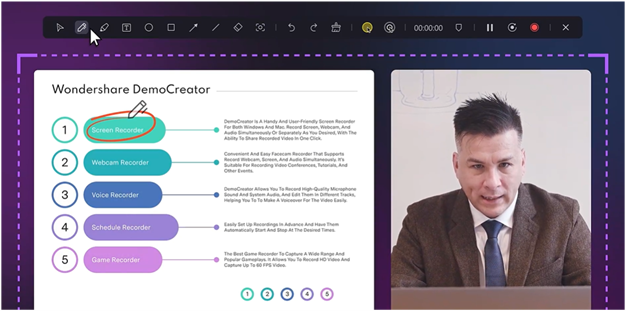
Screen drawing tools: With DemoCreator’s drawing tools, you can annotate directly on the screen capture effortlessly. Choose from the pen (annotate), highlight (transparent highlighter), and whiteboard (digital canvas).
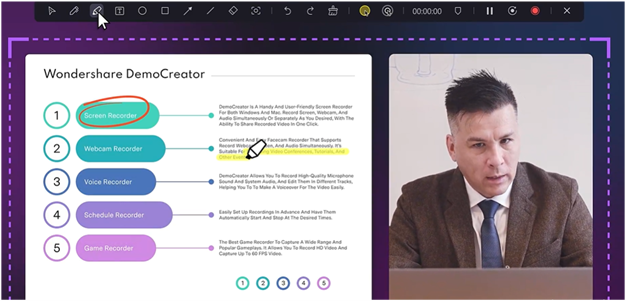
Cursor effects: DemoCreator has five different cursor effects–Spotlight, cursor, highlight cursor effect, magnify effect, and cursor click effect. These are useful for screenshots and screen recording. The Spotlight tool is great for blurring the surrounding screen parts if you want to focus on one thing. The highlight cursor effect will add desirable attention to the specific areas of the screenshot. As the name suggests, the magnifying tool will help you zoom in on a specific portion.
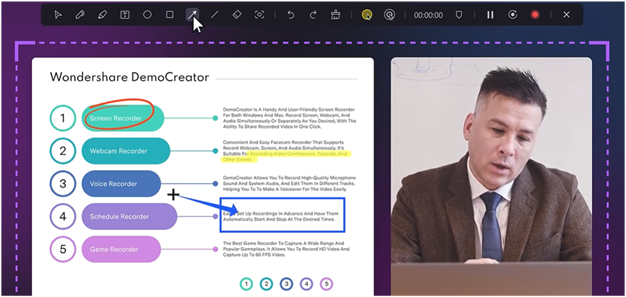
Element tools: Get Custom screenshot editing with arrow, rectangle, circle, text, and line tools. Using the Text tool, you may add text in different sizes and colors. The rectangle and circle tools create hollow shapes with different border thicknesses. Use the arrow tool to point to important information. The line tool can draw custom color lines across the screenshot.
Eraser tools: If you make a mistake in the editing, use the eraser, clear drawing, and redo/undo tools.
How to Use the Screenshot Toolbar on Chromebook
Find out how to use the screenshot toolbar for quick capture and editing the screen grabs.
Accessing the Screenshot Toolbar
You may access the screenshot toolbar by pressing the keys Shift + Ctrl + Show Windows. The last key looks like a rectangle with two vertical lines on the right. After pressing these keys, you’ll see a toolbar at the screen’s bottom.
Features of the Screenshot Toolbar
Here are the Chromebook toolbar's key features:
- Select the screen: Select a specific section of the screen or icon or the whole screen for Chromebook snapshot.
- Adding sound: You may add the sound to the screen recording by clicking on the gear icon. Toggle on the record microphone option.
- Video recording: Choose to screen record to capture a tutorial or an informative video. You can either record the whole screen or a small part of it.
Why Use DemoCreator for More Advanced Features
The Chromebook Screenshot toolbar offers limited features to capture and edit the screen. Using DemoCreator, you can choose from various advanced tools to make the job easier.
DemoCreator has over 10000+ royalty-free video effects, audio, transitions, and filters to edit the screen grab quickly. It also has presets, AI tools, and professional editing to make your screenshots more informative
Not only screenshots but also DemoCreator helps create effortless screen recordings of the whole screen or part of the screen. You can also add a webcam recording as a part of explainer videos or gaming tutorials.
DemoCreator has features like an AI teleprompter to help you record in one go without any pauses. The screen drawing tools make capturing super-easy. You can add text and draw arrows to point to important information.
Highlight or zoom in on the screenshot to focus on a specific part. Other features include video presentation with custom canvas, Avatar recording and scheduling recording with an automated recording setup.
Overall, DemoCreator ensures enhanced screen visibility with its interactive features and tools. This way, you can improve the screenshots and screen recording to fit your purpose.
Where Screenshots Are Saved on Chromebook
Screenshots on the Chromebook are saved in the Downloads folder. Video recordings are also saved in this folder.
Default Save Location
By default, the screenshots and screen recording is saved in the Downloads folder. Spot and select the Launcher icon at the bottom of the Chromebook's screen. Click on the Up arrow.

You'll see My Files on the left sidebar. Select the Downloads folder to access the screenshots.
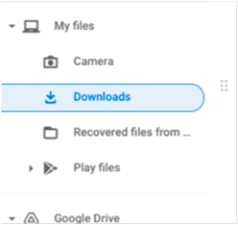
Another way to access the recent screen capture with Chromebook is to go to the Chrome Clipboard. It will have up to five recent items from the screen capture. You may save and paste them to a folder of your choice.
- Right-click anywhere to see “Clipboard”.
- Alternatively, press Search Key + V.
Customizing the Save Path
If you want to save the screenshots to a particular folder, you can change the default path. Just press Shift, Ctrl, and Show Windows together. Go to the settings to choose the specific folder. This will save your future screenshots to this folder.
In some cases, the Chromebook may run low on storage. To resolve these issues, you may use Google Drive, Google Cloud, flash drives, and hard drives to save the screenshots.
Taking Screenshots Using DemoCreator on Chromebook
DemoCreator is an efficient screenshot-grabbing software. It comes with a snapshot feature that allows you to take a screenshot from a video. The best part about the snapshots in Democreator is that the quality remains high up to a significant extent. This means that you can use these screenshots in your presentations or reports without having to worry much about the picture quality. Furthermore, accessing screenshots taken by DemoCreator is easy, too. Find how to capture the screen and edit it for your presentations and notes.
Step-by-Step Guide to Using DemoCreator for Screenshots
Here is a detailed guide for capturing screenshots using DemoCreator. Learn how to edit them, too.
Step1Installing DemoCreator
Click to install once the download is complete. Launch DemoCreator on your system.
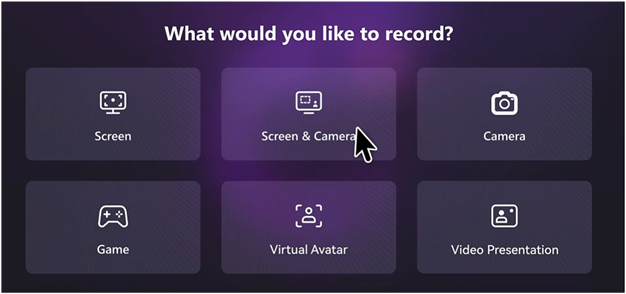
Step2Screen recording process
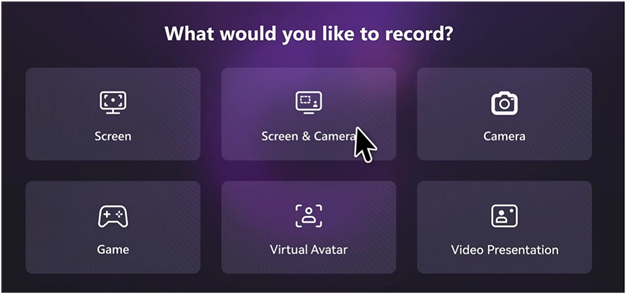
Choose from various screen recording options such as screen and camera, video presentation and screen. You may capture the whole screen or part of the screen. Once the screenrecording is done, open the video editor and play the video. You may also add a prerecorded video to the software.
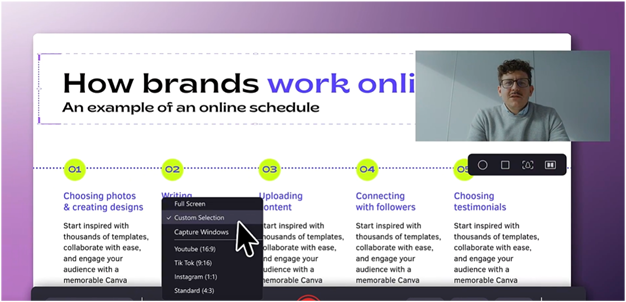
Step3Play and pause
As you play the video on DemoCreator, you’ll notice a camera-like icon. You can Pause the video where you want to take a snapshot (camera-like icon). Click the snapshot icon to take the screenshot of the desired part.
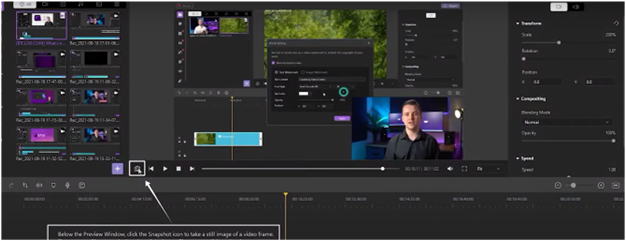
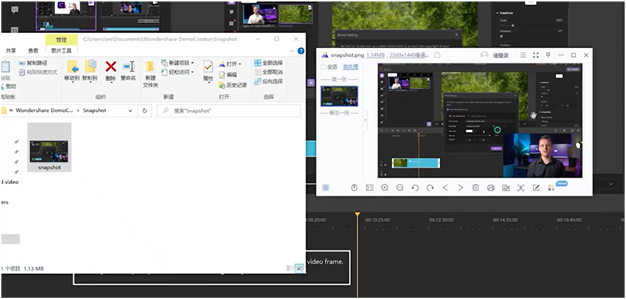
Step4Accessing screenshots
After taking the screenshots from the video, they will be saved to the DemoCreator folder. You can open the screenshot and further edit it with features such as pen, highlight, or add arrows.
Conclusion
Now, you know how to take screenshots on a Chromebook using various methods. You can capture the screen using keyboard shortcuts or use the Screen Capture tools. This works for basic screenshot capture and editing. For advanced screen grab Chromebook, choose DemoCreator. It has efficient editing features and makes screen recording easier. You may use the preset filters, AI tools, and teleprompter for effortless screen recording.
FAQ
-
How do I take a scrolling screenshot?
You may use Chrome’s developer tools. Press Ctrl + Shift + I, open the command menu and press Ctrl + Shift + P. Type screenshot in the menu and click on Capture full screenshot to download the whole webpage. Other options include using screen-capturing software such as Wondershare Democreator. -
Can I annotate my screenshots on Chromebook?
Annotate the screenshots using the built-in tools. Go to the files app and then open the screenshot. Click edit to highlight something or add text to the screenshot. -
How do I record my screen on Chromebook?
A reliable method to record screens on Chromebook is to use Wondershare Democreator for quick screen capturing and editing. You may also Press Shift + Ctrl + Show windows and select screen record. -
What does Ctrl+Alt+Z do on a Chromebook?
Ctrl+Alt+Z turns on and off the ChromeVox on any page. You don’t have to go to the menu to turn this screen reader on and off.


