

A proper tool to record full screen on your Windows 10 computer gives you numerous benefits. You can use those recordings for multiple purposes, from business conferences and university lectures to creating vivid social media reels and video calls.
However, many Windows 10 users still seek the best way to capture top-quality full-screen video clips. Today, we’ll help you solve this puzzle by listing the top five full-screen recorder tools for Windows 10 and giving you detailed steps to record the screen on your PC.
In this article
How to Record Full Screen on Windows 10

Below are the best full-screen recorder tools for Windows 10 you can rely on to capture full-screen videos on your PC.
Record Full Screen on Windows 10 With Democreator

Wondershare DemoCreator is an all-in-one full-screen recorder and AI-powered audio/video editor software for Windows and Mac. The tool lets you record your webcam, microphone, and computer screen simultaneously, adjust frame rate, customize screen capture according to your needs, and tap into AI-enabled editing tools to make your video captures as visually pleasing as possible.
DemoCreator streamlines screen recording by giving you user-friendly tools to capture your screen with high-quality sound effortlessly. You can also select a specific area of your screen or capture a specific window in 4K and 8K quality. Recording full-screen video clips with DemoCreator is a simple process.
Download and install DemoCreator on your Windows 10 computer, then follow the steps below to record full screen:
Step 1: Launch DemoCreator on your computer;
Step 2: Navigate to the main menu;
Step 3: Select Video Recorder to choose your recording mode;
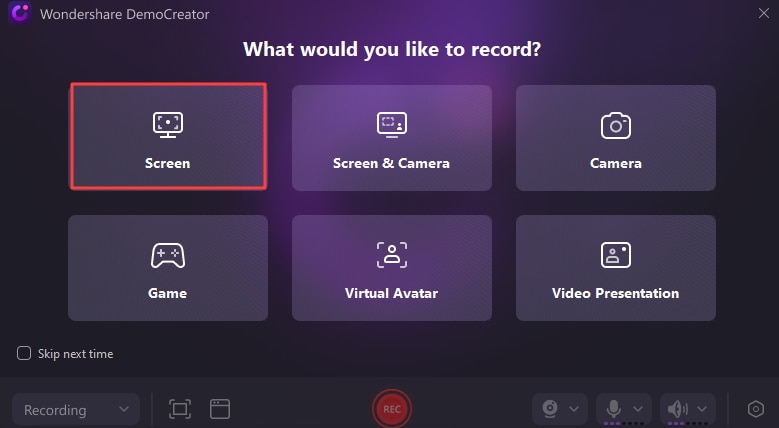
Step 4: Click Screen to proceed;
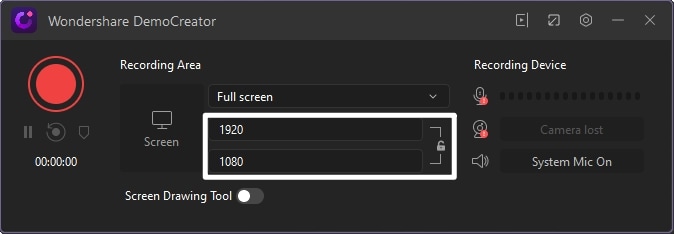
Step 5: In the Recording Area menu, select Full screen, adjust the resolution settings, and click the red Record button to start recording;
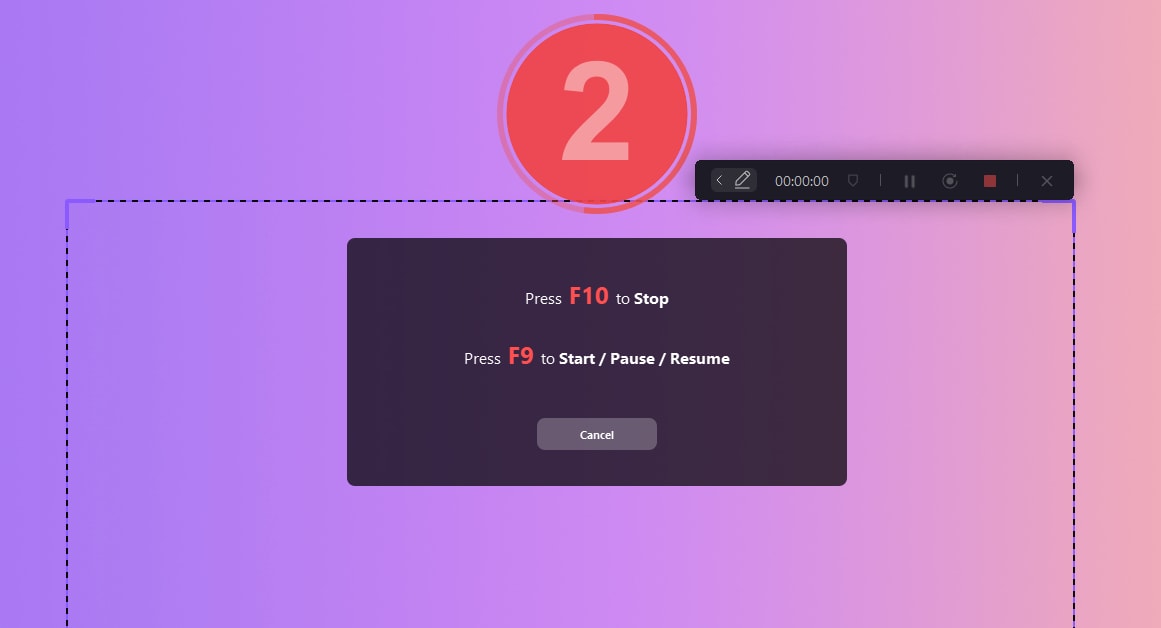
Step 6: Once you’ve finished, press F10 to stop recording;
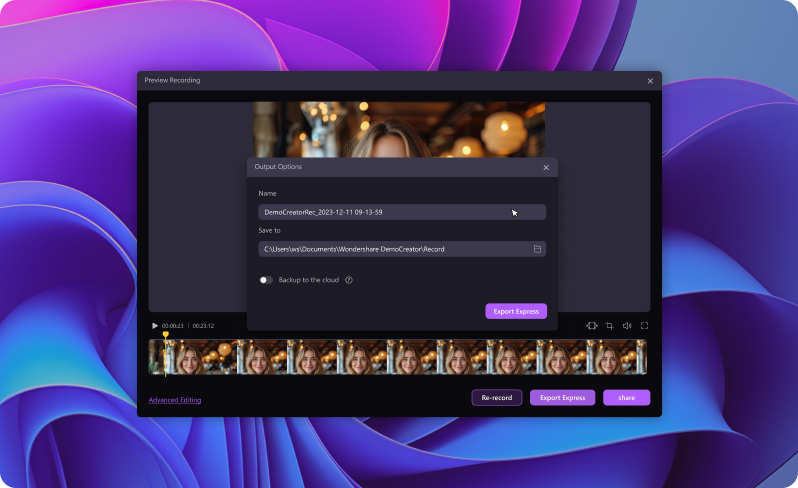
Step 7: Select your output options and click Export to save the recording on your computer.
Record Full Screen on Windows 10 With Game Bar
Windows 10 has a built-in screen recorder tool called Xbox Game Bar. Though its primary purpose is to capture game clips and record apps in full-screen mode, you can use the Game Bar screen recorder to record full-screen videos on your Windows 10 computer.
Here’s how to use it to capture the entire screen on your PC:
Step 1: Navigate to the Start menu and select Settings > Gaming;
Step 2: Click the Game Bar tab and enable Game Bar by toggling the switch to On;

Step 3: Press Windows + G to open the Game Bar;
Step 4: Tick the Yes, this is a game box;

Step 5: Click the Record button to start recording or press Windows + Alt + R;
Step 6: Click the Red button to stop recording and save the video on your computer.

Record Full Screen on Windows 10 With OBS Studio
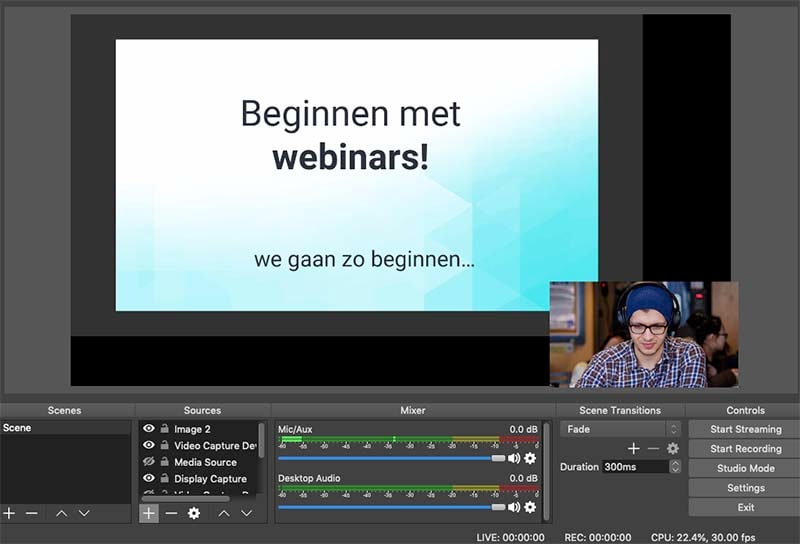
OBS Studio is a reliable, professional, open-source, free full-screen recorder and streaming tool for Windows and Mac users. The recorder packs top-grade recording features and settings, allowing you to capture top full screen recordings in high quality. You can use it to capture live streaming videos, presentations, live chats, gameplay, etc.
Download and install the OBS Studio full-screen recorder on Windows 10, then follow these steps to capture full-screen recordings:
Step 1: Launch OBS Studio on your PC;
Step 2: Select the Scenes tab and click the + icon;

Step 3: Click the Sources tab and select Display Capture > OK;

Step 4: Set the Capture Method setting to Automatic;

Step 5: Select Settings > Output to specify the output folder;

Step 6: Click Start Recording to capture the full screen on Windows 10.
Record Full Screen on Windows 10 With PowerPoint
MS PowerPoint is another excellent option for capturing full-screen recordings in ultra HD. The tool offers a user-friendly feature to record your computer screen and turn your screen captures into nail presentations, immersive slideshows, etc.
Follow the steps below to record your screen with PowerPoint:
Step 1: Type PowerPoint in the search bar and click Open to launch PowerPoint on your computer;
Step 2: Navigate to Insert > Screen Recording;

Step 3: Click Select Area to select the entire screen;
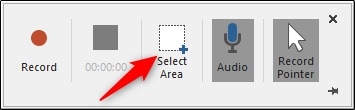
Step 4: Click the Record button to start recording;
Step 5: Once you capture the screen of your computer, PowerPoint will display the recording;
Step 6: Right-click the video and select Save Media as to save the clip on your device.

Record Full Screen on Windows 10 With MiniTool Video Converter
MiniTool Video Converter is a free tool you can use to capture screen recordings on your Windows 10 computer. The tool is easy to use and can seamlessly convert audio and video files. You can also download subtitles, playlists, audio files, and video clips from streaming platforms like YouTube. With MiniTool, you can record the selected area or full screen of your desktop.
Here’s how:
Step 1: Download, install, and launch MiniTool Video Converter on your PC;
Step 2: Navigate the main menu to Screen Record > Click to record screen;
Step 3: Select Full Screen and click the red Record button to start recording.

Comparing the Best Options for Recording Full Screen on Windows 10
Here’s a comparison table with the best tools for recording full screen on Windows 10 to help you make an informed decision.
| Software | DemoCreator | Game Bar | OBS Studio | PowerPoint | MiniTool |
| Ease of use | High | Medium | Medium | Medium | Medium |
| Effectiveness | Very High | Medium | High | Medium | Medium |
| Difficulty | ⭐ | ⭐ ⭐ | ⭐ ⭐ ⭐ ⭐ | ⭐ ⭐ | ⭐ ⭐ ⭐ |
| Video Quality | 4K/8K | 1080p | 4K UHD | 4K UHD | 4K |
Should You Use a Free Full-Screen Recorder?
Though free full-screen recorders offer a quick, easy, and convenient way to capture top-quality video footage for presentations, tutorials, social media, online meetings, and what have you, free software can never replace premium solutions.
Free solutions may offer the screen recording features you need, but these tools have limited functionality. That’s why opting for a tool that matches your screen recording needs is paramount to making an informed decision.
When choosing a free full-screen recorder, consider the following factors:
- Ease of use – select a screen recorder with an intuitive, user-friendly interface and streamlined workflows to capture full-screen recordings effortlessly.
- Scope of features – for a free solution with top features such as customizable video recording and editing settings, multiple screen capturing options, etc.
- Compatibility – check the compatibility information and system requirements to ensure the tool’s compatibility with your device’s operating system and avoid recording errors and software glitches.
- Editing tools – choose a free full-screen recorder that offers basic editing tools such as adding annotations, cropping, and trimming to help you enhance the quality of your videos, streamline your editing workflow, and create professional-looking screen recordings.
How to Select the Right Full-Screen Recorder for Windows 10

If you can’t decide which software to use to record the full screen on your Windows 10 computer, consider your specific recording needs. Different tools cater to different recording needs.
The best tools should offer all-encompassing full-screen recorder solutions with the following features and capabilities:
- Multiple screen recording options – the tool should let you choose the screen area you wish to record (full screen, specific area, or a single window);
- Audio/video recording – opt for a tool that supports microphone, system audio, and webcam recording;
- Presenting tools – top tools should come with top presenting features like captions, annotations, cursor highlighter, etc;
- Record in high-quality – top-grade tools like DemoCreator let you capture full-screen recordings in 4K and 8K quality;
- Multiple export and sharing options – you should be able to save your screen captures in multiple formats, such as MP4;
- Ease of use – a user-friendly interface with streamlined navigation is a must when choosing any type of software.
- AI-enabled audio/video editing capabilities – modern screen recorders like DemoCreator offer AI-powered audio and video editing features to empower users to turn simple screen captures into professionally looking, multi-purposeful visual content.
Conclusion
We have shared the best tools to help you capture full-screen recordings on your Windows 10 computer. Each solution comes with its unique advantages, functionalities, and recording capabilities.
Out of all the solutions on our list, DemoCreator stands out as the most all-encompassing full-screen recorder for Windows and Mac computers. The tool provides a streamlined, AI-powered audio/video editing platform, empowering users to capture top-grade screen recordings in real-time in 4K and 8K quality.


