

OBS Studio is one of the most popular screen recorders on the market. It’s an open-source, free recorder, meaning you’ll get various features without spending a dime.
However, OBS Studio has ups and downs; although it’s free to use, you may experience issues like OBS laggy recordings.
If you’re an OBS Studio user and have experienced lag while recording, we’re here to help. We’ll present all possible reasons behind the issue and show you how to resolve it.
If the following methods don’t work, we’ll show you how to step up your recording game with another recorder.
In this article
-
- Check if Your PC Meets the Minimum System Requirements
- Lower Your Game Settings
- Check if Your Network Is Stable
- Allow OBS Studio Through Windows Firewall
- Configure the Frame Rate in OBS Studio
- Configure the Resolution in OBS Studio
- Close All Background Processes
- Restart OBS Studio
- Reset OBS Studio to Default Settings
- Update the GPU Drivers

| Methods | Ease of use | Effectiveness rating |
| Check for minimum system requirements | Easy | 1/5 – You must use another recorder if your device doesn’t meet the requirements. |
| Lower your game settings | Medium | 3.5/5 – It should work and elevate your recordings in most cases, but the quality won’t be high. |
| Check the network | Medium | 2.5/5 – You must have an additional network source to resolve the issue. |
| Allow OBS through the firewall | Medium | 3.8/5 – This fix will resolve most OBS issues. |
| Configure the frame rate | Easy | 3/5 – You’ll make the platform compatible with your game. |
| Configure the resolution | Easy | 3/5 – OBS will make higher-quality videos. |
| Close background processes | Easy | 4/5 – This solution will make OBS run smoothly. |
| Restart OBS Studio | Easy | 2.5/5 – It only works with minor issues. |
| Reset OBS to default settings | Medium | 4/5 – This method will restore the app and make it as good as new. |
| Update GPU drivers | Medium | 3/5 – It isn’t the most common cause or solution for laggy recordings. |
Why Is My OBS Recording Lagging?
Numerous reasons may lead to laggy OBS recordings, including those below. We’ll present corresponding solutions in a minute to help you navigate the journey better and troubleshoot OBS Studio successfully.
- System requirements – OBS Studio has strict PC requirements you must meet to use the program.
- Advanced gaming settings – Your game may be too advanced for this recorder, so you must adjust the settings to fit the recordings.
- Internet connection issues – If you have an unstable internet connection, the recordings may lag, leading to poor-quality results.
- Permissions – Your computer may not have all the needed permissions to run OBS Studio.
- Low frame rates – OBS Studio may record at a low frame rate, leading to seemingly laggy recordings.
- Inadequate resolution – Your videos may become laggy if you’ve selected a low recording resolution.
- Multiple background processes – Running too many applications and programs in the background will impact OBS Studio’s performance.
- Settings issues – If you’ve changed the OBS Studio’s default settings, you may have accidentally caused recording issues.
- Outdated drivers – Obsolete GPU drivers can impact the recording quality and lead to laggy results.
Best Fixes for Laggy OBS Recordings
Here are all the solutions to fix the OBS laggy recordings issue.
Fix 1: Check if Your PC Meets the Minimum System Requirements
OBS Studio has strict requirements your device must meet. You can’t use the tool for recording purposes otherwise.
Before showing you how to check your device’s specifications, let’s see the minimum system requirements for OBS Studio:
- 64-bit processor and operating system
- At least 4 GB of RAM
- At least 600 MB of free space
- Windows 10 or 11
Check your device’s specifications by following these steps:
Step 1: Open Settings on your PC.

Step 2: Head to the System option.

Step 3: Open About to reveal your device’s specifications.

If your device’s specifications don’t match the minimum requirements, you can’t use OBS Studio for your recording needs.
Fix 2: Lower Your Game Settings
Higher game settings can lead to lag during recording. OBS Studio has limitations regarding the resolution and frames per second it can withstand, so if your game exceeds them, the recorder won’t be able to pick up everything on your screen.
OBS Studio can record your screen in up to 1080p resolution at a maximum of 60 FPS, so check the game’s settings and lower them if necessary.
The steps for this process will depend on the game you’re playing, so check the official guides and tutorials to ensure a smooth transition and the best recording results.
Fix 3: Check if Your Network Is Stable
Your network and internet connection can be your worst gaming and recording enemies. If the connection is slightly unstable, you’ll notice a difference in how the game runs and your recorder acts. Thus, check whether your connection is stable before jumping into the OBS recording journey.
Numerous network stability checkers are available. We’ll use PacketStats to showcase a general guide to checking the stability.
Step 1: Head to PacketStats.
Step 2: Click Start on the homepage.

Step 3: Once the tool finishes scanning, it will display the results on the page.

If the tool informs you of a poor connection, switch to a more stable network for the best OBS Studio recording results.
Fix 4: Allow OBS Studio Through Windows Firewall
Windows Firewall is a built-in security tool to protect your device from potentially threatening applications and processes. Since OBS Studio is an open-source screen recorder, your computer may recognize it as a threat and instantly deny access. You can quickly change these settings by following the steps below:
Step 1: Open Settings on your device.
Step 2: Head to Privacy and Security > Firewall & Network Protection.

Step 3: Click Allow an App Through Firewall.

Step 4: Click Change Settings > Allow Another App.

Step 5: Select OBS Studio and click Add.
After completing these steps, your OBS Studio recordings should be flawless.
Fix 5: Configure the Frame Rate in OBS Studio
OBS Studio lets you customize recording preferences and set the desired frame rate to capture your gameplay. If the frame rate is too low, the program will record according to the settings, so check and configure these elements before hitting the Record button. Here’s a detailed guide:
Step 1: Open OBS Studio and head to Settings from the main interface.

Step 2: Click Video and select the preferred FPS rate under Common FPS values.

Step 3: Click OK to finish the process.
After that, OBS Studio should be able to keep up with your gameplay and record high-quality videos.
Fix 6: Configure the Resolution in OBS Studio
Another reason behind laggy OBS recordings is an inadequate resolution. It may be lower in the default OBS settings than your screen’s resolution, leading to low-quality and laggy results. Luckily, there’s a quick method to resolve this issue.
Here’s a step-by-step guide to configuring your resolution in OBS Studio:
Step 1: Open Settings in OBS Studio.

Step 2: Head to Video in the left sidebar.

Step 3: Expand the Base (Canvas) Resolution drop-down list and select the desired option.

Step 4: Click Apply > OK to save the change.

As you can see, changing the resolution and bringing your recordings back to life will take only a few seconds.
Fix 7: Close All Background Processes
If numerous applications and processes run in the background, they’ll significantly impact your recorder’s and game’s performances, leading to low-quality and laggy OBS recordings. Therefore, close them before recording to avoid potential lag, bugs, and crashes.
The quickest way to close all background processes is to follow the steps below:
Step 1: Open Settings on your device.
Step 2: Head to Apps > Installed Apps.

Step 3: Click More (the three horizontal dots) next to the app you want to close and select Advanced Options.

Step 4: Click Never under Background App Permissions.

Repeat this process for all unwanted applications and watch your OBS Studio experience transform.
Fix 8: Restart OBS Studio
Sometimes, you may experience laggy OBS recordings due to random bugs. The best solution to this issue is to restart the OBS program. The process is quick. Here’s what to do:
Step 1: Close OBS Studio by clicking the X button in the top right corner.

Step 2: Open the Task Manager on your device.

Step 3: Select OBS Studio and click End Task in the top section (or the bottom right corner on Windows 10 and older).

After successfully closing the program, relaunch it to enjoy recordings without the lagging issue you have experienced.
Fix 10: Reset OBS Studio to Default Settings
If you wanted to make the most of OBS Studio and tried customizing the settings, you may have experienced lag or bugs during recording. If random lag and other issues greet you, resetting OBS recording settings to default can help you resolve such difficulties and continue your recording journey. Below is a step-by-step guide to doing it:
Step 1: Open the OBS program on your computer and head to File > Show Settings Folder.

Step 2: Close OBS Studio.
Step 3: Select all files in the folder, right-click them, and hit Delete.

Once you complete these steps, relaunch OBS Studio; the program will appear as if you’ve just installed it.
Fix 11: Update the GPU Drivers
Obsolete graphics drivers can impact the recording quality and the gaming experience. Therefore, regularly update them to ensure you use the latest versions and protect your gameplay and recordings.
Here’s how to update your GPU drivers:
Step 1: Launch the Device Manager on your PC.

Step 2: Expand Display Adapters.

Step 3: Right-click your GPU and select Update Driver.

Restart your device after updating the drivers to enact the changes.
OBS Recording Still Laggy? Switch to a Different Recorder
The solutions above should resolve all your laggy OBS recording issues. However, if the problem persists, use another recorder to get the most out of your experience. OBS Studio isn’t for everyone and will perform differently across devices.
The market is teeming with recording solutions, so selecting the ideal one may be a pain in the neck, primarily if you have little to no experience in the field. We’ve tested all popular solutions and can confidently say that Wondershare DemoCreator is the best and most versatile tool.
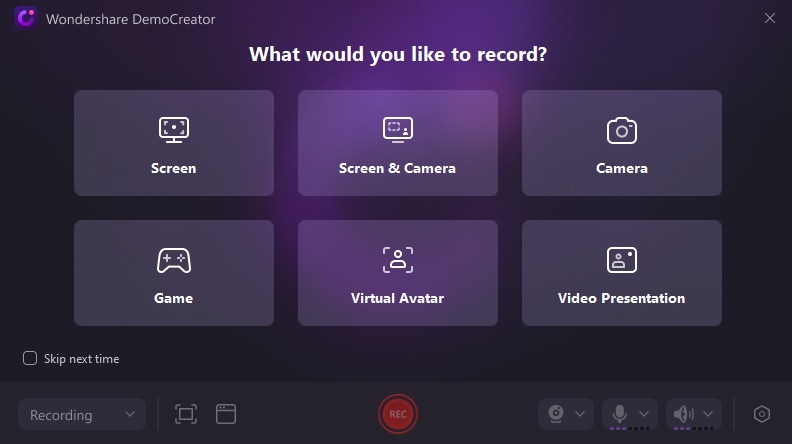
Wondershare DemoCreator has six recording modes, each catering to different needs and preferences. You can customize the recording experience by changing the resolution, output devices, FPS, and other settings before recording.
After you finish recording, you’ll access many exclusive editing features to make your content more professional and accessible. For instance, you can use annotations to highlight your best gaming moments.
Wondershare DemoCreator is a feature-packed, easy-to-use solution for beginners and professionals. Regardless of your skill level, you can use it to make fantastic content. Thus, download it from the official website and follow these steps to start recording:
Step 1: Open Wondershare DemoCreator and click the Video Recorder.
Step 2: Select a recording mode from the available options.
Step 3: Customize your recording settings.

Step 4: Click the REC button to start recording, or press F9 on your keyboard.
Step 5: Finish recording by pressing the F10 key or clicking the Stop button.

Comparing DemoCreator to OBS Studio
Check the table below to learn all the differences between Wondershare DemoCreator and OBS Studio. It’ll help you select your ideal solution and start the most efficient recording journey.
| Features | Wondershare DemoCreator | OBS Studio |
| Recording resolution | Up to 8K | Up to 1080p |
| Frames per second | Up to 120 FPS | Up to 60 FPS |
| Ease of use | Easy | Medium |
| Editing features | Yes | No |
| Recording modes | Yes | No |
| AI-powered tools | Yes | No |
| Windows OS support | Windows 7 and higher | Windows 10 and 11 |
| Beginner-friendly | Yes | No |
| Resource usage | Low | Medium |
As you can see, Wondershare DemoCreator is a more versatile solution than OBS Studio in various aspects. For instance, it has advanced, AI-powered features, including auto-captions, virtual avatars, a voice changer, and a denoiser, to take your video recording experience to the next level. Additionally, it’s far easier to use, making it beginner-friendly and perfect for everyone.
- Record customized screens with audio and edit them in different tracks.
- Capture gaming videos, tutorials, and presentations and then edit them in one tool.
- Built-in unlimited editing templates, special effects, and other sources.
- Supported export to MP4, MOV, MKV, GIF, and other formats.

Conclusion
OBS Studio is among the most popular free screen recorders on the market. Although it isn’t feature-packed, it can still do the trick and help you capture your favorite moments.
However, the tool may deliver laggy recordings, leading to poor-quality results. We’ve explored all working methods for dealing with that issue, including updating your graphics drivers, changing the settings, and enabling OBS through the firewall.
If those solutions work, use a better screen recording tool like Wondershare DemoCreator. This easy-to-use, feature-packed software is compatible with numerous devices and provides professional-grade tools to maximize efficiency and productivity.


