

Did you know that there are over 5 million podcasts in the world? If you are looking for ways to cut through all that noise, crisp recordings are a good way to start. Podcasters need professional sound before anything else, and the best way to achieve it for free is with GarageBand.
GarageBand is known as a beginner Digital Audio Workstation (DAW) for Macs. Unlike other similar solutions, it is completely free to use and fairly easy to master. If you still need some guidance, don't worry. We will show you how to set up, record, and edit a podcast in GarageBand.
Table of Content
Things You Need to Record a Podcast in GarageBand
Before we get started, there are a few things you need to record a podcast on GarageBand. Besides a working Mac, you should also have the right equipment. The essential gear includes the microphone, headphones, and audio interface if you decide to go with an XLR microphone.
| Equipement | Introduction |
| Microphone | XLR microphones are a more professional alternative to USB mics, but they are also more expensive and require an audio interface because you can't plug them directly into your computer. Ultimately, choosing a mic is a matter of personal preference and budgetary constraints. |
| Headphones | Can you use your regular headphones to record sound with GarageBand? You can, but the results will be inferior to recording with monitoring headphones. You want to be able to hear your recordings as they really sound, so you need pro headphones with flat frequency response. |
| Audio Interface | If you choose an XLR microphone, you will also need an audio interface to convert analog audio into digital form. An audio interface is necessary if you want to record instruments, as well. You don't need a $2,000 audio interface to get started; a $200 alternative will suffice. |
Do you have everything you need? Excellent. Let's record your first podcast.
How To Setup a Podcast Project in GarageBand
Many beginners ask us the same question: Are there default GarageBand podcast settings I can use? Unfortunately, GarageBand doesn't have a template for recording podcasts.
So, first, we need to make sure that GarageBand is configured for podcast recording. This is easy to do, even for beginners. GarageBand has default settings for recording software instruments, mic and instrument audio, and drums, so all you need to do is choose the right one.
- Make sure your microphone and headphones are plugged in before you launch GarageBand.
- Select New Project from the sidebar on the left and name your Empty Project.

- GarageBand will ask you to pick a recording preset. Under Choose a track type, select Audio Mic to record using a microphone or line input.

- In the menu bar at the top, click on GarageBand and select Preferences from the drop-down menu.

- In Preferences, click on the Audio/MIDI tab and look under Devices. Select your headphones for the Output Device and your microphone as the Input Device.

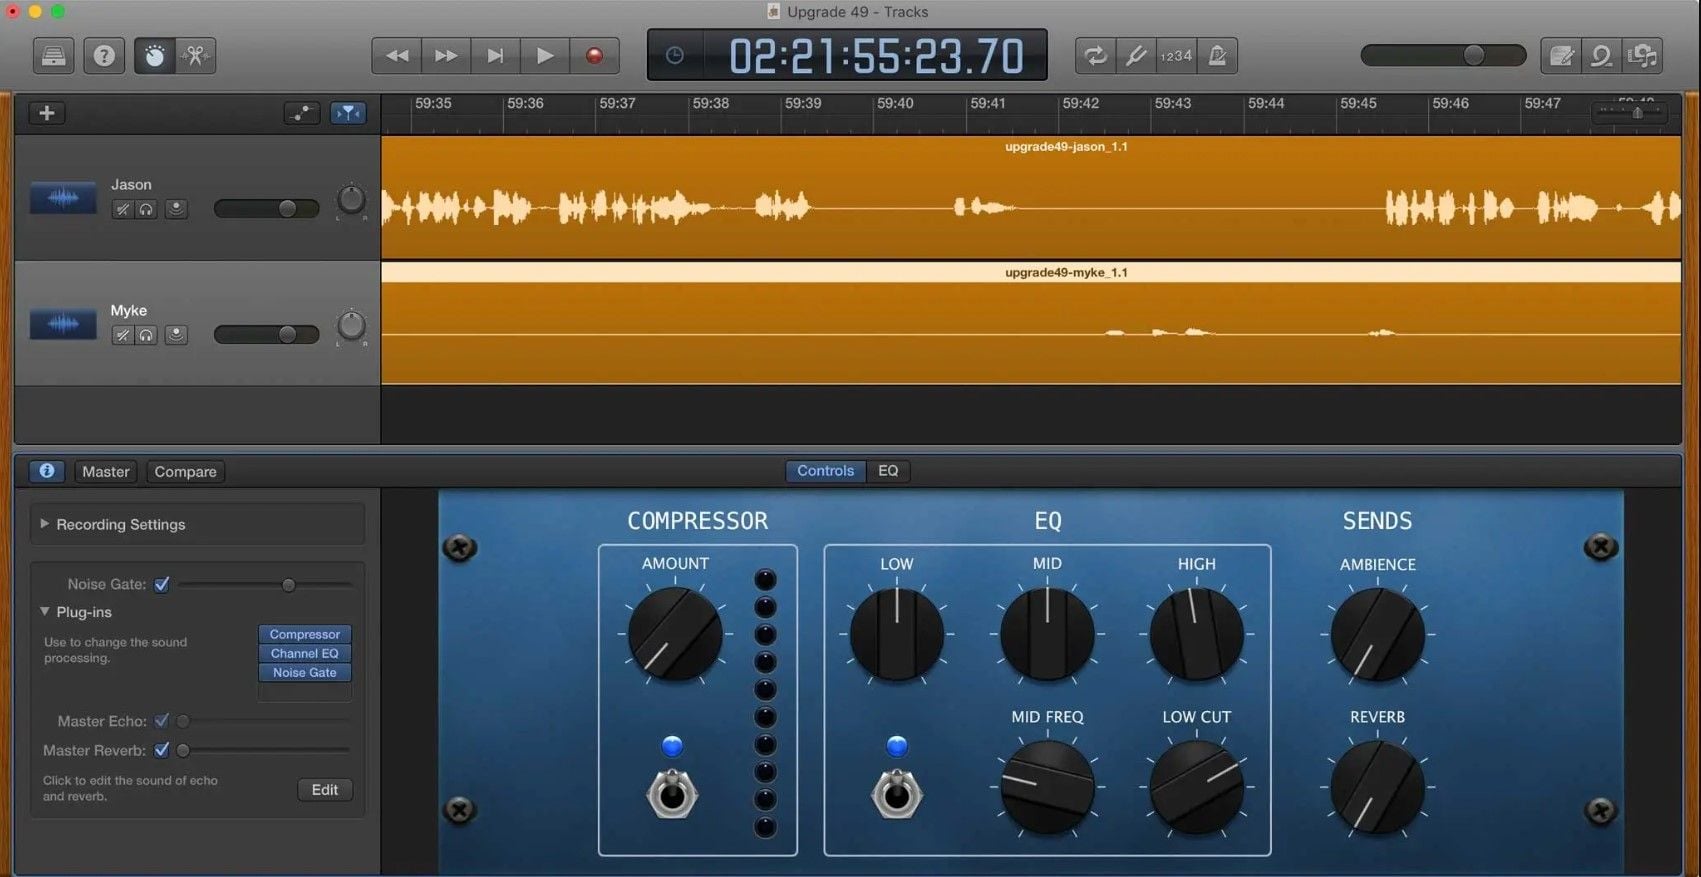
- If you're using multiple microphones, you need to create separate tracks for each. Doing this will give you more control over the editing process and help you achieve a balanced mix. Click on the + sign to add a new track. Don't forget to set the Input Device for each track because GarageBand won't let you record the same input to multiple tracks.

- There's one more thing you need to do before you start recording - you need to disable the metronome and count-in features. They are primarily used for recording music, and they might be distracting while recording a podcast. You will find a Metronome icon in the top menu bar. Click on it to turn the metronome off.

How To Record a Podcast in GarageBand
At this point, you're ready to hit the button and start recording a podcast with GarageBand. You have two options to choose from: single-track and multitrack recording.
- If you want to record a single track, simply press the Record button at the top menu bar. It's always a good idea to do a test run and make sure the volume and other settings are right.

- If you want to capture multiple microphones at the same time, you need to set GarageBand for multitrack recording. After you add a new track by pressing the + button, head to the top menu bar and select Track > Configure Track Header.

- Each track has a separate Record button. Click on this button for every track that you want to record.

- After you click on separate track Record buttons, they will turn red, and the tracks will start to flash. That means they are ready for multitrack recording. To begin recording separate tracks at the same time, click on the main Record button in the top menu bar.

How To Edit a Podcast in GarageBand
There are several features you can use to edit a podcast in GarageBand. Below, we'll show you how to use Loop Pointer, Split Regions at Playhead, and Automation. GarageBand also lets you enhance audio quality, mix separate tracks, and add music to your podcast.
Trimming Tracks (Loop Pointer)
If you want to shorten an audio track in GarageBand, you can do that using a Loop Pointer feature.
- Hover your cursor over the lower right edge of the audio clip until it turns into a double-ended arrow.
- Click on the edge of the clip and start dragging to the right.

Splitting (Split Regions at Playhead)
GarageBand also allows you to divide tracks into separate sections that you can edit individually. That way, you can trim and rearrange parts from the middle of the track.
- Click the vertical line that moves as you play the audio and drag it to the place where you want to split the track. FYI, this line is called the Playhead.

- Click on Edit at the top menu bar and select Split Regions at Playhead.

- Now, you can hit the backspace button to delete one of the sections or drag a new section to another place in the timeline to rearrange it.
Adjusting the Volume (Automation)
If certain parts of your track are quieter or louder than the rest, you can adjust their volume levels with a feature called Automaton.
- Select the track you want to edit.
- Open Mix in the menu bar at the top and click on Show Automation.

- You will see a faded yellow line across your timeline. Click on this line in the specific place on the timeline where you need to adjust the volume. This will create an Automation nod that you can drag up or down to make this part of the track quieter or louder.

- You can also use Automation nodes to fade in and fade out parts of the track that were abruptly cut with the Split Regions tool.
Enhancing Audio Quality
If you're not quite satisfied with the result and you want to polish your sound further, you can use GarageBand's Equalizer and other audio enhancement features like Noise Gate and Compressor.
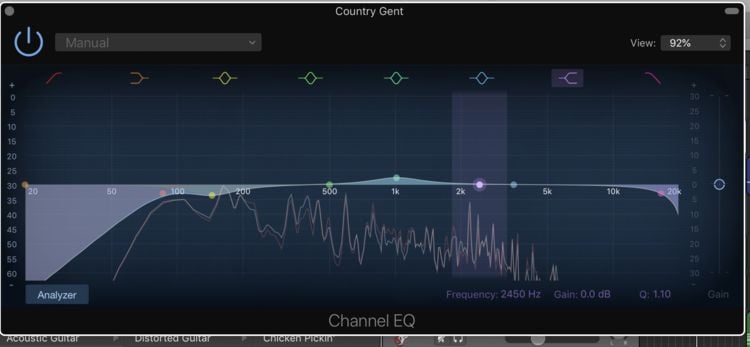
- The Equalization feature allows you to achieve the perfect frequency balance in your tracks. This is a powerful tool that largely contributes to the professional-sounding results, but it could take some time to master. You can learn more about it from DAW experts.
- The Noise Gate allows you to eliminate background noise and other unwanted sounds. Click the B key to open SmartControls and check the box next to the Noise Gate to enable it.
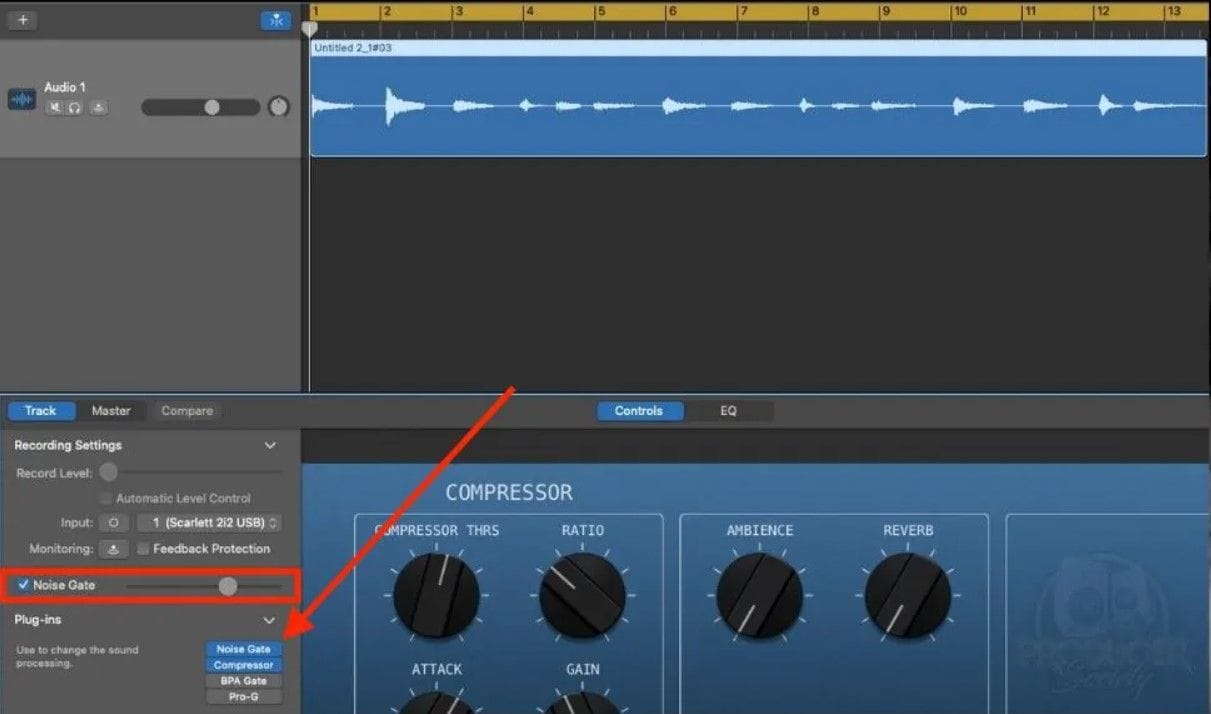
- GarageBand's Compression is useful when you have loud sounds that you want to tune down to the same level as the quieter sounds. Open SmartControls and click on Plug-ins > Dynamics. Select Compressor and find the perfect combination of settings.
Adding Music to Podcast
Being made for music production, GarageBand also allows you to add music to your podcast.
- Find the audio file that you want to add to your vocals and simply drag and drop it into GarageBand.
- Use the Automation feature to apply fade-in and fade-out and create smooth transitions between music and voice.
Arranging Tracks in GarageBand
The easiest way to arrange tracks in GarageBand is in chronological order:
- Select Track in the top menu bar and click on Show Arrange Track.
- Click on the + icon in the Mixer column to create a new region and move the line to set the duration of each track. Name sections for easier visualization.
- If you want to rearrange a section (for example, if you want to move the first part of the recording to the middle), simply click on it and drag it to the desired timeslot.

Mixing Tracks in GarageBand
There are many different ways to mix audio in GarageBand. Luckily, mixing podcasts does not need to be as complicated (or creative) as mixing music. The best way to approach this as a beginner is by using your voice recording as a basis for adjusting other tracks' parameters.
- Listen to your voice track and make sure that the voice levels are within the green range on the track's header meter.

- Listen to the other tracks (music, narration, and other sound effects) and adjust their volume levels accordingly.
- If you haven't done that already, use Automation to add fade-ins and fade-outs between different types of tracks.
Best GarageBand Settings for Recording a Podcast
Earlier, we mentioned that there are no default GarageBand settings for podcasts, but that doesn't mean that there isn't an easy way to make your GarageBand podcast-friendly. Sure, you will have to fiddle with a few settings yourself, but you only have to do that once.
Experienced users have already cracked the best GarageBand settings for podcasts. The only thing you have to do is apply and save them as your default podcast settings.
- To adjust the optimal input level, put the mic 3-5" (80-120 mm) away from your face and speak directly at its diaphragm in your normal-to-loud speaking voice. Ideally, you should achieve between -10 and -20 dB, which is about halfway up the recording meter.
- You can try laughing loudly to make sure the meter doesn't go into red. If it does, turn the input level down. The recommended peak value for podcasting is -1.0 dB, so make sure your loudest sounds don't go beyond that.
- The correct bit rate for podcasts is 128kbps, while the right sample rate is 44.1 kHz or 48 kHz.
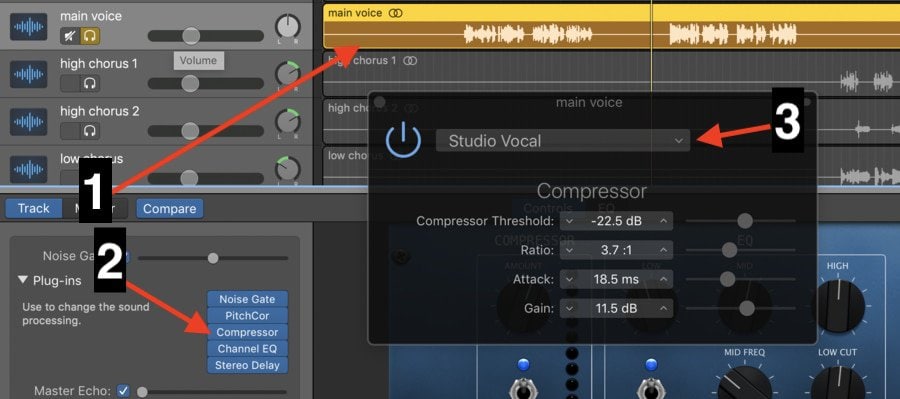
- To enhance sound quality, set the Compressor Threshold to -17.0dB, Ratio to 3.1:1, Attack to 9ms, and Gain to 7.0 dB.
GarageBand is not the only option for capturing podcasts. These settings are not specific to this DAW or Macs, which means you can use them to fine-tune any voice recorder.
A Simpler and Faster Alternative to Garageband for Podcast - Wondershare DemoCreator
Running a podcast is nowhere near as easy as it looks. As a first-time podcaster, you are probably starting out with limited experience and a shoestring budget. And even though GarageBand is the easiest DAW for recording and editing podcasts, there's a learning curve.
Is there any way you can do this faster? If you want a voice recorder that you can start using today, you might want to consider an alternative like Wondershare DemoCreator.
As you will see in a minute, DemoCreator is easier to configure and use than GarageBand. But there is more. Unlike GarageBand, DemoCreator is an all-in-one recorder that captures and edits video and sound using six recording templates with out-of-the-box settings.
On top of that, DemoCreator packs a selection of tools and features for quality enhancement and creative possibilities. Some of its best features for podcast recordings are:
- Internal and external sound capture;
- Separate audio and video recording;
- External and virtual camera capture;
- Screen capture with webcam overlay;
- AI Denoise and Speech Enhancement;
- AI Teleprompter with script editing;
- AI voice changer to help you sound more professional;
- Instant sharing to YouTube, Vimeo.
In other words, DemoCreator has everything you need to record your first podcast right now, plus additional features for producing professional and creative recordings. And let's also mention that this tool is not restricted to Macs. You can use DemoCreator on Windows, too.
Instead of telling you more about it, let's show you how DemoCreator works.
- First, download DemoCreator from the official website and install it.
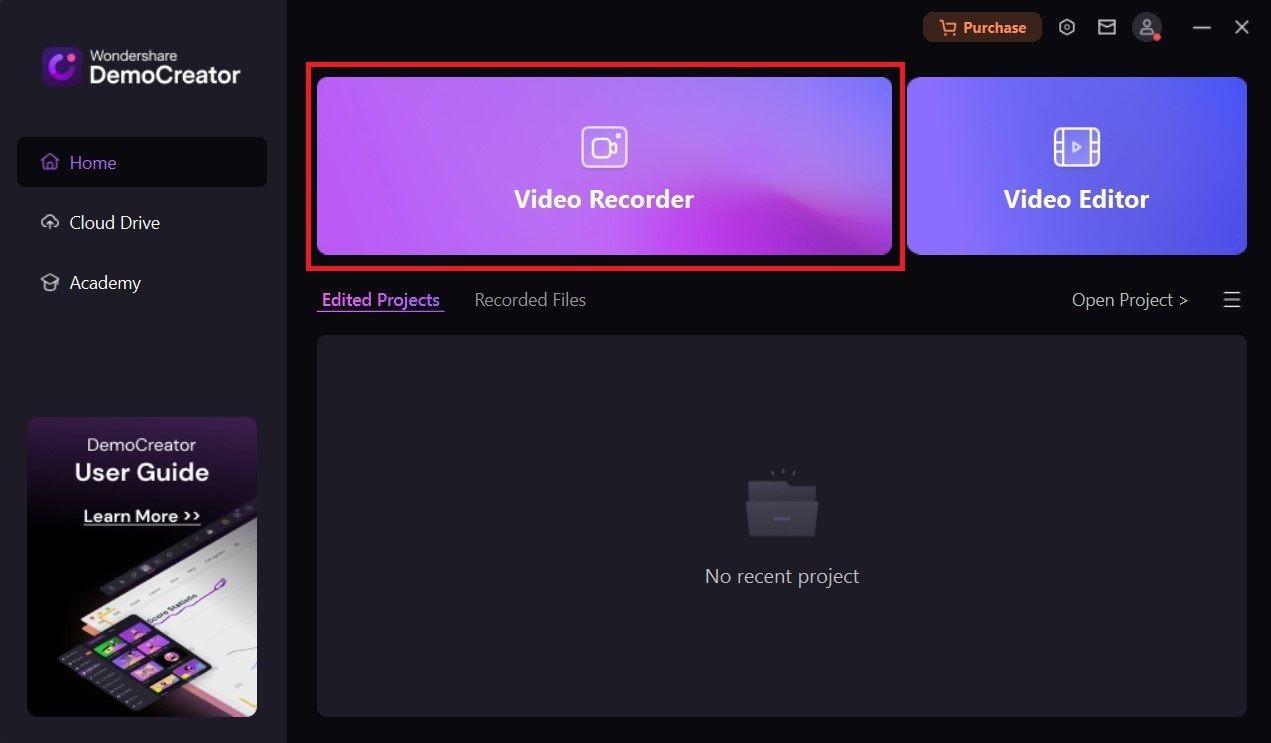
- Launch DemoCreator. The easiest way to record only audio without a picture is to select Video Editor.

- Click the Microphone icon and choose the Device input. Click the Record button and adjust the Volume if needed.

- When you want to stop recording, hit the Record button again.
- Look to your right, and you will see a panel with Magic Tools and Audio editing options. Many of these features let you improve the quality of your recording with a single click. You can use Denoise to get rid of unwanted background sounds, enable AI Speech Enhancement to achieve crisp vocals, or experiment with a Voice Changer feature that allows you to speak in a different voice.

- With DemoCreator's Audio editing tools, you can adjust the volume and sound balance, add fade-ins and fade-outs, and more.

- If you want to add sound effects or music, you can do that from the Audio Effects and Audios sections in the menu bar on the top left. Select and click on the effect to try it.

- When you're done editing your audio, click the Export button in the top right corner. Change the Format to MP3 or a different audio format.

- You can also post your recordings directly to YouTube, Vimeo, and TikTok.

If you want to record a multimedia podcast with both video and sound capture, choose Video Recorder.
- Pick Screen or Screen & Camera from the six available recording modes.

- DemoCreator will capture your screen together with a microphone and system sounds, but you can edit and export only the audio recording.
- The first time you use DemoCreator, you will be prompted to choose between two recording settings: Multitrack recording and editing and Single-track recording and editing. If you end up choosing the wrong one, you can always change this in Settings > General > Recording Configuration. The first option will launch DemoCreator's Editor immediately after you finish recording, while the second will let you choose between Quick Export and Advanced Editing.

- The toolbar at the bottom of the screen lets you adjust the Capture area if you want to record your screen in addition to sound. This is also where you can customize the audio input device and choose a microphone, system sounds, or both.

- If you're ready to start recording, hit the big red REC button.

- Click the Stop icon at the top right corner when you want to stop recording.

- If you have chosen Single-track recording and exporting, DemoCreator will give you the option to adjust the volume and use Quick Export or Share to save or share the recording as it is. However, this will export the recording as a multimedia file with both sound and picture. Alternatively, you can click on Advanced Editing and launch the DemoCreator Video Editor.

Conclusion
Making a podcast on GarageBand requires more or less technical knowledge, depending on your editing needs. While recording itself is a fairly easy process, using GarageBand for podcast editing could be challenging - especially when it comes to sound effects and mixing.
You should also know this: when you record a podcast in GarageBand, you only get sound. Ideally, you want to be able to record video, too. If you want to create a multimedia podcast with both video and audio, you need an all-in-one recorder like Wondershare DemoCreator.
FAQ
-
Is GarageBand good for podcasting?
GarageBand is a solid software for podcasts. It comes free with all MacOS devices, so it is an easy choice for budget-savvy beginners. It is also easier to use than other Digital Audio Workstations (DAWs), particularly the recording part of the process. In terms of audio editing and sound mixing, unlocking GarageBand's true potential comes with a learning curve that might take some time and effort to tackle. -
Which is better for podcasting, Audacity or GarageBand?
GarageBand is better for podcasting for a couple of reasons. 1) It is much easier to use compared to Audacity, particularly if you don't have prior experience with sound editing. 2) Its editing and mixing features are superior to Audacity, and it gives you access to a more extensive library of sound effects. -
Can you edit a podcast in GarageBand?
Yes, you can use GarageBand for podcast editing. Apple's DAW comes with excellent tools and features for sound enhancement and manipulation. However, the editing process could feel overwhelming because it was designed for musicians. If this is your first time using an audio editing solution, it is a good idea to have a step-by-step GarageBand for podcasting tutorial on hand. -
Do real producers use GarageBand?
Some real-life producers use GarageBand despite its limitations. GarageBand lacks some features and capabilities of advanced DAW solutions, but it still offers limitless possibilities to those who know how to use them in a creative way. -
What are the cons of GarageBand?
GarageBand is a fantastic DAW trusted by millions of musicians, but it has a few flaws that might alienate some users. Depending on your experience and skill, you might find sound editing with GarageBand too simple and rudimentary or too difficult to master. One of the major drawbacks of GarageBand is that it is available only on MacOS devices.


