

Most Apple enthusiasts know iMovie as a simple video editing tool for macOS and, later, iOS. After all, the app was primarily developed 25 years ago as a lightweight video editor focusing on essential editing tools that anyone can use, but did you know you can also record yourself with iMovie?
Today's guide will explore the app's recording capabilities and show you how to film yourself on iMovie. We'll provide detailed step-by-step instructions, help you figure out how to record yourself in iMovie on Macs, iPhones, and iPads, and offer an alternative solution that might better fit your recording needs.
Table of Content
How To Record Yourself in iMovie on Mac
As it was designed to be as simple as possible, figuring out how to record yourself in iMovie on macOS is remarkably straightforward. To help you get started, we've also provided detailed steps with images, so here's everything you need to do to record yourself in iMovie on a Mac:
- Open the Applications folder and tap iMovie to launch the app on your Mac.
- Select the Projects tab, tap the Create New button, and hit Movie to start a new movie project.

- Click My Movie in the Project Media area and tap Import Media.

- In the Cameras section in the top left corner, click the FaceTime HD Camera to use your Mac's built-in webcam. Alternatively, select a different camera if you own a third-party webcam.

- Once your camera's preview appears, press the red Record button to start recording yourself.
- When done, tap the same button again to stop the recording.
The recordings you create with iMovie will automatically be imported to Project Media. You can also change that location in the "Import to" field at the top of the iMovie screen.
How To Record Yourself in iMovie on iPhone/iPad
Although it was primarily developed for Mac OS, the iMovie app also became available to iOS users in 2010 with the launch of the iPhone 4. Today, iMovie is a part of any iOS and iPadOS device, allowing users with iPhones and iPads to film themselves straight from the video editing app.
Here's a step-by-step guide on how to record yourself in iMovie on iPhones and iPads:
- Tap the iMovie app to open it on your iPhone/iPad.
- Swipe from the bottom of the screen and choose the Movie option under Start New Project. You can also select Storyboard to use iMovie's premade templates.

- Import an existing video (which you can remove after you record a video of yourself) and press the Create Movie button at the bottom of the screen.
- Click the Plus icon and tap on Camera. Then, select the Video option and record yourself using the front-facing camera in iMovie on iOS. (You can also use the back cameras, but this will be more challenging and is far more likely to require cuts and trims.)

- If you're unsatisfied with the recording of yourself, tap Retake to try again. Otherwise, click the Use Video option to import the camera recording into iMovie.
Figuring out how to record yourself on iMovie for iOS devices is as easy as using the macOS version of the app. However, recording with your iPhone or iPad's native Camera app is always a far better option that provides many more customization options, and you can always import these recordings into iMovie instead of recording straight from the video editing app.
Tips for Recording Yourself in iMovie
Now that we know how to use iMovie on macOS and iOS, we can also dive into a few valuable tips to ensure you end up with engaging and exciting recordings of yourself, regardless of the audience. They include the following:
- Lighting - Filming yourself in natural and soft lighting conditions where you're well-lit without sharp shadows or bright backgrounds will result in a clear recording of yourself in iMovie, especially when using your Mac's relatively limited built-in webcam.
- Background - Clearing the space behind you will create an uncluttered environment and place the focus on you, which makes for a much more engaging recording, especially if you're filming yourself for YouTube and other similar platforms.
- Camera Position - Placing your Mac's built-in webcam or iPhone/iPad at eye level or slightly above plays a significant role when recording yourself for any video content. You can also use a laptop stand or a tripod for your iOS device.
Following these recommendations will make your iMovie recordings appear well-made, professional, and engaging, even if you use a low-quality Mac webcam.
Pros and Cons of Recording Yourself in iMovie
Like any desktop or mobile software, iMovie has distinct strengths and weaknesses. Let's examine these aspects and consider the pros and cons of recording yourself with the iMovie app.
It's clear that iMovie has both good and bad sides, regardless of whether you're using it on macOS or iOS. However, with all things considered, it might be a good webcam recorder for Mac, but not a screen recorder for Mac.
A Better Option for Recording Yourself - Wondershare DemoCreator
Third-party solutions often provide more customizability and recording options than the integrated iMovie app. Therefore, these apps are usually a better choice for professional recordings of yourself, and DemoCreator is a perfect example of such a third-party tool.
Unlike the integrated iMovie, DemoCreator isn't limited to webcam-only recording mode and doesn't suffer from overlay simplified controls. Instead, it lets Mac users create screen, webcam, and audio recordings separately or simultaneously, making it a far better option for recording yourself on Macs.
Its intelligent AI Video Background Remover can also be incredibly helpful, allowing users to remove and change their backgrounds seamlessly. This feature even has dozens of academic and business presets for virtual backgrounds, letting users change their surroundings with a single click as it instantly adapts to your face camera.
- Record desktop screen, audio, and webcam simultaneously or seperately
- AI teleprompter to ensure a smooth presentation
- Edit videos quickly with a wide range of professional tools and visual assets

Figuring out how to record yourself on iMovie for macOS or iOS is effortless, but doing so with DemoCreator is even more straightforward. Here's how you can do that:
- Download, install, and launch the DemoCreator app. Then, tap the All-in-One Recorder.

- Enable WebCam recording and set the app to use your Mac's FaceTime HD Camera.

- Adjust your System Audio and Microphone settings to include them in your webcam recordings.
- If you'd like to focus on webcam-only recordings, select the Don't record screen option under Capture Area. Alternatively, adjust the Capture Area settings to include a simultaneous screen recording.
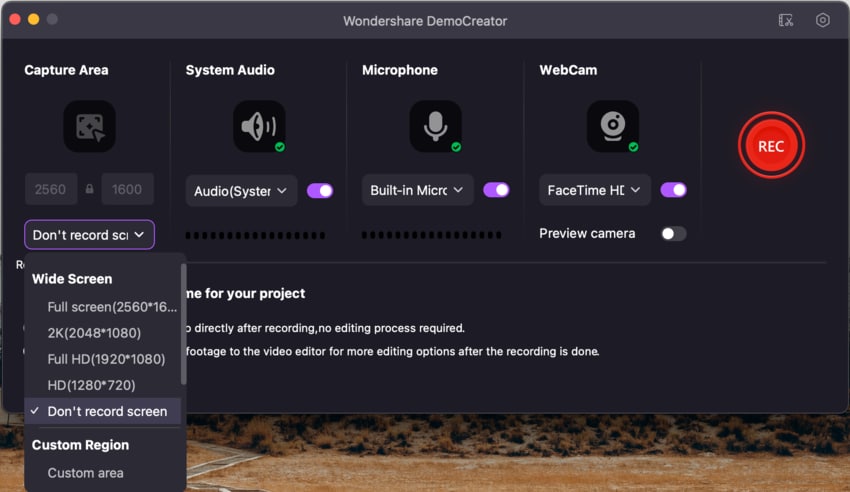
- Once you're satisfied with the settings, tap the REC button or hit OPTION + COMMAND + 2 to start recording. You can press the same key combo to pause or resume a recording.
- Press SHIFT + COMMAND + 2 to stop recording your webcam.
Users can also choose a Recording Scheme where Export Express automatically saves the recording while the Edit Recordings option launches DemoCreator's built-in video editor once you stop recording. You can then edit the webcam footage, apply various filters, adjust your audio levels, or try one of the app's many AI-powered tools to take your recordings to another level.
Conclusion
While iMovie is primarily a simple and lightweight video editing app for macOS and iOS, it can also serve as a decent video recorder, and we've shown you how to record yourself in iMovie with detailed guides for Macs, iPhones, and iPads.
However, despite its user-friendly design, Apple ecosystem integration, and simple operation, iMovie also has a few drawbacks. It offers no control over your recordings and is limited to webcam-only clips.
For anyone filming themselves for personal use, iMovie will likely be enough. However, if you're trying to create high-quality social media content, engaging videos, and elaborate tutorials, a third-party app like Wondershare DemoCreator makes much more sense.
Its user-friendly interface is packed with robust video recording and editing features. It lets users create separate or simultaneous screen, camera, and audio recordings, making DemoCreator a far more powerful recording tool than iMovie.


