Sling TV is a popular live TV streaming service that allows you to watch your favorite channels and shows over the internet. Many people use Sling TV as an alternative to traditional cable or satellite TV. While Sling TV offers a great way to watch live TV, you may want to record certain shows or events because they air at inconvenient times or clash with your schedule.
In this guide, you’ll explore different methods to record Sling TV episodes. Whether you prefer using Sling TV’s built-in DVR feature or want to explore third-party recording solutions, this article has you covered. Read through and ensure you never miss your must-watch programs again!
In this article
Part 1. How To Record Sling TV With DVR Plus
While Sling TV offers live TV streaming, sometimes you may want to record shows or events to watch later. Sling TV does provide a paid cloud DVR service called DVR Plus that allows you to record live TV programs. This will answer your question, “How do I record on Sling TV?”
What Is DVR Plus?
DVR Plus is Sling TV’s cloud-based DVR solution that enables you to record live TV shows and movies from Sling TV channels. It works by storing your recordings in the cloud, which you can access and watch on any supported Sling TV device.
How DVR Plus Works
With DVR Plus, you can record both individual episodes or entire series. Recordings are stored in the cloud, so your devices don’t need extra storage space. Sling TV takes care of everything server-side. Here’s how you can record with DVR Plus:
Step 1: Open the Sling TV app and go to the Guide.
Step 2: Browse or search for the show/movie you want to record.
Step 3: Select the program and find the Record option.
Step 4: Choose if you will record just that episode or the entire series (new episodes only or all).
Step 5: The show will now be scheduled to record.
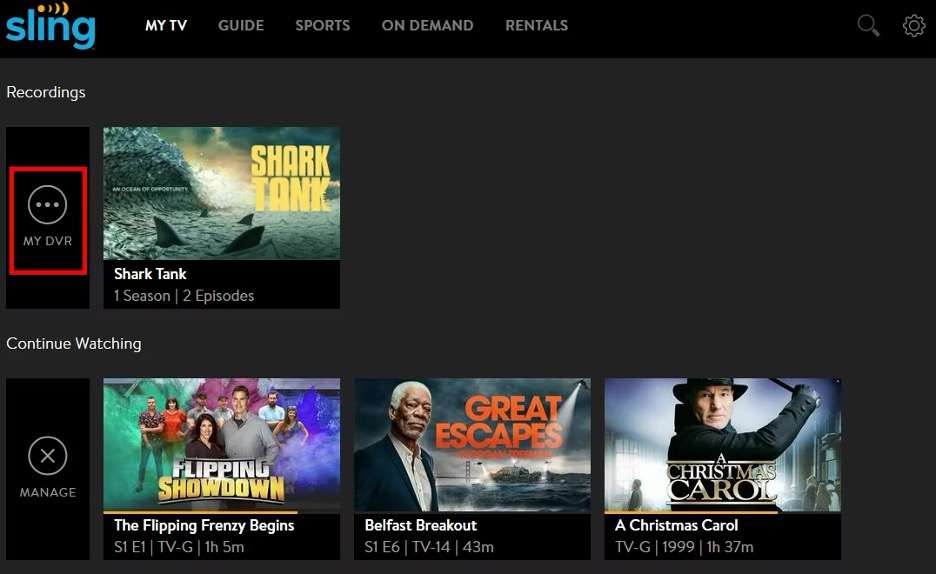
After recording, you might wonder how to access the shows. Of course, you can access everything within your Sling TV account. Just go to MyTV > Recordings. Select the show you want to watch, and it will start playing.
A Review of DVR Plus
While convenient, the main downside of Sling TV’s DVR Plus is that it requires an additional paid subscription on top of your Sling TV package. DVR Plus costs $5 per month, which gives you 200 hours of DVR storage. A free, more limited cloud DVR is included with Sling TV’s base subscriptions, providing 50 hours of storage. But the paid DVR Plus significantly increases your recording capacity.
Additionally, Sling TV has an “Auto Record” sports feature that is included with DVR Plus. It automatically records major professional and college sports events that air based on your Sling TV channel package. This can help ensure you never miss big games again.
If recording shows is essential to you, and you want expanded DVR capabilities, the $5 per month for Sling TV’s DVR Plus service may be worthwhile to ensure you can record as much live TV as needed.
Part 2. Alternative Ways To Record Sling TV
While Sling TV’s DVR Plus is a convenient way to record live shows, there may be situations where you want to explore alternative recording methods. Perhaps you don’t want to pay the $5 monthly fee for DVR Plus or need a more flexible solution to record shows across different platforms or devices. In such cases, third-party screen recording tools can be a viable option.
Option 1: Using a Third-Party Screen Recorder (for Windows and MacOS)
When using a third-party screen recorder to record Sling TV content, it’s essential to disable hardware acceleration in your web browser beforehand. Hardware acceleration can sometimes cause issues with screen recording software and lead to choppy or laggy recordings.
One screen recording solution that works well for recording Sling TV is Wondershare DemoCreator. It’s a versatile screen capture tool compatible with Windows, Mac, and web browsers. It focuses on providing high-quality recording for every purpose you might need. Not only that but it’s also equipped with AI features to allow you to edit with ease.
Here’s a rundown of its key features:
- Six distinct recording modes. DemoCreator is an all-in-one solution that offers six recording modes: Screen Recorder, Screen & Camera, Camera Recorder, Game Recorder, Avatar Recorder, and Video Presentation. For Sling TV recording, its Screen Recorder feature stands out.
- Dedicated Editing for Recorded Videos. Any recorded footage you create can be further enhanced with powerful editing tools. Use DemoCreator’s AI features to level up your output.
- Instant sharing. DemoCreator does not stop with recording and editing. It also supports sharing features that will improve your online presence. It offers free cloud storage and integration with popular social media apps like TikTok, Vimeo, and more.
- Powerful screen recording. The Screen Recorder feature lets you capture up to 4K/8K and up to 124 fps. This means you can enjoy your Sling TV shows in full quality – no problem.
How To Use DemoCreator’s Screen Recorder Feature for Recording Sling TV
Are you excited to try out DemoCreator to learn how to record on Sling TV? Read through the steps below to get a detailed guide on accessing the feature:
Step 1: Install, download, and launch DemoCreator on your computer.
Step 2: Select Video Recorder > Screen. This will bring up the Screen Recorder options.
Step 3: Select the screen portion you want to record by customizing the recording area. Be sure to select the entirety of the Sling TV player.
Step 4: Setup your Export Configurations. You can choose Fast Merge (Quick Export), which merges webcam and desktop content as one video. You can also use Track Separation, which separates webcam and desktop content.
Step 5 (Optional): The scheduling options will appear after setting up export options. Select the schedule of your Sling TV show to set up automatic tasks. This way, you can leave your computer and Sling TV running.
Step 6: After dealing with the settings, click the Rec button or hit F9 on your keyboard. To finish the recording, press F10.
Option 2: Using Screen Recorder Feature (Mac)
If you’re a Mac user, you can take advantage of the built-in screen recording utility on macOS to capture Sling TV content. This handy tool is free and comes pre-installed, making it a convenient option for recording shows without third-party software.
The screen recorder on Mac allows you to record your entire screen, a selected portion, or even just a specific application window. It captures video and audio, including any system audio playing from apps like Sling TV.
Disabling Hardware Accelaration
Before recording Sling TV, it’s recommended to disable hardware acceleration in your web browser if you plan to watch through a browser rather than the Sling TV app. Hardware acceleration can sometimes cause issues during screen recording. Please note that Safari, however, does not support disabling hardware acceleration as of writing.
How To Record With Mac’s Screen Recorder Feature
Begin by opening your Sling TV show in your browser. Then, press Command + Shift + 5 to open the screen recording controls. Select the recording area and click the Record button. When finished, click the Stop Recording icon in the menu bar.
The screen recording will be saved as a .mov file on your Mac, which you can then edit, trim, or convert to your preferred format using apps like iMovie or Quicktime Player. Using the native Mac screen recorder is an easy way to capture Sling TV shows for free without subscribing to DVR Plus or installing extra software.
Conclusion
This article answered the question, “Can you record on Sling TV?” Whether you want to record Sling TV shows using the official DVR Plus service or explore alternative methods, you now have several viable options. DVR Plus provides a seamless cloud DVR experience but requires a paid subscription.
DemoCreator is the recommended solution for most users as it combines powerful screen capture capabilities with easy editing tools to record Sling TV recordings effectively on Windows or Mac. With the selected recording method, you’ll never have to miss out on your favorite Sling TV content again.