"How to record a FaceTime Call with audio?" is one of the most commonly asked questions on Apple's forums. Users are worried about its legality and are looking for ways to record FaceTime with audio.
FaceTime has revolutionized the way we communicate through our mobile devices, whether it's for everyday calls with friends and family or important meetings with colleagues and clients, the need to record these calls is growing. While platforms like Zoom and Microsoft Teams are ideal for longer meetings, FaceTime, a pre-installed app on iPhone, iPad, and Mac, is still the instant communication tool of choice for many. If you want to preserve valuable moments with family, friends, or coworkers, recording a FaceTime call is the easiest and most effective way to do so.
Don't worry; this guide will answer both "Can you record on FaceTime legally?" and "How do you record on FaceTime with audio?" Stay with us to learn how to record a FaceTime call on iOS and Mac.
Table of Content
Part 1: Is It Legal to Record a FaceTime Call?
The short answer to the question, "Can you screen record FaceTime legally?" is yes. It's legal to record a FaceTime call. However, "Can you record a FaceTime call without them knowing?" has a different answer, so we should elaborate on this more.
Most countries regard FaceTime calls as regular calls, meaning you can't record them without the participants' permission.
On the other hand, as long as everyone participating in a FaceTime video call is notified and consents to recording beforehand, you can screen-record FaceTime calls without legal repercussions.
Part 2: How To Record a FaceTime Call With Audio on iPhone
Now that we know more about the legality of recording on FaceTime, we can dive into the methods of recording FaceTime with audio. Let's start things off with a guide on how to record FaceTime on iPhones.
1. Record FaceTime on iPhone Using the Built-in Screen Recorder
Like most smartphones, devices running iOS, whatever their version, have a built-in screen recorder. You can use this tool with FaceTime calls, so let's dive straight into how to screen record FaceTime with sound on iPhones:
- Go to your iPhone Settings > Control Center.

- Check if Screen Recording is located in the Included Controls section. If not, tap the + sign next to Screen Recording to add it.

- Swipe up from the bottom of your screen to access the Control Center.

- Look for the built-in Screen Recording tool, and then press and hold on its icon to enable the microphone before you start recording. If you don't, you won't see how to record audio from FaceTime, creating a video-only recording instead.

- Click Start Recording and make your FaceTime call. The phone will start recording your FaceTime call with audio.
Like that, you've learned how to screen record FaceTime with sound on iPhones in five simple steps. However, that's not the only method for recording FaceTime with audio on an iOS device.
2. Record FaceTime on iPhone Using a Third-Party App
While iPhones have a native screen recorder, the tool doesn't always work as it should. Sometimes, it has problems recording audio from the call, it doesn't allow users to record particular apps like WhatsApp, and it can't edit the screen recordings apart from elemental trims and cuts.
Because of these limitations, many users prefer third-party iOS screen recorders, and Record It! from Digiset is a perfect example. Let's see how to record a FaceTime conversation using this tool.
- Download and install Record It! on your iPhone.
- Launch FaceTime and start a call.
- Swipe to the home screen and open the Record It! App.

- Tap the red Circle button and hit Start Broadcast to record FaceTime.
- Return to the FaceTime call and continue as usual.
Unlike the native tool, this third-party screen recorder lets iPhone users record other aspects of the iOS, like other apps and games, add a face cam reaction to the footage, and thoroughly edit the clip before sharing it.
Part 3: How To Record a FaceTime Call With Audio on Mac
If you'd like to do everything mentioned above on a Mac, you can record a FaceTime video call with sound in macOS, too, and there are also two methods for it. Let's dig in.
1. Record FaceTime on Mac Using the Built-in Recording App
Wondering how to record FaceTime with audio without downloading anything? It's incredibly straightforward.
Like iOS devices have a native screen recorder, Macs have it, too. While it's not the best way to record FaceTime, it's the easiest method as you won't have to download a third-party app. Here's how to use it:
- Start FaceTime on a Mac.
- Tap the COMMAND + SHIFT + 5 keys to launch the built-in screen recorder.

- To record the FaceTime call with audio, click the Options menu to select a microphone. You can adjust additional settings as desired.

- Use the Record Entire Screen option and choose FaceTime from the menu.

- Hit the Record button to screen record FaceTime with sound on macOS.
- When finished, hit the COMMAND + CONTROL + ESCAPE keys to end the recording.
If you change the location during the third step, your FaceTime screen recordings will be saved in that location. Otherwise, they'll be saved in the Mac's Movies folder by default.
2. Record FaceTime on Mac Using Wondershare DemoCreator
Recording FaceTime with audio on macOS is also possible with third-party apps, often giving users more control over their recordings. Wondershare DemoCreator is a perfect example, as this incredibly straightforward and highly customizable tool works with any older Intel-based Macs and newer Apple Silicon devices.
The All-in-One Recorder allows users to modify the screen capture area to display their desired content, and combine the footage with webcam reactions, microphone audio, and system sounds. Additionally, Wondershare DemoCreator features a powerful Video Editor that enables users to cut and remove unwanted clips from their recordings, enhance speech, and much more.
The app's shortcuts are also effortless, creating a third-party tool that's far better and more capable than the built-in macOS screen recorder. Here's a quick guide on how to screen record FaceTime with audio via DemoCreator:
- Download, install, and open the app on your Mac and choose the All-in-One Recorder option.

- In the app's Capture Area settings, you can select and record the entire screen, a specific zone on their desktop, or a window. In this case, select your FaceTime window.

- Enable the Microphone if you want to record FaceTime with sound or turn it off for a simple video-only screen capture.
- When ready, start your FaceTime call and click the REC button or press the OPTION + COMMAND + 2. keys to start recording on FaceTime.
- When finished, click the End icon or Press the SHIFT + COMMAND + 2 keys to stop the recording FaceTime.
One of the most significant advantages of this third-party screen recorder is its built-in video editor. When you stop recording FaceTime, DemoCreator will instantly launch its video editor and import the recording into the Timeline.
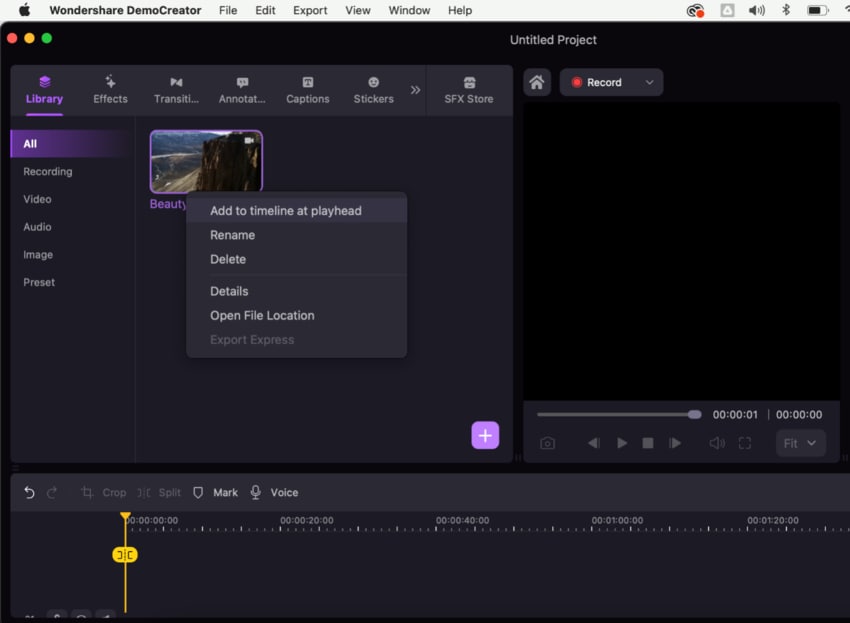
You can trim, split, crop, cut, resize, or rotate the FaceTime recording or apply any other edits the app supports. These edits include changing the resolution, speeding up the clip, adding markers and voiceovers, and countless other AI-powered ones.
Part 4: How To Record a FaceTime Call With Audio on Android
With easy-to-use, great accessibility, and better clarity, FaceTime calls are becoming increasingly popular. People may wish to record these calls on their Android device to use it as a reference for later use. Unlike iOS, Android mobile devices don't have the default feature of screen recording.
If you still wish to record your FaceTime calls on your Android device, you need to install a third-party screen recording app for Android. You will find such apps in your Google Play Store. Such third party apps usually are free software, and you can easily download them. Learn how to record FaceTime calls on Android devices.
1. Record FaceTime on Android Using DU Recorder
Du Recorder is one of the best apps among a hundred other alternatives on Google Play Store. This app is free of in-app purchases and is completely free. You can capture HD quality videos, adjust your frame rates, alter the recording settings, and gain quick access to the notification bar. You can use your device's front camera to record yourself during the FaceTime call. This app allows you to record any external sound if you wish to do so.
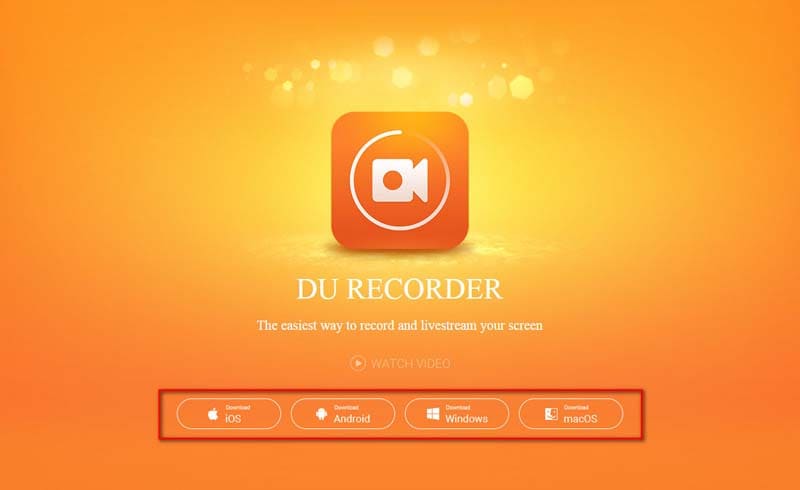
It also comes with an alternative location or storage space option. You can store your call recordings in your preferred place. It is one of the most powerful tools to capture screen recording on an Android phone. You can edit or trim your recorded videos with this free app. Also, you can create GIF files with your screen recordings. You can share cute moments in your social media or with your loved ones. Follow these steps to record a FaceTime call using DU Recorder for your Android device:
- Download, install, and launch the application on your Android phone.
- After successfully installing the DU Recorder, enable the permission feature on your DU recorder.
- The app may ask for permission to the audio, microphone, video, and file manager of your phone.
- You will see a pop-up screen of the DU Recorder app on your Android device.
- The screen will give you access to record FaceTime calls.
- You can choose your preferred call recording option.
- You can now get started with recording your FaceTime video calls.
2. Record FaceTime on Android Using MNML Screen Recorder
You can also use this free application to record your FaceTime calls.
- Download and install the MNML Screen Recorder. You can find this app for free on Google Play Store.
- Launch and open the application on your Android device.
- You will find three dots on the extreme right corner of your screen. At this point, opt to select Settings.
- You will find an icon named Recording to record your FaceTime calls. Now, opt to activate the option that is Record Audio.
- Go back to the MNML Screen Recorder application and tap on the Record button.
- A three-second countdown will start.
- You will also find a warning message on your screen. The message will indicate that the app will record everything on your screen. If you are comfortable with the fact, then confirm the message.
- The screen recording will start. Now, open your FaceTime app and call the person you want.
- Once the call ends, you will find a square button. It is the stop button. You can locate it in the MNML application or access it directly from the notification bar. You can alternatively tap on the Stop button displayed in the bottom right corner of your screen.
Part 5: Reasons Why Recording FaceTime Calls Can Be Convenient
There are plenty of reasons to record FaceTime calls. After all, it's a widely used video conferencing tool that doesn't allow users to review their past conversations. Therefore, many people record FaceTime calls for the following reasons:
- Memories - Seeing or hearing friends and family who are no longer with you is only possible if you record a FaceTime conversation, as you can't access and review previous FaceTime calls otherwise.
- Meetings - While there are other, more widely used business video conferencing tools, the COVID-19 pandemic has significantly increased the use of FaceTime in business settings. By recording FaceTime meetings, business users can access and review their meetings, calls, and interviews anytime.
- Interviews - Whether you're recording for academic and journalistic research, podcasts, or YouTube videos, recording FaceTime videos with sound lets you rely on the footage instead of having to take notes and remember everything.
Whatever your reasoning, it's warranted, and you can do this as long as you remember to ask for the other party's consent and let them know you'll be recording.
Conclusion
Recording on FaceTime has long been a subject in a legal gray area, with many users asking how to record a FaceTime call for various intents and purposes. The good news is that you can record FaceTime conversations as long as you inform the other party and get their consent, and we've shown you how to record FaceTime with audio with multiple apps.
For users asking, "How do you record a FaceTime call?" the answer is simple, and we've shown you how to screen record FaceTime with sound on an iPhone with both the native iOS screen recorder and a third-party app called Record It!
Apple users can also record FaceTime with audio on the macOS side. Whether that's for saving precious memories, reviewing meetings, or creating interviews, you can use the built-in macOS screen recorder.
However, a third-party app like Wondershare DemoCreator offers more features, additional customization options, easy-to-use shortcuts, and a built-in video editor, making it a better solution than the built-in screen recorder.
FAQs
-
Can I record FaceTime conversations with audio?
Yes, you can, and we've shown you how to record FaceTime with audio with built-in tools and third-party apps on iOS and macOS. These third-party solutions include Record It! for iPhones and iPads and Wondershare DemoCreator for Macs. -
Can I record FaceTime calls on my iPhone without installing additional apps?
Absolutely! You can record FaceTime calls on an iPhone with a built-in screen recorder, and here's how:- Start a FaceTime call.
- Swipe from the bottom, open the Screen Recorder, and start capturing.
- Return to your FaceTime call once you start a recording.
-
Can you record a FaceTime call without them knowing?
Yes, you can record a FaceTime call without the person on the other end knowing about the recording, as Apple doesn't notify FaceTime users of a screen recording happening. However, you can get into a lot of legal trouble for doing that since many countries regard FaceTime calls as regular calls, and recording these without the person's knowledge and consent can be illegal. -
Why is there no audio on my FaceTime screen record?
As mentioned, the iPhone's native screen recorder doesn't always record audio with FaceTime screen recordings. These issues can be related to both privacy and screen recorder settings. -
Can you rewatch a FaceTime call?
While Apple collects data about FaceTime calls in terms of users and duration, most of this data is on the company's server and not accessible to users. Therefore, you can't rewatch a past FaceTime call without recording it, and that's why many users are looking for guides on how to record a FaceTime conversation.