OBS virtual camera is a freeware with HD streaming and recording capabilities, a subsequent of OBS Studio. It works flawlessly with all popular operating systems, including Windows, Linux, and Mac. It does not impose a time restriction on the length of your films, which makes it ideal for lengthy recordings and video broadcasts. You may increase its functionality and usefulness by allowing it to seamlessly connect with video conferencing tools like video editors and recorders. OBS Studio is unquestionably a useful tool for video conferencing because of all these features.
In this article
Part 1. What is OBS virtual camera?
The virtual camera OBS is one of the greatest things OBS provides, and it can be incorporated into video calls software products like live calls and meetings. You may utilize a camera with several programs by using the OBS Virtual Cam plugin. With the help of the OBS virtual camera, you may utilize the video output from OBS as a webcam in applications like Zoom, Skype, Discord, and Google Hangouts.
In place of the recent updates, since you can now explore the built-in tool of OBS studio, you don't need to download any extra plugins to use OBS virtual camera. The virtual camera of OBS Studio may be exported to other applications and can function as a webcam for many programs. You don't need a lot to get the most out of the OBS virtual camera, and using it is quite simple.
Part 2. What Can OBS Virtual Camera be Used For?
Instead of choosing a camera or screen source in those apps, use the virtual camera to add text, play noises, or even share your screen and camera at the same time. It enables you to utilize OBS Studio itself, complete with all of its capabilities, as a webcam. In addition, you may send OBS videos to several platforms, such as Discord, Meet, and Skype, using the OBS Virtual Camera. Here are a few of its keynotes worth mentioning:
- Make use of it as a potent tool for game streaming; you may record and transmit high-quality, high-bitrate video.
- Create a limitless number of scenes and add other sources. Green screen setups in Full-HD and virtual sets are also options.
- For PiP mode, using OBS as a virtual camera works well since it enables the addition of video effects and filters.
- Amazing plugins are available, such as filters, visual effects, and audio upgrades.
- OBS enables webcam adjustments including exposure, zoom, and focus.
- Design layouts that are completely configurable that browser-based solutions may not provide.
- With audio improvements, video production tools like transitions, and scene organization, OBS also gives you the ability to improve the quality of your films.
Moreover, for your live broadcasts, which you conduct using a browser or any other streaming program, you may utilize your OBS software as a virtual camera to receive a ton of incredible capabilities. It's also neat that the most recent version of OBS doesn't need you to set up any other plugins or programs to utilize this functionality.
Part 3. How to Use OBS Virtual Camera in Video Presentation
OBS is renowned for having a sizable community and supporting a wide variety of third-party plugins. If any of the aforementioned factors piques your interest in OBS, you'll quickly discover that combining OBS with DemoCreator is a fantastic method to wow your friends and coworkers. To utilize OBS as your video and audio bridge with DemoCreator, you may use it with a virtual camera and virtual audio connections.
Being an open-source tool, OBS should be able to easily interact with a wide range of other software applications, including video conferencing tools like DemoCreator by Wondershare. DemoCreator, the most recent version of OBS Studio, and one of the several virtual camera plugins are required to get things going. By using this method, DemoCreator recognizes OBS Studio as a video source and outputs it as a virtual camera.
How to Configure OBS Virtual Camera in DemoCreator as a Webcam Source:
Wondershare DemoCreator entirely gets you out of problems with the full-fledged recording and streaming problem with the OBS Virtual Camera. Learn more about this by following the instructions for using the DemoCreator recorder.
Step 1Install and Launch DemoCreator Demo Mode
Simply visit the DemoCreator website and download the PC installation there for that. This program is available in the two versions mentioned, Windows and Mac, respectively.
An essential demo-making tool that helps learners, educators, freelancers, and gamers to take idea-sharing to the next level.
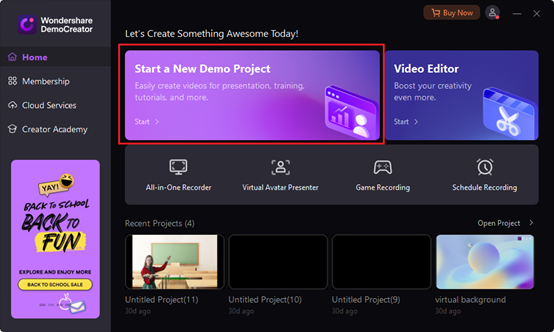
After that, launch the installer straight away, and set up the installation to proceed automatically. Now that the installation has been completed, you can run it from your PC and begin the Demo Mode by clicking on the Start button as shown here with the subsequent steps in next steps:
Step 2Integrate OBS Virtual Camera in DemoCreator
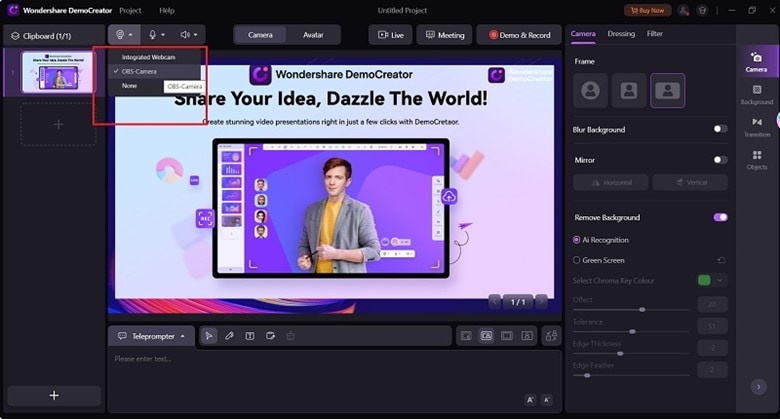
In the Demo mode of DemoCreator start OBS virtual camera concurrently and have all guests join. This step should be done before the go-live time to make sure the settings operate. In the recording Window, refer to the Webcam Source to select the OBS camera from the list as shown here. Further, for the audio sources, you may monitor and control them using the Microphone and Speaker button next to the Webcam.
Step 3Setup your Screen
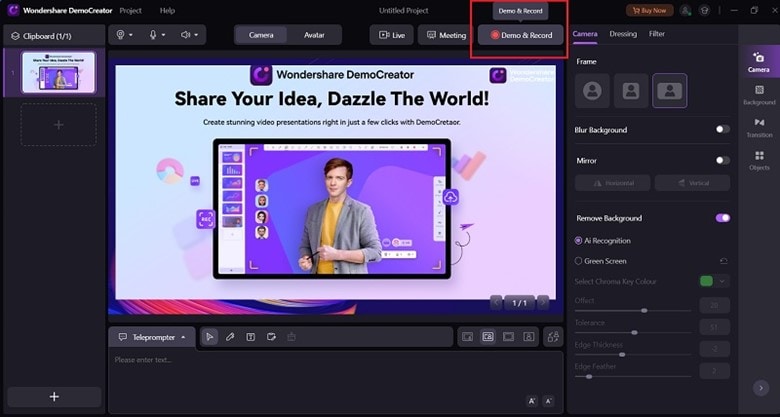
The interface below may be seen within the DemoCreator window, where one choice must be chosen from a variety of options. You can customize the recording screen by simply drag and drop within the Canvas. You can also add addition slides to your presentation using the + icon and then customize the screen from the preview canvas for each slide.
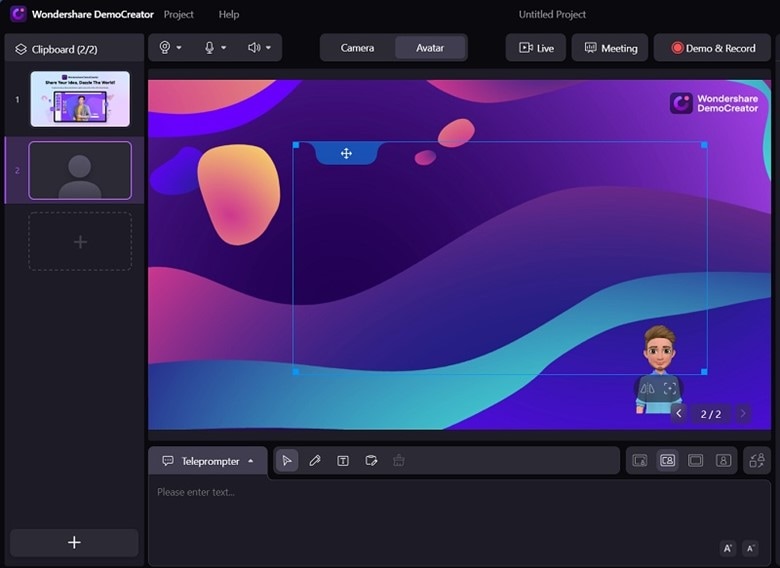
The full-screen interface that you wish to include in your finished film may be specified in the screen area. After choosing that, you can easily adjust your recording's parameters in the corner settings box as shown in the UI. Simply choose the option and begin customizing your screen as desired.
Step 4Start/Stop Recording
After finishing the OBS virtual camera adjustments within the DemoCreator Demo Record in the first phase, you must begin recording now. To do so, just click the Demo & Record button as seen in the recorder window. After setting a 3-second timer, your screen capture will now begin.
On the other side, you may end your recording immediately by pressing the red square button after you're done.
Step 5Export/Share Your Video
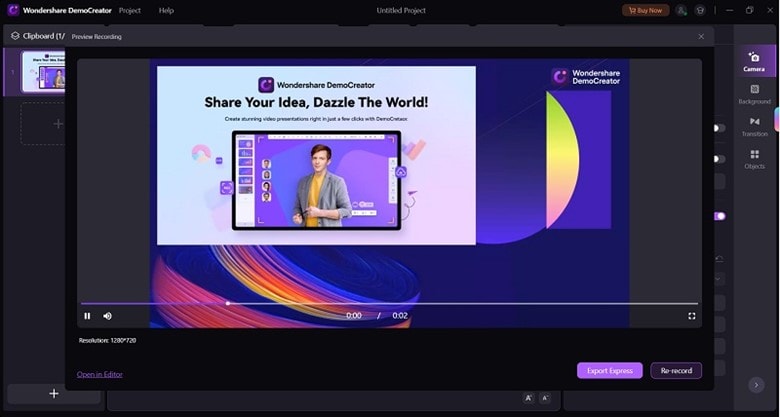
If you wish to export the screen recordings right immediately in the last phase, just click the Export Express button at the lower third of the interface and continue with your recorded video. In addition, you may easily post your recording and streaming on a social media site as well as YouTube by selecting the Editor button at the lower-left corner and then signing in to your channel. You may also save it in the format of your choice from the main editor.
Features of Using OBS Virtual Camera in DemoCreator
Webinars, online calls, and other screen actions may be easily recorded and captured with Wondershare DemoCreator. Making your recordings for lessons or video guides is another application for it. The OBS virtual camera in DemoCreator offers the following astounding capabilities, which are available for both Mac and Windows:
Virtual Background:
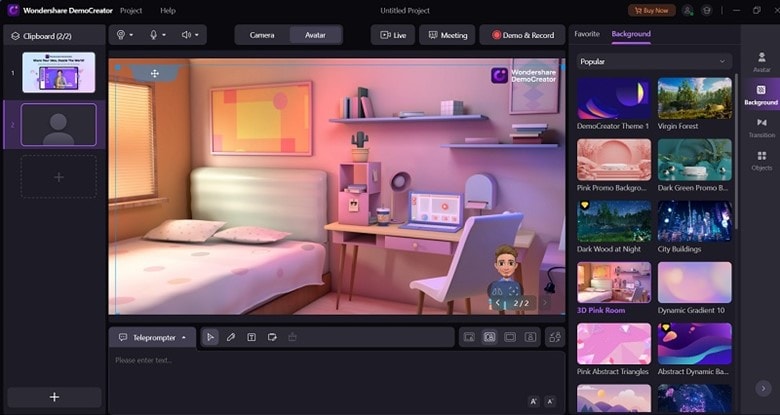
You can select your favorite virtual background with the DemoCreator camera effect. DemoCreator recorder lets you add AI Facial recognition feature to your OBS virtual camera with which you can remove the background of your streaming handily. Also, there are various ready-made templates that you can use as your video backgrounds such as Classroom, Office, Gaming, 3D, and Meeting. Just refer to the Background menu and select your favorite one to use as shown here:
Virtual Avatar:
In the Camera Effect of Avatar Mode, you can use the virtual presenter in place of your main character and you can present yourself in an Avatar of your own choice. The virtual avatar with your customized variations will present your main character in the streaming. You can visualize the character as well as select the favorite one from the list as shown here:

High-Quality Graphics:
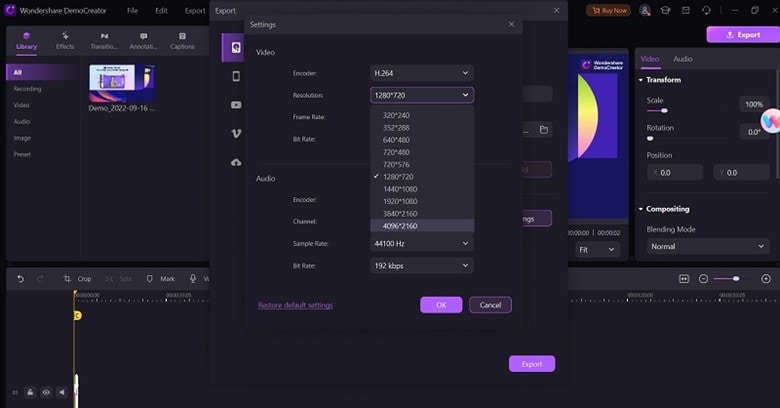
The quality of your streaming becomes top-notch with the integration of the OBS virtual camera into DemoCreator. The software allows you to record even 4K screen resolution at par with the original streaming. What's more, it won’t affect the final resolution of your virtual camera streaming even after adding various adjustments using the Demo mode of DemoCreator.
Trending Filters:
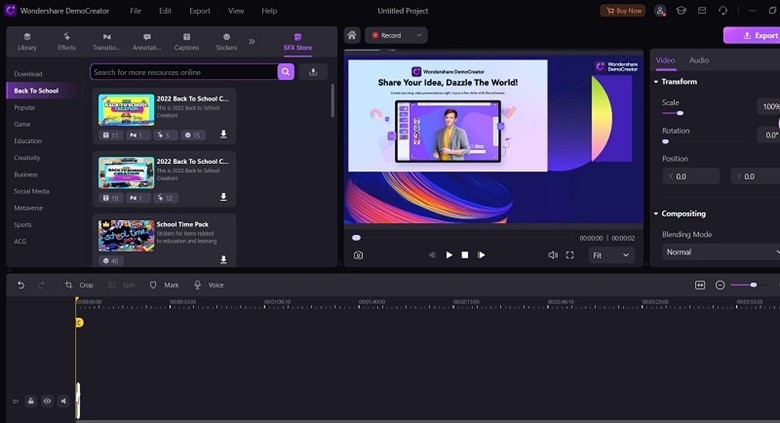
DemoCreator allows you to elevate your OBS virtual camera streaming with several filters that you can add in real-time. Go to the SFX store from the menu bar and select your favorite from the list.
Broadcast Support
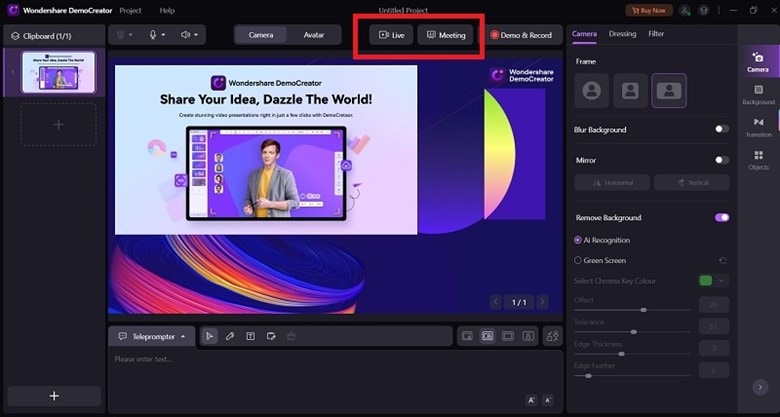
With DemoCreator demo mode, you can reach out to your OBS virtual camera audience virtually. You can stream your PC screen to several audiences with some simple settings and broadcast your virtual events hassle-free. You can use Live or Meeting mode to kickstart the broadcast on the go.
Conclusion
When live streaming, making video calls, or joining online meetings and conferences, using OBS virtual camera is the easy way to be creative with your webcam feed. Webcams are often used to improve the quality of meetings and live broadcasts. Unsurprisingly, OBS virtual camera is at the top of people's lists since it makes it easier for them to achieve their goals. Hence, you can leverage the usage of this application through the integration in DemoCreator newly launched Demo Record. This way, your OBS recording, and streaming experience remain handy yet up to the mark.
A powerful AI video presentation maker helps empower everyone to create impactful virtual presentations that are easier to remember.


