Whether you're making full-blown documentaries, movie trailers, tutorials for YouTube, or simple video presentations, you'll need a reliable tool that lets you create professional-sounding video narrations with minimal effort. Apple's iMovie could just be that tool.
Learn how you can do a voiceover in iMovie with your Mac, iPhone, and iPad with the utmost ease.
Table of Content
How To Record and Add a Voiceover in iMovie on Mac
First and foremost, yes, recording voiceovers in iMovie is possible on all macOS and iOS devices. You can do so in one of two ways, depending on your needs.
You can simultaneously record video and audio through iMovie - aka, you can record yourself talking in iMovie with the FaceTime HD camera– an option most commonly used for tutorials and video presentations. Alternatively, if you already have your video content, you can open it in iMovie and then record and embed your voiceovers.
To record both video and audio simultaneously in iMovie, you'll need to follow these steps:
- Open iMovie and click on the Import button (or Media > Import);

- In the import sidebar, select your built-in camera;

- Choose an existing event, new event, or open project to record your video into;

- Click the Record button to start recording video and audio.
The process is a bit different if you already have your video recorded. Here's how to add voiceover in iMovie to a preexisting video:
- Launch iMovie and click on Create New;
- Select Movie;

- Upload your video by clicking on the Import Media button;
- Drag and drop the video to the timeline;

- Hover your mouse over the position in the timeline where you want your voice narration to start, and click on the white line that appears;
- In the lower left-hand side corner, click on the Microphone icon; Alternatively, go to Window > Record Voiceover;

- Click the Sliders icon to select your audio input source and adjust the volume;
- Click on the red Record button to start recording your voiceover;

- After the countdown, start narrating your video;
- Click the red Record button to stop recording and click Done.

From there, you can review your voiceover and make any necessary edits to improve your video content.
How To Record and Add a Voiceover on iPad/iPhone in iMovie
If you'd prefer, you could also record audio on iMovie using your iPhone or iPad. You can get the app directly from the Apple App Store and get started with it right away.
As a general rule of thumb, most users find navigating iMovie and making all the necessary recordings and edits easier on Mac. Still, the app on iPhone/iPad has very similar features and capabilities, so you should expect similar results regardless of the device you're using.
With this in mind, here's how to do a voiceover in iMovie on iPhone/iPad:
- Download iMovie from the App Store, launch it, and select Create Project;
- In the new popup, select Movie > Create Movie;

- Select Tap + to add videos, photos, or audio, and go to Videos & Photos;
- Select Video;

- Go to All, select the video you want to import, tap on the blue tick mark, and select Create Movie;
- On the timeline, tap and move the playhead to the place where you want the video narration to start;

- Tap on the + icon in the upper right-hand corner and select Voiceover;
- Tap Record and start your voiceover after the countdown;

- Tap Stop to finish the narration and choose to Cancel, Retake, Review, or Accept the recording;
- Tap Done when you are finished with the recording.

If you're satisfied with your video and narration, you can immediately share it on any platform of your choosing.
Tips for Recording Voiceovers Using iMovie
Regardless of how you add a voiceover in iMovie - using your Mac, iPhone, or iPad - you can't get flawless results unless you're well prepared. Here are some things you should keep in mind when adding voiceovers in iMovie:
- Prepare a script - even if it's a short narration, a script could be most useful. It will help you stay on point and eliminate any unnecessary, awkward pauses that will require extensive editing;
- Record in a quiet environment - to get a clean, crisp sound, you'll want to record in a perfectly quiet environment without any noise or distractions;
- Practice before recording - even with a script, you still want to practice to ensure that you don't sound monotonous and to minimize the chances of tripping over your words.
Moreover, if you're recording a voiceover and making a cameo through your webcam, make sure to remove any distractions and clutter from the background. Even for casual, entertaining videos, you'll want to have a nice, clean background to ensure that your audience stays focused on you and what you're saying.
Best iMovie Alternative for Recording Voiceovers/Audio on Mac: DemoCreator
While iMovie can be convenient, it has its shortcomings that are preventing it from being the top tool for voiceovers. It's a bit complicated to use, especially for beginners. It lacks many advanced recording and editing capabilities. It's solely compatible with Mac and iOS devices.
If you want a more powerful solution that's easier to use and compatible with different systems, look no further than Wondershare DemoCreator.
Suitable for Mac and Windows devices, it has extensive recording and editing capabilities, many of which are powered by next-generation AI.
Whether you want to do voiceovers, simultaneously record your screen, webcam, microphone, and system audio, capture gameplay, make video presentations, or anything in between, DemoCreator will have you covered.
Offering over 50K creative assets and 10+ AI tools, it simplifies recording and editing, enabling you to capture mesmerizing content that will have your audience hooked.
How To Record a Voiceover in the iMovie Alternative
Despite offering dozens of unique features, Wondershare DemoCreator is perfectly user-friendly thanks to its intuitive interface. Within just a few clicks you'll be able to record professional-sounding voiceovers even as a complete novice.
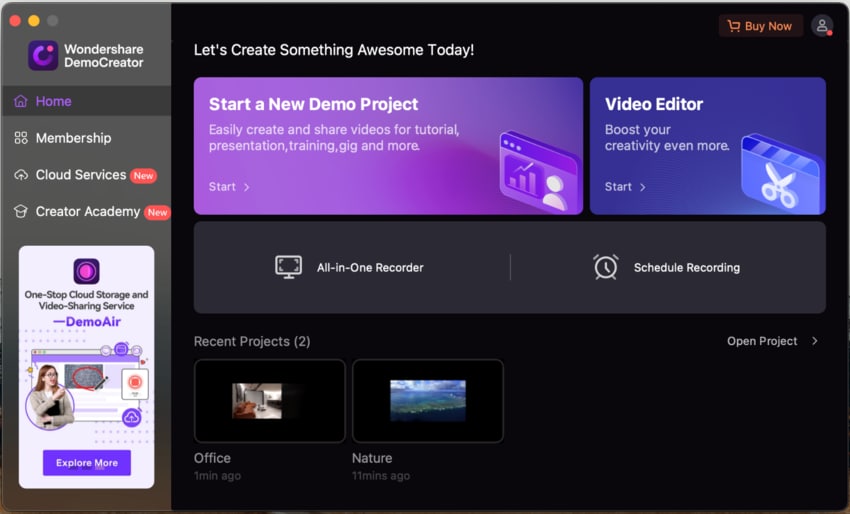
- Download and install Wondershare DemoCreator on your computer
- Select Video Editor;

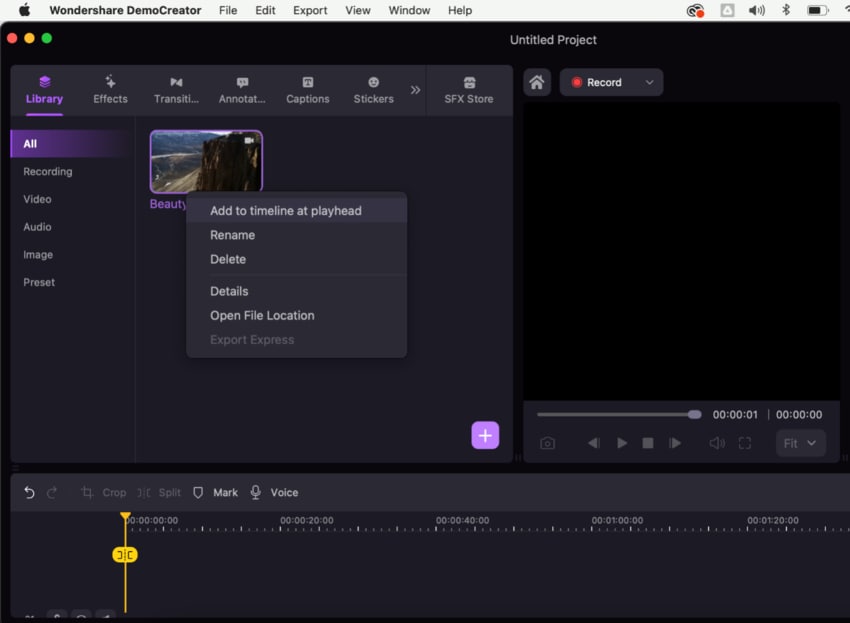
- Go to File > Import Media Files to upload your video;
- Right-click on your video and select Add to timeline at playhead;

- In the toolbar, select Voice;
- In the new popup, select either your built-in microphone or an external microphone;

- Click the Record button to start recording the voiceover; click the same button to stop recording;
- If you're satisfied, click on the Export button to save your video with voiceover.

How To Record Audio in the iMovie Alternative
If you want to record audio only and then add it to your video at a later time, Wondershare DemoCreator makes this easy.
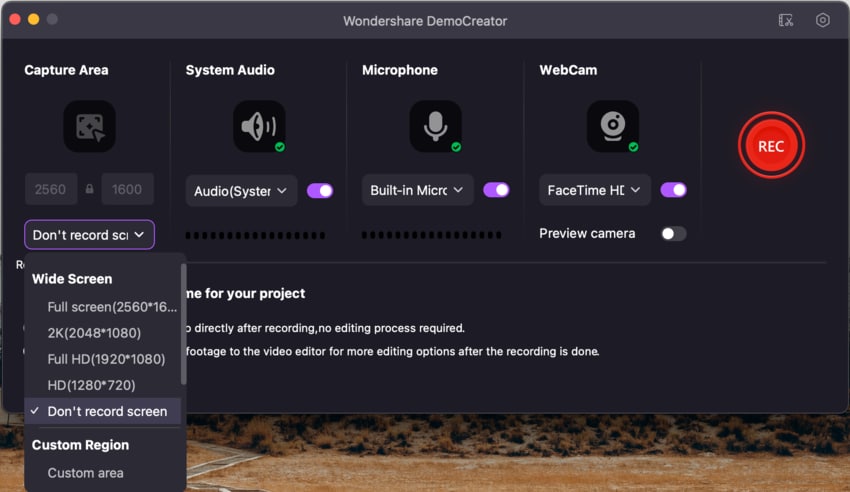
- After downloading and launching DemoCreator, select All-in-One Recorder;

- Under Capture Area, select Don't record screen, and adjust system audio and microphone settings;

- Click the red REC button to start recording audio;
- Click the End button or press Shift+Command+2 to stop the recording
- Record screen, audio, and webcam simultaneously or seperately
- Edit video and audio quickly with a wide range of professional tools
- Export to MP4, MOV, MKV, GIF, MP3, and multiple formats

Conclusion
Recording professional voiceovers for your videos can make your content more engaging and immersive for your audience. With tools like iMovie and Wondershare DemoCreator at your side, video narration becomes a seamless process you'll master with the utmost ease.


