Recording streaming audio on a Mac is a perfect option for listening to content without having to plug in directly into a stream. That allows you to listen to audio later and repeat the content as often as you want. You can do this on Mac in multiple ways, and you can even use a built-in option.
Furthermore, suppose you like streaming audio content online on websites like Pandora, Spotify, and YouTube but can't download the videos to your Mac. In that case, you can do this by recording streaming audio. Today, we'll introduce the five best methods to record streaming audio on a Mac.
| Method | Platform | Can record streaming audio directly | Key strengths |
| DemoCreator | Desktop | Yes | Simplicity, customizability, and editing |
| Audacity | Desktop | No, requires an additional sound driver. | Simplicity & editing |
| DemoAir | Web-based / plugin | Yes | Portable and quick operation |
| QuickTime | Desktop | No, requires an additional sound driver. | Mac built-in tool |
1. Record Streaming Audio on Mac With DemoCreator.
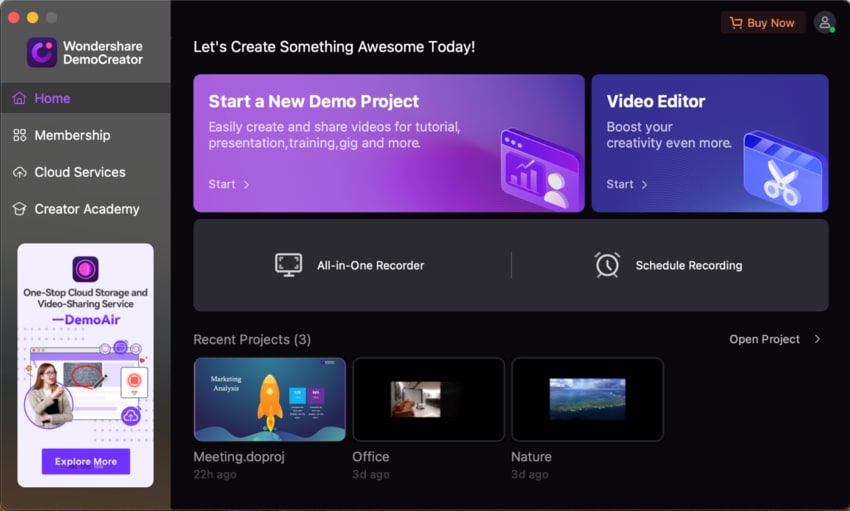
Wondershare DemoCreator is comprehensive video and audio recorder software with advanced editing capabilities like cutting, trimming, noise removal, adding fade-ins and fade-outs, etc. It can record screen, webcam, system sound, and microphone sound separately or simultaneously.
Although it offers many customizations and features, it's really simple to use and the audio recording feature is free! To use DemoCreator, you must go to the official website, download, and install the tool.
Follow these steps to record streaming audio on Mac with DemoCreator:
- Launch DemoCreator and select the All-in-One Recorder option. If the live stream has not started yet, click on Schedule Recording to create an appointment recording for capturing the streaming audio automatically.

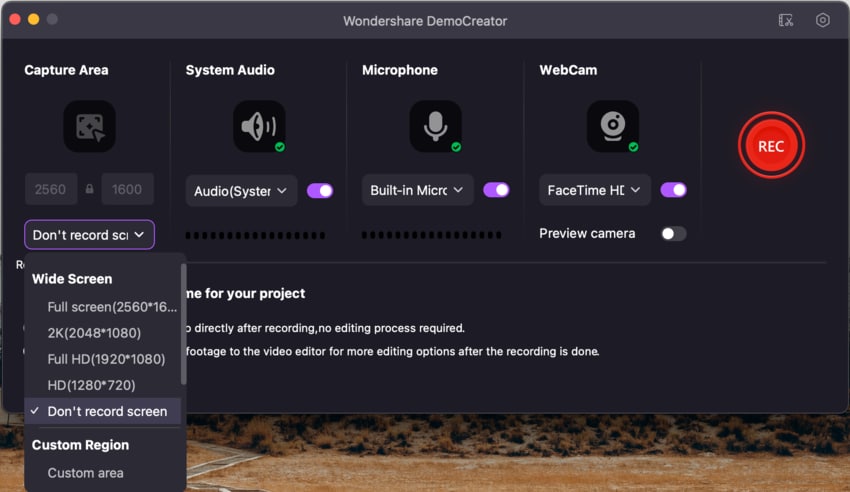
- You can customize different recording settings. If you want to record the streaming audio only without video, disable all recording options except System Audio. Under the Capture Area option, select "Don't record screen."

- Click the REC button or press OPTION + COMMAND + 2 on your keyboard to start recording audio.
- To stop recording, click the Stop button in DemoCreator's menu bar or press SHIFT + COMMAND + 2 on your keyboard.
Remember to turn on the streaming audio source before you start recording audio in DemoCreator.
2. Record Streaming Audio on Mac With Audacity
Audacity is a free and open-source audio recording tool for recording streaming audio on a Mac. It captures sound by converting digital audio into analog. In addition to being an excellent free audio recorder for Mac, Audacity has a multi-track editor for further editing, streaming audio, and saving it to your device.
You must download and install Audacity for Mac to record streaming audio. You will also have to download and install an additional sound driver, such as the Soundflower plugin, since Audacity can't record the sound on your computer on its own.
Here's how to record streaming audio on a Mac in Audacity:
- Download Soundflower for Mac from Softonic.

- Run the installer and follow the instructions.

- Go to System Preferences, click on Sound, and select Soundflower for sound output.

- Launch Audacity, go to Audio Setup, then go to Devices, and select Soundflower under the playback device.

- Open the streaming audio source you want to record.
- Click the Record button in Audacity.

3. Record Streaming Audio Online on Mac With Wondershare DemoAir
There are two different methods you can use to record streaming audio online. One is to use a browser extension, and the other is to use an online tool. Luckily, Wondershare DemoAir offers both. Because it is simple to use, and which method you choose depends on your personal preference.
Using DemoAir Browser Extension
First, go to the DemoAir website and install the plugin on your Chrome. It was originally a video recording extension, but you can also record audio. If you don't want any video, you only have to convert the file into an audio file.
Here's how to record streaming audio on Mac with Wondershare DemoAir:
- Open the online streaming audio source you want to record.
- Click on the DemoAir plugin in your browser.

- Select the Current Tab option, uncheck the microphone and webcam options, click Show Advanced Options, and enable Tab Audio. Click Start Recording.

- Select the tab you want to record and click Share.

- DemoAir will start recording. When done, click Stop Recording.

Using DemoAir Online
With DemoAir online, you don't have to install anything. Simply start the streaming window or app and follow these steps:
- Go to the DemoAir website and click Online Video Recorder.

- Select Audio Only and click Start Recording.

- Click the Stop Recording button and save your recording to the desired location.

4. Record Streaming Audio on Mac With QuickTime Player
QuickTime Player is the built-in audio recording software for Mac and iOS devices. However, even though it can record microphone audio, it can't record system audio or streaming audio on its own. That's why you have to use Soundflower like with Audacity. Before starting QuickTime player, download and install Soundflower on your Mac.
After installing Soundflower on Mac, follow these steps to record streaming audio with QuickTime:
- Click on the Apple icon in the upper left corner. Then go to Sound settings, click Output, and select Soundflower as the output option.

- Launch QuickTime, click File, and then New Audio Recording.

- Click on the arrow next to the recording button and select Soundflower.

- Open the audio stream you want to record.
- Click the Red Recording button to start recording audio.
Conclusion
The best methods for recording streaming audio on Mac are audio recording software, online recorders, built-in recorders, web extensions, or sound recording freeware. These are the five general categories of tools you can use. We've shared steps with some of the best tools.
However, there are other tools in these categories you can consider using for recording. Take the time to try these methods we've shared and see if you like them.


