

Whether you're an educator trying to record an explainer video, a marketer creating customer onboarding material, or a content creator wanting to post a new viral video, capturing audio on your Mac is often a necessity. However, it can be a bit confusing if you've never done it before.
Depending on your needs, you can record audio with QuickTime, but there are a couple of downsides to it.
Learn how to use QuickTime player for audio recording and check out the best alternative to ensure high-quality content.
Table of Content
How To Record Microphone Audio With QuickTime
Though most commonly used for opening and playing multimedia content, QuickTime has some extra features that make it more useful.
Its recording capabilities allow you to capture videos and screenshots without much fuss. The software also has a basic editor that lets you trim your videos, rotate them, rearrange them, and more.
To record audio in QuickTime, you'll need to follow just a few simple steps:
- Launch the QuickTime player and go to File > New Audio Recording;

- Go to Options to adjust recording settings;
- Under Microphone, select the microphone input you'd like to record;
- Under Quality, select your preferred quality;

- Click the Record button to start recording;
- Click the Stop button to stop recording.

Once you're done, go to File > Save and choose where to save your recording. It's a good idea to record in a nice, quiet environment. Otherwise, your audio might be poor quality and difficult to edit later.
How To Record System Audio With QuickTime
Unfortunately, the QuickTime audio recording was only created to capture sounds from your microphone. That means you can use it to narrate your videos, but you can't technically record any system audio.
The good news is that you can install Soundflower for that.
Soundflower is a free, open-source plugin designed to enable apps to transfer audio to other apps. In a nutshell, it can allow QuickTime to record computer audio. Without it, you wouldn't be able to use the player for recording sounds made by any of your programs.
Though capturing program audio might not initially strike you as necessary, it can be highly beneficial, especially if you're creating tutorial videos for onboarding, using certain apps and programs, gaming, and more.
Download and Install Soundflower

Soundflower doesn't come pre-installed on your Mac. You'll need to download and install it manually if you want to use it for system audio recording in QuickTime.
You can get it from the MacUpdate website, then follow these next few steps to install it:
- Go to MacUpdate;
- Click Safe Download;

- Once the download is complete, open the download folder and click on the Soundflower DMG file;
- Follow the on-screen instructions to install the software.
When the software is installed, restart your device to free up your memory and ensure the system runs smoothly.
Configure Soundflower So That QuickTime Can Record Audio
Downloading and installing Soundflower won't automatically enable you to use QuickTime to record internal audio from your Mac computer. You'll also need to configure the program to run efficiently.
Here's how to do that:
- Go to Finder > Applications > Utilities;

- Go to Audio MIDI Setup and click on the + icon;
- Select Create Multi-Output Device;

- Check the Built-in Output and Soundflower (2ch) boxes;
- Click the Settings icon and select Use This for Sound Output.
From there, it becomes easy to record computer audio with Mac's QuickTime.
Record Internal Audio With QuickTime
With Soundflower downloaded and properly configured, it's time to start using it with QuickTime to record sound from apps and programs. Here's how to start recording:
- Open QuickTime and the screen you want to record;
- Go to File > New Screen Recording (or New Audio Recording if you want to record only audio);

- Go to Options to adjust recording settings;
- Under Microphone, select Soundflower (2ch);

- Click the Record button to start recording;
- Click the Stop button to stop recording.
Once you've used Soundflower and QuickTime to record audio, you'll want to go to System Preferences > Sound > Output and select your internal speakers. Then, you can check the recording you've just made and see if everything is right.
Recording Audio With QuickTime Has Its Downsides
While recording audio with QuickTime can be effective, it's not always your best option. Unfortunately, the tool comes with several limitations and disadvantages that can make working with it somewhat annoying:
- QuickTime is a voice recorder only - by itself, this tool can record only microphone input. You need additional tools like Soundflower to record system audio;
- No audio editing features - while you can trim your recording, there are no audio editing features that can enhance it;
- Subpar quality - though the quality of audio recordings is fine for personal uses, it leaves a lot to be desired for professional or academic uses;
- Steeper than necessary learning curve - by itself, QuickTime is easy to use. However, you need to install, configure, and apply different tools to record system audio, which can be confusing.
All things considered, QuickTime is far from your best option for recording audio on a Mac. It can serve its purpose on occasion, but you have access to much superior tools that are more powerful and easier to use.
A Simpler Alternative for Recording Audio on a Mac: DemoCreator
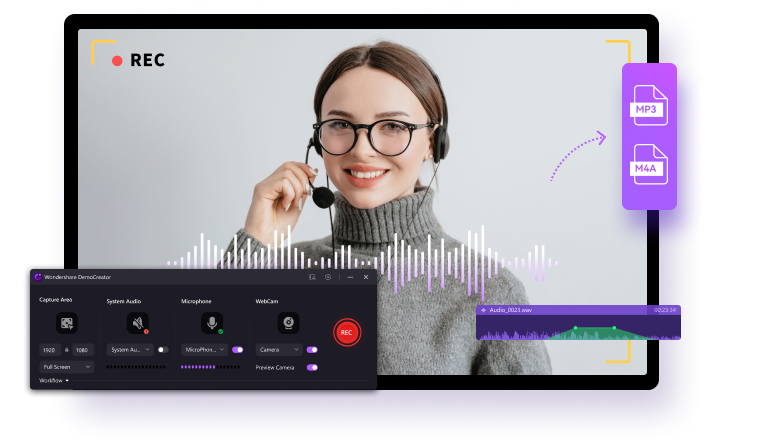
To get high-quality audio recordings on Mac with minimal effort, all you need is WondershareDemoCreator. An all-in-one recorder and editor, it can capture microphone and system audio with a single click. What's best, it produces high-quality recordings, even in cases where the original sound isn't all that good to begin with.
Some of its key features include:
- Selective recording - specify precisely what you want to record: microphone only, system audio only, or both. As needed, you can also combine the audio with screen capture or webcam;
- Audio Editing - You can trim the audio or add special audio effects after the recording.
- AI denoise - if your microphone input or system audio isn't clear, use AI denoise to clarify and refine the sound;
- AI speech enhancement - remove background noise and ensure that every word recorded is crisp and clean;
- Voice changer - modify your recorded voice and use one of countless unique effects and amusing voices;
- Audio detach - use DemoCreator to detach audio from a video clip and edit it separately.
With comprehensive recording and editing capabilities, DemoCreator is your go-to solution for all content creation and enhancement needs.
To record your audio using Wondershare DemoCreator, you'll need to follow a few simple steps:
- Download and install Wondershare DemoCreator;
- Launch the program. On the main page, select All-in-One Recorder;

- Select Don't record screen and toggle the Webcam OFF if you don't want to record video;
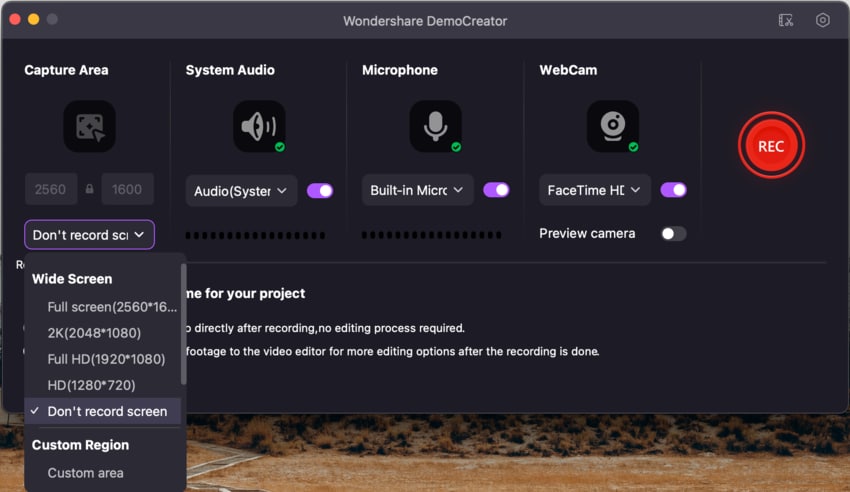
- Adjust your System audio and Microphone settings;
- Click the red REC button to start and stop the recording.
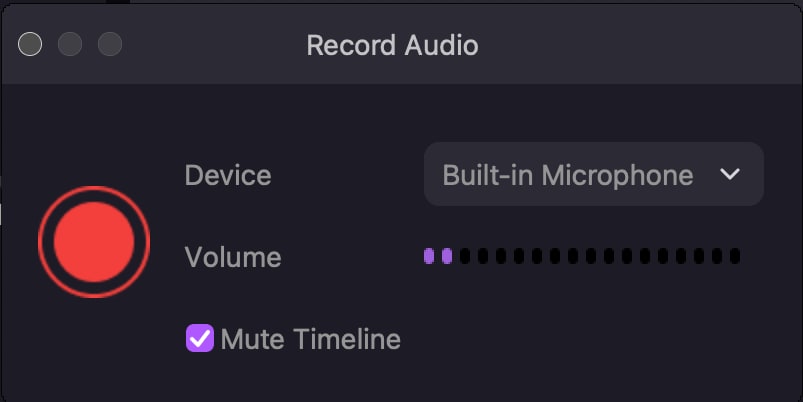
If you want, you can also record audio straight from DemoCreator's video editor to add a voiceover for your video:
- Set up your microphone;
- In the editor, go to the panel Record Audio;
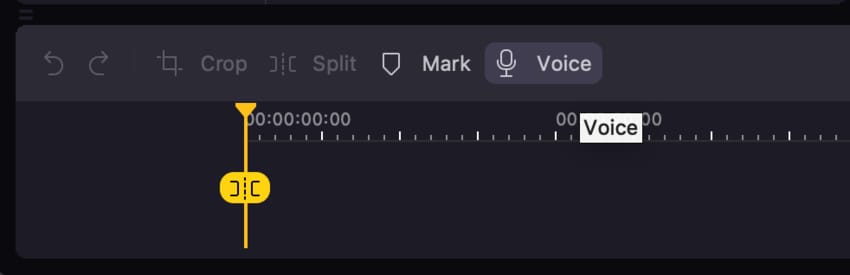
- Click the red REC button to start recording.
Once you're done, you can continue editing your audio and video, adding unique effects and ensuring your content is flawless.
Conclusion
Although you can record audio with QuickTime on Mac, the process is less than satisfactory. Using the tool as is, you can only capture your microphone input. To record computer audio in QuickTime, you'll need to install additional plugins like Soundflower and configure them before you can start using them.
That's why solutions like Wondershare DemoCreator are much more effective. Enabling you to select what audio and video you want to record, DemoCreator allows you to create content how you see fit.
FAQs About Audio Recording With QuickTime
-
Can I use QuickTime to record voice on Mac?
Yes, QuickTime can record microphone input on Mac, so recording your voice is a relatively simple process. Simply open QuickTime and go to File > New Audio Recording. Configure your microphone settings and start recording. -
Can QuickTime record computer audio without third-party tools?
QuickTime can only record your microphone audio. It doesn't record system or program sounds - you'll need to install a plugin like Soundflower and configure it to capture system audio through QuickTime. -
What do I need to do to enable audio recording with QuickTime?
You must download and install Soundflower to record system audio with QuickTime. Once you install it, go to Finder > Applications > Utilities > Audio MIDI Setup. Under Create Multi-Output Device, check the Built-in Output and Soundflower (2ch) boxes. Then, go to Settings and select Use This for Sound Output. Start a new audio recording in QuickTime and select Soundflower (2ch) under Microphone.


