

Open Broadcaster Software, commonly known as OBS, is a powerful and widely used open-source software for video recording and live streaming. It is among the most common software among gamers, YouTubers, Content Creators, and Professionals. No-cost accessibility, available customization options, and versatility have made it what it is today.
The primary purpose of this article is to teach you the optimal settings based on your system capacity so that you can achieve quality videos without compromising your system performance. Let’s now see in detail the best OBS recording settings.
In this article
Part 1: Importance of optimizing OBS recording settings
OBS is a very powerful software. However, little can be achieved from it if the settings are not proper. The following are some of the key reasons why it is essential to optimize the recording settings:
- Video Quality— Only proper settings can ensure high-quality video output. Recording quality is the most important factor for any content creator. High resolution and proper bitrate and frame rate will ensure that the video is crisp, clear, and smooth.
- System Performance— Balancing system performance and video quality is very important. A high-quality video will burden the CPU and GPU too much, ultimately making your system run slow or hang in between. The optimal settings need to be used to create quality videos without burdening the system.
- File Size management— Proper settings will ensure that the file size isn’t too large, making it easier to store and share.
Part 2: Best OBS Settings for Recording
The following are the best OBS settings for recording.
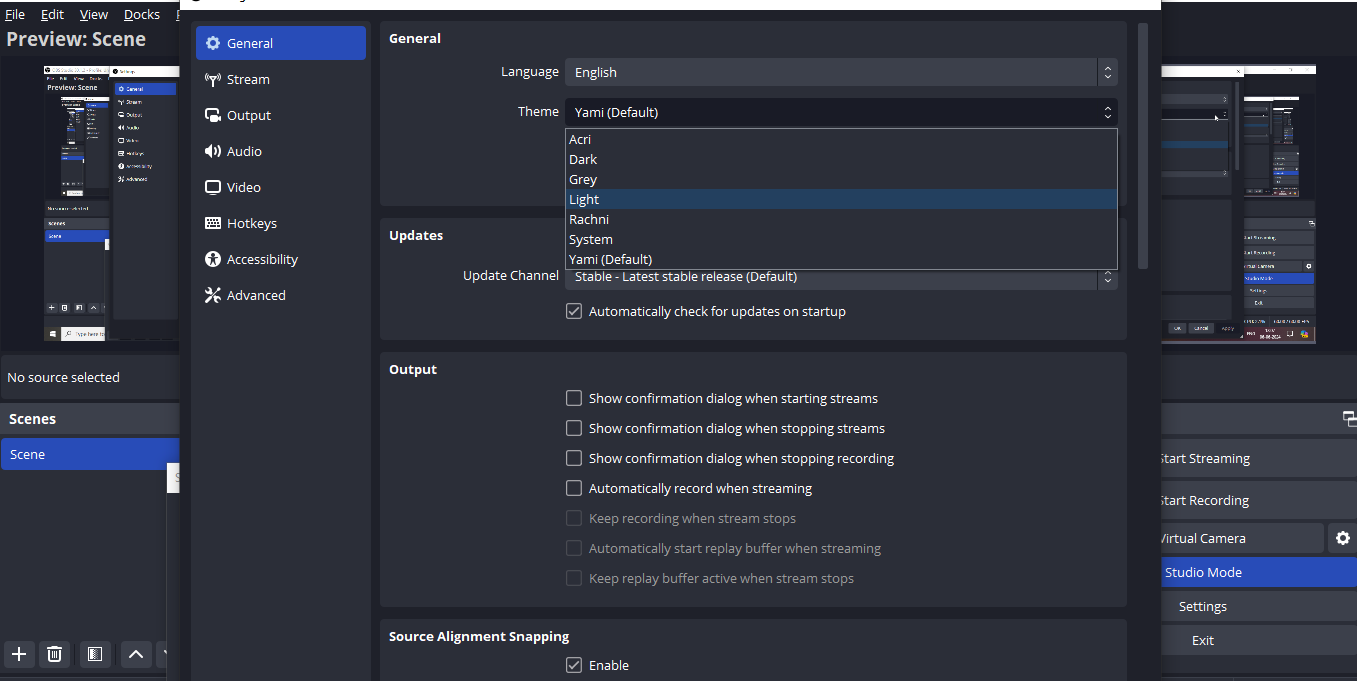
1. General Settings
The general settings include the language and theme. These don’t impact the recording but are needed for your comfort during recording. You can access the general settings by going to File > Settings > General.
- Language—OBS is available in almost all languages. Choose your preferred language to better understand other instructions.
- Theme – The default theme is Yami. You can select from other themes such as Dark, light, Grey, Rachni, Acri, and System.
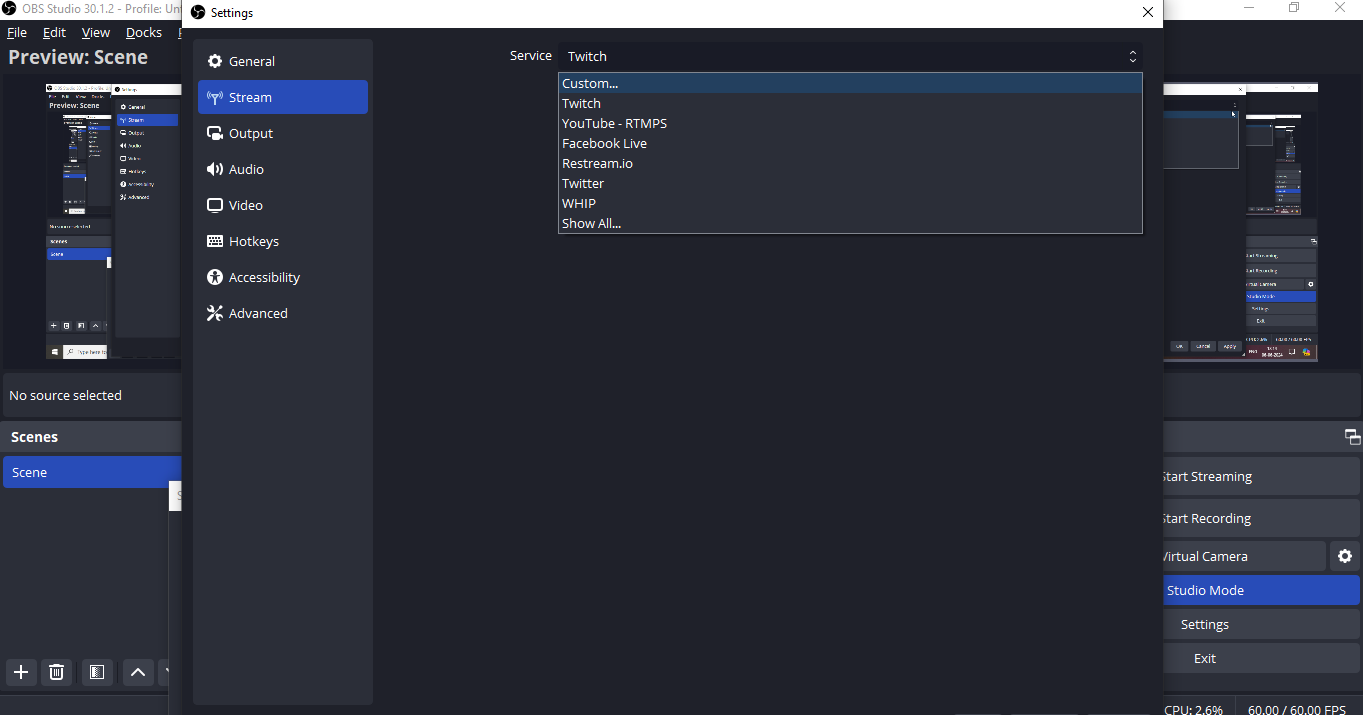
2. Stream
Under the stream settings, you need to decide what the primary target of your recording is: Twitter, Twitch, Facebook Live, or another Channel. Based on that, the optimum settings of the output video will be decided. Besides, adding the stream key would ensure that the settings are saved for future recordings.
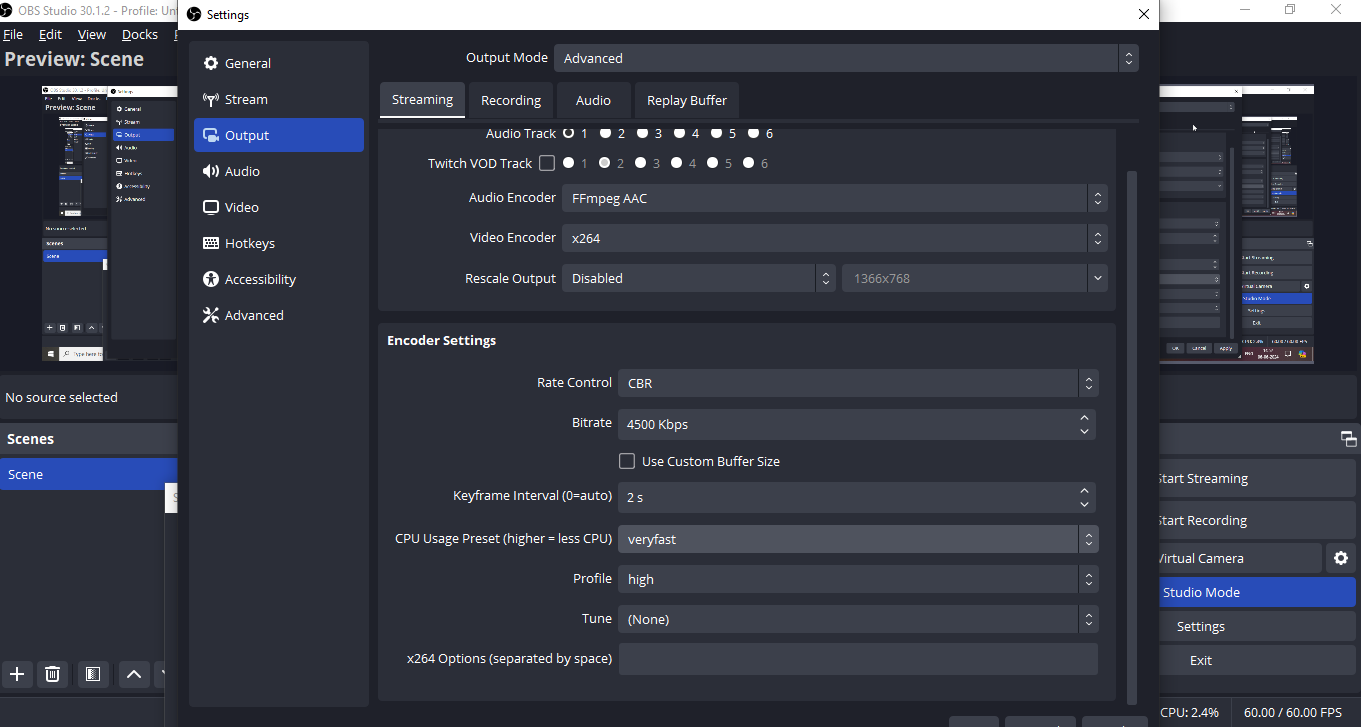
3. Output Settings
The output settings will decide the quality of the output. Select the output mode from Simple to advanced. This will enable you to do more complex settings. The output settings are broadly classified into four sections – Streaming, Recording—audio, and Buffer. Let us explore each one of them.
- Streaming Tab
-
- Encoder—If your system has the latest and most powerful CPU, use X264 for CPU encoding. Use NVENC or AMD for hardware encoding.
- Rate Control – Set the rate control to CBR. CBR refers to Constant Bitrate.
- Bitrate—If you are recording the video at 720p at 30fps, then the ideal bitrate should be between 2500 and 4000. For video recorded at 1080p at 60 fps, a higher bitrate between 4500 and 6000 is needed.
- Keyframe Interval – It should be ideally set to 2 seconds.
- Preset – Set the CPU preset to very fast or above.
- Profile – set the profile to high.
- Tune – Leave the Tune as none.
An ideal streaming tab would look something like this.
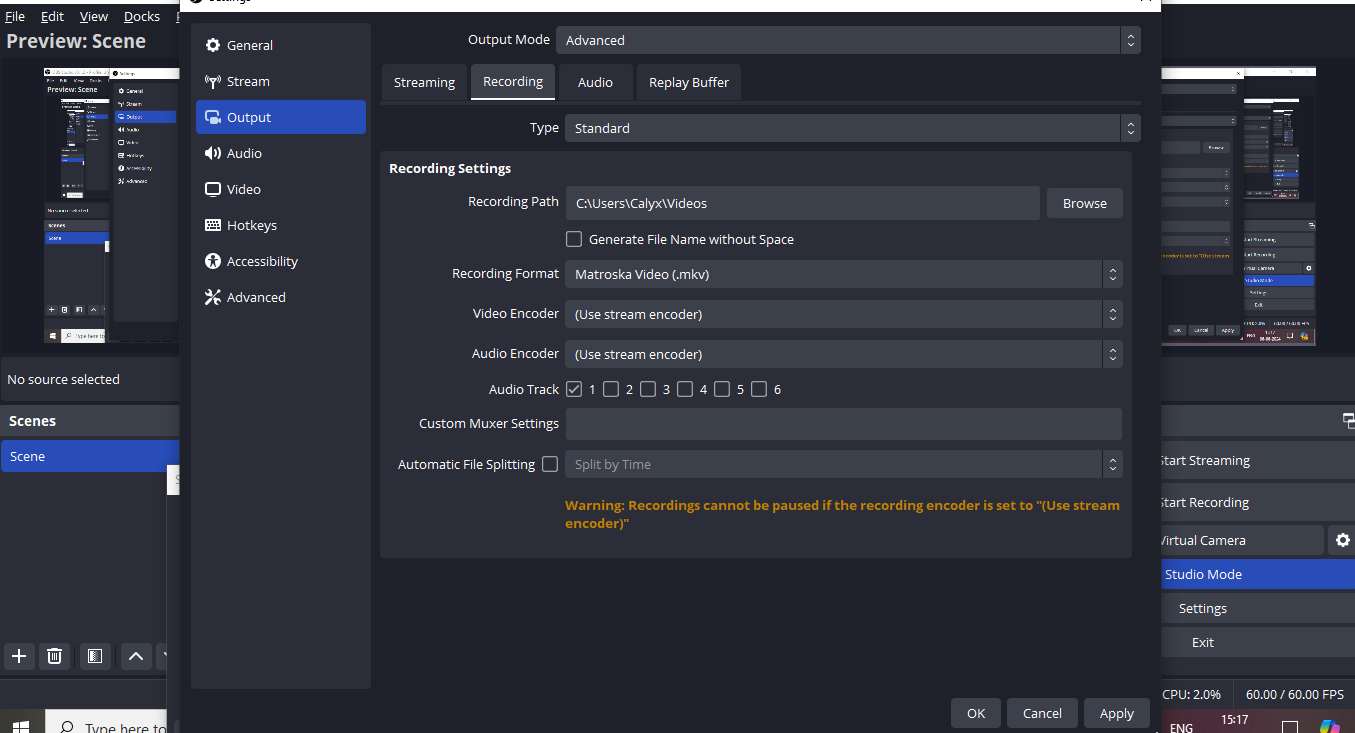
- Recording Tab—The recording tab again has several settings under it. Let's explore each one in detail.
-
- Recording path—This is where the recording will be stored. Select it on the drive with ample storage as the OBS recordings are comparatively larger and need a lot of space for streaming seamlessly.
- Recording Format— Choose the recording format, which should be MP4 or MKV. Mkv is a better option because it prevents data loss in case of a crash and allows for recovery.
- Video Encoder—For simplicity, keep it the same as in the streaming tab. However, if you wish to have a higher-quality recording, you may try a different encoder.
- Audio Encoder—select “Use stream encoder” to keep it the same as the streaming tab. This will maintain unanimity in the quality of recording and streaming.
- Automatic file splitting—If you want to record smaller videos, you can check the automatic file splitting. You can decide whether to split the file by time or by size. I usually keep it unchecked.
An ideal recording tab will look as under.
- Audio Tab – Here, you can decide the trackwise bitrate of the recording and also name the recording.
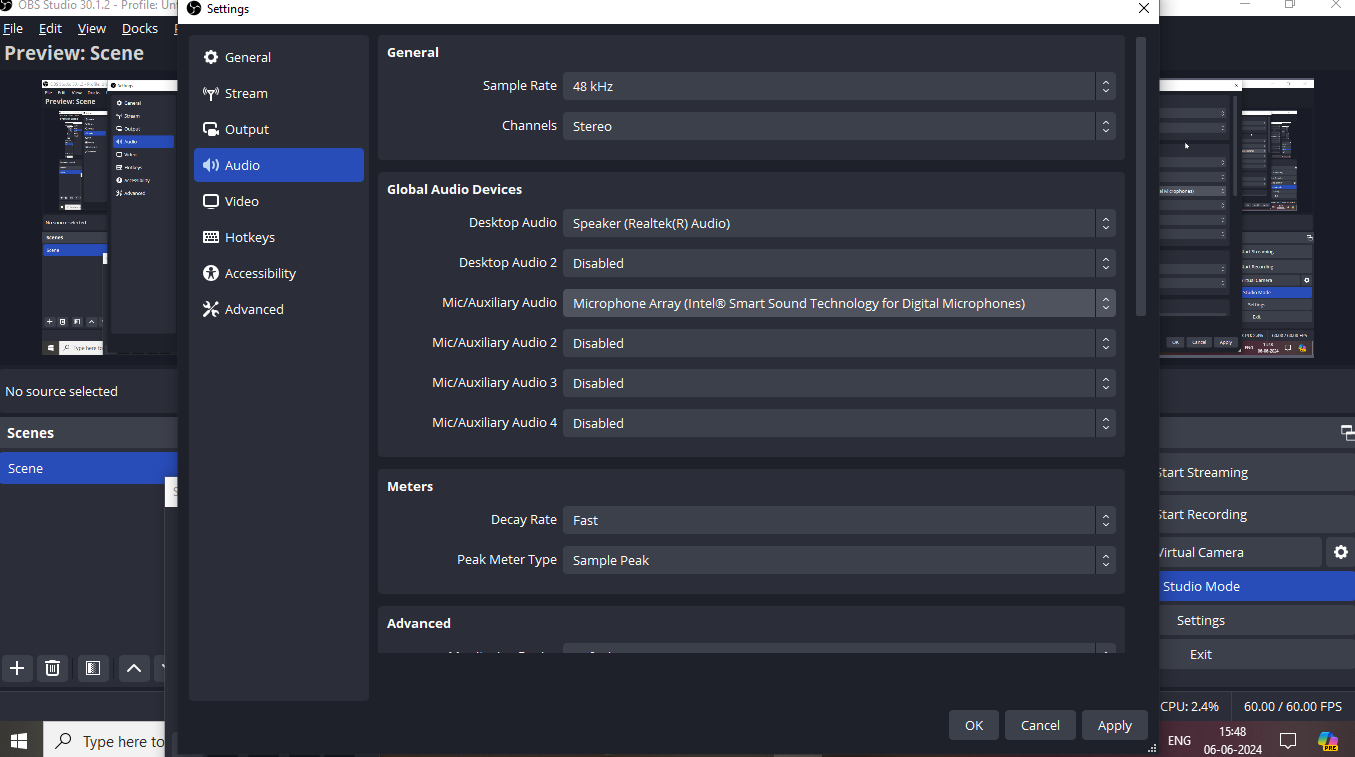
4. Audio Settings
Optimizing audio settings in OBS is essential for crisp and clear audio quality. Let’s explore each setting in detail and what it implies.
- Sample Rate—This implies the quality of the audio. 44.1kHz is a standard CD quality, while 48kHz refers to a professional production standard. Make sure you choose the audio rate matching your audio recording device to avoid resampling issues.
- Channels (Mono vs. Stereo)—Stereo is the standard channel for most users. It implies dual audio channels left and right. On the other hand, you need to choose Mono if you only need a single audio channel.
- Desktop and Mic/Auxiliary Audio Devices –
-
- Desktop Audio - Desktop audio refers to the primary and default audio output device. For example, your built-in speakers or headphones. This is used to capture system sounds, game audio, etc.
- Desktop Audio 2 – This is only used if you have a secondary audio device.
- Mic/ Auxilliary Audio – Select your microphone here.
- Auxiliary audio 2/3 – This is optional and only needs to be set up if you have more than one mic in use.
The optimal audio settings look something like this.
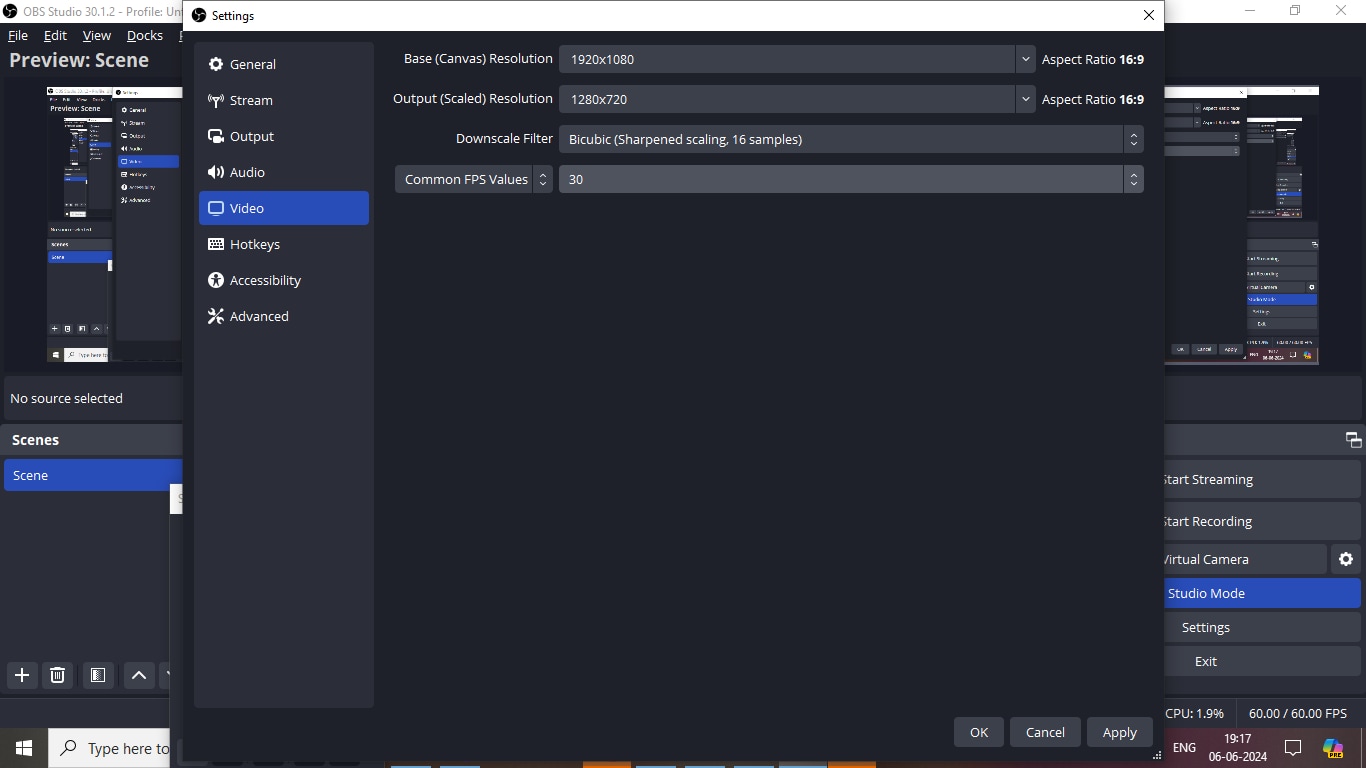
5. Video Settings
- Base (Canvas) Resolution – This denotes the resolution of your canvas where you arrange your sources. Usually, this resembles your screen’s native resolution Eg. 1920X1080
- Output (Scaled) Resolution—This is the resolution at which the stream will be recorded. It will depend upon the social media site for which you are recording. For example, Instagram has different resolution settings than YouTube. Scaling down from base resolution can save bandwidth and processing power. Common settings are 1280X720 for HD recording and 1920X1080 for full HD.
- Downscale Filter – The various filters have different properties.
- Bilinear - Fastest but poorest quality. Suitable for less critical scenes.
- Bicubic – optimum balance between performance and quality.
- Lanczos – Best quality, but also very heavy on the system.
- Common FPS Values – FPS stands for Frames Per Second. The following are the meanings of the common FPS values.
- 30 FPS – Standard value for most recordings and very light on the system.
- 60 FPS – Smoother videos, suitable for high motion recording such as games but also very heavy on the system.
A standard video setting on OBS will be as under:
Part 3: How to Optimize OBS for Different Recording Scenarios
Optimizing OBS for different recording scenarios involves achieving the right balance between your system's performance and the recording's quality. Too high a recording quality could cause your PC to crash, while too low a quality could optimize the system performance but leave you with a recording that would be of no use.
To be able to understand better we have tried to tabulate the various settings for various requirements.
Scenarios |
Games |
Live Streaming | Online Conference and lectures | ||
| Settings | High Action Games | Casual Games | Low action games/Bad PCs | ||
| Video Settings | |||||
| Base resolution | Monitor’s native | Monitor’s native | Monitor’s native | Monitor’s native | Resolution of Display or Webcam |
| Output resolution | 1920X1080 | 1280X720 | 1280X720 | 1920X1080 for Full HD streaming 1280X720 for HD streaming | For most lectures, 1280X720 is sufficient |
| Downscale Filter | Lanczos | Bicubic | Bilinear | Lanczos | Bicubic |
| FPS | 60FPS | 30 FPS | 30 FPS | 30 FPS usually 60 FPS for high paced streaming such as games |
30 FPS is sufficient for lectures and conferences |
| Output settings | |||||
| Output Mode | Advanced | Advanced | Simple | Advanced | Simple |
| Streaming Tab | |||||
| Encoder | NVENC or X264 | NVENC or X264 | X264 CPU with faster preset | NVENC or X264 (Prefer NVENC) | NVENC or X264 |
| Rate Control | CBR | CBR | CBR | CBR | CBR |
| Bitrate | 6000-9000 for 1080p 60fps/ 4500-6000 for 720p 60fps | 4500-6000 for 1080p 30fps/ 2500-4000 for 720p 30fps | 2500-4000 for 720p 30fps | 4500-9000 for 1080p 60fps/ 3000-6000 for 720p 30fps | 6000-9000 for 1080p 60fps/ 4500-6000 for 720p 60fps |
| Key Interval | 2 sec | 2 sec | 2 sec | 2 sec | 2 sec |
| Preset | Quality for NVENC and Very Fast for x264(CPU) | Quality for NVENC and Very Fast for x264(CPU) | Superfast or ultrafast for X264 (CPU) | Quality for NVENC and Very Fast for x264(CPU) | Quality for NVENC and Very Fast for x264(CPU) |
| Profile | High | High | Main or Baseline | High | High |
| Tuning | Enable NVENC | Enable NVENC | Enable NVENC | Enable NVENC | |
| Audio Settings | |||||
| Sample Rate | 48kHz | 48kHz | 44.1 kHz | 44.1 kHz or 48 kHz | 48kHz |
| Channels | Stereo | Stereo | Stereo | Stereo | Stereo |
| Desktop Audio | Primary audio output device | Primary audio output device | Primary audio output device | Primary audio output device | Primary audio output device |
| Mic/Auxilliary Audio | Primary microphone | Primary microphone | Primary microphone | Primary microphone | Primary microphone |
Part 4: Achieving the Best-Quality Screen Recording Videos in OBS Studio
1. Balancing Settings
Balancing the OBS settings between quality and system performance is crucial to a clear and smooth recording and streaming experience. Here are some key factors to consider when choosing the right OBS setup for your system.
Key factors you must consider:
- System resources: Consider the capacity of your CPU, GPU, and RAM.
- Internet bandwidth: Run a speed test to determine the upload speed of your internet connection.
- Content-Type: The content you wish to record or stream.
Tips for adjusting settings based on hardware capabilities:
- Use hardware Encoding: If possible, use hardware encoders such as NVENC or AMF to offload the burden on your CPU.
- Adjust the Bitrate according to your Intenet Bandwidth: Ensure your upload speed can handle the chosen bitrate.
- Monitor System Performance: Use Task Manager to monitor CPU and GPU performance and memory usage.
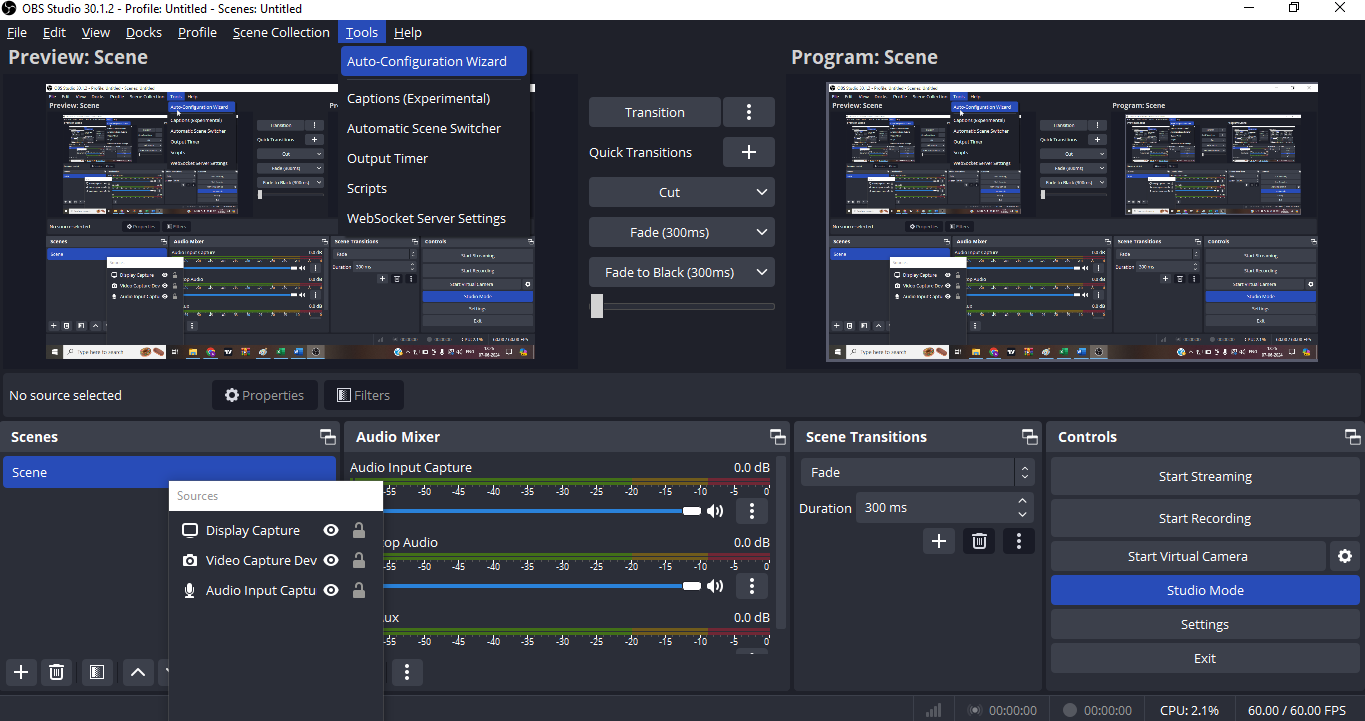
2. Using the Auto-Configuration Tool
OBS is equipped with an Auto-Configuration Wizard that can help you optimize streaming and recording settings based on your system performance. Here is a step-by-step guide on how to use the OBS auto-configuration wizard.
How to use OBS's built-in auto-configuration tool
Step 1: Open the OBS software on your PC.
Step 2: Open Auto-Configuration Wizard – Tools > Auto-Configuration Wizard
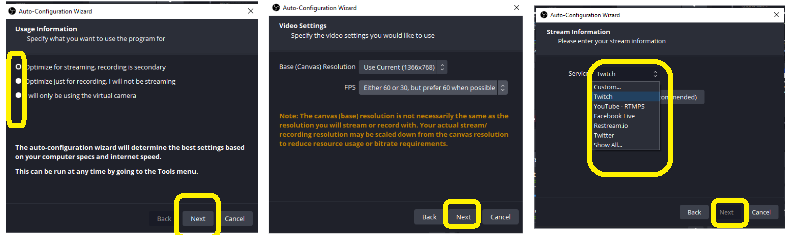
Step 3: Select the purpose for using the Auto-Configuration Wizard and click on Next. Select the video settings that you would like to use and again click on Next. Enter your stream information, as in the purpose of your recording—whether you are recording for Twitch or YouTube, Facebook live, etc. Enter your stream key or log into your account for verification and click next. Finally, click on Apply Settings.
Part 5: Troubleshooting Common Issues in OBS
Now, let us troubleshoot some of the common issues in the OBS.
1.Dropped Frames and Lagging
Causes:
- Insufficient internet bandwidth.
- High CPU usage.
- Improper bitrate settings.
Solutions:
- Check internet Connectivity: You need a stable internet connection with high speed to upload the video. A wired connection would be better.
- Reduce Bitrate: Go to Settings > Output and reduce the streaming bitrate.
- Change the Encoder: Using an external hardware encoder such as NVENC is better as it reduces the load on the CPU. If you are using X264, then lower the preset to faster or very fast.
- Close all background applications: Background applications, though not seen, put a lot of load on the CPU. Closing them can remove the lagging issue.
- Lower resolution/FPS: Go to Settings > Video and reduce the FPS or output resolution.
2. Audio-Video Sync Problems
Causes:
- Incorrect Sync Offset settings.
- Audio Input and Video Capture latency issue.
Solution:
- Set Sync Offset: To set the sync offset, go to Audio Mixer and click on the gear symbol. This will open the Advanced audio properties. Set the sync offset here.
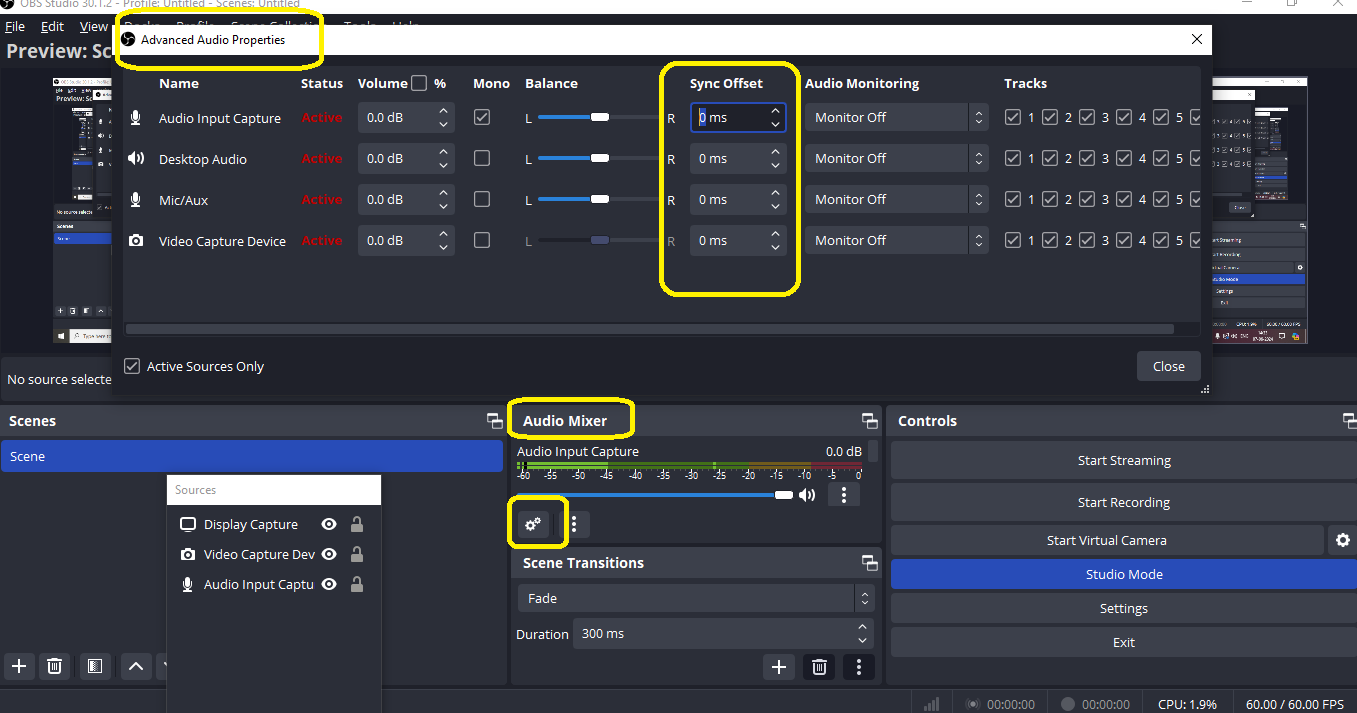
- Enable Audio monitoring: This will help you check for delays in your audio sources.
3. Black Screen Capture
Causes:
- Incorrect capture settings
- Conflict with GPU settings
Solutions:
- Choose the correct Capture Mode: OBS offers different capture modes, such as Display Capture, Window Capture, or Game Capture. Make sure you have selected the right capture mode for recording.
- GPU Settings: For the laptops with integrated GPU, make sure OBS uses the dedicated GPU in your Graphics Control panel.
4. No Desktop Audio
Causes:
- Incorrect audio device settings
- Conflicting audio drivers
Solutions:
- Check Audio settings: Go to Settings > Audio and make sure the correct desktop audio device has been selected.
- Update Audio Drivers.
- Default Audio Device: Set the desired playback device as default in your System’s sound settings.
5. Poor Video Quality
Causes:
- Low bitrate settings
- High Compression
Solutions:
- Increase the Bitrate: Go to Settings > Output and increase the bitrate
- Change Encoder Preset: If using x264, slow down the preset by a level or two for better quality.
- Resolution and FPS: Ensure your resolution and FPS settings are optimum for your system.
6. OBS crashes or Freezes
Causes:
- Insufficient system resources
- Conflicting software
Solutions:
- Update OBS to the latest version.
- Ensure CPU, GPU, and RAM are sufficient and performing optimally.
- Disable conflicting software: Any antivirus or firewall that may be restricting OBS's performance must be disabled.
Bonus: Best Alternative to OBS Studio – Wondershare DemoCreator
OBS is one of the oldest and most popular Video recording and streaming software. It is free of cost. However, OBS goes too heavy on your system, especially when you are recording on an older system, then your system will keep on crashing. To avoid these problems, we have a state-of-the-art and AI-powered video recorder and editor that can change your recording experience. Let us explore the features, pros, and cons of Wondershare DemoCreator to help you understand its power.
Features:
- Six recording options for a dedicated, high-quality recording experience.
- Dedicated editing for fast and easy video creation.
- You need a lot of visual assets to polish your recorded videos and give them a feel of studio recording.
- AI power is available for recording, video editing, and audio editing.
- Advanced version 8.0 is available to amplify the entire recording and editing experience.
How to record using Wondershare DemoCreator
Step 1: Download Wondershare DemoCreator—Open the DemoCreator home page by clicking on the link above. Click on Try it for Free. This will automatically download the DemoCreator software. Follow the onscreen instructions to install the software on your PC. DemoCreator works well on both Windows and Mac.
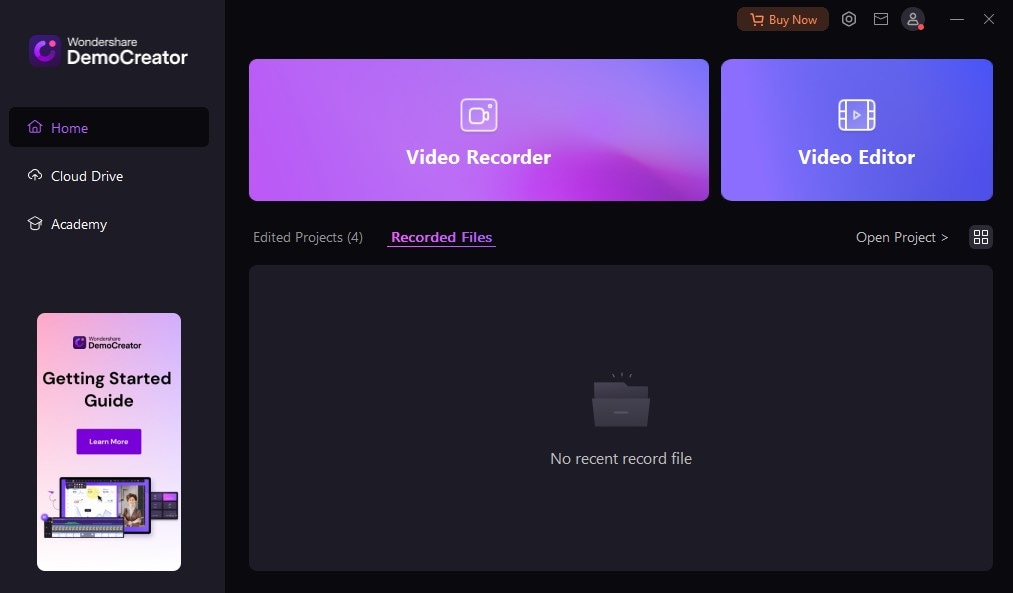
Step 2: Open DemoCreator and select Video Recorder. Open the DemoCreator shortcut by double clicking on the Desktop icon. You will see 2 options: Video Recorder and Video Editor. As we want to use Democreator as an alternative to OBS for recording click on Video Recorder.
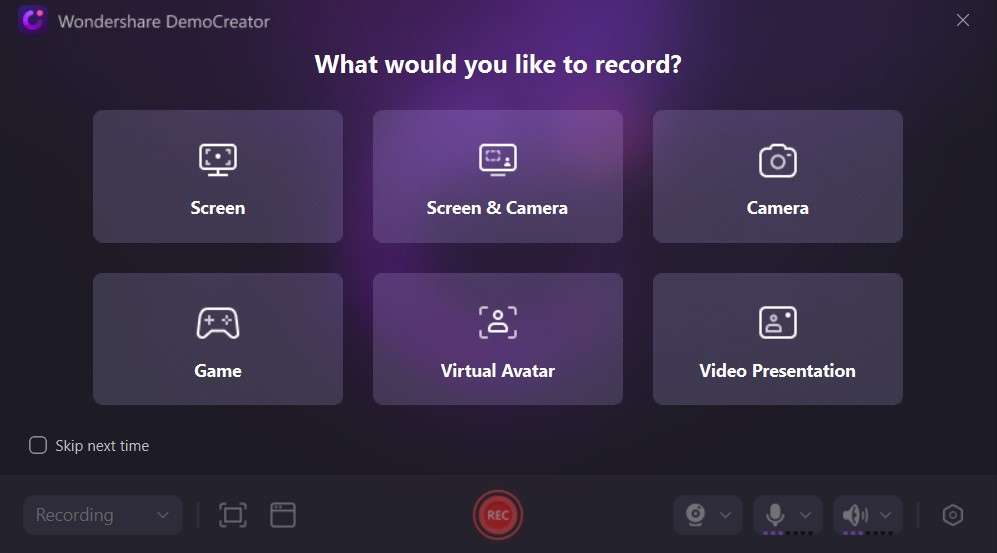
Step 3: Select what you want to record. Unlike OBS there are no separate settings for Video Recording, Live Streaming or Game Recording. You simply need to select the right option based on what you wish to record and click on that. Here we’ll show how to screen record on DemoCreator. Click on Screen and then open the screen that you wish to record.
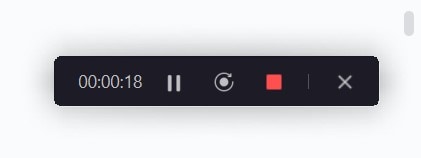
Step 4: Begin recording—Click on the red REC button, which will give a countdown of 3, and begin recording.

Step 5: Stop Recording and Edit Video—Once you are done with your recording click on Stop button to stop the recording. The recording will now appear on the next screen, where you can preview your video and edit it as per your requirements.
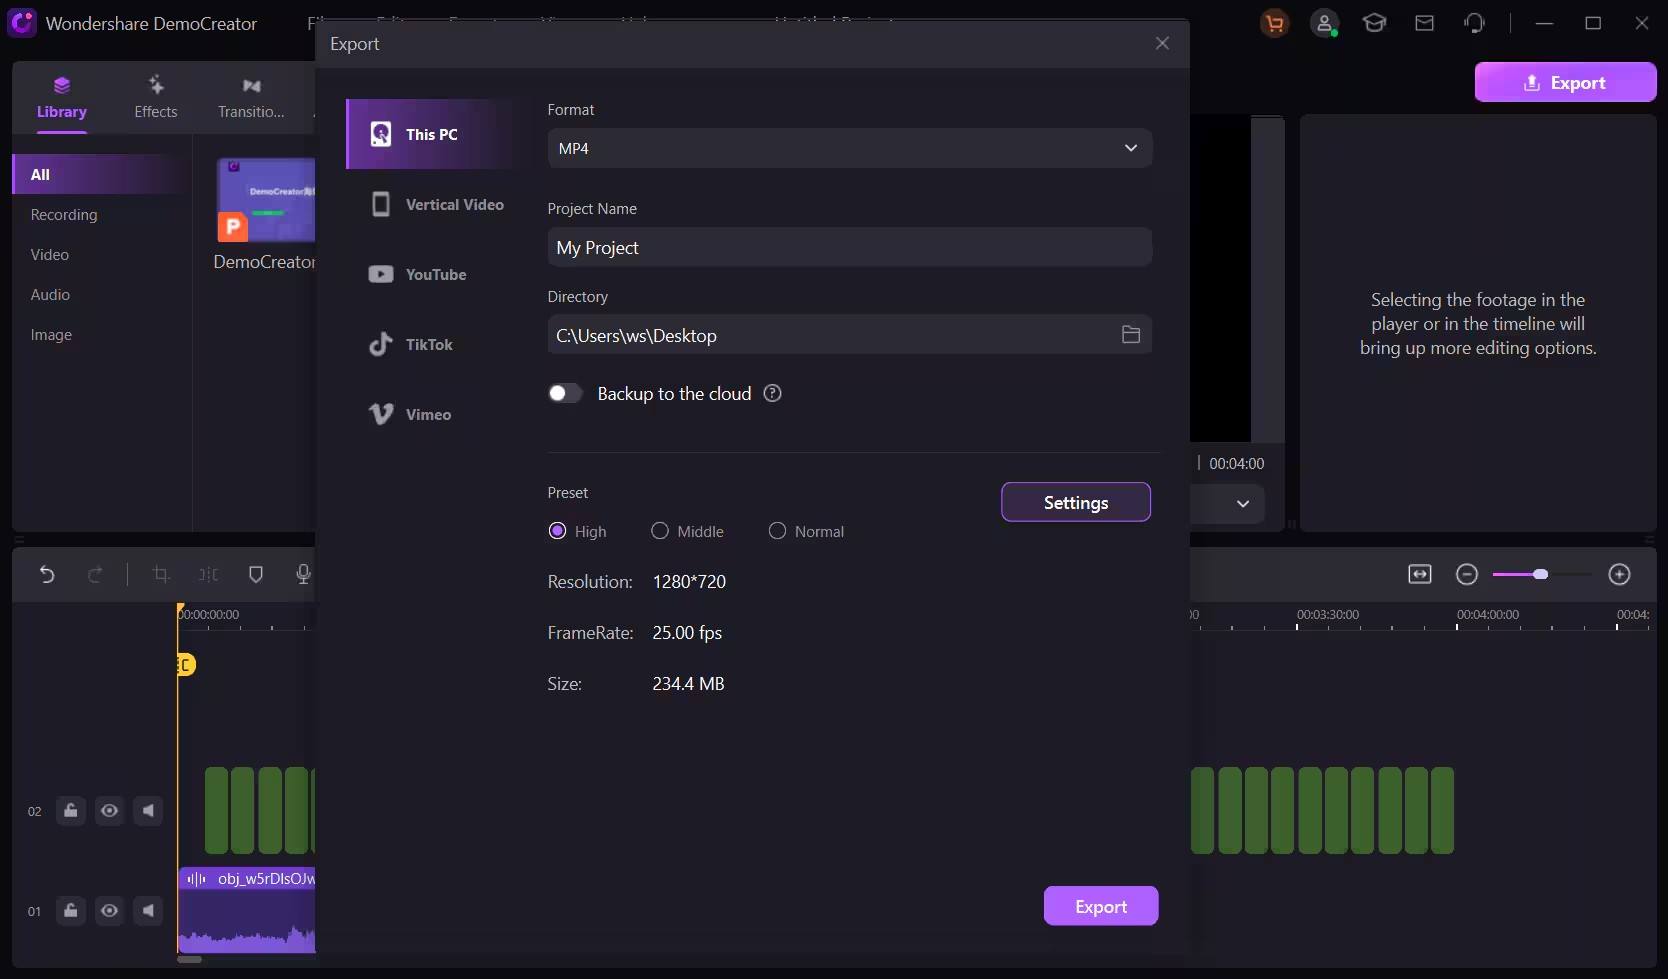
Step 7: Export Video— Once done with the editing, you can directly Export the video from here to your social media account or share it with your friends. To do so click on Export and then select the social media site on which you wish to upload. Alternatively, you can also save the video on your local device by providing the designated path.
- Record customized screens with audio and edit them in different tracks.
- Capture gaming videos, tutorials, and presentations and then edit them in one tool.
- Built-in unlimited editing templates, special effects, and other sources.
- Supported export to MP4, MOV, MKV, GIF, and other formats.

Conclusion:
The aforesaid is a detailed guide on the best OBS settings under various circumstances and for various needs. We have tried to highlight the best possible settings that will help you have a seamless recording experience without putting a lot of load on your system. However, if you are still facing issues with OBS and your system isn’t well equipped to handle the load by the OBS software, it's time to switch to Wondershare DemoCreator. Light on your CPU and AI-powered recording and editing experience will make you fall in love with the software.


