
Voice memos on an iPhone serve various purposes, from capturing quick reminders to recording important interviews, lectures, and even creative ideas for podcasts. Transferring these memos to a Mac allows users to edit, organize, and back them up for future use. Whether you need to transcribe an interview for research, preserve cherished family memories, or share a lecture with classmates, syncing voice memos ensures that your recordings remain accessible and easy to manage.
In this article
- Part 1: How to Sync Voice Memos from iPhone to Mac Using iCloud
- Part 2: How to Transfer Voice Memos from iPhone to Mac via AirDrop
- Part 3: Moving Voice Memos from iPhone to Mac Using Finder (MacOS Catalina & Later)
- Part 4: How to Transfer Voice Memos from iPhone to Mac Using Email or Messages
- Part 5: Using Third-Party Tools to Transfer Voice Memos to Mac
- Conclusion
- FAQs
However, syncing issues and file management complexities can be frustrating. Users often face problems like memos not appearing on Mac, iCloud sync delays, or file transfer errors. This guide provides the most reliable and up-to-date methods for syncing iPhone voice memos to Mac, covering iCloud, AirDrop, Finder, third-party tools, and troubleshooting tips to help you avoid common pitfalls.
Part 1: How to Sync Voice Memos from iPhone to Mac Using iCloud
Step 1Enable iCloud Sync for Voice Memos
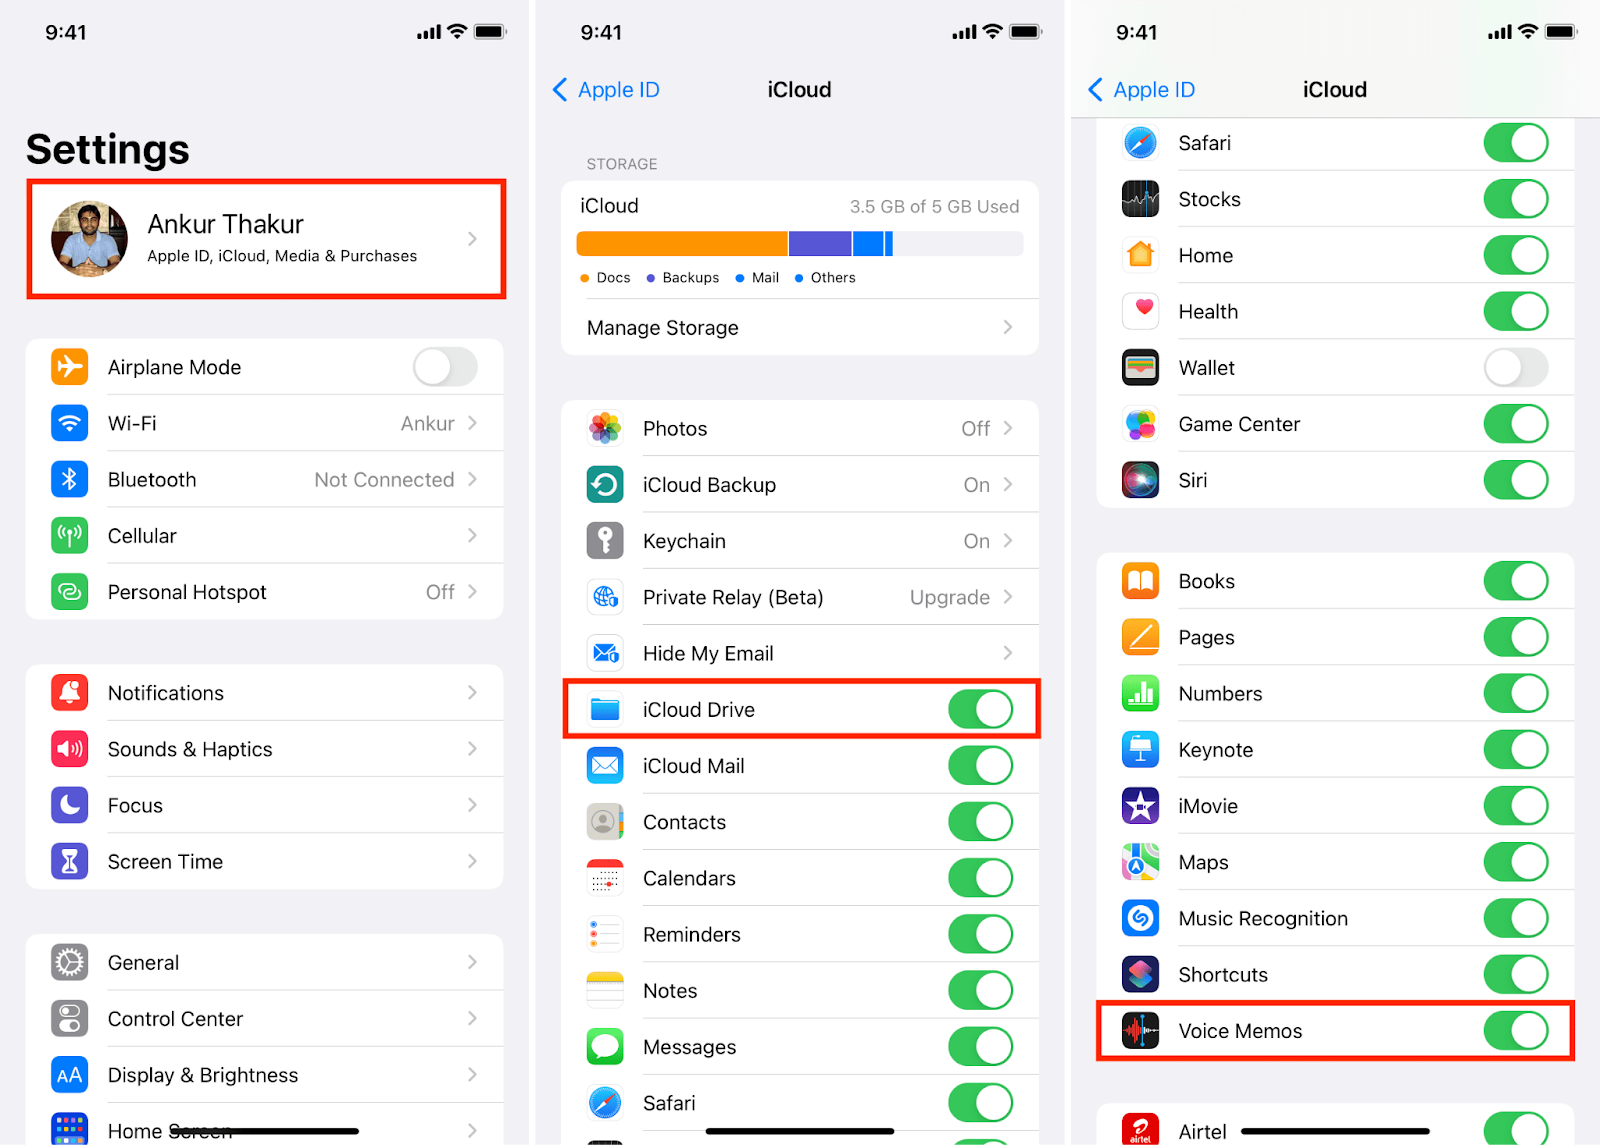
For iOS 16 and later, start by opening the Settings app on your iPhone and tapping on [Your Name] > iCloud. Scroll down and tap Show All under the "Apps Using iCloud" section. Locate Voice Memos from the list and toggle it ON to enable automatic syncing across your Apple devices.
For iOS 15 and earlier, navigate to Settings > [Your Name] > iCloud and scroll down until you find the Voice Memos option. Toggle it ON to activate syncing. Additionally, ensure that iCloud Drive is enabled by going to Settings > iCloud > iCloud Drive and switching it ON. This step is necessary for your voice memos to sync properly across all your Apple devices, including Mac. Once enabled, any new voice recordings will automatically appear in the Voice Memos app on your Mac, as long as both devices are signed in with the same Apple ID and connected to the internet.
Step 2Access Voice Memos on Your Mac
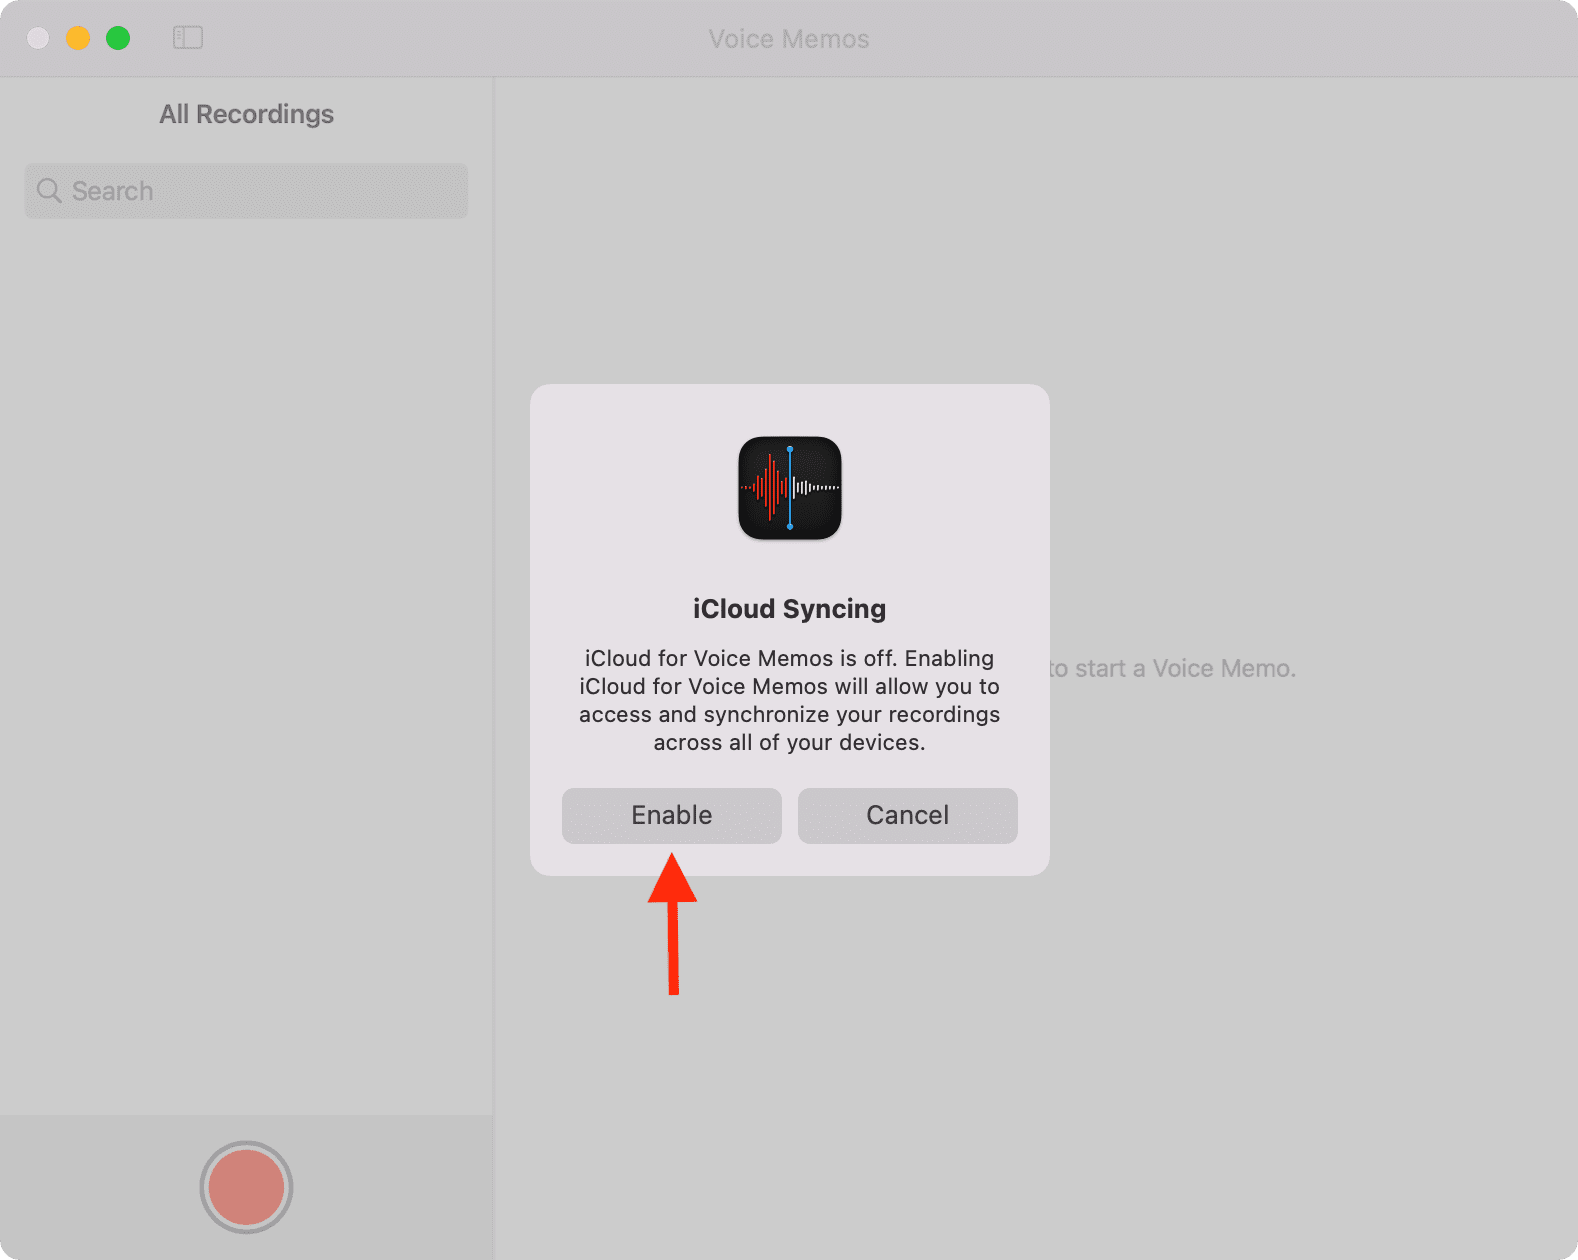
Once iCloud sync is enabled, you can access your voice memos on your Mac. If you’re using macOS Ventura or Sonoma, open the Voice Memos app, and your recordings should appear automatically. For macOS Monterey and earlier, you can either access the files directly from the Voice Memos app or find them in Finder > iCloud Drive > Voice Memos.
Pros & Cons of Using iCloud for Voice Memo Sync
Part 2: How to Transfer Voice Memos from iPhone to Mac via AirDrop
Step 1Enable AirDrop on Both Devices
First, ensure that AirDrop is enabled on both your iPhone and Mac. On your iPhone, swipe down from the top-right corner (on Face ID models) or up from the bottom (on Home Button models) to open Control Center.
Tap and hold the network settings card (Wi-Fi, Bluetooth, and Airplane Mode panel), then tap AirDrop and select either "Contacts Only" or "Everyone" (if the Mac isn’t listed in your contacts).
On your Mac, open Finder, click on AirDrop in the sidebar, and set it to "Everyone" or "Contacts Only" for seamless file sharing. Ensure that Wi-Fi and Bluetooth are turned on for both devices.
Step 2Share the Voice Memo via AirDrop
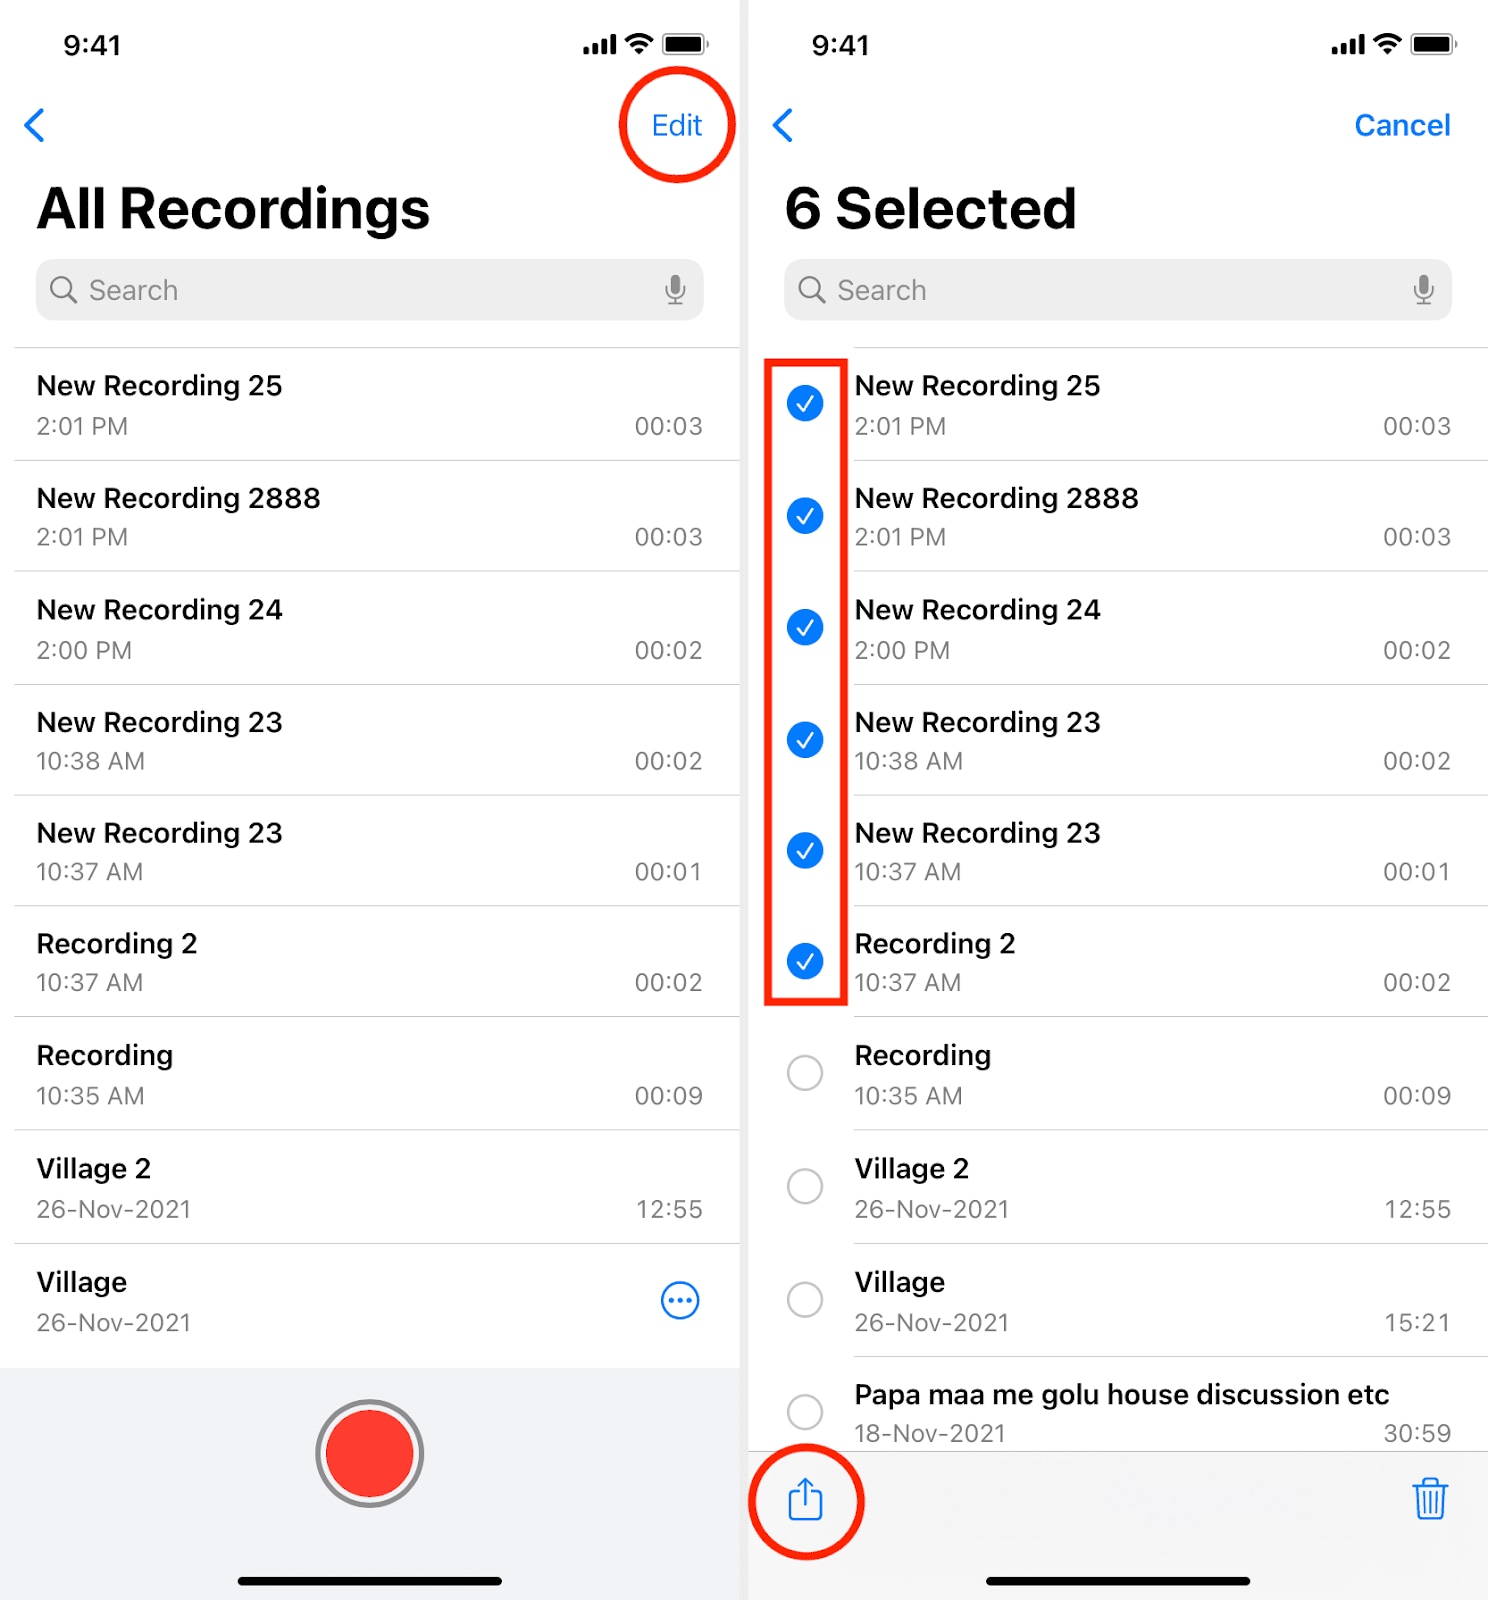
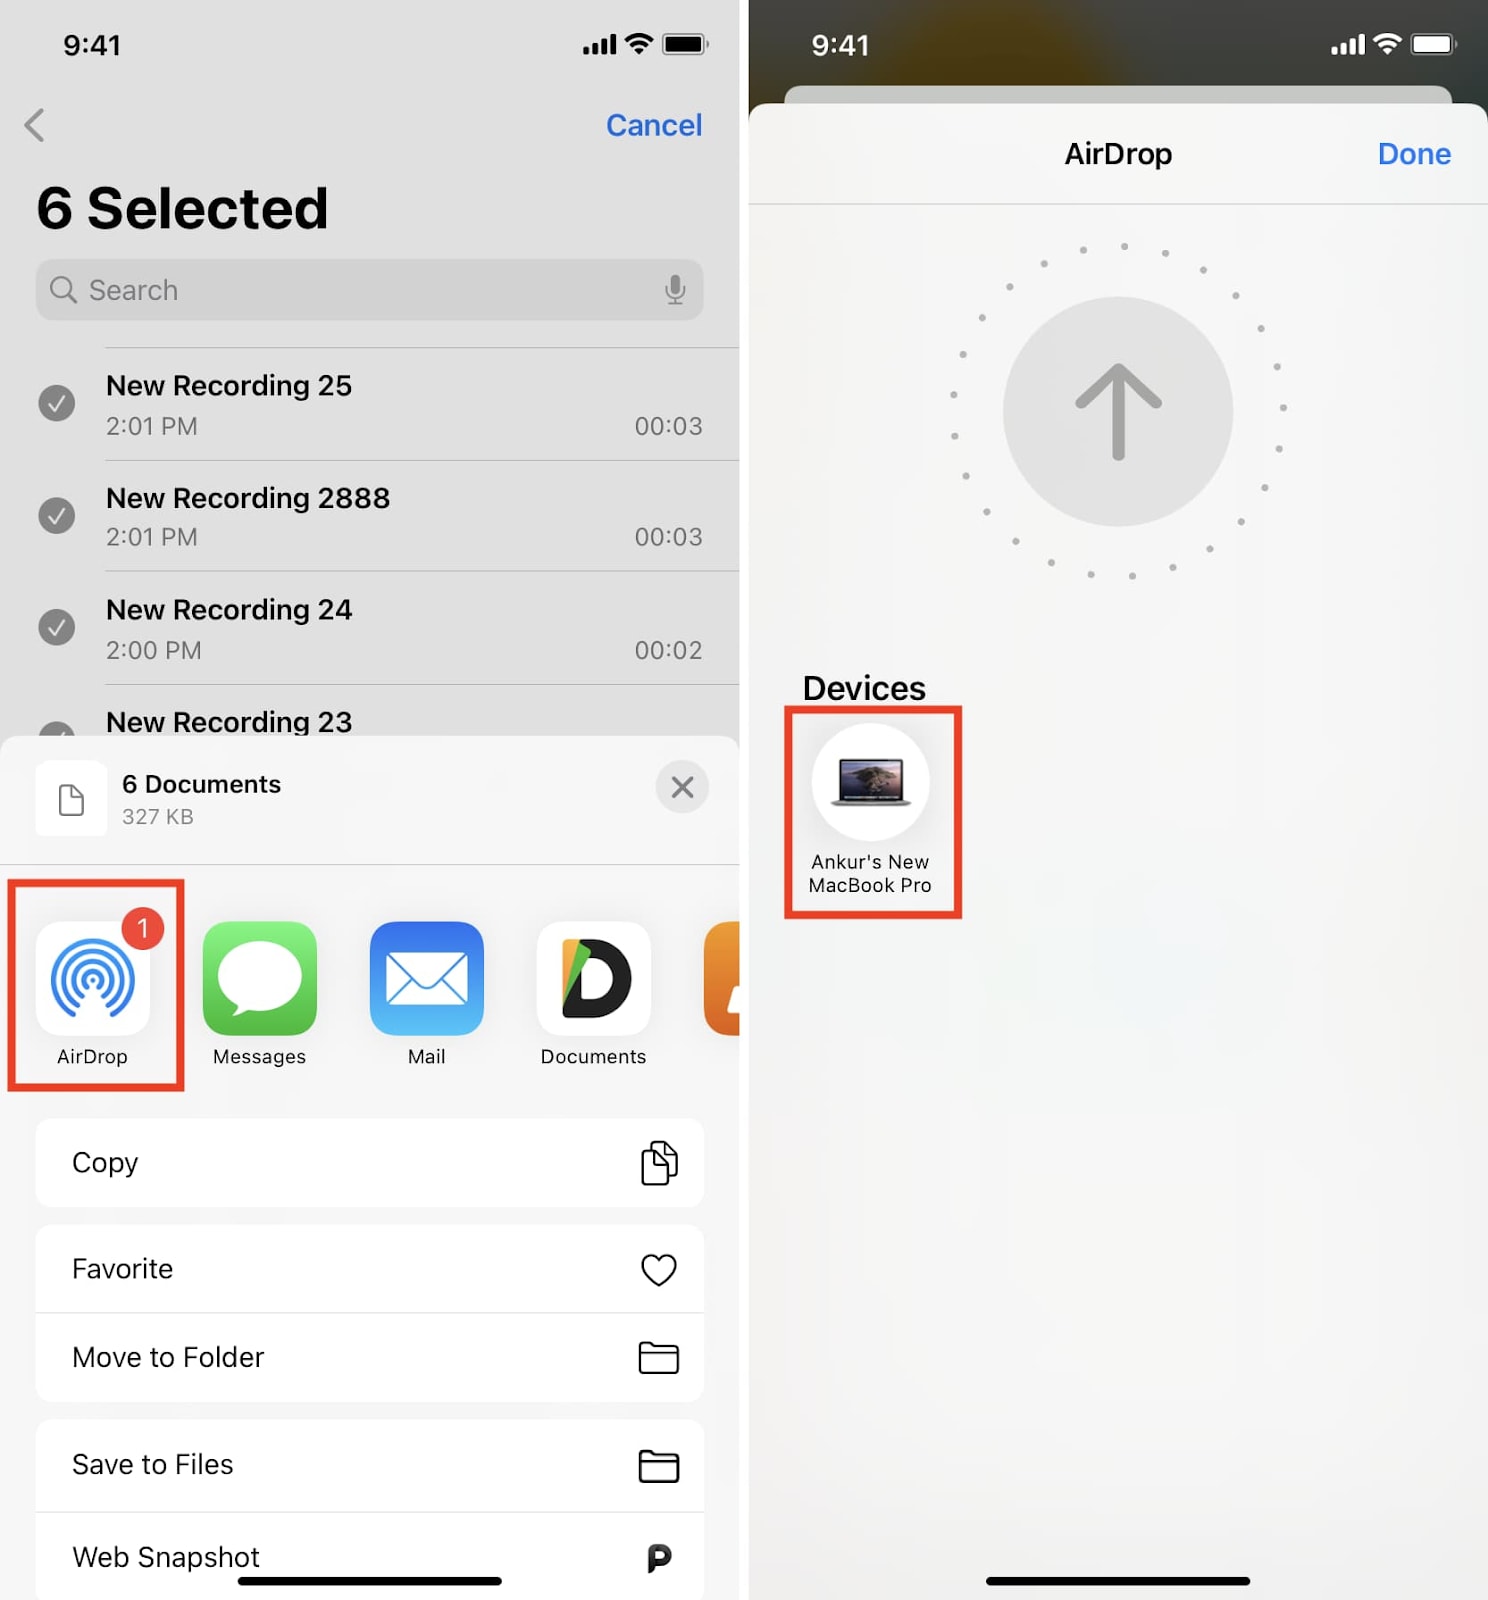
Once AirDrop is enabled, open the Voice Memos app on your iPhone and locate the recording you want to transfer. Tap on the recording, then press the Share button (square with an upward arrow).
From the sharing options, select AirDrop and choose your Mac from the available devices. A pop-up will appear on your Mac asking if you want to accept the file—click Accept, and the voice memo will be saved in the Downloads folder by default.
Pros & Cons of Using AirDrop for Voice Memo Sync
Part 3: Moving Voice Memos from iPhone to Mac Using Finder (MacOS Catalina & Later)
For users who prefer a wired and offline method, Finder provides a reliable way to transfer voice memos from an iPhone to a Mac. This method is ideal for large voice memo files or when AirDrop and iCloud syncing aren’t available.
Step 1Connect Your iPhone to Mac
Start by using a USB or USB-C cable to connect your iPhone to your Mac. Once connected, open Finder on your Mac. In the sidebar, you should see your iPhone’s name under the Locations section. Click on it to access your device’s settings. If prompted, tap "Trust" on your iPhone and enter your passcode to establish a secure connection.
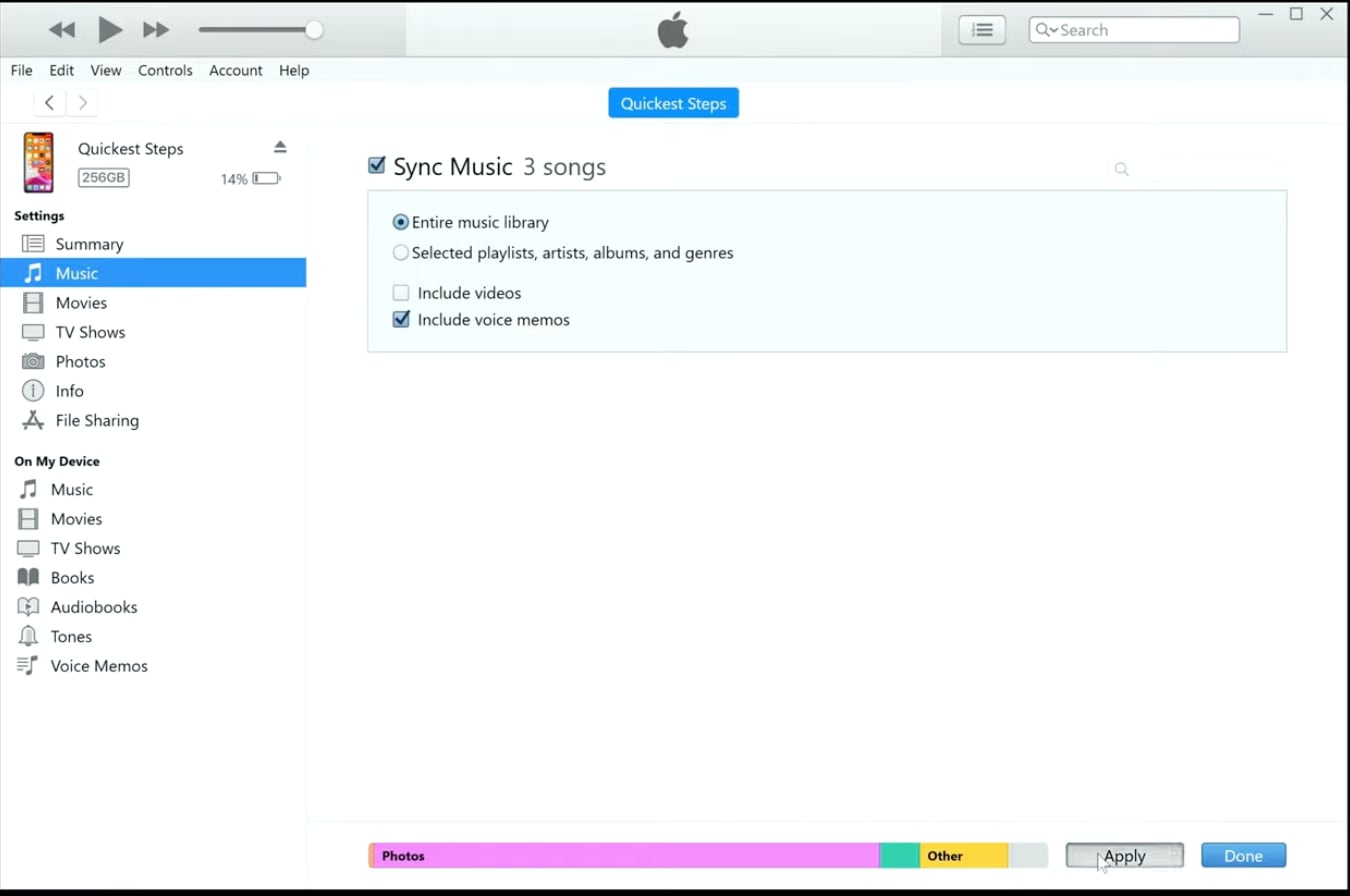
Step 2Manually Sync Voice Memos
Once your iPhone is detected in Finder, navigate to the Music tab in the top menu. Scroll down and look for the "Sync Voice Memos" option. Check the box to enable it, then click Apply or Sync at the bottom of the Finder window. Finder will begin transferring your recorded voice memos to the Music app on your Mac.
Pros & Cons of Using Finder for Voice Memo Transfer
Using Finder is a great option when dealing with multiple voice memos or if wireless syncing isn’t an option. However, if you prefer an automatic cloud-based method, iCloud sync might be a better choice.
Part 4: How to Transfer Voice Memos from iPhone to Mac Using Email or Messages
If you're looking for a quick and easy way to transfer a small voice memo from your iPhone to your Mac, using email or iMessage is a convenient option. This method works best for short recordings that do not exceed email attachment size limits.
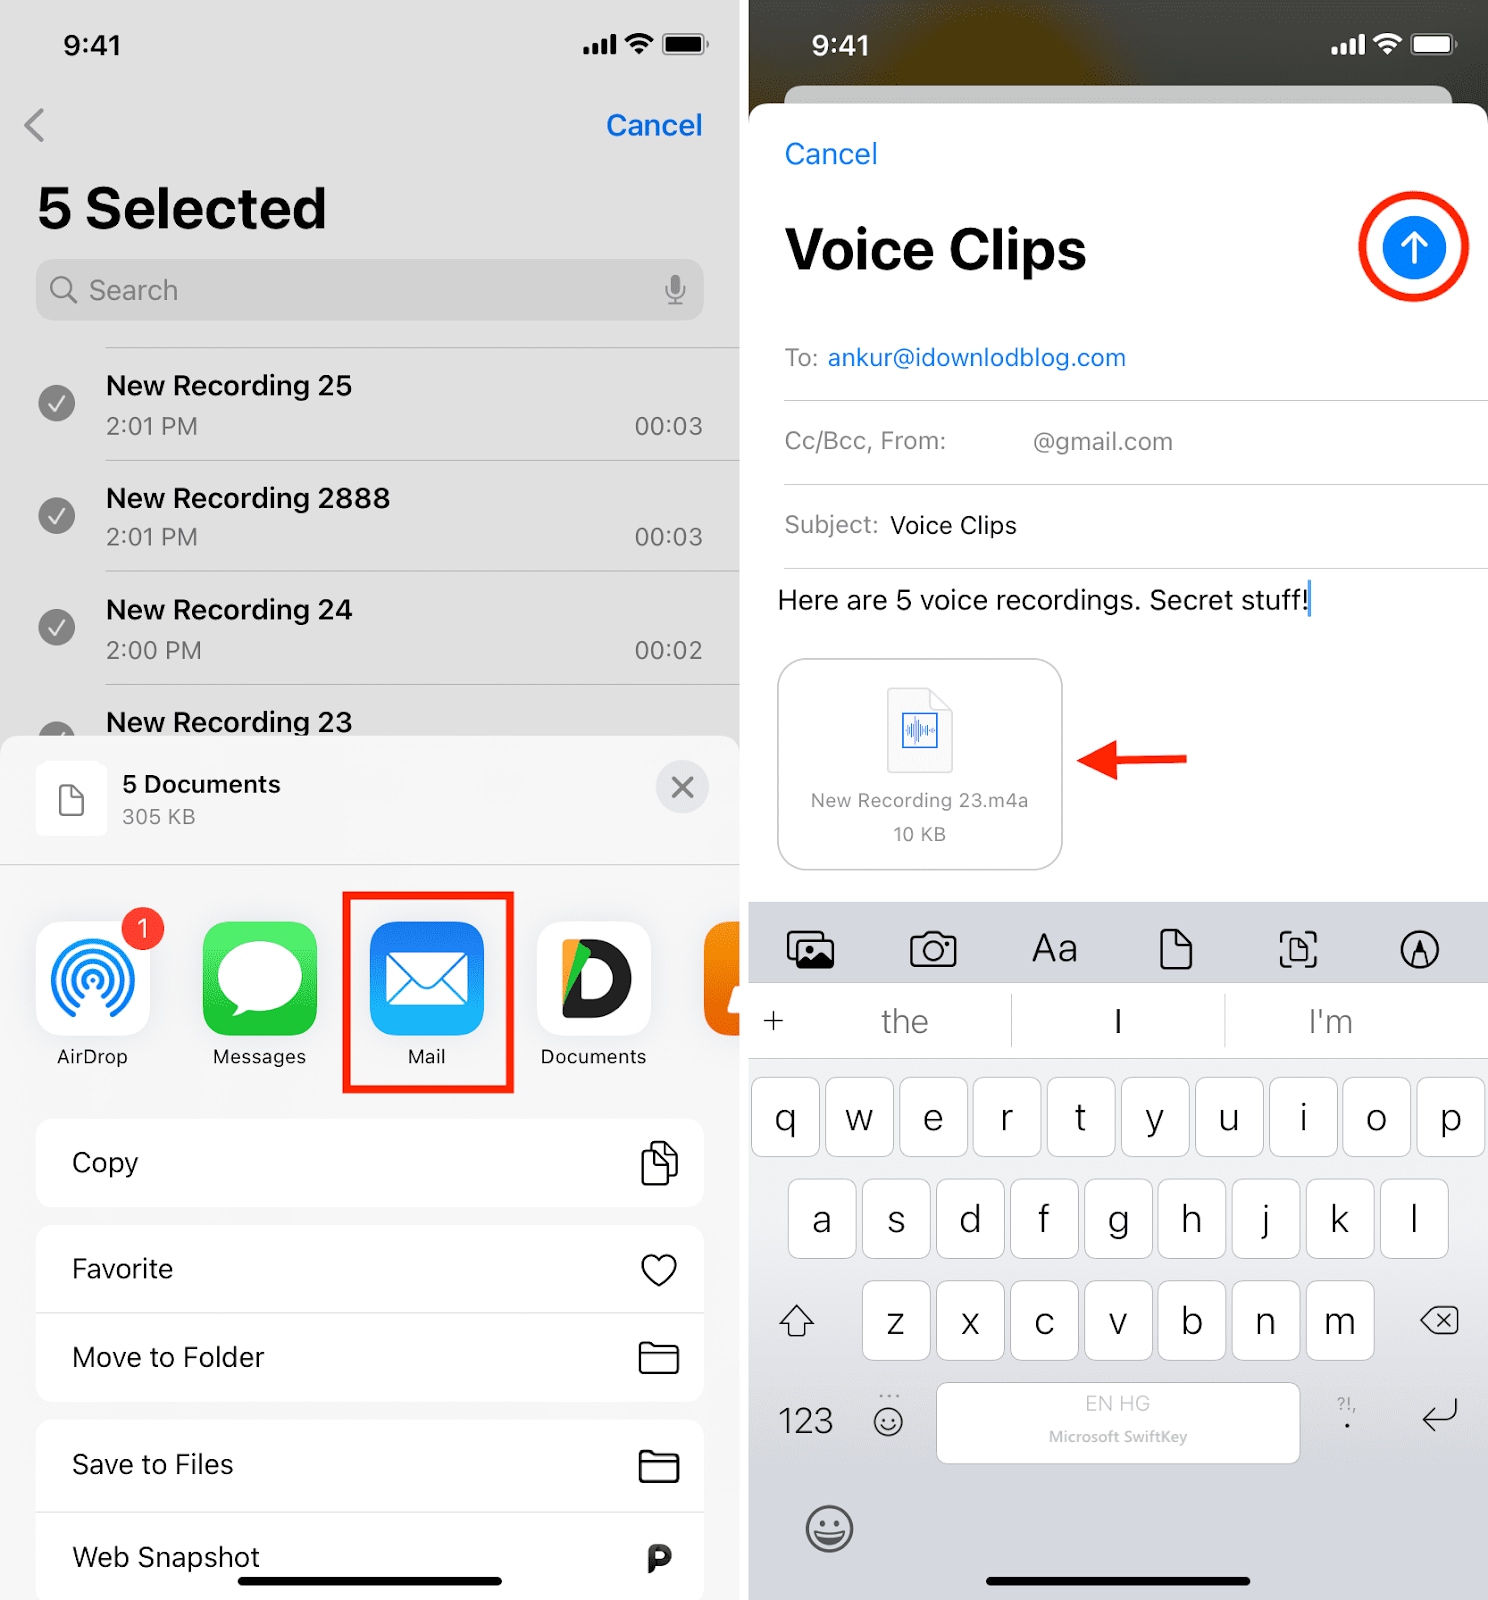
Step 1Share the Voice Memo via Email or iMessage
Open the Voice Memos app on your iPhone and select the memo you want to transfer. Tap the Share button (square with an upward arrow), then choose either Mail or Messages from the sharing options.
Step 2Send the File to Yourself
If using Mail, enter your own email address in the recipient field and tap Send. If using Messages, select your contact and send the memo via iMessage. Once sent, open the Mail app or Messages app on your Mac and download the attached voice memo.
Pros & Cons of Using Email or Messages for Voice Memo Transfer
Part 5: Using Third-Party Tools to Transfer Voice Memos to Mac
For users who frequently transfer voice memos, need advanced editing options, or want to convert recordings into multiple formats, third-party tools provide a more efficient and flexible solution than built-in Apple methods.
Why Use Third-Party Software?
- Batch Transfer – Move multiple voice memos at once without selecting and sending them one by one.
- No iCloud or Internet Required – Transfer files offline via USB or local network.
- Format Conversion – Convert voice memos into MP3, WAV, AAC, or other audio formats for better compatibility.
- Advanced Editing Features – Trim, denoise, and enhance audio for podcasts, interviews, or professional use.
Best Third-Party Tool for Voice Memo Transfer: Wondershare DemoCreator
Wondershare DemoCreator is an all-in-one audio and video editing tool that helps users transfer, enhance, and edit voice memos seamlessly. It allows users to capture high-quality recordings, remove background noise, and save files in various formats like MP3, WAV, and AAC.
Key Features of Wondershare DemoCreator for Voice Memo Transfer
- Fast & Easy Transfer – Move voice memos from iPhone to Mac quickly without relying on iCloud.
- AI-Powered Audio Enhancement – Clean up background noise and improve voice clarity.
- Batch Export & Format Conversion – Convert memos to multiple formats, making them easier to share or edit.
- Editing Tools for Audio & Video – Trim, cut, and enhance recordings before saving.
- Secure & Private Storage – Keep recordings stored safely on your Mac without relying on cloud services.
How to Transfer Voice Memos from iPhone to Mac Using Wondershare DemoCreator
Step 1Install Wondershare DemoCreator on Your Mac
Download and install Wondershare DemoCreator from the official website. Launch the software and ensure your iPhone is connected to your Mac.
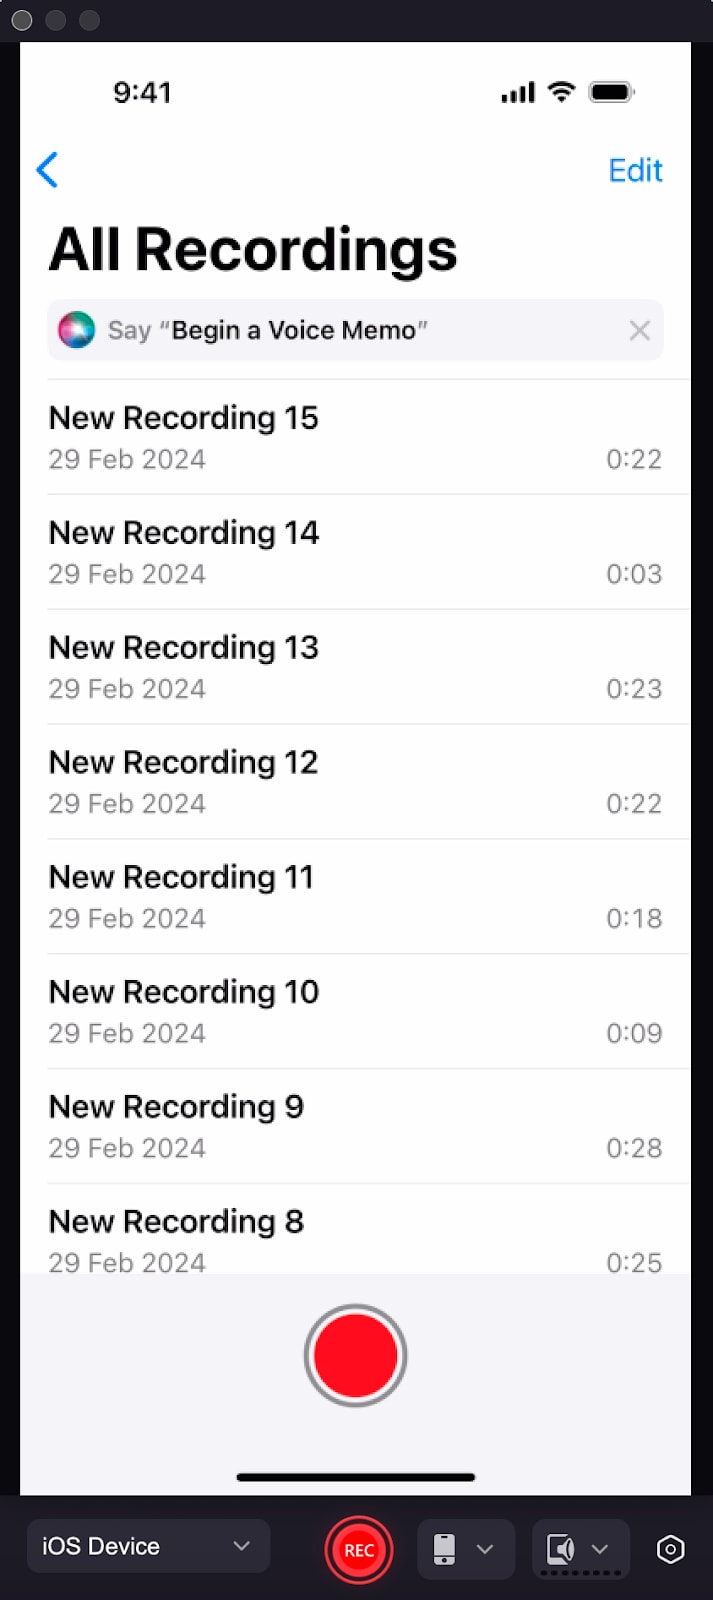
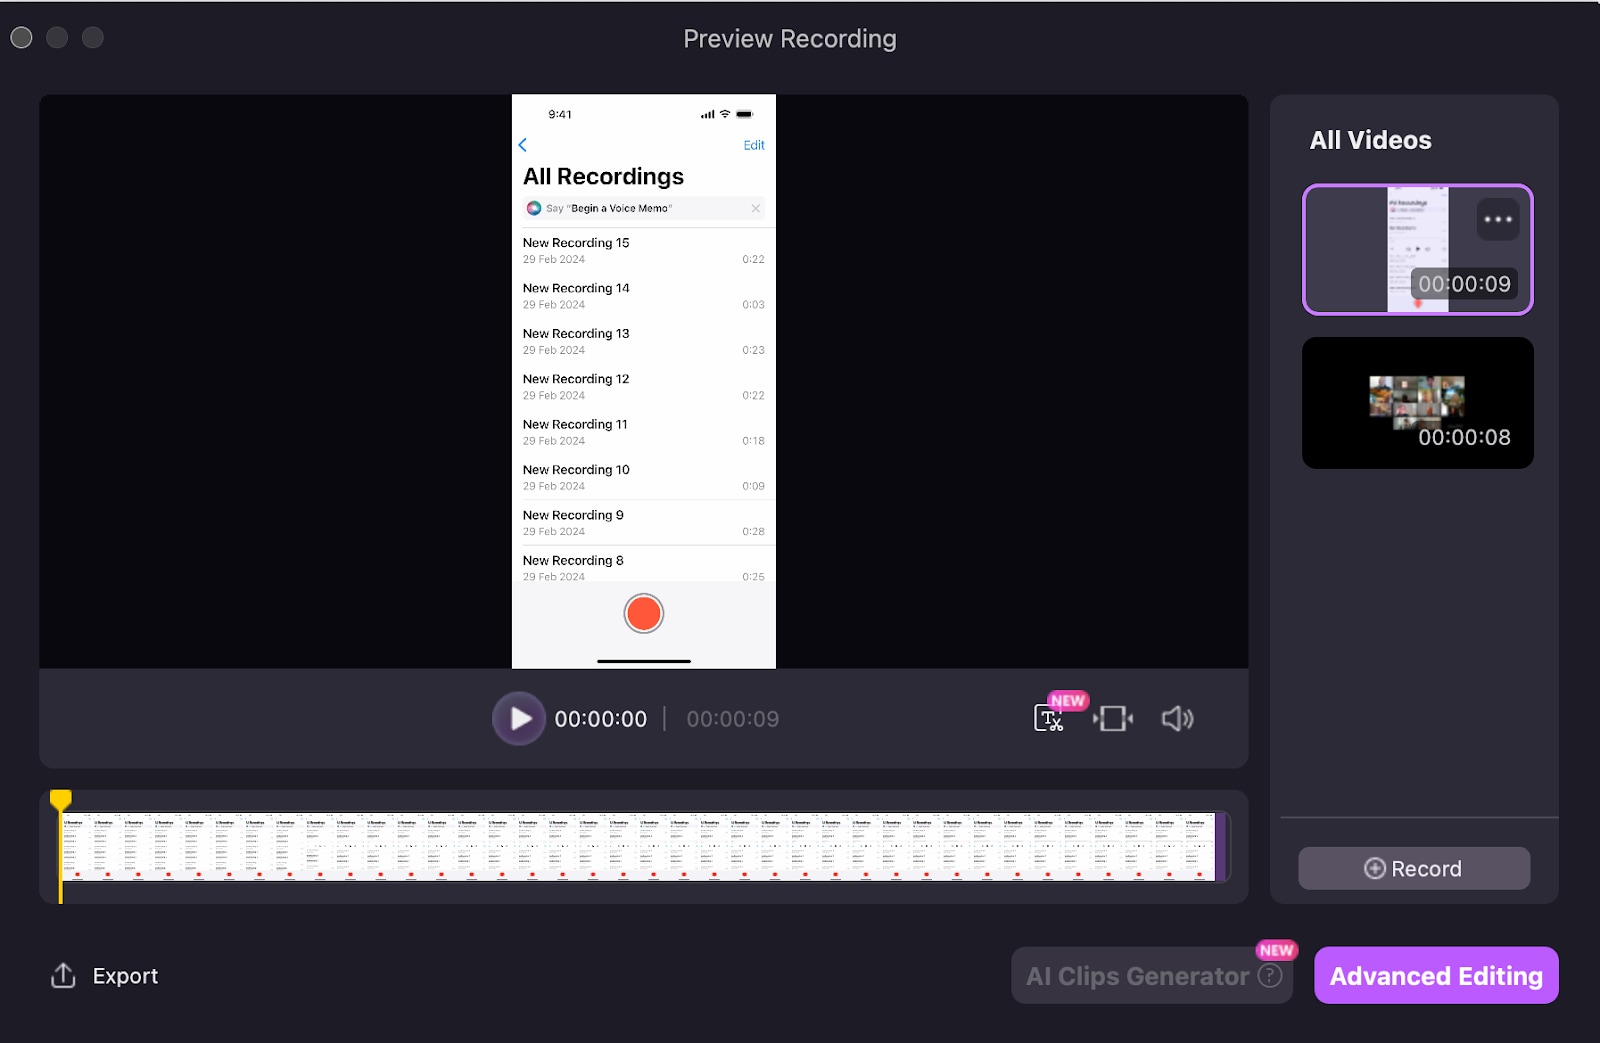
Step 2Record Voice Memos
Open the Voice Memos app on your iPhone, select the recordings you want to transfer, and tap the Rec button. Wondershare Democreator will record the voice memo in the interface to further edit it.
Step 3Edit & Enhance Your Voice Memos
To add and edit audio in Wondershare DemoCreator, open the "Advanced editing" tab and browse or search for music tracks and sound effects. Drag and drop your selected audio into the timeline beneath the video layer. Use the "Audio" section under Magic Tools on the right panel to adjust volume, speed, and presets. For voiceovers, click the microphone icon to record narration directly.
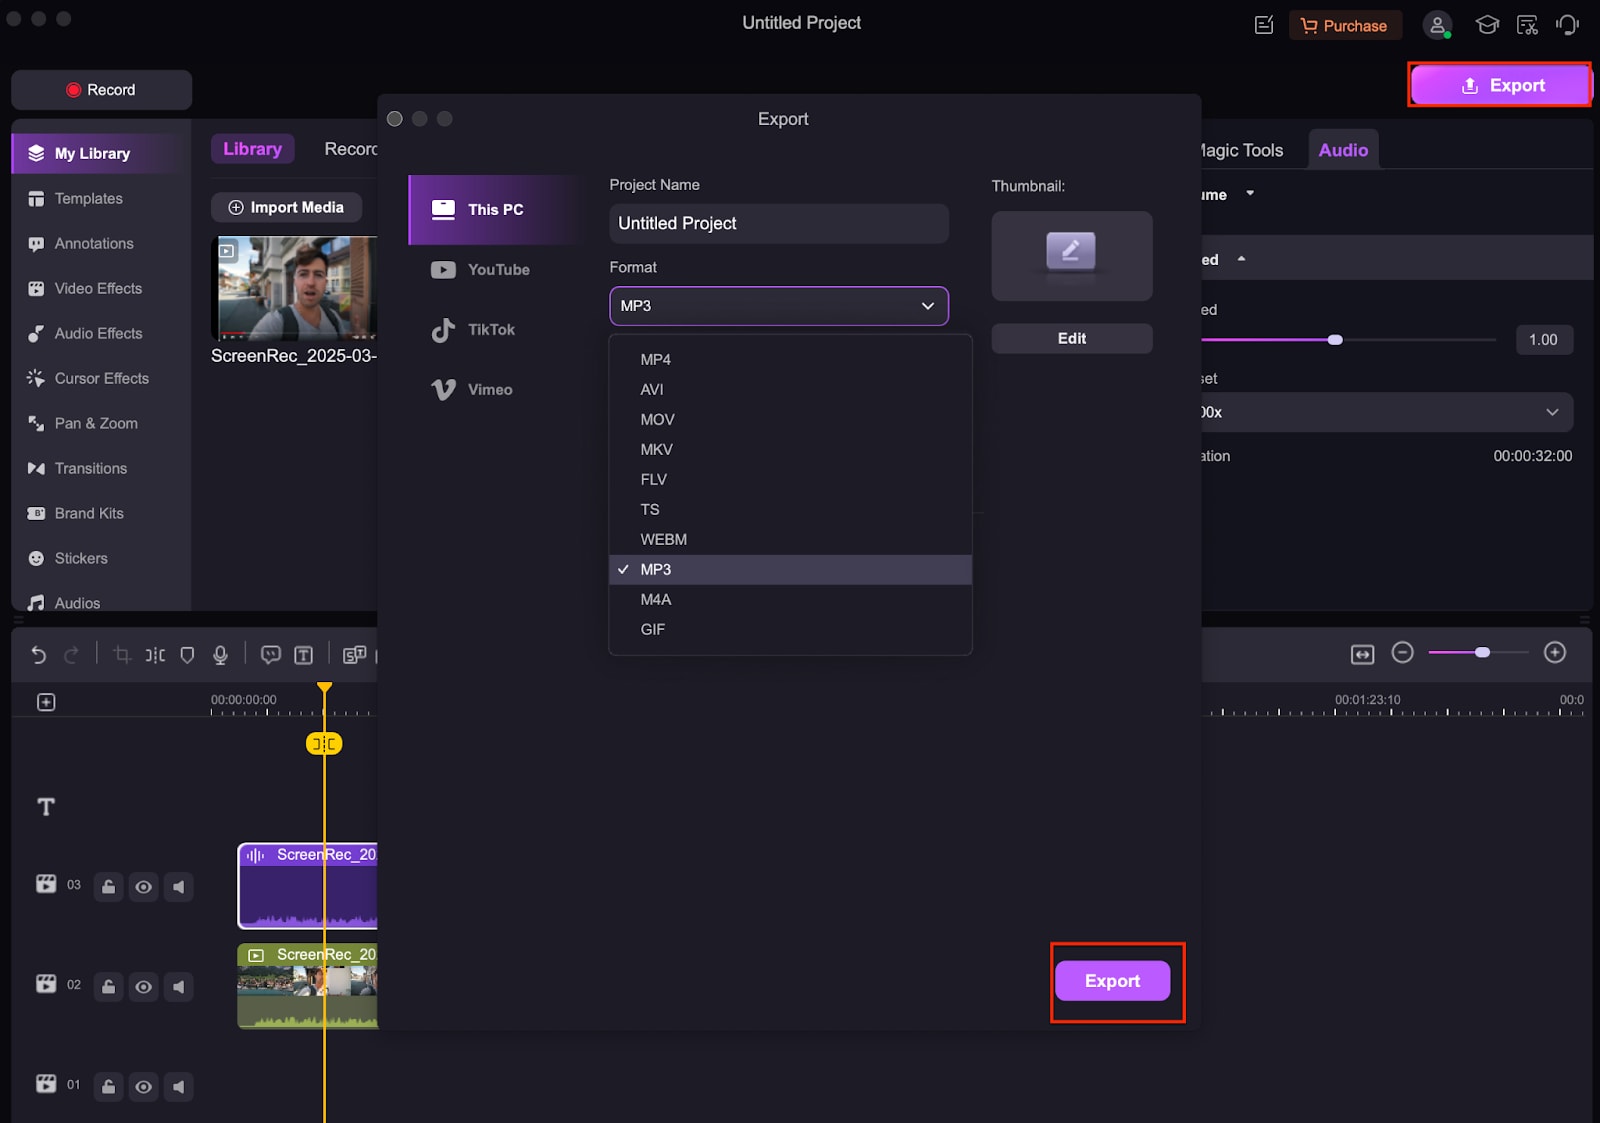
Step 4Export & Save in Any Format
After editing, export the final audio in MP3, WAV, or AAC format. Save the file to your Mac, ensuring it's optimized for playback, sharing, or further editing.
Pros & Cons of Using Wondershare DemoCreator for Voice Memo Transfer
Conclusion
Syncing voice memos from your iPhone to your Mac ensures that your important recordings—whether interviews, lectures, or personal notes—are safely stored and easily accessible for editing or sharing. Apple’s built-in options like iCloud Sync, AirDrop, and Finder offer convenient ways to transfer files, while email and messaging work well for smaller recordings. However, if you need batch transfers, advanced editing, or format conversion, third-party tools like Wondershare DemoCreator provide a more comprehensive solution. No matter which method you choose, regularly backing up your voice memos helps prevent data loss, improve organization, and streamline your workflow. Whether you're a student, professional, or content creator, ensuring seamless memo transfer between your devices will enhance efficiency and productivity.
FAQs
-
1. Can I transfer voice memos from iPhone to Mac without iCloud or a USB cable?
Yes, you can use AirDrop or send the voice memo to yourself via email or iMessage. If these methods are not ideal for large files, using a third-party tool like Wondershare DemoCreator allows seamless wireless transfers. -
2. Where are my voice memos stored on my Mac after syncing?
If synced via iCloud, voice memos will appear in the Voice Memos app on your Mac. If transferred manually using Finder, the files are stored in the Music folder under the "Voice Memos" section or in the folder you selected during the transfer. -
3. Can I convert voice memos to MP3 or another format after transferring?
Yes, after transferring voice memos to your Mac, you can use Wondershare DemoCreator, QuickTime Player, or third-party converters to save them as MP3, WAV, or AAC for better compatibility. -
4. What should I do if my voice memo is too large to send via email or AirDrop?
If the voice memo exceeds email or AirDrop size limits, try compressing the file using a tool like Wondershare DemoCreator or iMovie. Alternatively, upload the memo to Google Drive or Dropbox and share the link. -
5. Can I recover deleted voice memos on my iPhone or Mac?
Yes, deleted voice memos are stored in the "Recently Deleted" folder in the Voice Memos app for 30 days before permanent deletion. If removed permanently, you can try using a data recovery tool like Wondershare Recoverit.


