


A Mac is a powerful and efficient machine; this is simply a fact. So, it’s pretty ironic how finding something basic like the Snipping Tool on Mac can be such a challenge for most users!
Perhaps the issue stems from the fact that it’s easy to locate the Snipping Tool on Windows, and most people are used to that; macOS doesn’t have a dedicated “Snipping Tool,” which might confuse some people.
But since this is a prevalent issue among Mac users, we’re here to save the day. We’ll show you how to snip on Mac using keyboard shortcuts,
its native tools, and something extra! If you are a Mac user, you might also be interested in these topics such as audio recording software for Mac 、 cutting video on Mac.
In this article
5 Keyboard Shortcuts to Snip on Mac
Okay, we’ll start with the fastest way to snip on Mac: keyboard shortcuts or hotkeys.
What’s great about this method is that you can use the hotkeys as a Mac Snipping Tool to screenshot your whole screen, a specific part, or even a particular window.
The only downside is that you might not always remember the key combinations or miss a key or two when pressing them.
But if you do it right, snipping for Mac becomes a simple and easy affair. Let’s begin!
Command + Shift + 3 (Capture the Full Screen)
Place your fingers over these three keys and press them simultaneously: Command + Shift + 3.
Your macOS will automatically take a picture of the entire screen. A little preview will pop up on the bottom right of your screen.
Click it to make any further edits to the screenshot, or leave it in the default save directory.
Even if you don’t see the preview, the Mac Snipping Tool has already saved it in your system, so you can access it anytime.

Command + Shift + 4 (Capture a Part of the Screen)
This command gives you more control over the screenshot the Mac Snipping Tool will take. All you have to do is press and hold down these keys: Command + Shift + 4.
Your cursor will turn into a crosshair [+]. Move the crosshair to the area of the screen you want to capture,
then click on one corner and drag to the other side until A rectangular selection area covers the part you want to screenshot.
We recommend you drag from left to right for convenience. Once you let go of the trackpad or mouse if you’re using one, the Snipping Tool Mac will capture the portions you covered.

Command + Shift + 4+ Spacebar (Capture a Selected Window or Menu)
When using this method to snip on Mac, you repeat the same key combination in the previous step,
but with an extra key this time: Command + Shift + 4+ Spacebar, then release the Spacebar.
Now, your cursor will turn into a camera icon [], and your screen will turn into a very light shade of blue, indicating the Snipping Tool for Mac is ready.
Move the camera cursor to the window you want to capture, tap the trackpad, or click your mouse. Your Mac will take a screenshot;
it’s intelligent enough to know the exact size to make the screenshot and what to include in it or not.

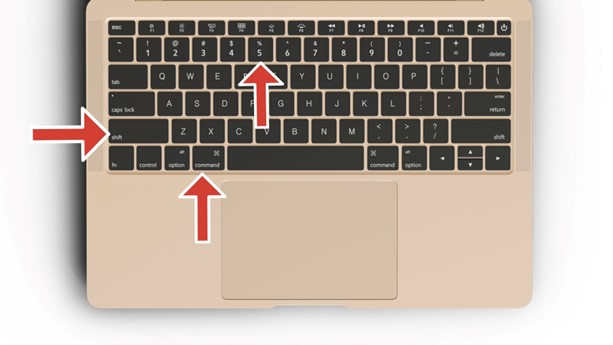
Command + Shift + 5 (Snip on Mac with Screenshot Toolbar)
This method of snipping for Mac gives you even more control over the screenshots you take. First, press and hold these keys: Command + Shift + 5.
Your Mac’s native screenshot tool or toolbar will open on the screen or Touch Bar if your Mac model has one. You’ll see five little squares on it and an “Options” and “Capture” button.
The first square captures your entire screen. The second square captures a selected window.
The third square captures a selected portion of the screen (the fourth and fifth squares are irrelevant for now).
In other words, the squares or buttons on this toolbar pretty much do what the shortcuts you learned about earlier do.
So, click on the appropriate square and then on “Capture.” The Snipping Tool on Mac will take the screenshot.

Command + Shift + 6 (Grab the Touch Bar)
This is the last hotkey we’ll talk about, and we saved it for last because it’s the least relevant. Why? Apple discontinued making Macs with a Touch Bar in 2021 because it couldn’t keep users interested.
So, this keyboard shortcut for using a Snipping Tool on Mac only applies if your Mac is older than 2021. Nonetheless, press and hold these keys to use it: Command + Shift + 6.
The Snipping Tool Mac will take a screenshot of what’s currently displayed on the Touch Bar. The image will be displayed on a thin, horizontal trip, reflecting the layout of the Touch Bar.

How to Change the Snipping Keyboard Shortcuts
Your keyboard shortcuts are fine as they are, but if you want to change them for one reason or another, follow the steps below.
Click on your Mac’s Apple Menu [🍎]. Then click on “System Preferences.” A sidebar will open. Click “Keyboard” on the left and then “Keyboard Shortcuts” on the right.

Then click “Screenshots” to see the current keystroke combinations for the Snipping Tool for Mac. To change the shortcut, double-check a combination,
type a new one, and click “Done” when you finish.But, mind you, any new combination you enter must be unique and not one assigned to a different function or feature.
You must begin the new combination with a modifier key: Option, Command, Control, Caps Lock, or Fn.

How to Change the Default Save Location for Screenshots
You’ve used the keyboard combination for this shortcut before. All you have to do is press and hold Command + Shift + 5. The screenshot toolbar will appear.

Click on “Option,” and a dropdown menu will appear on the Snipping Tool for Mac. Choose “Other Location.” From here,
look for the folder you want the tool to save your screenshots and set it.

How to Quickly Find Mac Screenshot Toolbar
Yet again, for this shortcut to quickly bring up the toolbar and snip on Mac,
You used the same screenshot combination in the previous section but with one more key added: Command + Shift + 5 + Spacebar.
This will open the screenshot toolbar and automatically set the Mac Snipping Tool to capture a specific window.
You can capture the window or move your cursor to the screenshot tool to access it and its options.
How to Record Screen on Mac
Alright, we’re going from taking screenshots to recording your screens.
Kudos to Apple for adding this feature to their Snipping Tool for Mac because even though it’s primarily meant for taking screenshots, it also doubles as a screen recorder.
So, let’s start with the tool you use to snip on Mac and record screens, too!
Using Mac’s Recording Tool
To open the screen recorder, press and hold these keys: Shift + Command + 5.
You’ll see the toolbar for Snipping Tool for Mac. The last two little squares or screens on the toolbar are the buttons for recording your screen.
The first one will record your entire screen. So, select it and click “Record.” A Stop button will also appear once you do this.
Click it when you’re done recording, and the Mac Snipping Tool will save the video in the same location where your screenshots are saved.
The second button records a section of your screen. To do that, click it, and the tool will set a large rectangular selection area for recording.
Your cursor will turn into a small hand icon. Use it to grab the center of the selection triangle and move it entirely to cover the part of the screen you want to record,
or drag its edges to expand its size and coverage area. Once you’re ready, click “Record” and then click the Stop button when done to save your video.

Using DemoCreator
Keyboard shortcuts are good, but they can be a tad bit annoying. We alluded to that earlier.
So why not just use a tool that does all the work for you and offers more than just your average screen recording feature?
If you think this is a good idea, you’ll love Wondershare DemoCreator!
Though it’s a third-party screen recorder, you can still consider it a “native” Mac Snipping Tool. Why? Its efficiency makes it a worthy addition to any Mac,
and it can keep up with all the other robust software Mac users rely on!
DemoCreator, though powerful, is a lightweight Snipping Tool for Mac and a screen recorder designed for both Mac and Windows.
We guarantee it will meet all your screen recording needs!
Features:
- Offers six different recording modes, including picture-in-picture recording (record your screen while your webcam and sound are on).
- Allows you to snip on Mac and gives you editing tools like a cropper, merger, and cutter.
- Offers unique effects and templates, background music, animations, etc.
- AI tools like an AI teleprompter, video object remover, auto subtitles, beauty filters, etc.
- Learn how simple it is to use this Snipping Tool Mac below!
Step1Open DemoCreator
Download DemoCreator for macOS. Then, install and open the Mac Snipping Tool. Click on “New Recording.”

Step2Select Screen Recording Area and Record
A selection rectangle will appear. Click and hold onto the crosshair in the middle of the rectangle to move it to cover the part of the screen you want to record.
You can also make the selection rectangle of the Mac Snipping Tool bigger by dragging its edges to cover more screen area. Once you’re ready, click “REC.” The tool will record your screen.

Step3Save Recording
Once you’re done recording your screen, click the Stop button atop the selection rectangle. The Snipping Tool on Mac will save the file to the default location that DemoCreator set.

Other Snipping Tools for Mac
DemoCreator is all you need to snip on Mac. But if you still want more options, you can’t go wrong with the three snipping tools below.
Snagit
Snagit claims it’s the best snipping tool for Mac and Windows, and we can affirm that it is indeed a great tool. It allows you to grab screenshots, record screens, and add annotations.

Rating
-
4.5/5
Features
- The Snipping Tool Mac is fast and has precise screen capture.
- The time delay allows you to set up screenshots.
- Has custom keyboard shortcuts.
Advantages
- The Mac Snipping Tool has a user-friendly interface.
- Has regular updates and additions to features.
- Comes with extra perks like adding effects.
iScreen Shoter

Do you want a Snipping Tool for Mac alternative that boasts about simplicity? iScreen Shoter makes capturing screens a breeze.
It’s light and offers the features the most popular Mac snipping tools provide.
Rating
-
4.8/5
Features
- It instantly translates text that’s visible in screenshots.
- This Snipping Tool for Mac can be pinned for quick access.
- It can set custom folders.
Advantages
- The Snipping Tool on Mac instantly shares screenshots with any platform.
- It saves screenshots in JPG, PNG, or PDF.
- It can extract OCR (Optical Character Recognition) from text in screenshots.
Awesome Screenshot

With a name like “Awesome Screen Recorder,” it will be pretty hard to fault this Mac Snipping Tool.
It’s very honest about what it offers: a 2-in-1 software that takes screenshots and records screens.
And with over 24 thousand+ reviews and 3 million+ users worldwide, this Snipping Tool for Mac more than lives up to its name!
Rating
-
5/5
Features
- It records both the screen and camera.
- It’s available on Chrome, Safari, Firefox, and Edge.
- The Snipping Tool Mac has cloud storage integration.
Advantages
- The screenshot or recording can be instantly shared.
- The free version has enough tools and features for users.
- There’s easy sharing to social media with this Mac Snipping Tool.
Conclusion
What you read covers the most popular and efficient methods to take screenshots on Mac and record screens using native tools.
It shouldn’t take long to memorize the key combinations and know how to take screenshots or snip on Mac swiftly.
But if you want a method that gives you more control over what you can do with the screenshots, then Wondershare DemoCreator will be happy to oblige!
The Snipping Tool for Mac was designed to meet both your basic screenshot needs and cater to any advanced editing you might require.
Do you want to snip on Mac and make the most of it? DemoCreator is the only tool you need!


