
PowerPoint is a powerful tool for creating presentations, but sometimes you need to print PowerPoint slides with notes for better reference, note-taking, or audience distribution. Whether you're preparing speaker notes for a presentation, printing handouts for your audience, or saving your slides with notes as a PDF, knowing the right settings is essential. This guide will show you how to print PowerPoint with notes on Windows and Mac, how to print handouts that include notes, and the best ways to save your PowerPoint slides as PDFs with speaker notes. We'll also cover common printing issues and how Wondershare DemoCreator can help you record and enhance PowerPoint presentations before sharing them.
In this article
- Part 1: How to Print PowerPoint with Notes on Windows & Mac
- Part 2: How to Print Handouts with Notes in PowerPoint
- Part 3: Saving PowerPoint with Notes as a PDF
- Part 4: Wondershare DemoCreator – Record & Enhance PowerPoint Presentations
- Part 5: Troubleshooting Common Printing Issues in PowerPoint
- Conclusion
- FAQs
Part 1: How to Print PowerPoint with Notes on Windows & Mac
Printing PowerPoint slides with notes is useful for presenters, students, and professionals who need a reference while delivering a presentation. Whether you’re using Windows or Mac, the process is straightforward. Below, we’ll guide you through the exact steps to print PowerPoint slides with notes on both operating systems.
How to Print PowerPoint with Notes on Windows
If you’re using Windows, follow these steps to print PowerPoint slides with speaker notes quickly and efficiently.
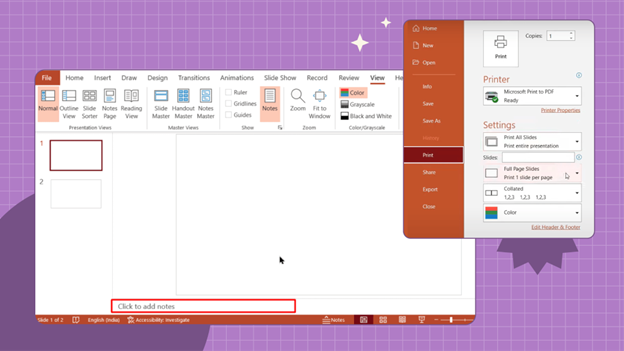
Step 1Open the Presentation and Access the Print Menu
Launch Microsoft PowerPoint and open the presentation that contains speaker notes. Click on File in the top-left corner to access the main menu. From the sidebar, select Print to open the printing settings.
Step 2Adjust Print Settings to Include Notes
In the Print window, locate the Settings section. By default, PowerPoint prints full-page slides, but to include notes, click the Full Page Slides dropdown menu and select Notes Pages. This will ensure that each slide is printed along with its corresponding notes.
Step 3Select Printer and Print the Notes
Choose your preferred printer from the Printer dropdown menu. If needed, click Printer Properties to adjust paper size, orientation, or print quality. Once satisfied with the settings, click Print to start printing your PowerPoint slides with notes.
How to Print a PowerPoint with Notes on Mac
Mac users can also print PowerPoint slides with notes using a simple process. Here’s how to do it:
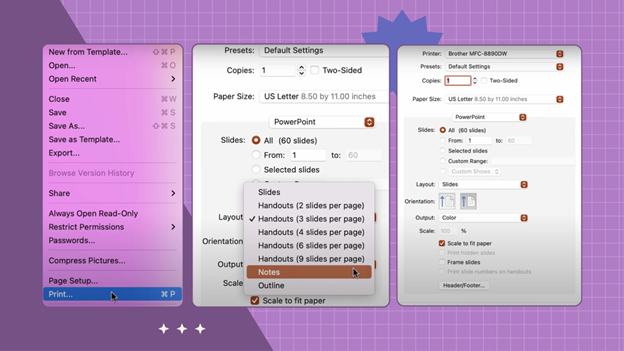
Step 1Open PowerPoint and Access the Print Menu
Open the PowerPoint presentation that includes your speaker notes. Click File in the top-left corner of the screen and select Print from the dropdown menu. This will bring up the Print window.
Step 2Select the Notes Layout in Print Settings
Under Printer, choose your preferred printing device. Then, click Show Details at the bottom of the print window to expand more options. From the Layout dropdown menu, select Notes, ensuring that each printed page contains both the slide and speaker notes.
Step 3Adjust Printing Preferences and Print
Review the page orientation, color preferences, and number of copies before proceeding. Once all settings are in place, click Print to generate the PowerPoint handouts with notes. If you prefer a digital version, select Print to PDF instead.
By following these steps, you can efficiently print PowerPoint slides with notes on both Windows and Mac, ensuring a well-organized and easy-to-reference document for your presentations.
Part 2: How to Print Handouts with Notes in PowerPoint
When distributing presentation materials, it’s often more efficient to print PowerPoint handouts with notes rather than full-page slides. Handouts allow multiple slides to be printed on a single page, reducing paper consumption while keeping speaker notes accessible. This is especially useful for students, business meetings, and training sessions, where attendees can take notes alongside the slides.
Steps to Print Handouts That Include Slides and Notes
Step 1Open PowerPoint and Access the Print Menu
Launch Microsoft PowerPoint and open the presentation you want to print. Click File in the top-left corner and select Print from the menu. This will bring up the Print settings window, where you can customize how your handouts will appear.
Step 2Select Handouts Under Print Layout
In the Settings section, locate the Print Layout drop-down menu. By default, PowerPoint selects Full Page Slides, but for handouts, choose Handouts instead. This option allows multiple slides to be printed on a single page, making it easier for audiences to follow along.
Step 3Adjust the Number of Slides Per Page
Choose between 1, 2, 3, 4, 6, or 9 slides per page, depending on how much content you want per sheet. The 3 slides per page layout is particularly useful, as it includes lined space for handwritten notes, providing a structured way for attendees to jot down key points.
Best Practices for Printing Handouts Efficiently
- Use grayscale mode to save ink while ensuring slides remain readable.
- Select the 3 slides per page layout to provide lined space for handwritten notes.
- Optimize margins and spacing to prevent overcrowding and improve clarity.
- Choose landscape orientation for better layout and readability, especially for wide slides.
- Print double-sided when possible to reduce paper usage and create compact handouts.
- Test print a sample page first to check formatting and visibility before printing in bulk.
By following these best practices, you can ensure your PowerPoint handouts with notes are clear, professional, and easy to follow, making presentations more engaging and organized for your audience.
Part 3: Saving PowerPoint with Notes as a PDF
PowerPoint provides built-in options to save presentations as PDFs while retaining speaker notes. This is useful for sharing presentations digitally without losing important details. Below are two efficient methods to save PowerPoint with notes as a PDF on Windows and Mac.
Method 1: Save PowerPoint as PDF Using the ‘Save As’ Option
Step 1Open PowerPoint and Access the Save As Option
Launch Microsoft PowerPoint and open the presentation you want to save. Click File in the top toolbar and select Save As from the menu to begin the process.
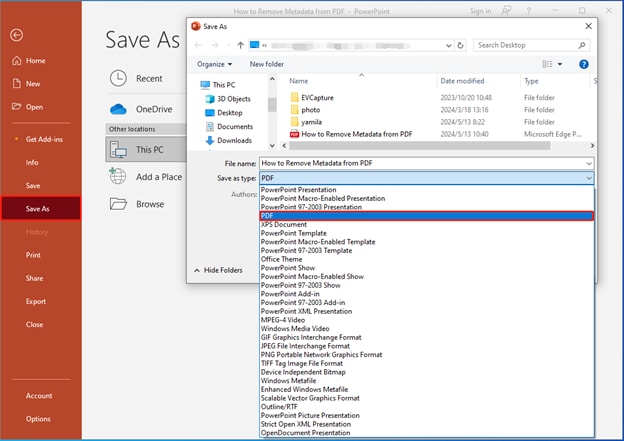
Step 2Choose PDF as the Output Format
In the Save As window, select the destination folder where you want to save your file. Under the Save as type drop-down menu, choose PDF to convert the presentation into a PDF format.
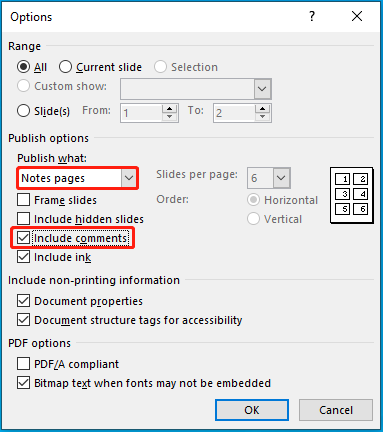
Step 3Enable Notes Pages and Save
Click Options, then under the Publish what section, select Notes Pages and check Include Comments if needed. Once all settings are configured, click OK, then hit Save to generate the PowerPoint as a PDF with notes.
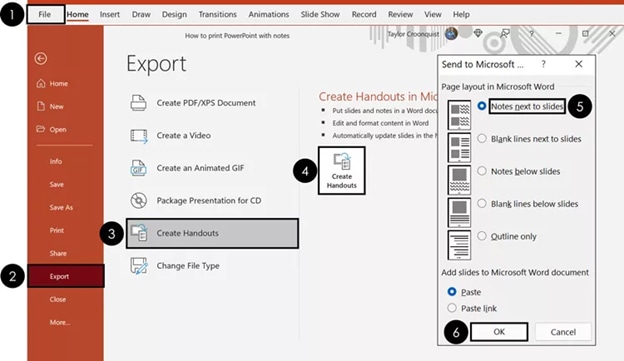
Method 2: Save PowerPoint as PDF Using the Export Option
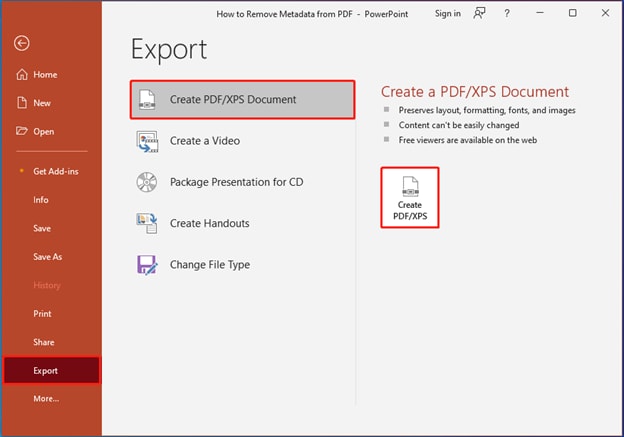
Step 1Access the Export Menu in PowerPoint
Open your PowerPoint presentation and click on File from the top menu. Navigate to Export and select Create PDF/XPS Document to open the conversion window.
Step 2Adjust Export Settings for Notes
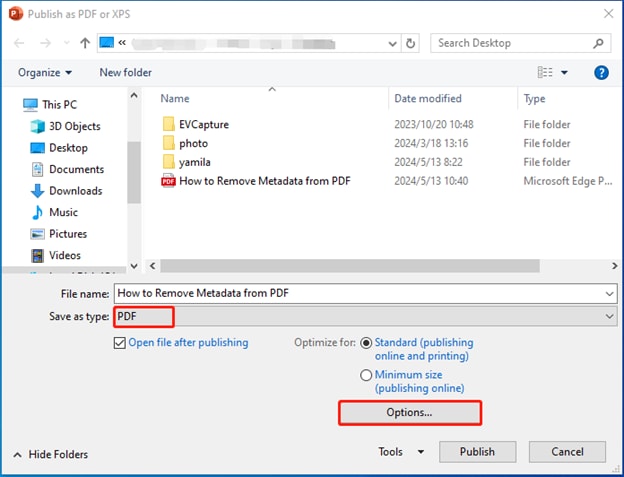
In the Publish as PDF or XPS window, choose PDF as the Save as type. Click Options, then select Publish Notes Pages to ensure the notes are included in the final PDF.
Step 3Finalize and Save the PDF
After adjusting all settings, click OK, then press Publish to export your PowerPoint as a PDF file with speaker notes. The file will be saved to your selected location, ready for printing or digital distribution.
Using either of these methods, you can save PowerPoint presentations as PDFs while keeping speaker notes, making it easier to share, print, or present your slides with additional details.
Why Saving as PDF is Useful
- Ensures formatting remains consistent: Prevents changes in fonts, spacing, or layout when opened on different devices.
- Easy to share digitally without compatibility issues: PDFs are universally accessible on any device without requiring PowerPoint software.
- Protects content from accidental edits: Unlike PowerPoint files, PDFs cannot be easily modified, maintaining document integrity.
- Reduces file size for efficient storage and sharing: Compressed PDFs take up less space compared to PPTX files, making them easier to send via email.
- Supports printing with proper layout and notes: Ensures that slides and speaker notes appear exactly as intended when printed.
- Works on all operating systems and devices: Whether on Windows, Mac, or mobile, PDFs maintain their structure without additional software requirements.
Part 4: Wondershare DemoCreator – Record & Enhance PowerPoint Presentations
Wondershare DemoCreator is an innovative tool designed to transform static PowerPoint slides into visually engaging, interactive video presentations. Whether you're creating lectures, business reports, training materials, or online courses, DemoCreator enhances your presentations with screen recording, webcam overlays, real-time annotations, and professional editing tools. Instead of just printing PowerPoint slides with notes, you can convert them into dynamic videos, making it easier to share, engage, and educate your audience.
Why Use Wondershare DemoCreator for PowerPoint Presentations?
✔ Pre-Made Presentation Video Templates – DemoCreator provides built-in PowerPoint-to-video templates for different use cases, including Business Pitch Decks, Online Course Presentations, Training Sessions, and Product Demonstrations. These templates feature pre-set transitions, animated text overlays, and guided prompts to make slide narration effortless.
✔ Interactive Effects & Smart Screen Drawing Tools – Highlight important points using real-time annotations, laser pointers, handwriting tools, and on-screen arrows. This is perfect for educators, trainers, and corporate professionals who want to emphasize key concepts while presenting.
✔ AI-Powered Auto Captions & Speech Enhancement – DemoCreator includes automatic subtitle generation, ensuring accessibility for all audiences. The tool also offers AI voice enhancement, noise removal, and audio balancing to ensure crystal-clear narration, especially useful for creating recorded online courses and training materials.
✔ Dynamic Webcam Overlays & Virtual Backgrounds – Make presentations more engaging by overlaying your webcam video onto your slides. Choose from multiple frame styles such as circular, rectangular, or blurred backgrounds to keep the focus on the speaker while maintaining a professional aesthetic.
✔ Seamless Export & Multi-Platform Sharing – Convert your PowerPoint slides into MP4, AVI, WMV, or GIF and upload directly to YouTube, Google Drive, Dropbox, and social media platforms. Users can also extract high-resolution images from slides for use in handouts or reports.
How to Use Wondershare DemoCreator with PowerPoint
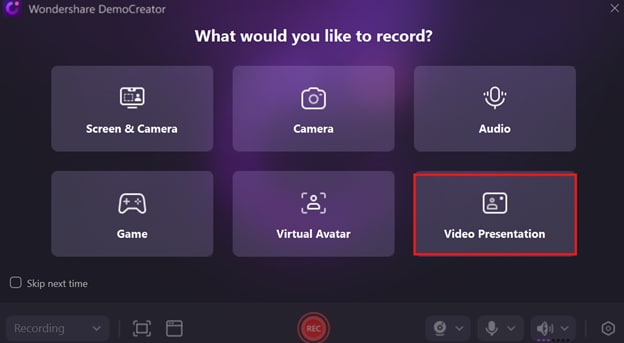
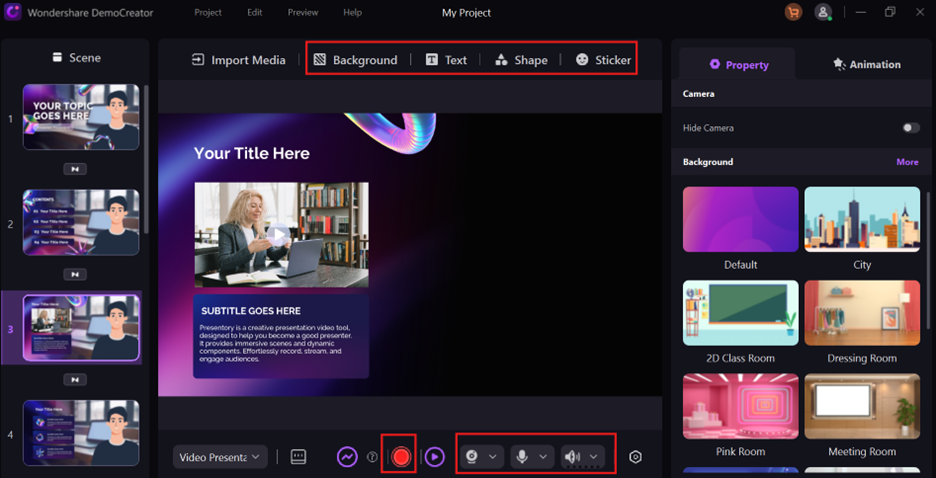
Step 1Launch Wondershare DemoCreator and Select Video Presentation Mode
Open Wondershare DemoCreator and select “Video Presentation” mode. This allows you to record your PowerPoint slides, webcam feed, and screen simultaneously for a professional-quality presentation.
Step 2Import Slides and Set Up Webcam & Audio
Upload your PowerPoint slides into DemoCreator using "Import from PowerPoint" or create them within the software using “Popular Templates” or “New Blank Project.” Enable the webcam overlay to add a personal touch and engage your audience visually. Connect your microphone for clear voice narration, ensuring high-quality audio. Adjust webcam and audio settings for the best recording experience.

Step 3Record and Enhance Your Presentation
Click "Start Recording" and present your slides while using screen drawing tools, cursor effects, and interactive highlights to emphasize key points. You can pause and restart as needed to ensure a smooth, polished presentation.
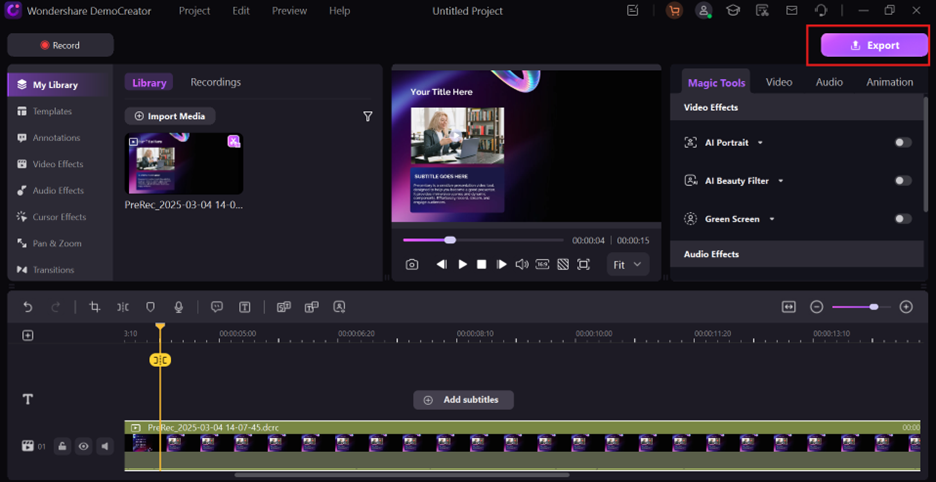
Step 4Edit and Export Your Video Presentation
Once recorded, use DemoCreator’s built-in editing tools to trim footage, add transitions, captions, and effects for a polished final product. Export your video in MP4, AVI, or GIF, or share it directly to YouTube, LinkedIn, and learning platforms.
By using Wondershare DemoCreator, you can go beyond printed handouts and create engaging, interactive presentation materials that enhance audience understanding and engagement.
Part 5: Troubleshooting Common Printing Issues in PowerPoint
Printing PowerPoint slides with notes doesn’t always go smoothly. You might face missing notes, blank pages, formatting errors, or print misalignment. Below are some common issues and their solutions to help you fix printing problems and ensure your slides and notes are printed correctly.
- Notes not showing in print preview? Make sure Notes Pages is selected under Print Layout in the print settings, not Full Page Slides.
- PowerPoint prints blank pages instead of notes? Update your printer drivers or try printing to PDF first to check if the issue persists.
- Printed text is too small to read? Go to View > Notes Master and increase the font size before printing your slides.
- Slides and notes are cut off in print? Check and adjust the paper size, margins, and orientation in the print settings for better layout alignment.
- PowerPoint is printing in black and white instead of color? Ensure the printer settings are set to Color Printing, and check if the selected printer supports color.
- Notes appear misaligned or overlapping? Use View > Notes Master to manually adjust text box positions and formatting before printing.
- PowerPoint crashes when trying to print? Try saving as a PDF first or restart PowerPoint to clear any software glitches affecting the print process.
By following these troubleshooting tips, you can avoid printing errors and ensure your PowerPoint slides with notes come out correctly formatted every time.
Conclusion
Printing PowerPoint slides with notes is an essential step for presenters, educators, and professionals who need a reference while delivering presentations. Whether you choose to print notes pages, create handouts, or save slides as PDFs, selecting the right method ensures better readability and accessibility for your audience. By following the step-by-step guides and troubleshooting tips, you can avoid common printing issues and ensure your materials are well-formatted.
For those looking for a more dynamic and engaging approach, Wondershare DemoCreator provides an excellent solution to record, edit, and enhance PowerPoint presentations. Instead of relying solely on printed handouts, you can convert your presentations into interactive video content that can be shared digitally. No matter which format you choose—printed notes, PDFs, or recorded videos—having well-structured presentation materials will help you deliver a more impactful and professional presentation experience.
FAQs
-
1. How do I print PowerPoint notes without slides?
To print only the speaker notes without slides, copy the text from the Notes Pane into a Word document and print it separately. Alternatively, use File > Print > Publish What: Notes Pages, then adjust the settings to minimize the slide size and maximize the notes section before printing. -
2. Can I print PowerPoint notes in black and white to save ink?
Yes! In the Print settings, select Grayscale or Pure Black & White under the Color options before printing. This reduces ink usage while keeping text and notes readable. You can also preview the print layout to ensure clarity before printing. -
3. How do I adjust the layout of notes pages before printing?
Go to View > Notes Master, where you can resize text boxes, adjust fonts, and modify the placement of slides and notes. This ensures that your printed notes pages are well-formatted and easy to read before printing. -
4. Is there a way to print PowerPoint notes without speaker comments?
Yes! Before printing, manually remove unnecessary speaker comments from the Notes Pane in PowerPoint. Alternatively, you can copy and paste only the essential notes into another document for printing, ensuring only relevant information is included.


