
As a content creator or marketer, you may need to capture recordings in busy settings. Whether it's a podcast or a simple voiceover, unwanted background noises can disrupt the audio quality. In such situations, achieving professional-quality audio can be difficult. Various microphone noise suppression techniques are available to resolve this issue.
This guide will introduce you to the top effective methods for ensuring your mic focuses on your voice and not on the surroundings. We'll guide you through different processes, including utilizing different techniques and using software tools like DemoCreator to enhance your recordings. By following these strategies, you can produce clear audio every time you record using your mic.

In this article
Part 1. How to Eliminate Annoying Noise From Your Computer Equipment
Multiple noises are produced when you use your computer devices, which can be annoying, especially while recording. In this section, we will look into various ways to remove ambient noises:
Detect Sound Source
First and foremost, you must detect the sounds created by using the computer and other background sounds to reduce noise in the audio. Common culprits include keyboard clicks, laptop fan noise, mouse clicks, and external hardware like speakers or drivers. Listening carefully can help you determine which device generates the most distracting noise. Once you have determined the sound source, you can take specific measures to avoid it.

For instance, mechanical keyboards tend to be louder, so switching to a quieter membrane keyboard can help reduce typing noise. Additionally, software to adjust the fan speed can sometimes minimize unnecessary fan sound. Identifying and addressing each annoying sound source can help you create a quieter and more productive workspace.
Use Windows Microphone Enhancement Tool
Another method is to use the integrated microphone enhancement tool available on Windows devices. Follow the steps below to figure out how to eliminate background noise while using the integrated Microphone on your device:
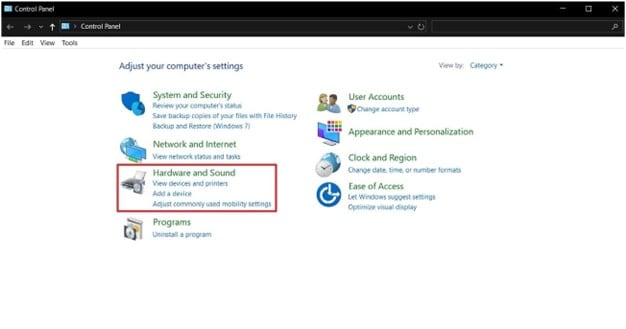
Step 1. Open your Windows device's “Control Panel” and choose the "Hardware and Sound" settings.
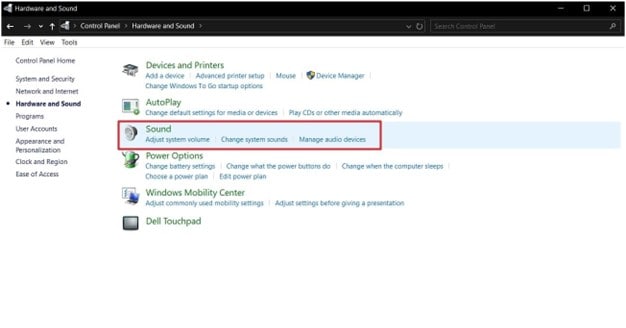
Step 2. Within the "Hardware and Sound" settings panel, choose the "Sound" option to move to the next screen for further adjustments.
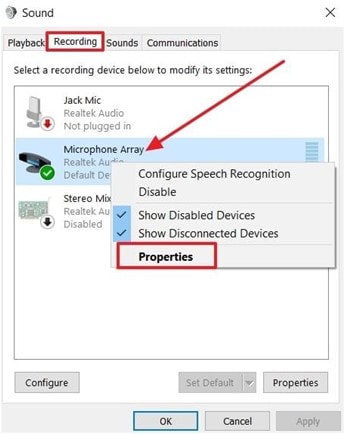
Step 3. A small popup "Sound" dialog box will now open up from where you have to access the "Recording" tab and move to the "Microphone Array" option. Right-click on this setting and choose "Properties" from the drop-down menu.
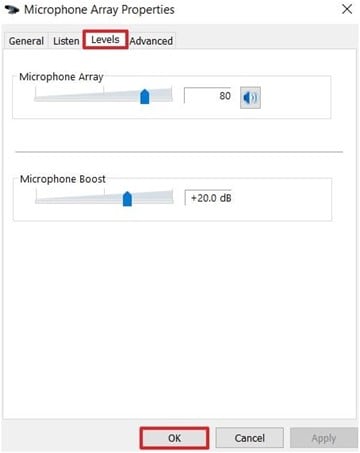
Step 4. Lastly, another dialog box, "Microphone Array Properties," will pop up. Move to the "Levels" tab and adjust the values according to your needs. Once you are satisfied with your adjustments, hit the "OK" button to save the settings.
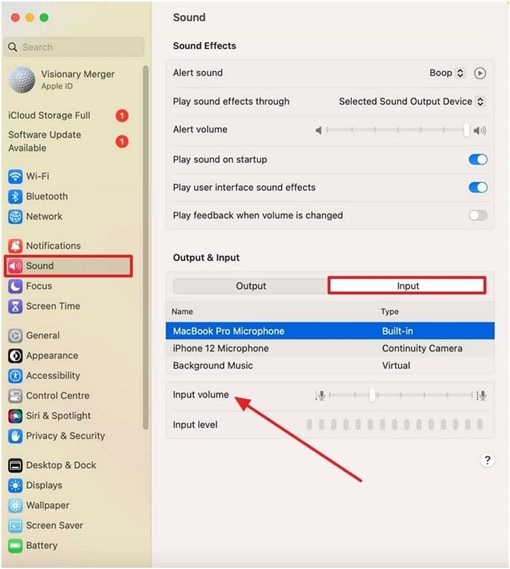
Using macOS Noise Preferences
If you are using a macOS device, you can utilize the noise preferences settings by adjusting the input volume. The users will be able to keep an eye on the input level to have a visual representation of the background sound. You get the ability to capture less background noise when you use the computer’s built-in microphone. Read into the instructions to understand how to filter out background noise on Mac devices:
Instructions. Initiate the process by going into the “System Settings” screen of the Mac device and navigating to the “Sound” tab. Next, select the “Input” option and adjust the “Input Volume” according to your requirements.
Part 2. How to Effectively Reduce Background Noise
One of the best methods to get rid of background clutter is to block it out during the recording phase. By controlling your recording environment, you can reduce unwanted noise. The following section discusses the best tips for minimizing background noises efficiently:
1. Find and Reduce the Source of Noise
Before beginning the recording, identify where the noise is coming from. Listen carefully to determine if the noise is from outside or inside sources. Once you know the source of background noise, try to reduce this input. For example, turn off noisy devices or move your recording set up away from busy areas. In case you can’t completely remove the noise, try to reduce noise in audio as much as possible.
2. Use Quiet Locations
Choosing the right area for recording is very important. Always record in a space that is quiet and free from any noise source. Rooms with soft furnishings like carpets and curtains are better for absorbing sound. This helps create a more controlled recording environment. Additionally, make sure to close all windows and doors to keep outside noise away from the recording area.
Part 3. How to Reduce the Noise Picked Up by the Microphone
Minimizing the background clutter that your microphone captures involves careful equipment choices and recording techniques. Here are some of the most effective tips to help you minimize unwanted noises while recording:
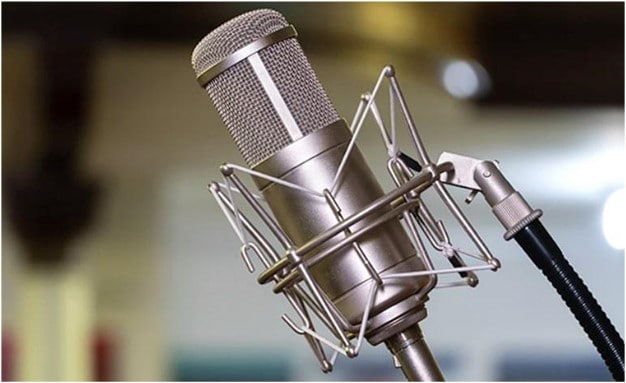
1. Choose the Right Microphone
Different microphones have different directional patterns and are suitable for specific recording situations. For a noisy environment, you must consider using a dynamic microphone as they are less sensitive to background noises. In contrast, for recording in quiet spaces, a condenser microphone will work best. Users who want to capture sound from the front can use Cardioid microphones.
2. Get Close to the Mic
Positioning yourself close to the mic is a simple way to reduce background noise. When you're close to the recording source, it captures your voice clearly. Aim to keep the microphone within a few inches of your mouth. Avoid keeping the mic too close to the mouth, as it can lead to distortion or breath noises.
3. Choose a Suitable Microphone Stand
Using the right microphone stand can greatly affect the quality of your recording. A stable and adjustable stand allows you to set the mic at a suitable distance from your mouth. This helps in capturing clear audio while minimizing the chance of picking up background noises. Ensure the stand is strong enough to prevent any movement that could affect the recording.
4. Shock Mount
It holds the microphone in a special holder that absorbs any shocks to prevent the microphone from vibrations. This is especially useful for recording in a place where vibrations from a floor might affect your audio. By suspending the microphone and reducing its contact with surfaces, a shock mount helps generate clearer recordings.
Part 4. How to Reduce Plosives for Clearer Sound
Loud sounds that happen when you say “p” or “b” are known as plosives that can make your recordings sound distorted. To learn how to record voice without background noise, you can use a pop filter. It is a simple tool that you place in front of your microphone.
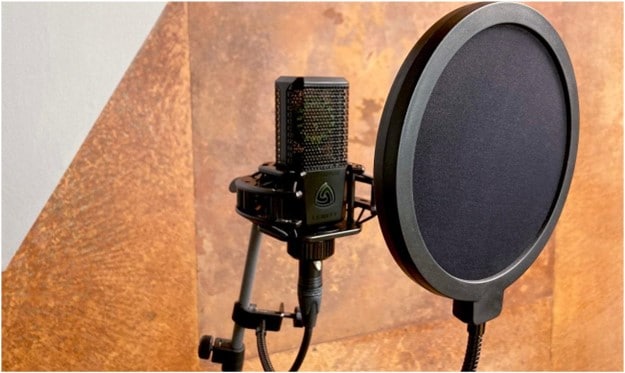
It has a mesh screen that catches the burst of air from plosive sounds before they reach the mic. This helps to smooth out the sound and prevent those distracting noises. You just need to attach it to the mic stand or position it in front of the microphone.
Part 5. How to Reduce Buzz, Hum, and Other Current Sounds
Unwanted pitch noises and electrical sounds can disrupt the quality of the recorded audio. To overcome these challenges, it’s important to detect sources of such noises. Following the given tips will help you reduce these annoying sounds:
1. Check Electromagnetic Interference
It is a common cause of buzzing and humming noises in audio recordings. EMI often comes from nearby electrical devices such as computers and lighting equipment. To reduce this interference, keep your mic and cables away from such sources. Also, avoid placing audio cables parallel to power cables. Moreover, shielded cables are used to block out external electromagnetic noise.
2. Power Regulator
A power regulator is essential for protecting your audio equipment. It ensures a stable flow of electricity to prevent sudden drops in voltage that can damage the device. Without this, your recordings are at risk of getting electrical noises and graininess. Using a power regulator keeps your voltage consistent by reducing the chance of unwanted harm. Always plug your sensitive audio devices into a power regulator to maintain high sound quality.
3. Headphone Jack Check
A loose or damaged headphone jack can introduce noise into your recordings. Before starting recording, ensure the jack is fully inserted into the port. A loose connection can create noise, so always inspect the jack and cable for damage. Make sure to replace the damaged or worn-out parts with new ones. Furthermore, make sure your headphones and audio cables are securely connected.
Part 6. How to Minimize Noise During Live Streaming
Learning how to filter out background noise during live recording is crucial for delivering clear audio output. The two effective ways to reduce noise in your live streams are using popular platforms like OBS and Twitch:
1. OBS - Noise Suppression and Limiter Filters
In Open Broadcaster Software, you can use the “Noise Suppression” filter to reduce background noises. This filter helps clean your audio by suppressing lower-level background noises. Simply go to your audio settings in OBS, add the Noise Suppression filter to your microphone input, and modify the suppression level based on your environment.
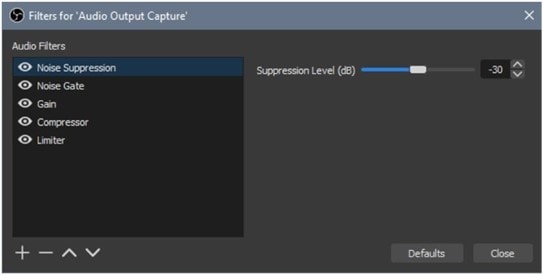
Additionally, the “Limiter” filter is essential for preventing sudden loud noises from distorting your stream's audio. It works by specifying a maximum volume level for your mic to ensure that loud sounds don't overwhelm the audio. Users can adjust the limiter's threshold in OBS to fit their streaming setup.
2. Twitch - Noise Gate Setting
On Twitch, the “Noise Gate” setting helps control when your mic picks up sound by setting a volume threshold. The microphone doesn't detect sounds lower than the threshold. When you speak and your voice is louder than the threshold, the mic activates and captures only what's important.
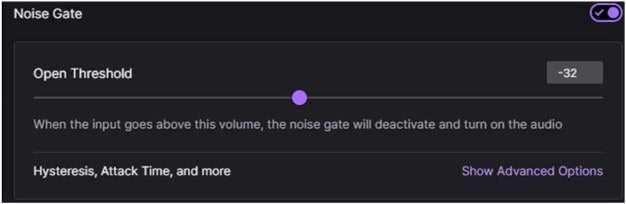
You can adjust the open and close thresholds within your streaming software to ensure the noise gate filters block out background clutter without cutting off your voice. This capability is useful for reducing distractions in a noisy place, leading to a more professional audio experience for viewers.
Part 7. How to Reduce Noise When Recording Audio?
Now, let us discuss the features and benefits gained as you use the DemoCreator AI Voice Cloning feature to take control over unnecessary voices. This easy-to-use screen recorder and editor tool ensures that users have the ability to clean the strength of the voice from 0 to 100. To reduce noise in audio while recording on your device, you can apply the steps discussed below:
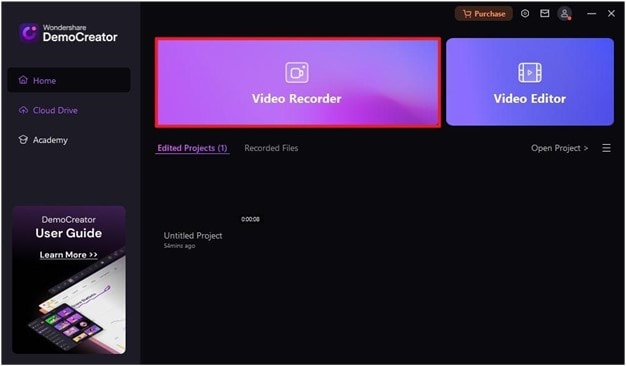
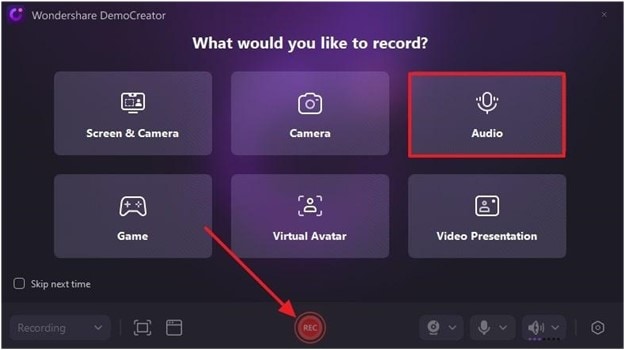
Step1Get Access to the Video Recorder Tool at the Main Interfac
To use the “Video Recorder” feature from the DemoCreator software, download it from the official website and get access to its main interface.
Step2Choose Audio and Hit Recordm
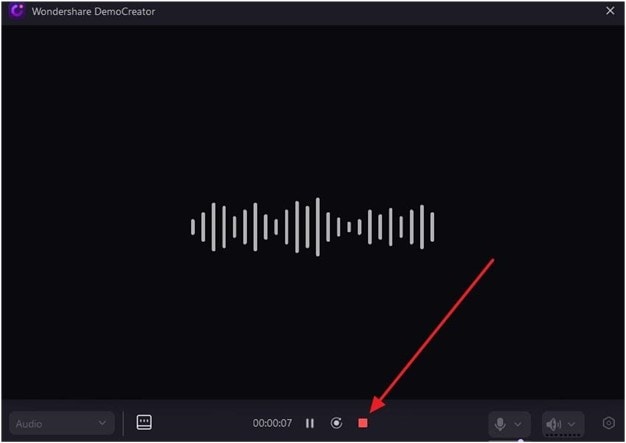
You will be shifted to another dialog box, from which you have to select which tool you want to use. From here, use the “Audio” feature and record your voice by clicking on the red “Rec” button.
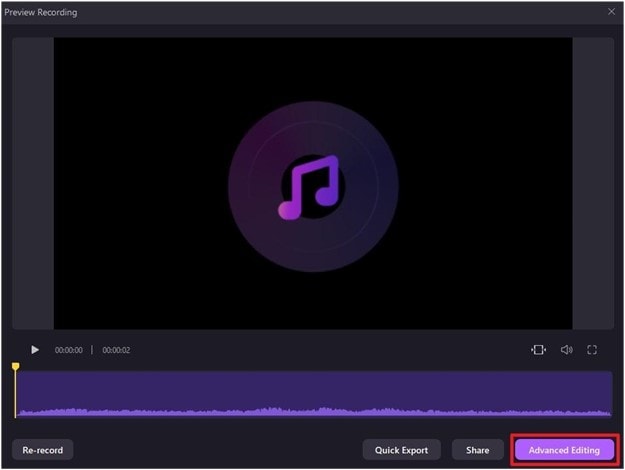
Step3Preview Recording and Move to Advanced Editing
Once you are done recording the audio, hit the stop button and preview the audio. Then, listen to the recording and then hit the “Advanced Editing” button to move to a new window.
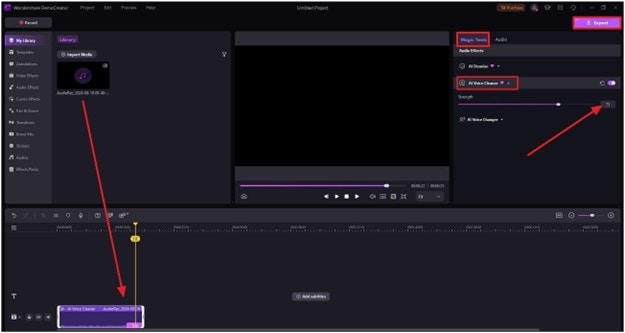
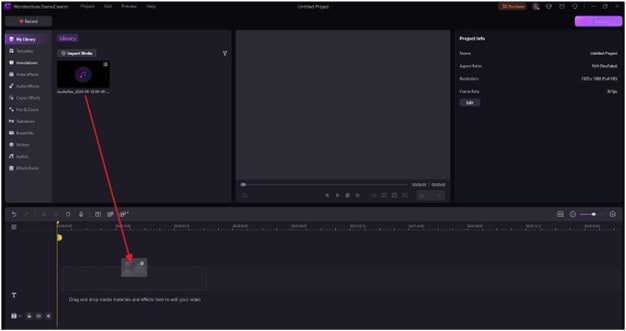
Step4Drag Audio to the Timeline and Make Adjustments to Save to Devic
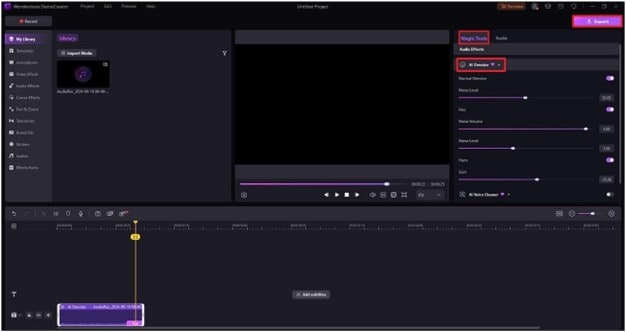
Lastly, drag and drop the audio you just recorded onto the timeline to begin applying the AI Voice Cleaner feature. Go to the “Magic Tools” tab and select the “AI Voice Cleaner” to adjust its parameter and “Export” the enhanced voice to your desktop device.
Part 8. How to Reduce Noise After Recording?
Users can even utilize the DemoCreator AI Denoiser feature to reduce the noise after they are done recording. Eliminating annoying background sounds can enhance the quality of your recordings. Users can adjust the volume of the hiss sounds created according to their requirements. To follow the microphone noise suppression process through this AI video and audio editor, follow the steps below.
Step1Navigate to the Audio Recorder Toolm
Commence the process by getting access to the audio recorder tool from the main interface. Then, hit the “Record” red button and start speaking to record your entire speech.
Step1Hit the Stop Button After Recording
Once you are done recording your voiceover content, hit the “Stop” button to finish the recording and move to the “Advanced Editing” tab. Afterward, hitting the relevant button will redirect you to a new window where you can edit the voice generated.
Step3Drag the Audio Recorded to the Timeline
Next, in DemoCreator's editing window, you have to drag and drop the audio to the timeline and click on it to open the “Magic Tools” tab.
Step4Select the AI Denoise and Adjust the Parameters
Upon entering the “Magic Tools” tab, enable the “AI Denoise” option and adjust its noise, hiss, and hum parameters according to your requirements. Hit the “Export” button once you are satisfied with the output before tapping the “Export” button.
Conclusion
Understanding how to make the mic not pick up background noise is important for generating a professional-grade audio output. By using the right tools, techniques, and recording environments, it's important to reduce the unwanted sounds to ensure better clarity. Among all the techniques discussed, using DemoCreator stands out as an effective solution. It provides advanced AI Denoise features with adjustable noise thresholds, allowing users to precisely control the level of noise reduction.
FAQs
-
What types of background noise are there?
There are several types of background noises that can affect the audio quality, which is explained below:
1. Broadband Noise: It is a continuous noise spread across a wide frequency range, such as the hum of a fan.
2. Narrowband Noise: This noise is concentrated within a small frequency range, such as electrical buzzing.
3. Irregular Noise: Unpredictable sounds like footsteps or distant conversions that occur randomly in the background.
4. Impulse Noise: These kinds of noises consist of short, sharp sounds like clicks or pops.
-
Are there any tools to remove background noise?
There are many tools available for removing unwanted noises from recordings. Audacity is a popular tool with a noise-reduction feature that allows you to remove background sounds. Though this tool offers a reliable noise removal feature, it lacks advanced options for fine-tuning the audio. Advanced software like DemoCreator provides an AI denoise feature with adjustable audio parameters, allowing for better overall sound quality.
-
Can noise reduction affect the original quality of the recording?
Yes, over-reducing noise in audio can sometimes affect the overall quality of the source audio. Excessive removal of noises from the audio might result in loss of audio detail, making the recording sound less clear. Additionally, mic noise suppression might compress the sound’s depth and richness.
-
Which kinds of noises are harder to remove?
Removing background noises such as white noise, low-frequency hums, echoes, and variable noises can be challenging to remove. White noises have a broad frequency range, low frequency hums can overlap with the speech, echoes merge with the original audio, and variable noises are difficult to isolate .
-
How can I use software to reduce background noise?
By installing DemoCreator on your desktop devices, you can effortlessly use its AI technology to remove unnecessary sounds. To start the process, begin by recording your “Audio” by selecting the “Video Recorder” tool from its main interface. Then, you can move to the “Advanced Editing” feature to adjust the AI Voice Cleaner or AI Denoise features to remove the annoying sounds from your audio.


