
The challenge of how to record a Zoom meeting on iPad is common for users needing to save vital discussions. iPads offer convenience, but recording limitations exist. Zoom's cloud recording requires a paid subscription, and iOS screen recording omits internal audio. This guide addresses these hurdles. We'll explore Zoom's built-in options, the iPad's screen recording feature, and introduce desktop software like Wondershare DemoCreator. This software provides a robust method, bypassing audio restrictions and enabling high-quality recording directly from your iPad to a computer. Whether for educational, professional, or personal use, this guide offers solutions to efficiently capture your Zoom meetings.
In this article
Part 1: How to Record a Zoom Meeting on iPad with Zoom’s Built-in Feature
Zoom offers a built-in Cloud Recording feature for iPad users, but it is exclusive to paid Zoom accounts (Pro, Business, Enterprise). Additionally, local recordings are not supported on iPads, meaning free users or those without host permission will need alternative methods.
Paid Account Requirement & Host Permissions
To use Zoom’s built-in recording on an iPad, you must be a paid Zoom subscriber. If you are a meeting participant, the host must explicitly grant you recording permission—which, as one user puts it, "getting that can be like pulling teeth." If the host does not enable recording, you cannot record the meeting using Zoom’s built-in option.
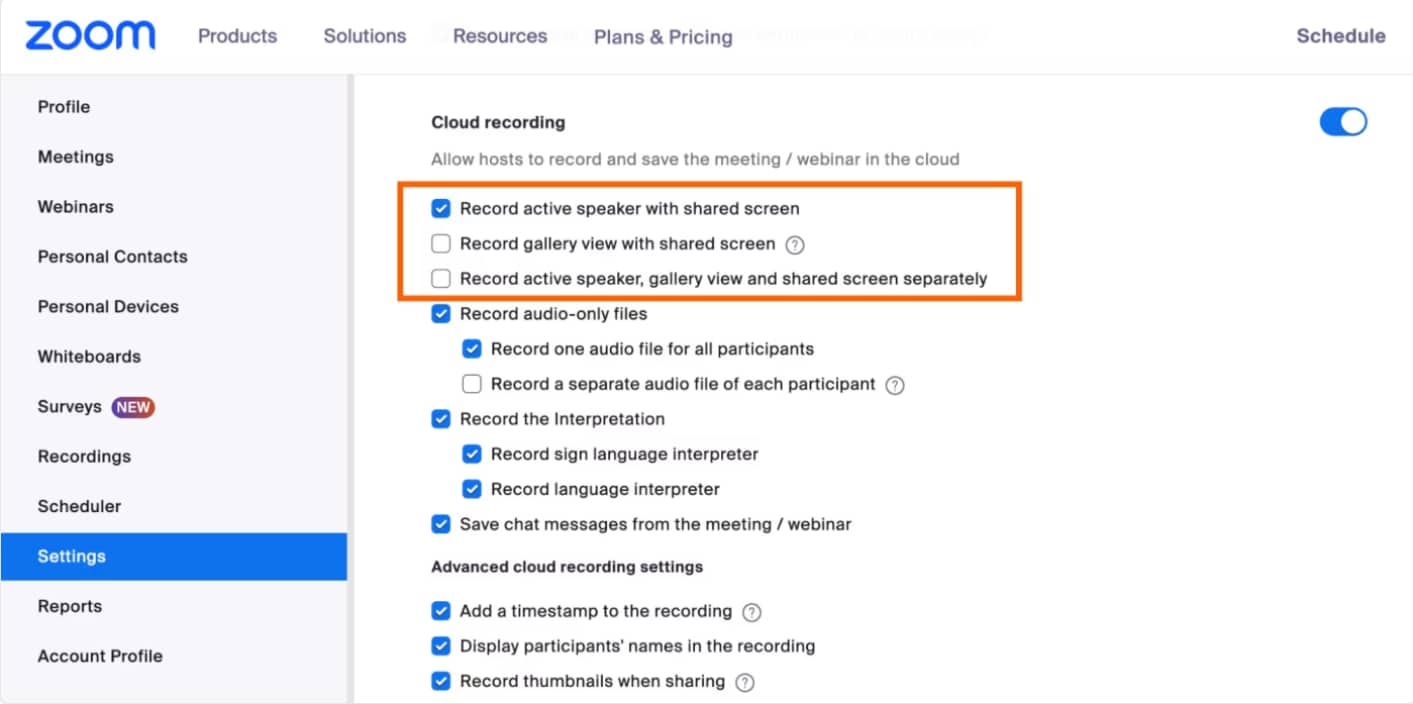
Step 1Check if Cloud Recording is Enabled
Zoom’s built-in recording feature is only available for Pro, Business, and Enterprise users. The host must enable Cloud Recording before the meeting by going to Zoom Settings > Recording. Without this setting enabled, participants won’t be able to record the session.
Step 2Start Recording the Meeting
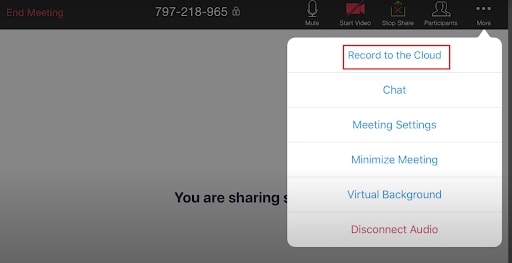
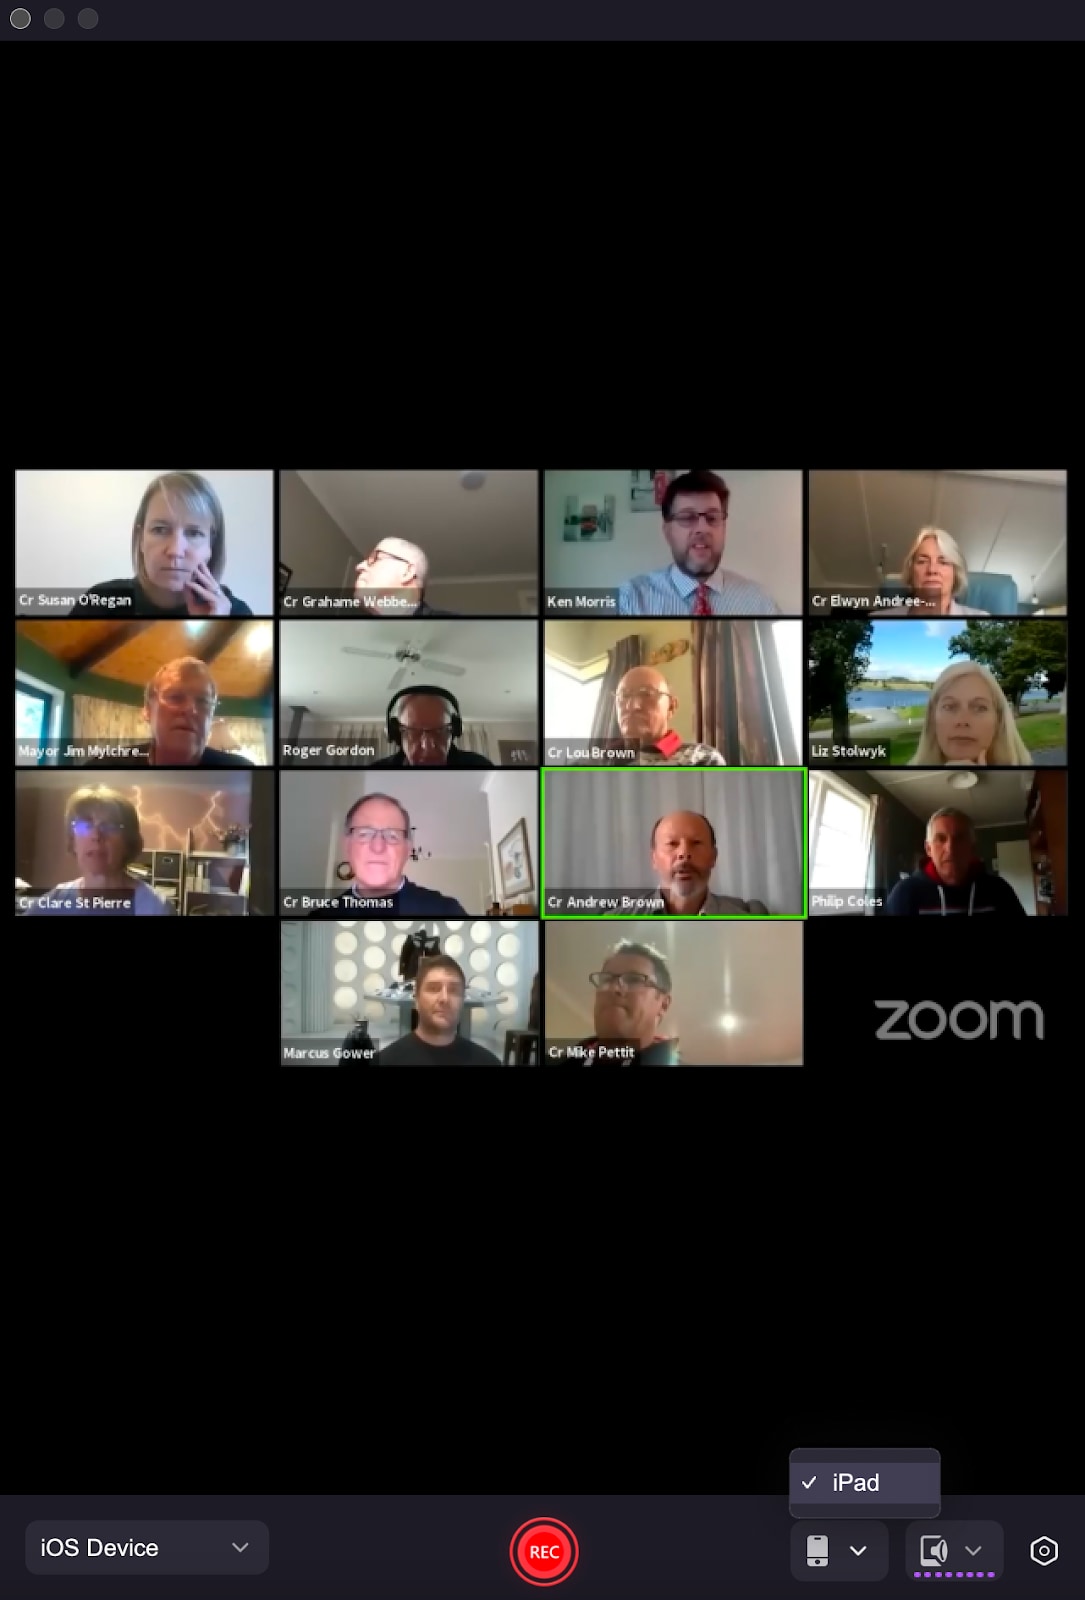
Open the Zoom app on your iPad and join the meeting. Tap More (… button) > Record to the Cloud to begin recording. A recording indicator will appear, confirming that the video is being saved to Zoom Cloud.
Step 3Access the Recorded Meeting
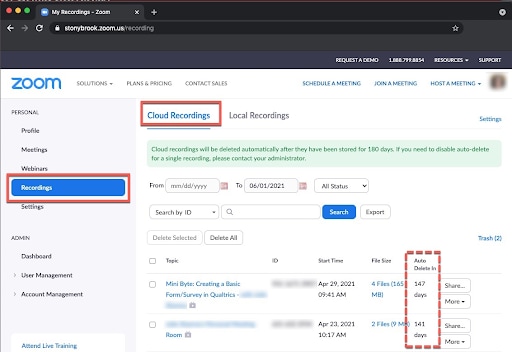
Once the meeting ends, go to Zoom > Recordings to view, download, or share the video. The recorded meeting is stored in Zoom Cloud and can be accessed from any device through the Zoom website.
Limitations of Zoom’s Built-in Recording on iPad
- Cloud Storage Dependency – Since iPads do not support local recordings, all recordings are stored in the Zoom cloud, requiring users to manage their available storage effectively.
- Storage Limits – Zoom imposes storage limits based on subscription plans. If your cloud storage is full, recording will fail.
- Format Compatibility – Cloud recordings are usually saved as MP4 (video) or M4A (audio-only) files, which may require conversion for use in some applications.
- No Control Over Recording Settings – Unlike desktop users, iPad users cannot adjust resolution, bitrate, or other video settings for recordings.
Part 2: How to Screen Record a Zoom Meeting on iPad Without Permission
If you don’t have a paid Zoom account or host permissions, you can use the built-in screen recording feature on your iPad to record the meeting. However, keep in mind that iOS privacy restrictions prevent internal audio recording, so you will need to enable the microphone to capture sound. Follow the steps below to record Zoom meetings discreetly on your iPad.
Step 1Activate Screen Recording
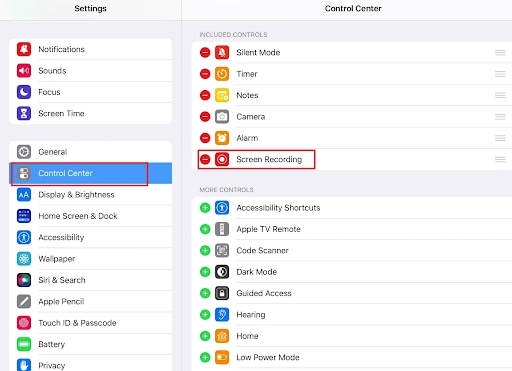
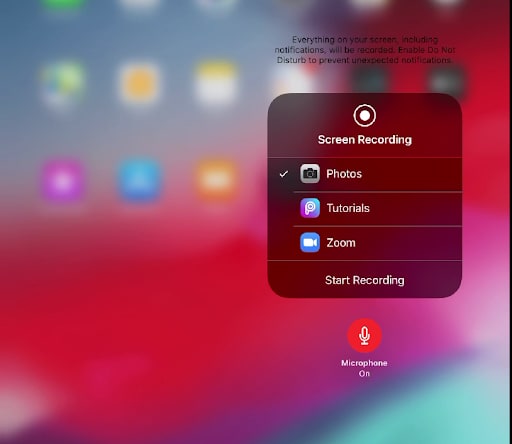
To use the iPad's built-in screen recording, first navigate to the Settings app, then select Control Center. Here, customize the controls by adding "Screen Recording" to the included controls list. This will make the recording feature easily accessible from the Control Center.
Step 2Commence Recording During the Meeting
During your Zoom meeting, swipe down from the top-right corner of your iPad screen to open the Control Center. Tap the circular record button to start recording; ensure the microphone icon is highlighted to capture your voice. This step captures both the visual content and your spoken audio.
Step 3Conclude and Save the Recording
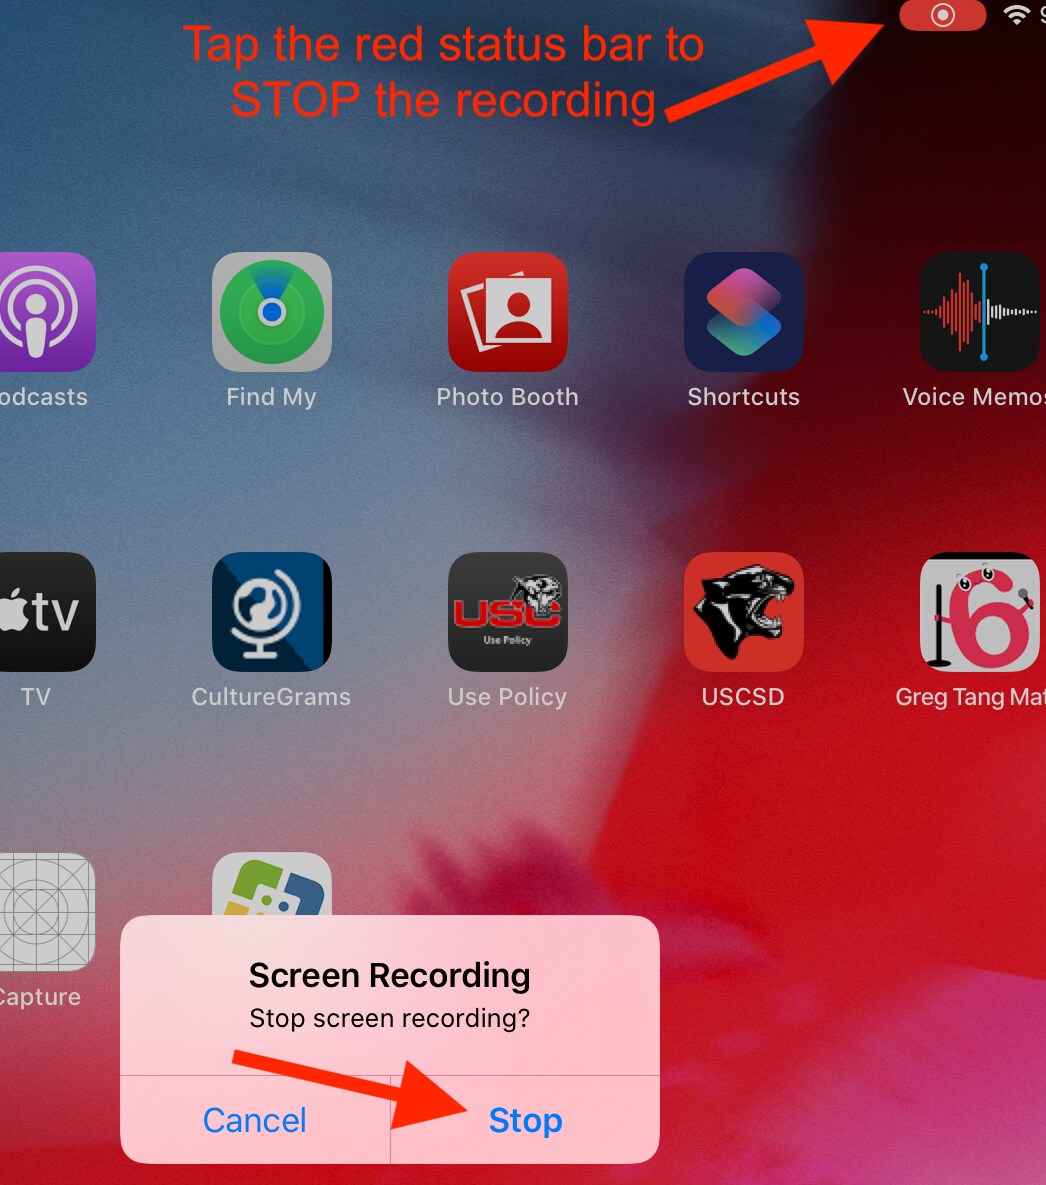
When the meeting concludes, tap the red status bar located at the top of your iPad's screen, and then select "Stop" to end the recording. The captured video will be automatically saved to the Photos app, where you can easily playback and share the recording.
Limitations of recording Zoom’s meeting without permission
✖ No internal audio recording – iOS prevents internal audio capture for privacy reasons, so you must enable the microphone, which picks up background noise.
✖ Visible recording indicator – The red status bar at the top of the screen makes it obvious that you're recording.
✖ Can affect device performance – Running screen recording during a Zoom meeting may cause lag, overheating, or battery drain.
✖ Storage limitations – Long recordings take up significant storage space on your iPad, requiring frequent transfers or deletions.
Part 3: How to Record Zoom Meetings on iPad with Wondershare DemoCreator
For users who need high-quality Zoom recording without iOS restrictions, Wondershare DemoCreator offers a seamless solution. It allows you to capture both video and audio from an iPad to a desktop using a wired connection. This method bypasses iOS limitations, ensuring smooth and uninterrupted recording. With 4K resolution support, it provides professional-quality results suitable for tutorials, meetings, and content creation. Additionally, its built-in editing tools let you enhance recordings before exporting and sharing.
Why Use Wondershare DemoCreator?
- Seamless iOS Device Recording – Capture your iPad’s screen directly on a desktop via wired recording, avoiding iOS audio restrictions. Ideal for professionals who need to record Zoom meetings with full audio without worrying about iOS privacy limitations.
- High-Quality Capture – Record up to 4K at 120 FPS for crystal-clear video. Perfect for educators, business professionals, and content creators who require high-resolution recordings for online classes, corporate presentations, or YouTube tutorials.
- Screen & Voice Recording Together – Record your screen while adding voiceover narration for tutorials or reviews. Great for trainers and online instructors who need to explain concepts while showcasing Zoom meeting content in a structured way.
- nstant Editing & Exporting – Edit recorded content in DemoCreator’s built-in editor and export in MP4, MOV, or AVI. Useful for marketing professionals, YouTubers, or students who want to edit Zoom recordings by adding captions, annotations, or trimming unnecessary parts before sharing.
How to Record a Zoom Meeting on iPad Using Wondershare DemoCreator
Step 1Connect iPad to Wondershare DemoCreator on PC
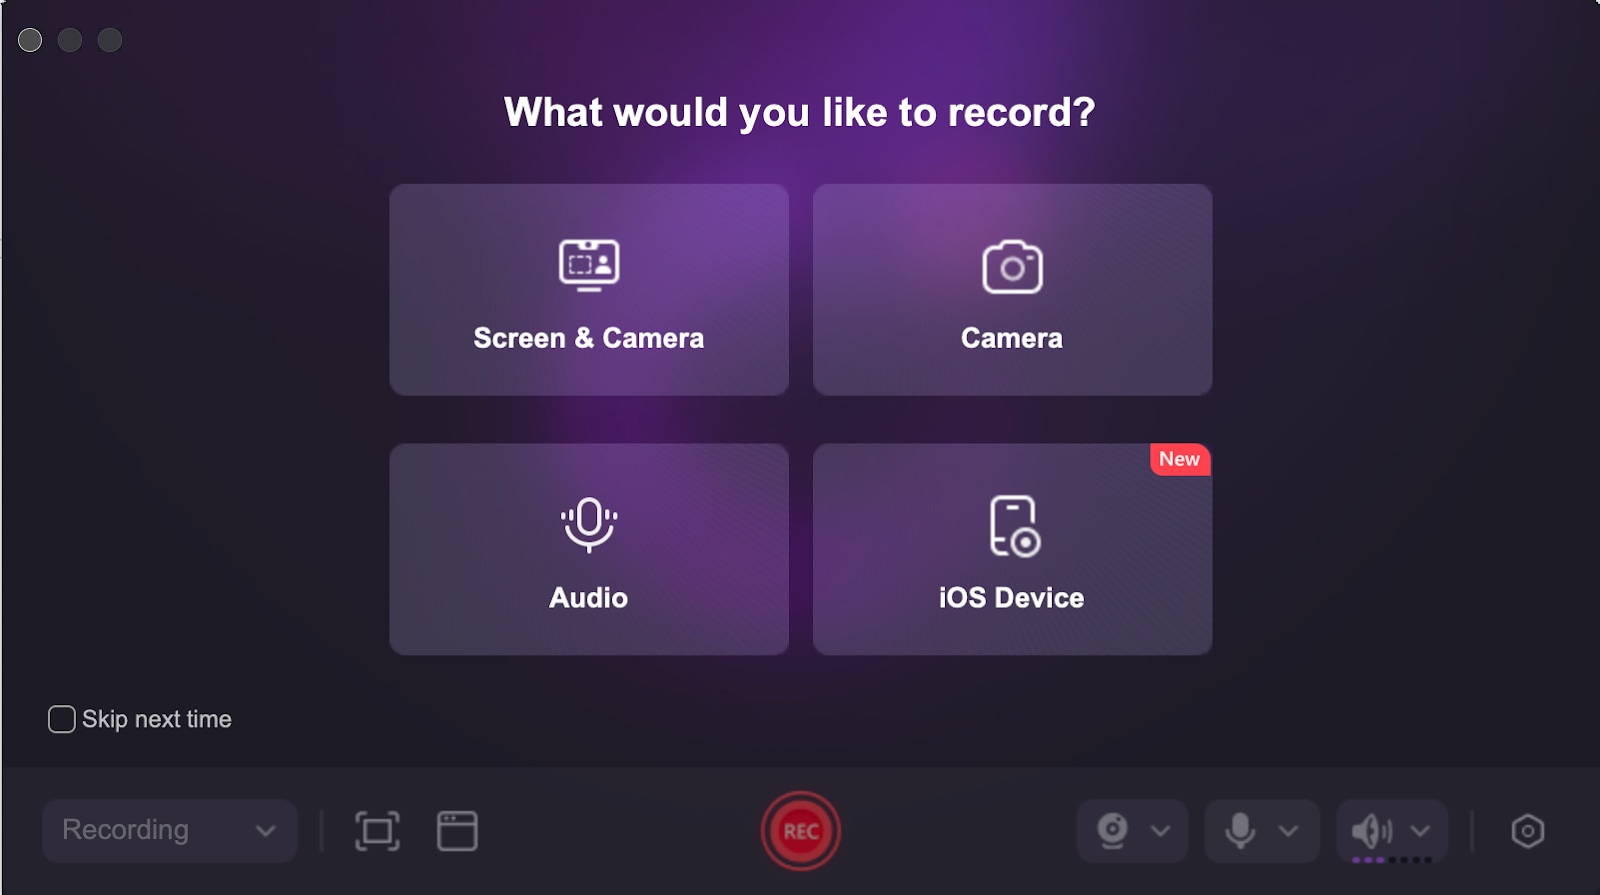
Download and install Wondershare DemoCreator on your computer, then launch the software. Select Video Recorder > Screen & Camera from the main interface to access recording options. Connect your iPad via USB cable and choose Record iOS Device Mode to begin capturing your iPad’s display.
Step 2Start Recording Your Zoom Meeting
Open Zoom on your iPad and join the meeting as usual. In Wondershare DemoCreator, click Start Recording to capture both the iPad’s screen and audio. The recording will continue without restrictions, ensuring high-quality output.
Step 3Edit and Enhance the Recording
After completing the recording, click on Advanced Editing to open the recorded video on the editing canvas. Use DemoCreator’s built-in tools to trim clips, adjust brightness, add captions, and apply effects to enhance the video quality before saving.

Step 4Export and Share the Recording
Once editing is complete, click the Export button in the top-right corner. Save the recorded video in MP4, MOV, or AVI format for compatibility. You can then share it via email, cloud storage, or social media platforms while maintaining high resolution.

Pros & Cons of Using Wondershare DemoCreator for Recording Zoom Meetings on iPad
Part 4: Best Practices for Recording Zoom Meetings on iPad
To ensure smooth and high-quality Zoom meeting recordings on your iPad, follow these best practices. These steps help prevent interruptions, improve recording clarity, and optimize storage and performance.
- Get permission: Always check Zoom policies and request host approval before recording, especially in professional or educational settings.
- Optimize storage: Free up space on your iPad by deleting unnecessary files to avoid running out of storage during long recordings.
- Use a stable connection: A strong internet connection prevents lags, buffering, and recording failures, ensuring smooth video and audio capture.
- Enable Do Not Disturb: Turn on Do Not Disturb Mode to prevent calls, messages, and notifications from interrupting the recording.
- Test recording before meetings: Run a quick test recording to check for audio and video sync issues before capturing an important session.
Conclusion
Capturing Zoom meetings on an iPad can be accomplished in several ways. Paid Zoom users can leverage the platform's Cloud Recording feature, while all users can utilize the iPad's screen recording, though with audio capture limitations. For those seeking a comprehensive, high-quality recording experience, Wondershare DemoCreator offers a superior solution. By connecting your iPad to a desktop, DemoCreator bypasses iOS audio restrictions and delivers crisp video and audio, making it ideal for professional recordings, educational tutorials, and engaging content creation.
FAQs
-
1. Can I record a Zoom meeting on iPad with participants' consent only?
Even with consent, Zoom does not allow free users to record meetings unless the host enables it. If you are not the host, you will need third-party tools like iPad screen recording or Wondershare DemoCreator. -
2. Does Zoom notify others when I record a meeting on iPad?
Yes, when using Zoom’s built-in Cloud Recording, all participants will see a recording notification. However, if you use an iPad's screen recording or Wondershare DemoCreator, Zoom does not notify participants. -
3. Can I pause and resume recording a Zoom meeting on iPad?
If using Zoom’s Cloud Recording, you can pause and resume recording during the meeting. iPad’s built-in screen recorder does not have a pause function, so you will need to stop and start a new recording. -
4. What is the best way to record Zoom meeting audio clearly on iPad?
If using the iPad's screen recording, place the iPad close to the speaker to capture external audio. For internal Zoom audio recording, use Wondershare DemoCreator, which captures sound directly from the iPad. -
5. How much storage space does a Zoom recording take on an iPad?
The storage required depends on the recording length and resolution. A one-hour screen recording in HD can take up 2–4 GB of space. Zoom Cloud Recording depends on your account’s storage limit.


