

If you are a music lover, you have probably used Audacity vocal remover to isolate or remove vocals from your favorite audio/video. While Audacity vocal remover has been around for a while, myriads of users are still struggling to either navigate or effectively extract vocals from their audios.
This could be due to the somewhat complicated interface or lack of certain capabilities. Well, this is not good especially when handling professional music or need to unlock your music creativity. Fortunately, this article gives you a comprehensive guide on how to isolate vocals in Audacity.
In this article
Overview of Audacity Vocal Remover
Audacity is a popular open-source vocal remover for Mac, Windows, and Linux. Although primarily used to record and edit videos, many people use it to produce podcasts and music and simply play around with vocals. It is simply a good tool to get creative with music sounds.
The good thing with Audacity is that it is free and you can download it directly to your device from the Audacity vocal remover download page. With it, you can remove vocals through different methods including split stereo to mono, noise reduction technique, and vocal reduction and isolation effect, or adding an AI plugin.
Features of Audacity Voice Remover
- Adjust your music tempo with or without altering the pitch.
- Edit your audio track with cutting and pasting.
- Supports smooth volume mixing.
- Alter audio frequency to meet your needs using equalizers, high pass filters, and low pass filters.
- Use noise reduction tools to remove or reduce background static.
- Record your audio live via microphone or mixer.
3 Ways to Isolate or Remove Vocals in Audacity
Way 1: Using Vocal Reduction and Isolation
While Audacity's interface is a bit complicated, you can follow the steps and still achieve vocal isolation in your audio track. The following steps illustrate how to isolate or remove vocals in Audacity.
Step 1. Download, install, and launch Audacity on your computer to access the main interface. Once opened, navigate to File > Import > Audio and follow the on-screen instructions to import the audio file you want to remove the vocals.

Step 2. Once it is imported, go to the "Select" menu and choose "All".

Step 3. Next, hover your cursor over the "Effects" menu and choose the "Vocal Reduction and Isolation" option.

Step 4. In the subsequent pop-up window, click the "Action" drop-down button and select the "Remove Vocals" option. Now wait to obtain Audacity separate vocals and then save your vocals. You can play to preview.

Way 2: Using Splitting Stereo to Mono
Another way to isolate vocals from audacity is to use the splitting stereo to mono technique. The steps are illustrated below
Step 1. Open Audacity vocal remover and head to File > Import > Audio to import your audio file.

Step 2. Once you have imported your audio, click the drop-down arrow on the audio name and select the "Split Stereo to Mono" option.

Step 3. Now click the "Play" button and select the "Solo" option in each of the separate tracks. Play each of these tracks separately to identify the one with a solo vocal. Click the "x" button on the left side to delete the one without a solo track.

Way 3: Using an AI Plug-in [Only Available on Windows or Linux]
Compared to the previous two solutions, this one is more tech-savvy. Here are the steps:
Step 1: Download and install the Intel OpenVINO plugin.
Step 2: Restart Audacity, you can find it in Effect -> OpenVINO AI Effects -> OpenVINO Music Separation.

Step 3: Choose separation mode, 2 stem works for isolating vocals from most songs, while 4 stem works for separating more specific sounds like drums, bass, vocals, and others.
Step 4: Choose your inference device. Normally, the CPU always works but is the slowest, the GPU is the fastest on high-end computers, and NPU can only be used on modern Intel processors and is similarly fast as the GPU.
Limitations of Removing or Isolating Vocals with Audacity
While Audacity is useful in removing or isolating vocals, it also has certain limitations rendering this tool less effective and unreliable in several instances.
- This method is not always successful in removing vocals. Sometimes, it can extract other unnecessary audio elements alongside the vocals.
- It requires more manual adjustments if you want to have a better result.
- It has a complicated interface that disrupts seamless user navigation.
- You can hardly experience better performance until you download external plugins.
How to Remove Vocals Using an Audacity Alternative?
As you have seen, Audacity vocal remover has several limitations and you cannot bank on it to deliver quality and reliable vocals for your project. Therefore, finding a suitable alternative will be a good option. Fortunately, you don't have to go far because Wondershare DemoCreator is here for you.
Although primarily designed as a video recorder, creator, and editor, with its newly added AI-powered feature- AI voice remover, it can help you remove vocals and other components of your audio/video with ease and speed.
What makes it an unmatched Audacity voice remover alternative is its speed, affordability, ease of use, and compatibility with popular operating systems and devices. Additionally, it supports batch processing and multiple input and output file formats. Whether you are a newbie or an expert, navigating through its interface is hassle-free. Download the free trial version and upgrade to unlock unlimited features for a top-grade vocal isolation experience.
Steps to Isolate or Remove Vocals Using Wondershare DemoCreator
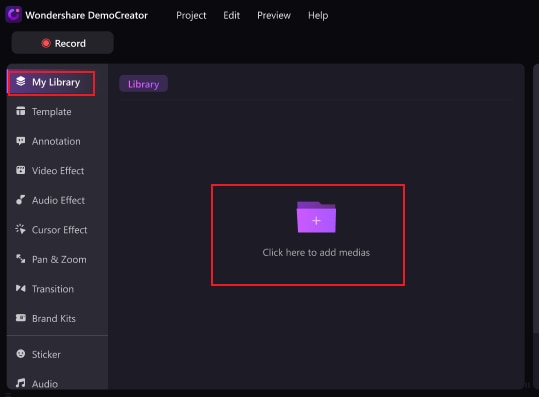
Step 1. If you have downloaded and installed Wondershare DemoCreator, launch it and subsequently hit the "Video Editor" option on the main window. Next, click the "+" and import the target audio file from the file explorer window.
Step 2. Drag it to the timeline and head to the "Audio Effects" section. Select and drag the "AI Voice Remover" to the track on the timeline.
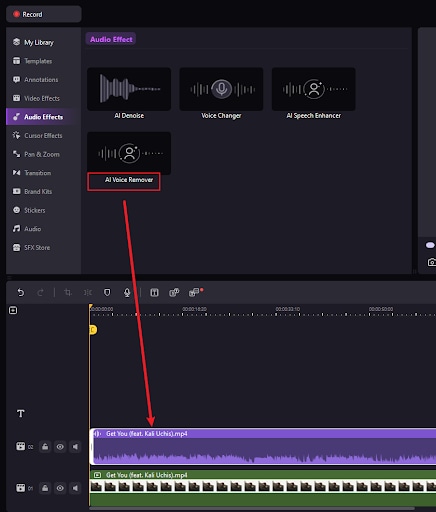
Step 3. Then it will automatically process and produce two new separated tracks.

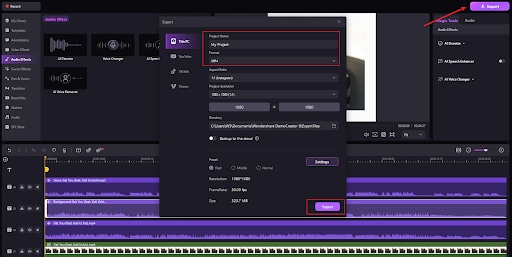
Step 4. Finally, click the "Export" button and select your preferred output settings. You can also edit them if you need to.
Conclusion
While many people still use Audacity to remove or isolate vocals from a song, its limitations might not make it useful especially when you need professional or quality vocals. Fortunately, Wondershare DemoCreator fills the gap and ticks all the boxes of a modern vocal remover. Visit the Wondershare DemoCreator homepage and download a suitable package.


