

Changing the voice in videos is becoming a trend. Whether it is YouTube videos, presentations, tutorials, or customer service, replacing the voice in videos is becoming a necessity and there are no signs of slowing down. It can entertain people, contribute to appealing to many more audiences, encourage creativity, improve engagement and interactions, encourage effective delivery of content, and more.
However, changing voice in a video is not always a walk into the park especially if you are a newbie. Without the right voice video changer, you will struggle to do it.
Fortunately, this article gives you a complete guide on how to change voices in videos irrespective of your technical know-how.
In this article
What to Consider When Choosing a Voice-Changing App?
When changing the voice in a video, your success depends on your choice of voice-changing app. Different apps vary each other in capabilities and limitations. Some of the things you need to consider when choosing a voice-changing tool include:
- Device Compatibility- Make sure the tool is compatible with your device's operating system. Some tools have special computer spec requirements. It is always good to pick a tool that runs on popular operating systems like Windows, Mac, Linux, Android, and iOS.
- Supported File Formats- It is important to choose a tool that supports many and especially popular video and audio formats. This will save you the time and energy of converting files to other formats before changing your voice.
- Ease of Use- As a rule of thumb, choose a voice-changing app that offers a user-friendly interface. This way, you can navigate with ease, save time, and reduce potential errors. Also, check that it is easy to install and doesn't consume too much resources.
- Available Voice Options- With many relevant voice options, you can make your content more attractive.
- Sound Effects- Just like voice options, sound effects bring another level of voice versatility. They add a polishing touch to your voice and make it plentiful and appealing.
- Cost Effectiveness- Compare the price and capabilities to understand whether the tool is worth the price or not. Avoid checking the price alone because cheap tools lack some important features that might be a game-changer in your content.
Overall, finding a tool that ticks all these boxes is not an easy task. Fortunately, after considering all these range of factors, we have picked out Wondershare DemoCreator to change voices in videos for you.
| Tool | Wondershare DemoCreator |
| Compatibility | Normal OS system in Windows and Mac |
| Supported file formats | Multi-format and multi-size, saving your videos as MP4, MOV, MKV, AVI, WMV, WebM, or TS in HD or 4K/8K. |
| Ease of Use | Very easy to use. ⭐ ⭐ ⭐ ⭐ ⭐ |
| Available voice options | More than 22+ voices to choose from and will continue adding. Covering 8+ different languages. |
| Sound effects | Rich in sound effects with playfulness, nature, animal, or gaming. |
| Cost-effectiveness | $29.9 for 10,000 credits |
| Voice editing features | Powerful editing features like removing background noise, speech enhancement, text-to-speech, auto subtitles, etc. |
The Best Voice Changer for Videos: Wondershare DemoCreator
Wondershare DemoCreator intelligently lets you replace the voice in a video for various needs including presentations, tutorials, product demonstrations, and advertisements among others. Thanks to its collection of editing features and ability to change your voice to that of a man, woman, child, transformer, and robot! This tool is fast, easy to use, and compatible with popular operating systems, devices, and file formats.
Key Features:
- Supports the audio denoise feature that helps remove all types of voice background noise.
- Allows users to increase or decrease voice volume to meet their needs.
- Provides various transition effects to make it easy to transition between voices/audio.
- Allows users to trim and split audio/voice.
- You can share your voice directly on social media platforms and the cloud.
- You can export voice in nearly all audio formats.
How to Use DemoCreator AI Voice Changer?
Working with DemoCreator is easy and full of fun. The interface is straightforward and you can seamlessly navigate irrespective of your level of expertise. The following steps show how to use DemoCreator AI voice changer:
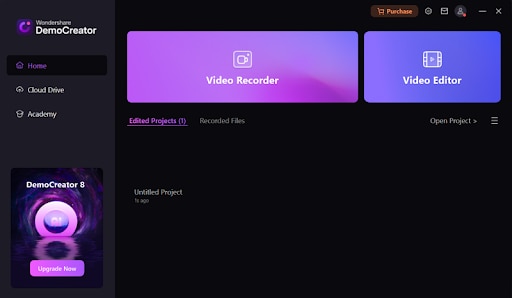
Step 1. If you have installed DemoCreator on your device, just run it to access the main interface. Here, click the "Video Editor" tab.
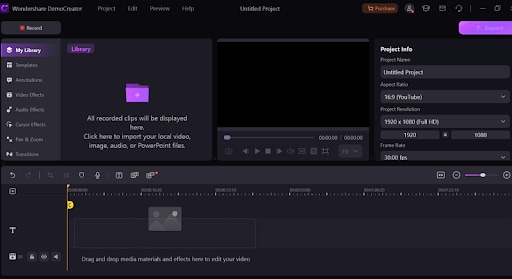
Step 2. On the next screen, hit the "+" button and import the video you want to change its voice. Additionally, you can record yourself directly by clicking the "Record" icon. When the video is successfully uploaded to the library, drag it into the timeline to begin editing.
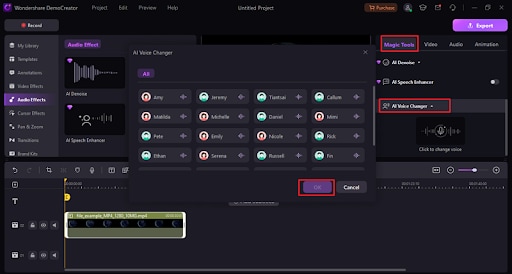
Step 3. Now, click the video on the timeline to access editing options on the top-right. Select the "Magic Tools" option then "AI Voice Changer". Choose the voice you want and click "OK."
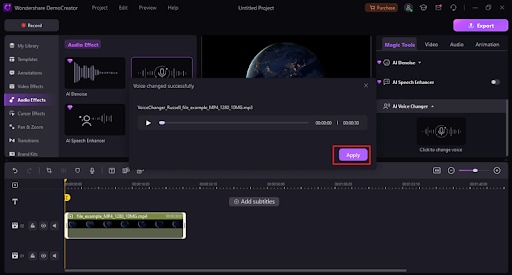
Step 4. Next, click "Apply" to add the selected voice to your video.
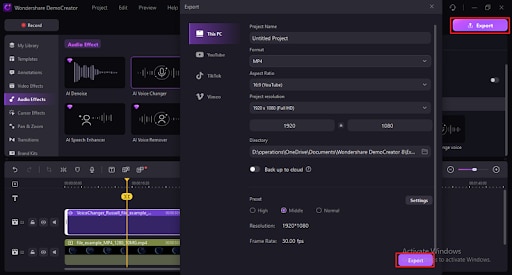
Step 5. Once done, click the "Export" button and choose your desired format and destination. Then click "Export" to confirm and save or share your new video.
Conclusion
Changing voice in videos is not complicated as long as you have the right tool. After going through this discussion, it is quite clear that Wondershare DemoCreator makes it easier and more interesting to change voice in videos. Whether you are doing a presentation project, tutorial, customer guides, narrations, or product demonstrations, choose Wondershare DemoCreator to get the best experience in changing video voice.
FAQs
-
Can you change the voice of a video recording?
Yes, you can change the voice of a recorded video using a suitable voice changer for videos like Wondershare DemoCreator. When you record your video, this program allows you to change the voice of the audio component and export the recorded video as a single file. -
Is there a device that can change your voice?
Sure! For a device to change your voice, it requires a voice changer app installed. These apps often use AI to change your voice according to your selection. Install the best video voice changer app on devices like a computer (Wondershare DemoCreator), smartphones, and tablets, and start changing your voice with ease. -
How do you change the voice of a recorded audio?
Changing the voice of a recorded audio is simple. You only need a proper audio voice changer like DemoCreator.- Simply upload your recorded audio and drag it to the timeline.
- Go to Audio Effects > choose AI voice changer in the menu bar.
- Choose the desired voice and apply it to the recorded audio.
- Export your recorded audio to your device.


