Thumbnails are a key element of YouTube Shorts, serving as the first impression for your content. A well-designed thumbnail can increase click-through rates (CTR) and enhance your branding, helping your Shorts stand out in a crowded feed. This guide will show you how to add thumbnails to YouTube Shorts, both before and after publishing, and provide tips for creating engaging designs using tools like Wondershare DemoCreator.
In this article
Part 1: Why Thumbnails Are Essential for YouTube Shorts
Thumbnails are a vital element of YouTube Shorts, playing a key role in grabbing viewers’ attention and boosting engagement. Acting as a visual teaser, a well-designed thumbnail provides a glimpse of your content, encouraging clicks and views. Custom thumbnails enhance branding by making your Shorts more recognizable and memorable, creating a cohesive identity for your channel. In crowded search results and feeds, high-quality thumbnails help your content stand out, leading to improved visibility and higher click-through rates (CTR). Learning how to add thumbnails to YouTube Shorts is essential for attracting viewers and growing your audience effectively.
Part 2: How to Add Thumbnails to YouTube Shorts
Adding a custom thumbnail to your YouTube Shorts is a simple process that can greatly enhance your content’s visibility and appeal. Whether you’re uploading a new Short or editing an existing one, the steps to add thumbnails are straightforward. Follow these methods to ensure your Shorts stand out with professional, eye-catching thumbnails.
Method 1: Adding Thumbnails Before Publishing a Short
Step 1Create the Thumbnail
Design a custom thumbnail with the recommended dimensions: 1280x720 pixels (16:9 aspect ratio). Use tools like Wondershare DemoCreator to create visually appealing designs that align with your content theme.
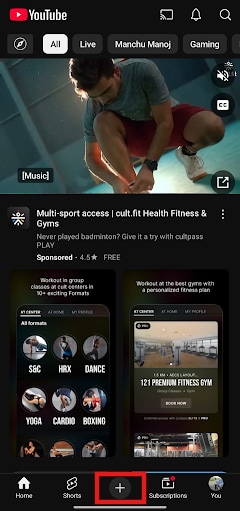
Step 2Upload Your Short
Open YouTube Studio on desktop or mobile. Upload your Short and fill in the required details, including the video title, description, and tags.
Step 3Add the Thumbnail
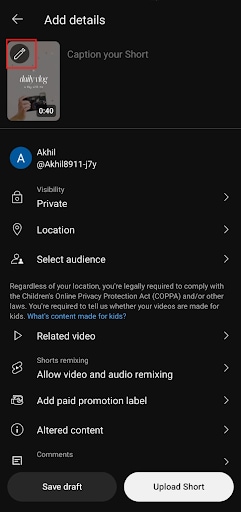
On the Details page, click on the Custom Thumbnail option. Upload your pre-designed thumbnail file and adjust it as needed to ensure proper alignment.
Step 4Save and Publish
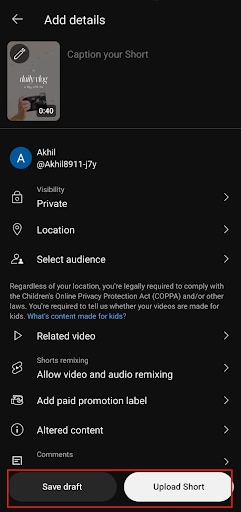
Click Save to finalize the changes. Preview your video to confirm the thumbnail displays correctly across devices before publishing it to your channel.
Method 2: Adding Thumbnails After Publishing a Short
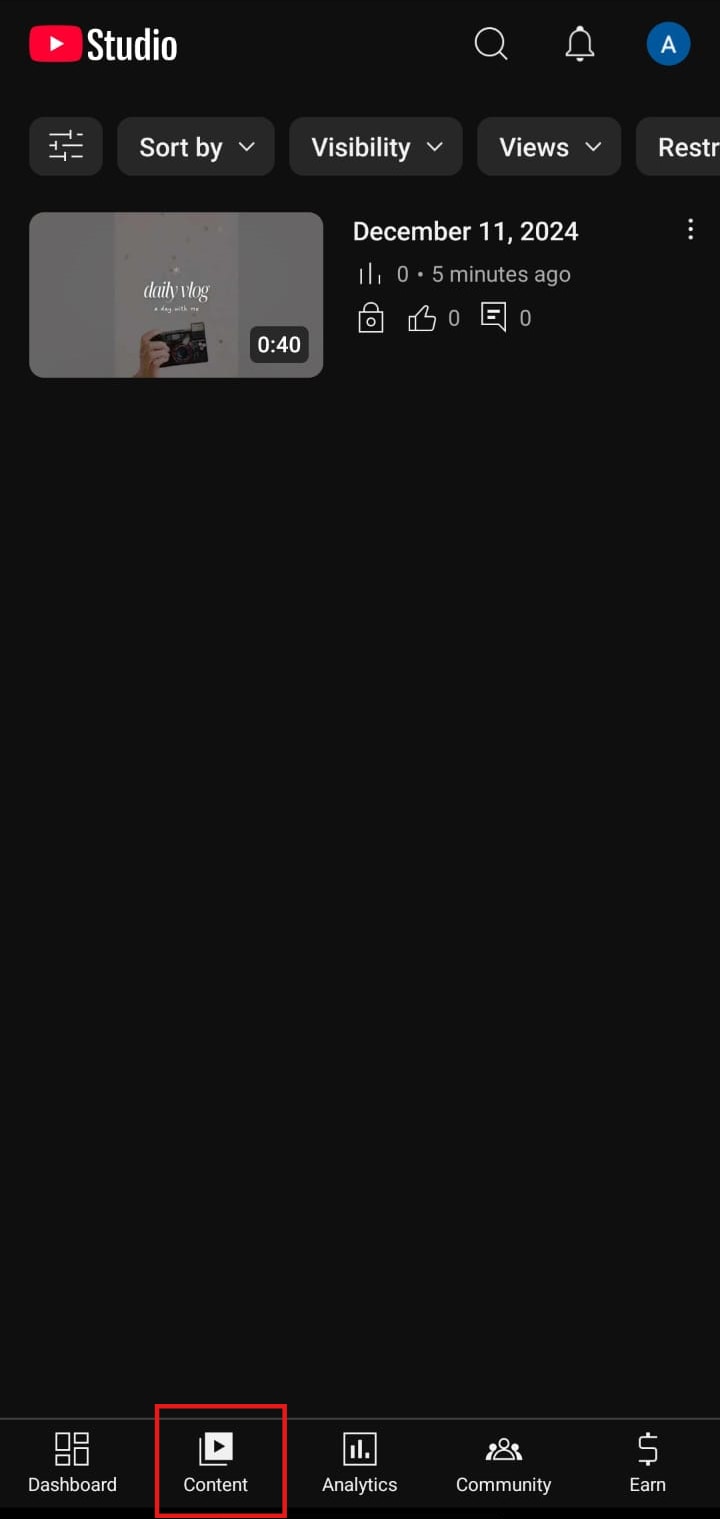
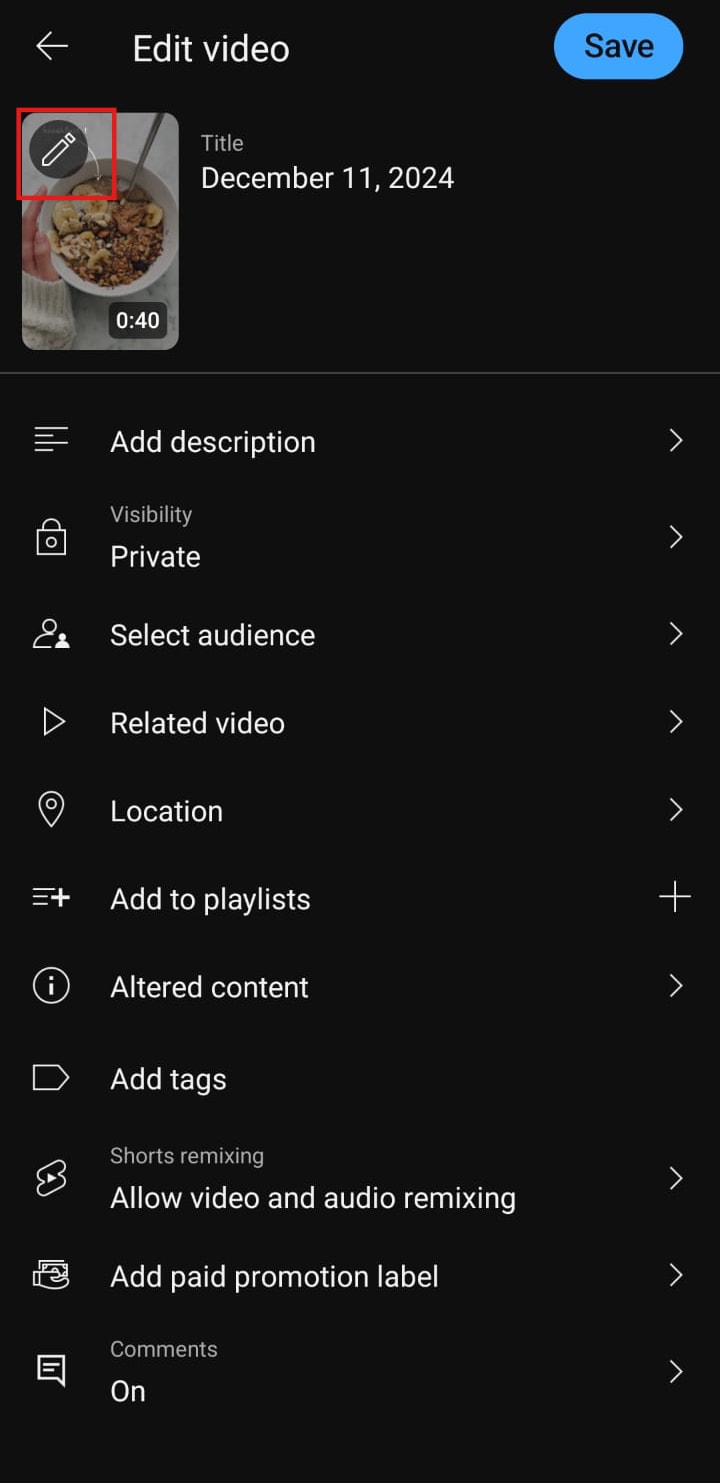
Step 1Access the Video in YouTube Studio
Step 2Add or Change the Thumbnail
In the Details section, select the Custom Thumbnail option. Upload your thumbnail file, ensuring it meets YouTube’s resolution and format guidelines.
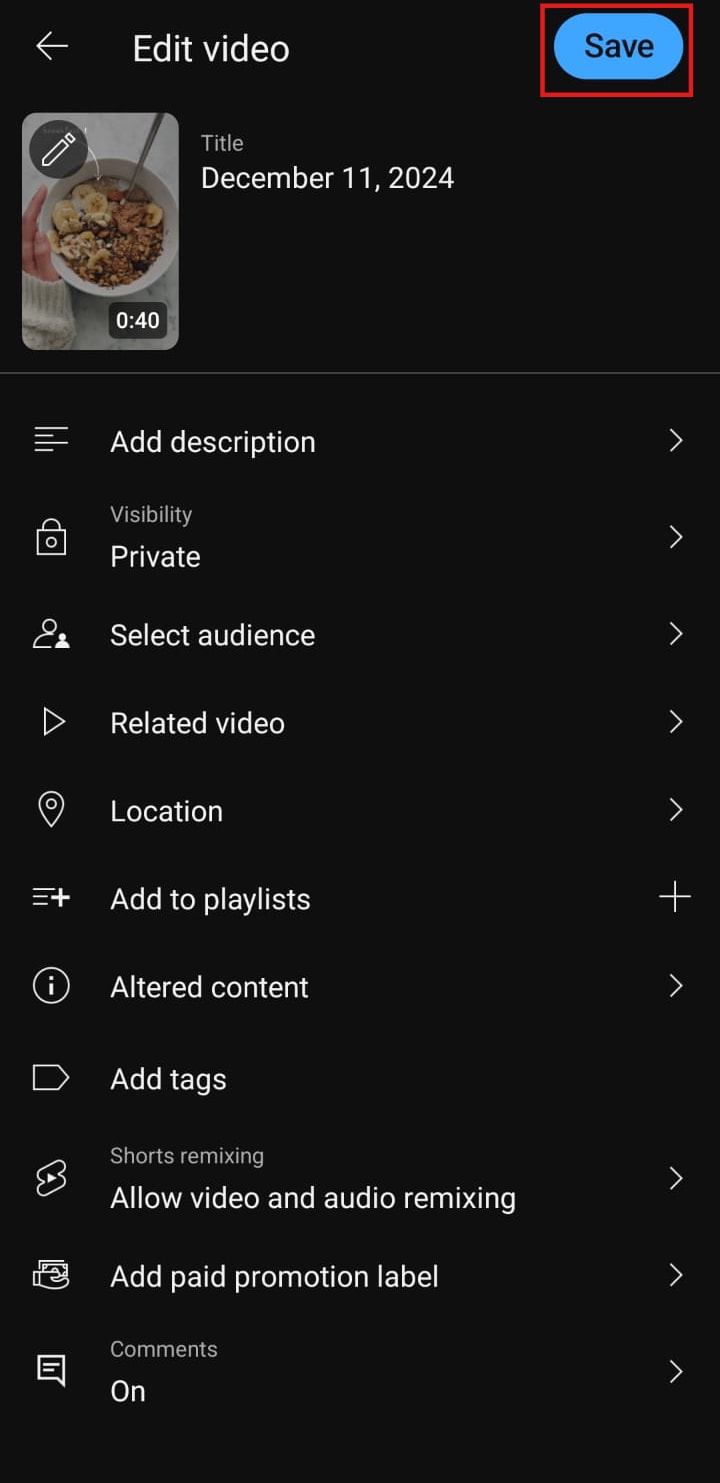
Step 3Save Changes
Click Save to apply the updated thumbnail. Revisit your channel to confirm that the new thumbnail displays correctly, and make adjustments if necessary.
Part 3: Best Practices for Thumbnails on YouTube Shorts
Creating impactful thumbnails for YouTube Shorts is essential for grabbing attention and enticing viewers to click. A great thumbnail should clearly convey the essence of your video while standing out in a crowded feed. Follow these detailed best practices to ensure your thumbnails are effective:
- Focus on Simplicity: A clutter-free design ensures that your thumbnail communicates its message instantly. Use bold text to emphasize key elements and clean visuals to avoid overwhelming viewers. Simplicity helps your thumbnail remain clear and attractive, even when displayed in smaller sizes, such as on mobile devices.
- Highlight Emotions: Thumbnails with expressive faces or dynamic action shots tend to resonate with viewers emotionally. Adding human elements, such as reactions or excitement, can make your content feel relatable and engaging. Emotions like surprise, joy, or suspense can pique curiosity and encourage viewers to click.
- Vibrant Colors: Bright, contrasting colors are crucial for making your thumbnail visually striking. Use bold and vibrant shades that catch the eye while ensuring the design remains cohesive. High-contrast color combinations, such as yellow and black or red and white, work particularly well to grab attention on small and large screens alike.
- Brand Consistency: Establishing a consistent style across your thumbnails helps reinforce your channel’s identity. Incorporate your logo, brand colors, and specific fonts to ensure viewers instantly recognize your content. Consistent branding not only builds trust but also creates a professional and polished look for your channel.
Part 4: How Wondershare DemoCreator Can Help You Create Perfect Thumbnails for Long Video
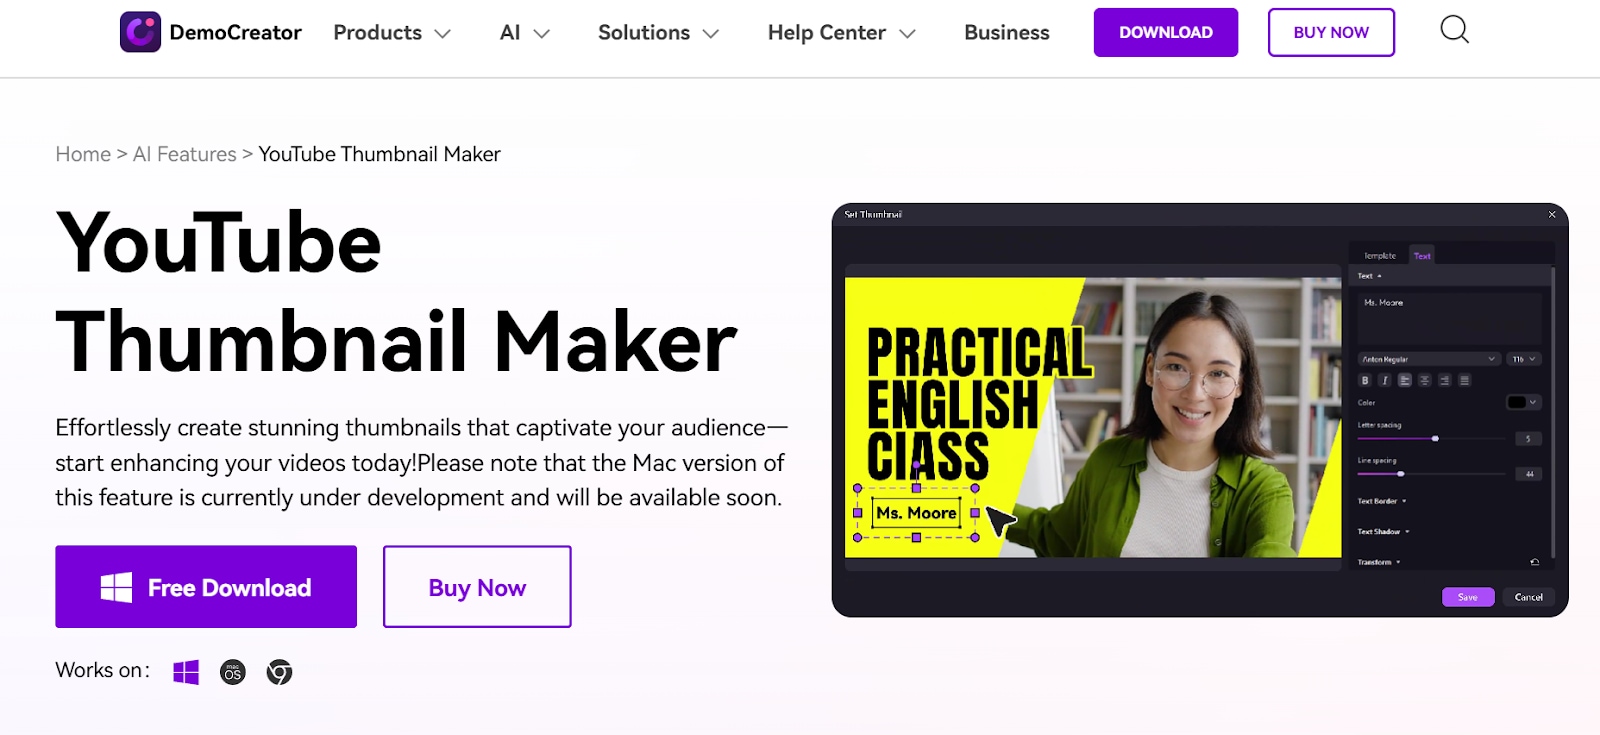
Wondershare DemoCreator is a versatile tool designed to simplify the thumbnail creation process for long-form videos. With its intuitive interface and advanced features, you can design professional, eye-catching thumbnails that resonate with your audience. Whether you’re a beginner or a seasoned content creator, DemoCreator offers tools to streamline your workflow and enhance your branding. From AI-powered frame selection to customizable templates, it’s an all-in-one solution for crafting thumbnails that boost engagement.
Key Features
- AI Frame Selection: Automatically identify and select the most engaging frame from your video as the starting point for your thumbnail, saving time and effort.
- Customizable Templates: Access a library of pre-designed templates tailored for various video themes, including Shorts, making it easy to create polished designs.
- One-Click Export: Save your finished thumbnail in the recommended resolution and format with just one click, ensuring a seamless upload process to YouTube.
- Advanced Editing Tools: Enhance your thumbnails with text, overlays, filters, and colors to make them visually striking and aligned with your content.
- Branding Integration: Add logos, fonts, and custom elements to maintain consistent branding across all your thumbnails, building recognition and trust with your audience.
Simplify the Thumbnail Creation Process with Democreator:
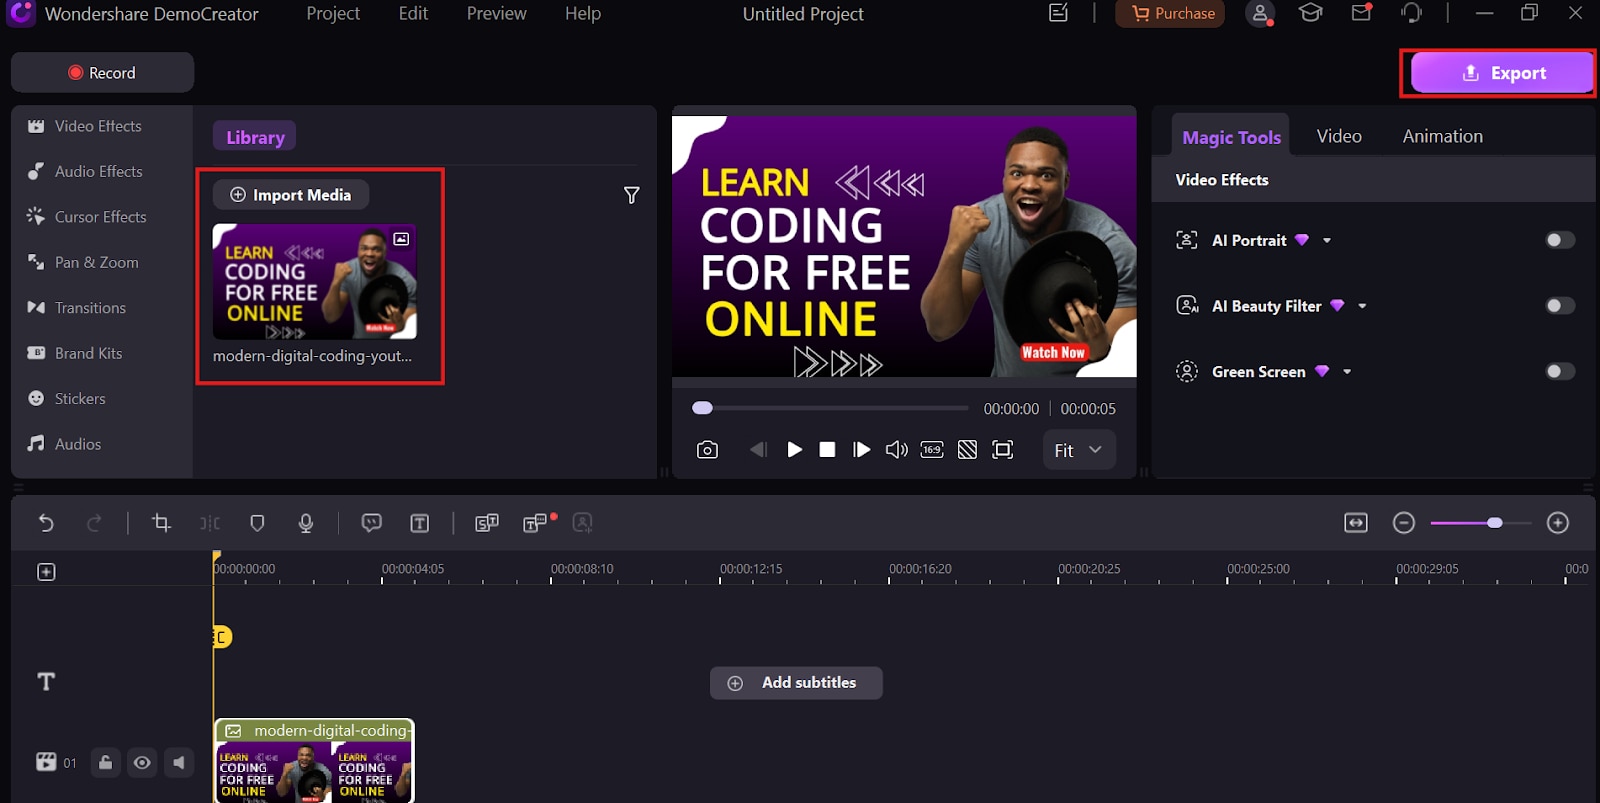
Step 1Launch DemoCreator and Import Video
Start by launching Wondershare DemoCreator and selecting the video editor. Import your video file directly from your device to get started with the thumbnail creation process. This intuitive interface ensures a smooth workflow right from the beginning. Click Export to identify key frames.
Step 2Use AI to Identify Key Frames
Harness the AI Frame Selection feature to automatically highlight the most engaging frames from your video. This intelligent tool saves time and ensures you capture a visually compelling moment as the base for your thumbnail.

Step 3Select a Pre-Designed Template
Explore DemoCreator’s extensive library of pre-designed templates tailored to various video themes. Choose a template that best suits your content and enhances its overall visual appeal, providing a polished and professional look.
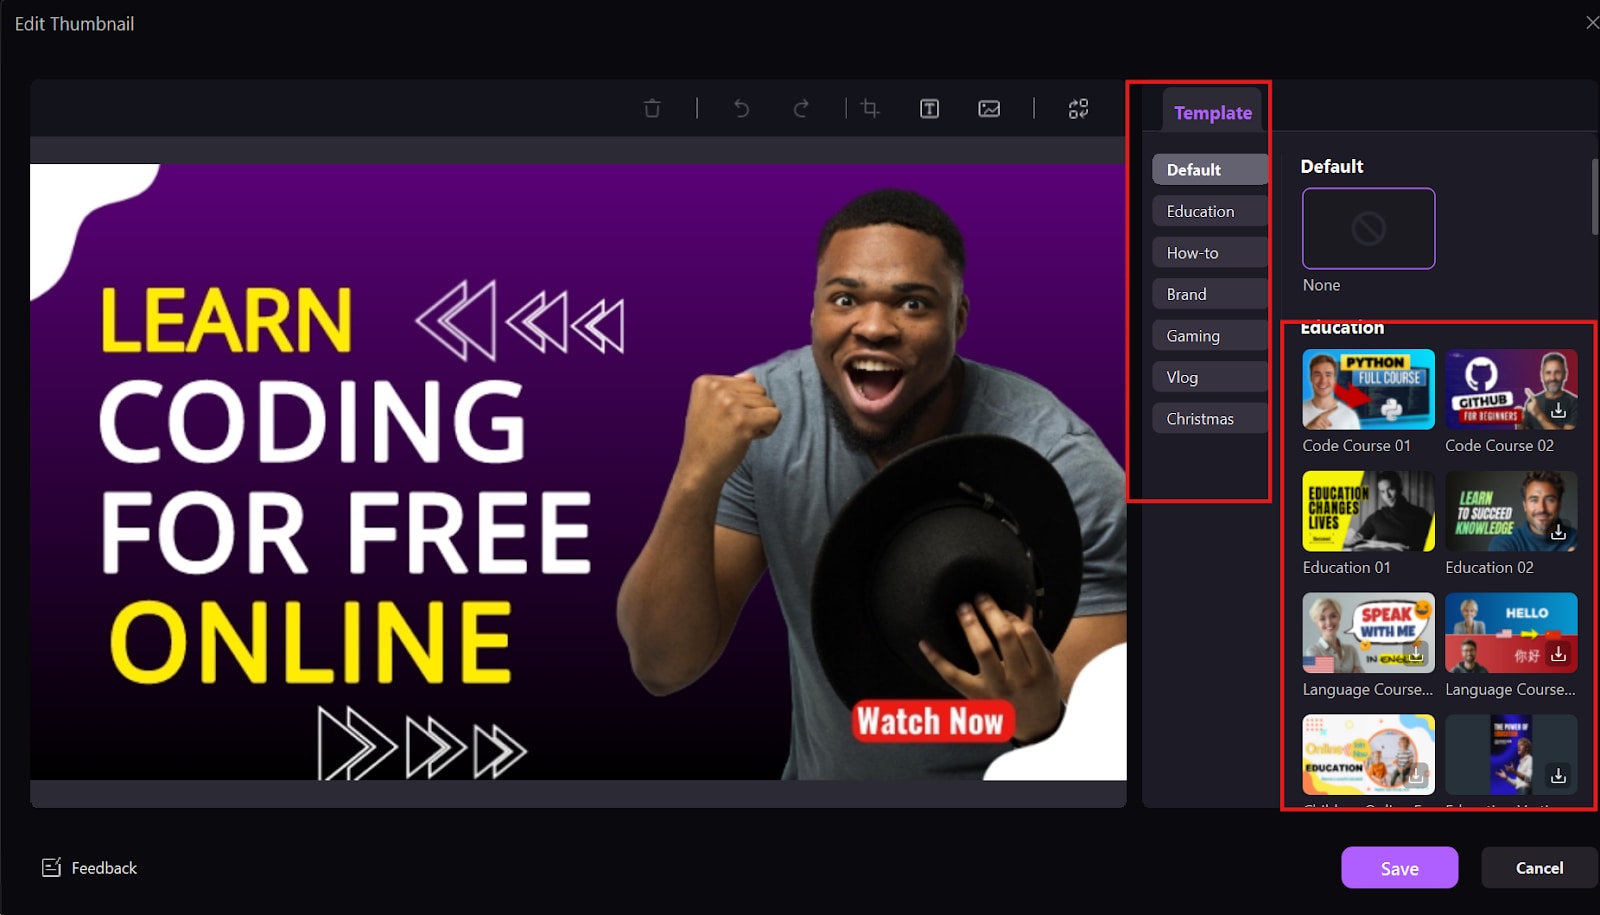
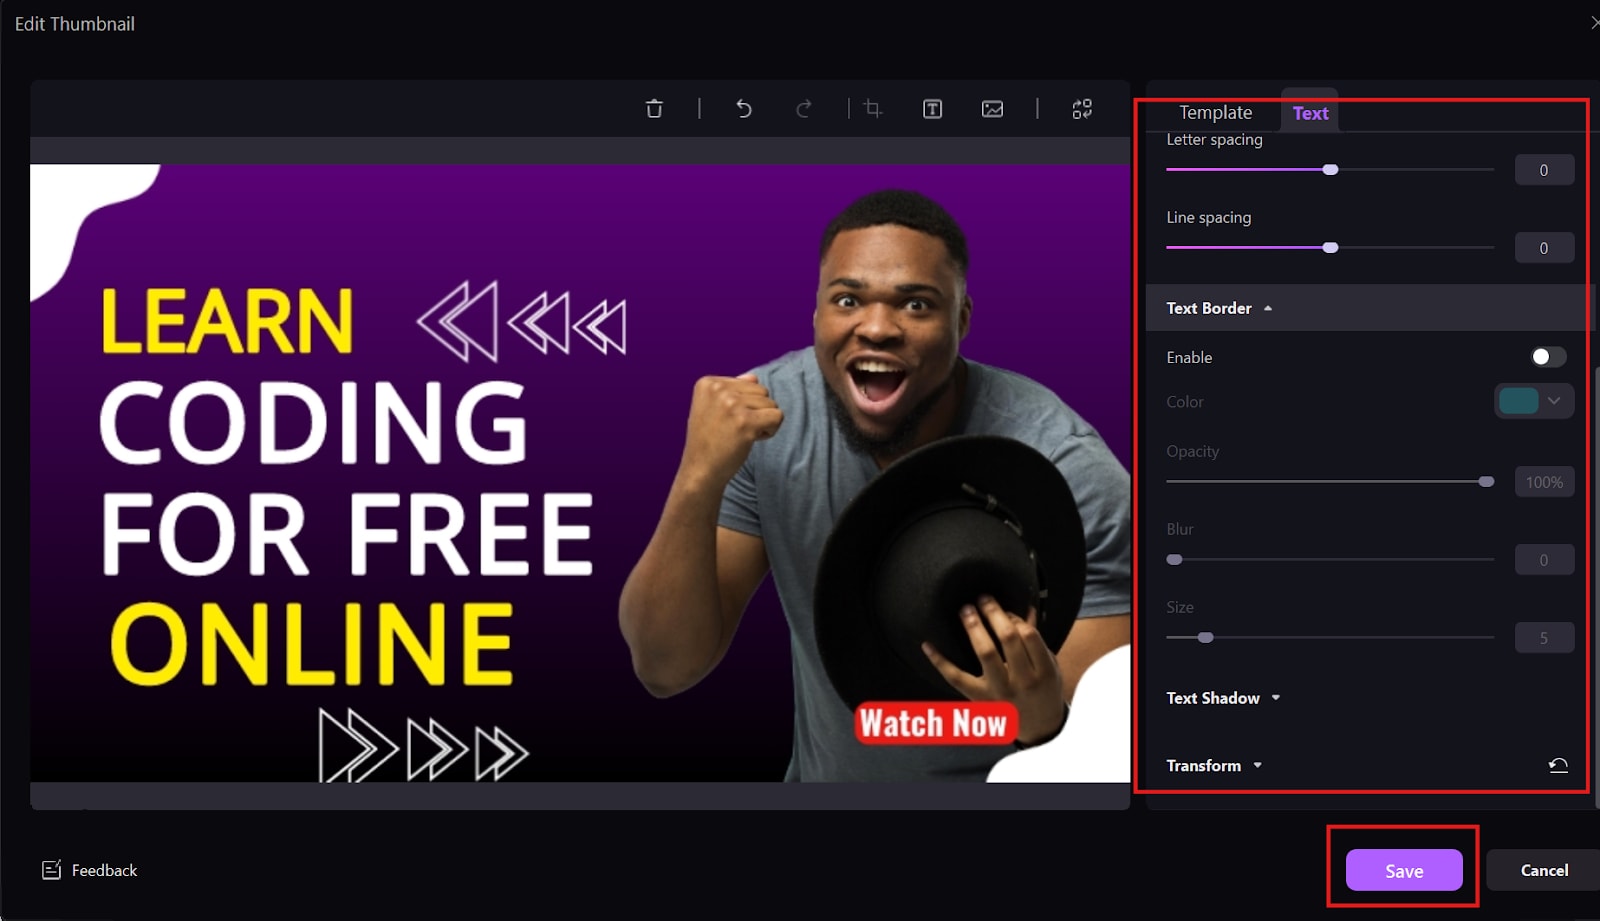
Step 4Personalize Your Thumbnail Design
Add a personal touch to your thumbnail by customizing the selected template. Adjust fonts, text, colors, and overlays to match your video’s theme. Incorporate branding elements like logos or icons to maintain consistency across your channel’s visuals.
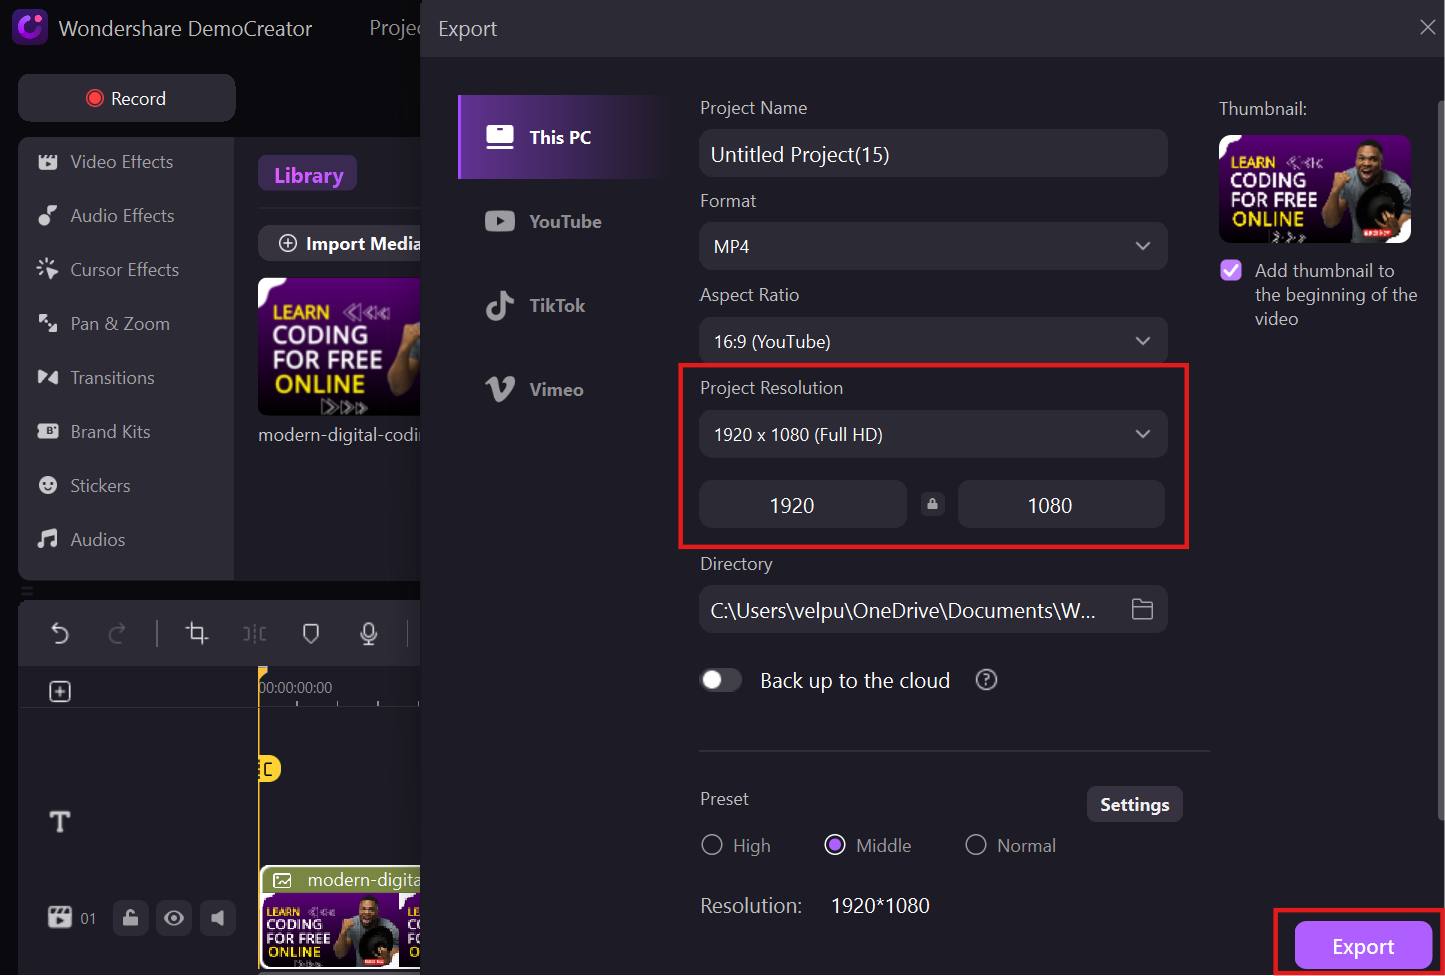
Step 5Export and Publish Your Thumbnail
Save your finalized thumbnail in high resolution using DemoCreator’s One-Click Export feature. Seamlessly upload the thumbnail to your YouTube video, streamlining the process and ensuring it’s ready to attract clicks.
Why DemoCreator Stands Out:
Wondershare DemoCreator stands out as a versatile tool with seamless integration with YouTube, allowing users to create and upload thumbnails effortlessly. Its intuitive interface and advanced features make it ideal for both beginners and professionals, catering to diverse skill levels. The tool streamlines the thumbnail creation process, saving time while delivering high-quality results. Whether you’re looking for quick templates or advanced customization, DemoCreator offers the perfect balance of simplicity and functionality.
Conclusion
Custom thumbnails are essential for making your YouTube Shorts visually appealing and increasing their click-through rates. Whether added before or after publishing, thumbnails serve as a powerful tool to attract viewers and enhance your branding. With user-friendly tools like Wondershare DemoCreator, creating high-quality, professional thumbnails is quick and seamless, making it ideal for both beginners and professionals. By following best practices and aligning your thumbnails with your content’s theme, you can ensure your Shorts stand out in search results and feeds. Learn how to add thumbnails to YouTube Shorts today and take your channel’s performance to the next level.
FAQs
-
Can I use the same thumbnail for multiple Shorts?
Yes, you can reuse a thumbnail for multiple Shorts as long as it aligns with the content and does not mislead viewers. Consistent thumbnails can help with branding across similar videos. -
Are there any tools to preview how my thumbnail will look on different devices?
Yes, tools like Canva and Wondershare DemoCreator allow you to preview thumbnails on various screen sizes, ensuring they are optimized for mobile and desktop viewers. -
Do YouTube Shorts require different thumbnail dimensions than regular videos?
No, YouTube Shorts use the same recommended thumbnail dimensions of 1280x720 pixels (16:9 aspect ratio), ensuring consistency across video types. -
Can I add a thumbnail to a YouTube Short directly from my phone?
Yes, you can use the YouTube Studio app on your phone to add or change thumbnails for Shorts. This feature makes it convenient for creators on the go. -
What are some common mistakes to avoid when creating thumbnails for YouTube Shorts?
Avoid cluttered designs, low-quality images, and misleading visuals. Ensure your thumbnail is clear, relevant, and aligned with the video content. -
Can I change the thumbnail of a YouTube Short after it’s been published?
Yes, you can update the thumbnail at any time by accessing the video in YouTube Studio. Changes are applied immediately after saving. -
What file formats are accepted for YouTube thumbnails?
YouTube accepts thumbnails in JPG, PNG, and BMP formats, with a recommended file size of less than 2MB for optimal performance.


