Clear and quality sound is paramount, especially when recording podcasts and videos or partaking in voice calls. Interferences such as background noise or poor quality of sound can hamper the message and cause the audience to lose interest. Mastering the method of how to clean up audio recordings is crucial to improve clarity and professionalism. Many factors could impact your audio, including background noise and microphone interference. However, there are numerous available tools and techniques that can remove noise from voice recordings.
Therefore, this article will delve into why it is necessary to clean up audio recording, some techniques involved, and a detailed guide on cleaning up using basic software, such as Audacity. It will also address advanced noise cancellation technologies for real-time noise reduction. These solutions will come in handy whether you are new to recording audio or are a veteran content creator, as they will assist in avoiding background noises and other issues that can hinder the quality of your recordings.
In this article
Part 1: Why is it Necessary to Clean Up Audio Recordings?
Cleaning audio recordings is crucial in ensuring the production of high-quality audio and enhancing the users' experience. Whether you are recording a podcast, making a video, or conducting an online meeting, getting a clear sound is very important.
Any background noise, sound echo, presence of wind gusts, or any interference to the microphone will distract the listener and hamper your communication. In voice calls, web conferencing, or video production, such interruptions tend to quickly reduce the quality of your content and your professionalism. For example, fluctuating sound levels and background noises in audio playback can be sources of annoyance for the target audience and make them stop listening. Therefore, cleaning up audio not only helps to make it clearer but also reflects your professionalism and respect for your listener.
Additionally, improving the overall sound quality boost your audience satisfaction, ensure clear communication, and create a more polished, engaging experience.
Part 2: How Can I Clean Up an Audio Recording?
There are several techniques you can use to clean your audio recording. But nefore we dive into that, let’s take a look as some of the common audio recording problems that requires clean up;
Common Audio Recording Problems that Requires Clean-Up
- Background Noise
Unwanted background noise is one of the most common issues with audio recording. This encompasses sounds like air conditioning, traffic, and distant, barely audible conversations. These noises are usually apparent in recordings made using microphones that are more sensitive to their surroundings.
- Microphone Noise
Microphone noise is the sound distortion produced by the activity of the microphone. This often happens when the microphone is placed right at the speaker’s mouth and causes breath pops or plosives (the exaggerated “P” or “B” sounds recorded by the mic). However, in some microphones that have a low quality, there is usually a hissing sound or some form of static, which will also affect the sound quality.
- Current Sound or Hum
A constant hum can be heard in the recordings due to electrical interference or grounding, which might stem from wiring problems, loose connections or other electrical appliances.
- Ambient Sound
Ambient sound is the general noise present in the environment where the recording is taking place. This could be anything from wind blowing in the background, birds singing in the background, or any sort of sound that a character’s clothing might make when they move.
- Echo and Reverb
Echoes and reverb are cases where sound waves reflect off surfaces, resulting in a booming or hollow sound on the recording. This is most apparent in rooms with little sound insulation or when recording a song in huge, vast spaces. Reverb tends to make the voices sound shallow and less comprehensible thus lowering the overall clarity of the recording.
Methods and Techniques to Clean Up Audio Recordings
Here are the ways to clean up audio recordings without hassle;
Method 1Noise Reduction Software
One of the best ways of cleaning up audio recording is by utilizing specialized software for sound reduction. Tools like Audacity, Adobe Audition, and iZotope RX present impressively powerful instruments to remove background noise and other unwanted sound sources. These programs allow you to remove noise profiles such as static or hum, to apply sound attenuation to the whole track and get a sound that is clearer.
- Audacity:
This is a free and open-source program which is primarily intended for the simplest of purposes of sound reduction: if you are using this tool and you do not want a particular sound in the background, you can find the section with such a sound, click ‘Get Noise Profile’, and then choose the sound reduction effect for the entire record.
- Adobe Audition:
A professional-level program with exciting features like a real time frequency display option to help in separating and eliminating interferences. One of its functions to eliminate noise works very well for live concert recordings with different levels of noise.
- iZotope RX:
Izotope RX is well-equipped for handling progressions involving complicated audio problems like clicks, hums, or hitches. Automated based along with manual editing tools are widely used by sound engineers or audio professionals.
Method 2Equalization (EQ)
This is a method that gives one the possibility to equitably divide the frequency point of the sound. The best way to increase the intelligibility of the recording in question is to decrease the noise level, including low signals of background audio or a microphone.
Method 3High-Pass Filter
A high-pass filter is a very basic yet highly effective component of any noise reduction toolbox as it is specifically designed to get rid of low-frequency noises such as hum or rumble from recordings. That is why the high pass filter cuts all the frequencies below a certain point, mostly ranging between 80-120 Hz, thus eliminating unwanted low-frequency noise while at the same time making the speech or vocals clear and audible. Therefore, this technique is beneficial, especially when doing recording in environments with high levels of low-frequency interfering sounds.
Method 4Soundproofing and Proper Mic Placement
Preventing noise from entering the recording process in the first place is easier and more effective than trying to avoid it afterward. Proper insulation, in which one can purchase acoustic foam panels, carpets, or heavy curtains, helps to reduce echoes and other noise around the room. Recording should be done in the least noisy environment as much as possible.
Method 5Online Noise Removal Tool
If you are looking for a quick solution and don’t need complex options, there are many free online tools that can help remove noise. Services such as Audioalter and Auphonic allow you to go directly to your web browser to upload audio files and apply noise reduction. These tools are useful when dealing with minor tasks or in a time when the user has little time at his or her disposal; however, they are not as accurate or as infused with complex tools as the professional software.
Method 6Noise-Cancelling Microphones
The noise cancelling microphones are designed to capture the primary source of sound which more often than not is the speaker’s voice while reducing the volume of any other unwanted sound. It is commonplace in professional voice recording studios, podcasts, and video conference applications.
Part 3: How to Clean Up Audio Recording Using Audacity
Audacity is a Windows-based program for editing audio that is quite popular because of its free and open-source, has outstanding noise reduction tools and easy navigation. Ideal for first-time users and experts likewise, Audacity provides a strong set of functions for editing audio, suitable for removing background sounds, loudness, and improving sound quality.
Step-by-Step Guide to Cleaning Up Audio with Audacity
Step 1: Download and Install Audacity: To begin with, go to the official website (audacityteam.org), download the latest version of Audacity, and run it on your computer.
Step 2: Import the Audio File: Open Audacity and import your audio file through ‘File’ > ‘Import’ > ‘Audio’ or you can just simply drag and drop the file to the Audacity program you have opened.
Step 3:Select the Noise Profile: To remove any unwanted sound, one has to find a part of the audio that has only this kind of noise (for example, at the beginning or at the end of the file). This can be done by clicking the computer mouse and dragging the cursor over the focused section of the page. Secondly, go to “Effect” > “Noise Reduction” or press Ctrl + M and choose “Get Noise Profile.” This action helps Audacity to filter and pinpoint the sort of noise that you would want to reduce.
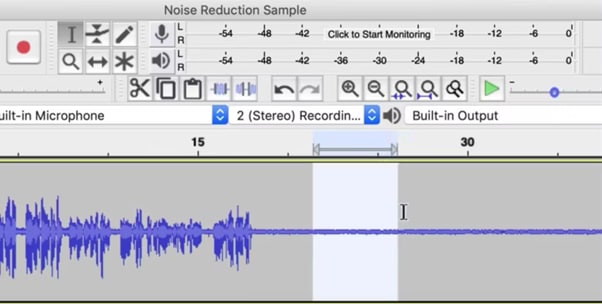
Step 4: Apply Noise Reduction: Once the noise profile is set, right click and choose 'get noise profile' again and select the whole audio track by clicking Ctrl + A or Command + A if you are on a Mac. Go back to "Effect"> "Noise Reduction," and you can change it to the preferred setting. Audacity provides three primary options:
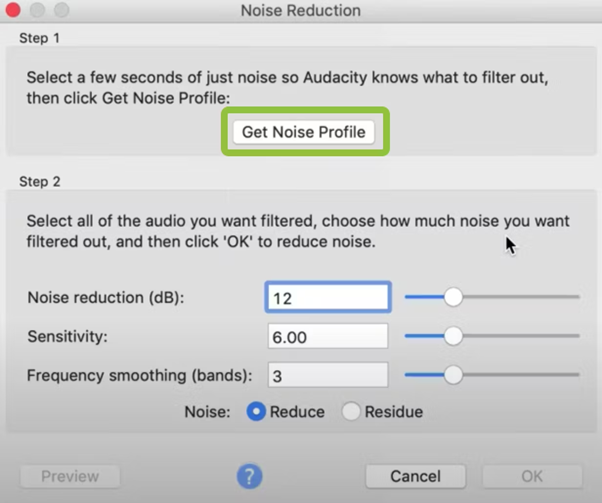
- Noise Reduction (dB): Regulates the amount of noise to be removed.
- Sensitivity: Defines what Audacity recognizes as noise.
- Frequency Smoothing: Minimizes distortion resulting from the noise reduction process. Modify these sliders as necessary and click "OK" to apply the changes.
Step 5: Preview and Export: After applying the noise reduction feature, play the audio to make sure it is audible enough. If changes seem necessary, you can reverse or change the settings of the specific influence. Once you are done with the cleaning process, follow the steps “File” > “Export” to export the cleaned audio.

Bonus: Real-Time Noise Cancellation to Enhance Your Recording Quality Instantly
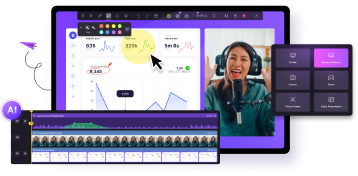
Democreator comes with an enhanced functionality for the real-time noise cancellation which enhances the quality of the audio recording. Whether you are recording podcasts, creating videos or just attending online meetings, Democreator promises a clear and very sharp sound without any interference from background noise.
Key Features of Democreator’s Noise Cancellation
- Advanced Ambient Noise Cancellation (ANC): Democreator uses sophisticated ANC algorithms to filter out environmental sounds including wind, typing, and background echoing. This functionality is especially helpful in environments where you need to maintain good audio quality, you do not have to correct the sound afterward.
- Real-Time Noise Reduction: Unlike traditional tools that require post-recording editing, Democreator offers noise cancellation throughout the entire recording process. This ability works as a safeguard where even the simplest hums, statics or other noises are sent back to the drawing board in order that you are not distracted while feeding your audience with content.
- Customizable Noise Reduction Settings: The program means that users can turn up or down the noise reduction or amplification ratio to increase control over the output quality. From the settings you can adjust to the surroundings thereby reducing the noise level while at the same time keeping the voice clear and audible.
Steps to Achieve Real-Time Noise Reduction with Democreator
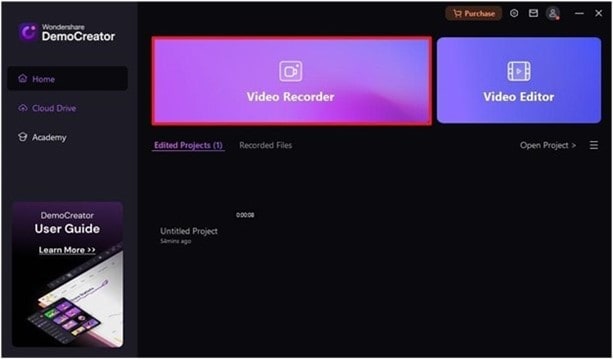
Step1 Access Video Recorder
Run the “DemoCreator” software on your computer and select the “Video Recorder” feature.
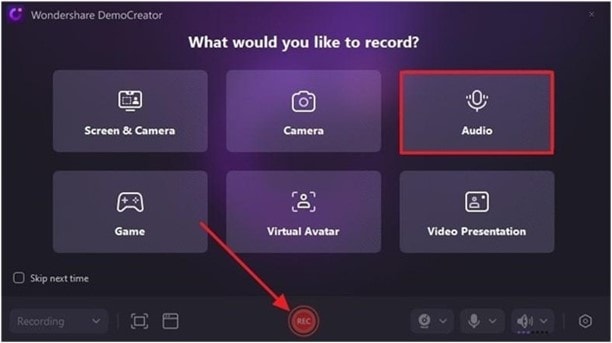
Step2 Select Audio and Hit Record
Next, select “Audio”. Then, click on the “REC” button to start recording your audio.
Step3 Preview Recording and Move to Advanced Editing
After you record the audio clip, click on the stop button and preview it.
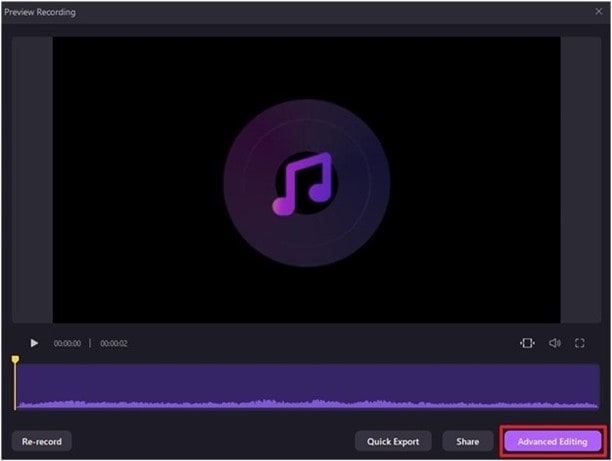
- If you’re satisfied with the recorded audio, click on “Advanced Editing”.
Step4 Adjust Recorded Audio
Drag and drop recorded audio to the timeline. Then, click on the “Magic Tools” tab at the top-right corner and choose “AI Voice Cleaner”.
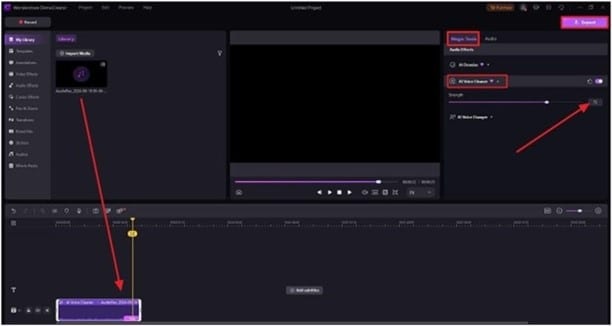
Step5 Export
After that, click on the “Export” button to save the file.
Conclusion
It is always crucial to ensure that while recording any type of audio, whether podcasts, videos, or voice messages you get the best quality sounds. Thus, using tools like Audacity and Democreator, one can easily clean up sound recordings and eliminate background noise in an audio recording for free over the Internet. The appropriate method and instrument will also enhance your content and will sustain the interest of the people.
FAQs
-
Is there an app to clean up an audio recording?
Yes, there are many apps that can be used to improve the sound of the recorded material. Many free software for audio editing exists; among them, the famous one is Audacity, which I find suitable for this purpose. Other potential options include Adobe Audition, which offers professional tools for editing, as well as services that can enhance sound and hush noises Auphonic.
-
Is there a way to remove background noise from audio?
Yes, several tools can be employed to strip ambient noise from audio tracks. Audacity's components, for instance, contain a noise-removal feature which is used to remove noise. In addition, there is Krisp and Democreator, which are online services that allow blocking noise in real-time during the recording process.
-
How to get a clear voice recording?
Depending on the quality of voice recording needed, it is preferred to use a professional microphone and record in a noise-free environment. The clarity can be further improved with the help of noise elimination applications like Audacity having noise reduction capability or applications having live noise elimination functions like Democreator which effectively removes all sorts of background noises and echoes.


