The current modern world has made content creation and virtual communication a lifestyle. Therefore, having high-quality audio can enhance work engagement and performance. Understanding the techniques to apply to make your sound better is crucial for anyone who wants to improve audio clarity, whether for Livestream events, podcasting, or YouTube video production. Poor mic quality is among the key contributors to misunderstanding, poor conversations, and lack of professionalism in the digital space.
This article will offer step-by-step guidance about the strategies on how to make your mic sound better, delving into various aspects, including noise reduction methods and adjustments of equipment. The guidance guarantees better audio output regardless of whether you need it for hosting a virtual meeting or screen recording.
In this article
Part 1: Why Does Your Mic Sound Weak?

When your mic produces poor-quality sound, it demonstrates unprofessionalism, which leads to frustrations and a lack of confidence. Understanding the common causes of weak mic performance is crucial in rectifying the mistakes for better quality and performance in the future. Some of these factors include:
- Low Quality Microphone: In some cases, the problem is the equipment. Different microphones are best suited for various uses. A low-end microphone can produce distorted sound leading to lack of interest in the content to the audience. While purchasing high-end equipment might be expensive, going for a mid-range alternative can help make a recognizable difference.
- Background Noise: Environmental noise is a major cause of poor audio quality. Sounds coming from rooms with echoes, traffic, and other machinery can affect your recording. These disruptive sounds make it hard to hear your voice.
- Wrong Positioning of the Mic: When microphones are placed in an improper position, even the best-quality mics may perform poorly. It is not advisable to place the mic too close to the mouth since it can pick up the breathing sounds. Similarly, placing the mic too far can lead to lack of clarity. Therefore, setting the microphone in the correct angle and distance can enhance production of professional audio.
- Improper Audio Setting: Incorrect sampling rates and gain levels can lead to the production of low sound output, which might not be clear to the audience. Many people ignore audio settings and end up with weak audio quality for their content. It is important to ensure that the mic is optimally set for better sound quality.
Part 2: 6 Proven Tips on How to Make Your Mic Sound Better
Fortunately, there are several tips you can use to achieve better Mic sound. In this part, we’ve shared 6 proven techniques that you can use.
1. Enhance Your Recording Environment
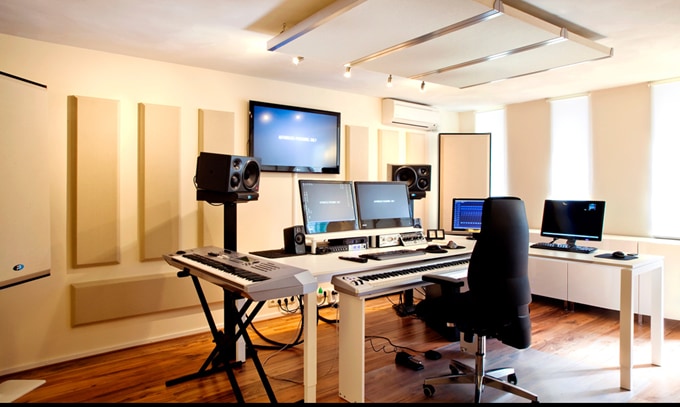
The space where you record your audio contributes to the quality of the sound. Recording in a noisy place or in a room with a hard surface can produce echoes that can be captured by the mic. You can solve this problem by looking for a quiet space or building a soundproof space. By building a soundproof room, I do not mean that you need to create a professional studio, but you can use simple techniques like positioning cushions around your recording space or hanging thick curtains that can help absorb sound and prevent it from bouncing back to the mic. Additionally, minimizing external sounds by keeping away from traffic areas or other running machines can greatly impact the quality of your audio. All these considerations can enhance the processing and enhancement of your audio, improving the overall audio quality.
2. Placing the Mic in the Right Position
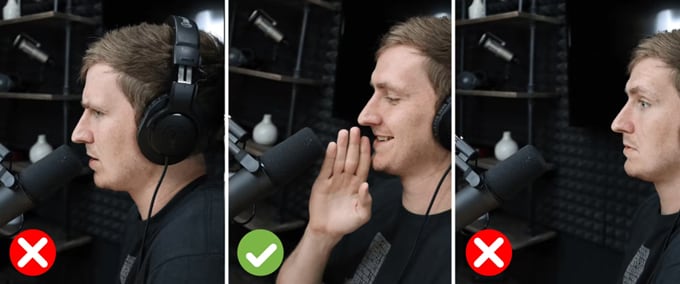
The position of a microphone can affect the quality of sound it traps. The best distance to place a mic is between 6 and 12 inches from the mouth, depending on the sensitivity level of the microphone. Placing the mic too far may lead to the capture of unclear sound, while taking it too close may add some noises caused by trapping breath noises and pops. To avoid capturing breathing, you can place the mic slightly aside; this works perfectly for dynamic microphones that, when positioned correctly, capture less background noise. Therefore, it is important to experiment with different angles and distances until you find the ideal position that offers optimal clarity.
3. Microphone Upgrade
Besides the use of optimal settings and recording spaces, a low-quality microphone still has its quality limitations. Upgrading to a better version can help you realize a change in sound quality. For example, USB microphones are known for their quality sounds, even without the need to invest in audio interfaces. However, top-quality options still exist that guarantee quality audio. It comes with advanced control systems that allow sound tuning, making it an ideal option for professional recording.
4. Use of Noise Reduction Software
It is possible for a microphone to still trap some noise, even in controlled spaces. In such cases, you can use background noise reduction software like Wondershare DemoCreators that helps to automatically reduce noise in real time. The software works well in screen recording sessions where background noise can distract your presentation. The software also helps refine audio by removing unnecessary noises to enhance clarity. There are other powerful editing tools like Adobe Audition that can be used to filter audio post-recording to ensure the sound is clear and professional. The different types of software are reliable in both real-time recording and when you need to edit the audio after recording to remove unwanted sounds.
5. Use of Pop Filters and Windscreen
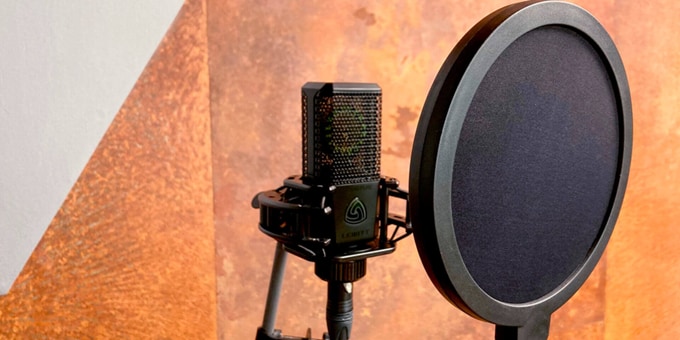
Many people overlook the function of pop filters in enhancing sound quality, yet they play an essential role in promoting microphone quality. It is a mesh screen that is placed between the microphone and the mouth. It helps reduce the sudden burst of sounds that happens when some consonants are pronounced, such as “p,” “k,” or “t.” The primary function of pop filters is to diffuse the spikes in sounds that may cause distorted audio into clear sounds. It is preferable for audio recording to be done in enclosed spaces. On the other hand, a windscreen is suitable for outdoor recording where air movement is experienced. The device prevents interference of the air with the microphone, thus eliminating unwanted sounds. These tools are readily available in the market at affordable prices and can help you elevate your audio quality to sound professional.
6. Tuning Your Audio Settings
You can achieve better audio quality from your microphone by fine-tuning the audio settings. The first step is adjusting the gain, which regulates the amount of signal picked by the microphone. When the gain level is high, there is more likelihood that you will experience unwanted sounds. On the contrary, when the gain is low, your voice might sound unclear or dissolve into background noise.
The sample rate is also a crucial consideration, with a higher sample rate being more effective in capturing audio detail and producing clear sound. Most of the microphones have all these settings allowing you to adjust them as per your preference. You can also use equalization to balance sound frequencies and make your sound more natural or noise gates that prevent the recording of background noises by automatically stopping recording when it detects no speech.
The Best Choice: Achieve the Best Mic Quality for Screen Recording

When it comes to screen recording, achieving high-quality audio is just as crucial as capturing clear visuals. Wondershare DemoCreator stands out as the ideal solution for enhancing microphone sound quality during screen recordings. What makes DemoCreator stand out is;
Superior Noise Reduction Technology
DemoCreator's AI-powered noise reduction feature automatically identifies and removes unwanted background sounds, ensuring crystal-clear audio in your recordings. This advanced technology effectively filters out common disturbances such as keyboard clicks, computer fans, and ambient noise, allowing your voice to come through with exceptional clarity.
Comprehensive Audio Enhancement Tools
Beyond noise reduction, DemoCreator offers a suite of audio enhancement features:
- AI Speech Enhancer: This tool improves voice quality, making narrations more crisp and professional.
- Voice Modulation: Adjust pitch and tone to add creativity or maintain anonymity in your recordings.
- Audio Syncing: Automatically aligns your voice recording with video content for a polished result
- User-Friendly Interface: Intuitive design allows for easy navigation and quick adjustments, even for beginners, ensuring a smooth and efficient editing process.
Steps to Achieve Noise Reduction with Democreator
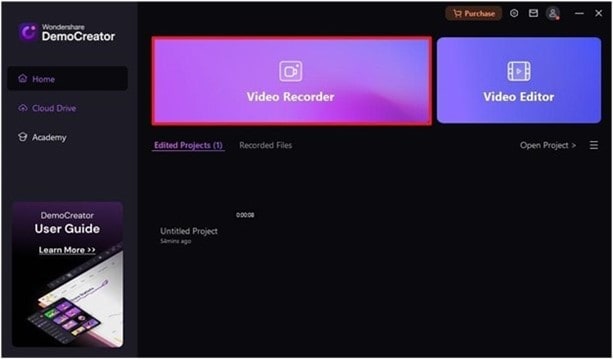
Step1 Access Video Recorder
Run the “DemoCreator” software on your computer and select the “Video Recorder” feature.
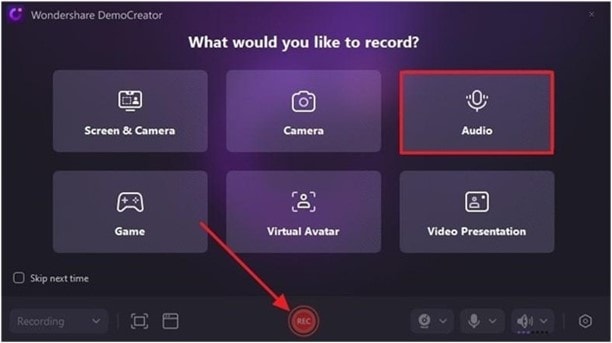
Step2 Select Audio and Hit Record
Next, select “Audio”. Then, click on the “REC” button to start recording your audio.
Step3 Preview Recording and Move to Advanced Editing
After you record the audio clip, click on the stop button and preview it.

- If you’re satisfied with the recorded audio, click on “Advanced Editing”.
Step4 Adjust Recorded Audio
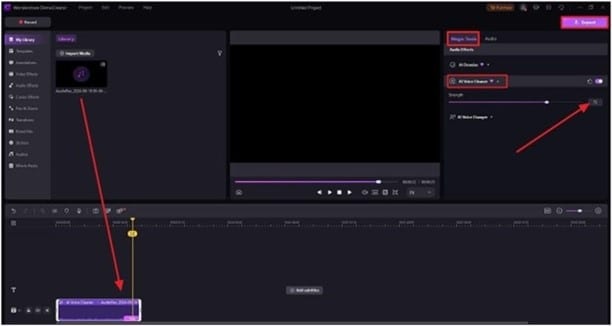
Drag and drop recorded audio to the timeline. Then, click on the “Magic Tools” tab at the top-right corner and choose “AI Voice Cleaner”.

Step5 Export
After that, click on the “Export” button to save the file.
DemoCreator's intuitive design makes it easy for both beginners and experienced users to achieve professional-grade audio. The software guides you through the process of optimizing your microphone settings and applying audio enhancements with just a few clicks.
Conclusion
Improving your microphone sound quality is not a complicated process; you just need to follow the above simple techniques. Some of the tips on how to make your mic sound better include setting it in the right position, using noise reduction software, and adjusting the settings to produce a clear audio output. Purchasing a better microphone device is also among the primary methods of how to improve mic quality.
FAQs
-
How do I get the best quality sound from my microphone?
To achieve the best quality sound, make sure you are placing your microphone at the right distance and position. The average distance should be between 6 and 12 inches away from the mount. Placing the mic too close can capture breathing sounds and pops that can alter the quality of output, while placing it far away can lead to a lack of clarity due to background noise. Additionally, make use of audio settings to enhance quality.
-
How can I fix a bad-sounding mic?
This can be done by repositioning the mic to see if you can get better results. You can also use auditing software to remove background noise. The use of external voice suppression tools has also demonstrated better results in audio output. Another alternative can be upgrading your microphone to a better version.
-
How can I improve the sound quality of my mic?
Purchasing a mid-range to high-quality mic is the first step to realizing better results. However, you can improve the sound by adjusting the mic settings or placement. The use of sound proofs is also a good idea that helps reduce background noises like echoes. The use of noise reduction software is also a reliable technique for making your sound clearer.


