The Blue Yeti microphone has gained a reputation for delivering high-quality sound at a relatively affordable price, making it a favorite among podcasters, streamers, and content creators. But simply plugging it in won't get you the perfect, professional sound you're aiming for. Like any piece of recording equipment, it requires a bit of fine-tuning and an understanding of how to use it correctly.
In this article, we'll guide you through how to use a Blue Yeti mic, providing tips on how to make the Blue Yeti sound better and eliminate background noise. Whether new to recording or looking to improve your setup, these strategies will help you unlock the microphone's full potential.
In this article
Part 1: How to Get Better Blue Yeti Microphone Sound – Best Settings

Achieving great sound with the Blue Yeti is not just about plugging it in and hitting the record button. The settings and environment in which you use the microphone play a critical role in capturing high-quality audio. Let's dive into the specific steps and adjustments you should make for the best sound possible.
1. Microphone Gain and Volume Settings
One of the most common mistakes people make when using the Blue Yeti is incorrectly adjusting the gain, which can lead to distorted, noisy recordings. Gain controls the microphone's sensitivity to sound, and setting it too high will pick up background noises like the hum of your computer or even footsteps from an adjacent room.
First, you want to set the gain to a moderate level—usually around 30-40%. If you're recording in a quiet room, this setting should capture your voice clearly without picking up unwanted noise. Always wear headphones when adjusting gain, as this lets you hear what the mic captures in real-time. If your audio sounds muffled, try increasing the gain slightly, but dial it back if you notice distortion or background noise creeping in.
Volume control is another crucial aspect. While the Blue Yeti has a built-in volume knob for monitoring your audio through headphones, this does not affect the recording level. Adjust the input volume on your computer or recording software to manage the actual recording level. Please set it to a level where your voice peaks in the middle range without maxing out or distorting.
2. Optimizing the Recording Environment
Your recording environment significantly impacts sound quality. Even the best microphones will struggle to deliver clean audio in a noisy or echo-filled space. Recording in a quiet room with soft surfaces helps minimize reverberation (echo) and background noise.
Here's how you can optimize your space:
- Choose a room with minimal echo: Smaller rooms with carpets, curtains, and soft furnishings will help absorb sound, reducing unwanted echoes.
- Reduce background noise: Turn off fans, air conditioners, and other noisy appliances. If you can, use noise-cancelling foam or blankets to block out any external noise.
- Proximity is key: Being closer to the microphone allows you to lower the gain and capture more of your voice while reducing room noise.
3. Microphone Placement and Distance
Positioning your microphone correctly is essential for capturing clear, natural audio. Place the Blue Yeti on a stable surface with a shock mount or stand to avoid vibrations from your desk or keyboard.
Position the mic 6 to 12 inches away from your mouth for best results. You can angle it slightly toward your face for a more direct pickup. This distance strikes a good balance between capturing your voice and minimizing unwanted sounds. Be sure to use a pop filter or windscreen to reduce plosive sounds (like "P" or "B") that can cause harsh bursts of air to hit the microphone and distort the audio.
Part 2: The 4 Modes of the Blue Yeti Microphone

One of the reasons the Blue Yeti is so versatile is its ability to switch between four different pickup patterns. Each mode is designed for specific recording scenarios, and understanding how to use them will allow you to tailor your recordings to other environments.
1. Stereo Mode
Stereo mode captures sound from the left and right channels, creating a more immersive experience. This mode is ideal for recording vocals or instruments in a way that replicates the natural spread of sound. For example, if you're recording a guitar, stereo mode will give a broad, rich sound that feels like you're right there in the room. However, this mode may capture too much room noise for voice recordings or podcasts, so use it primarily for music or soundscapes.
2. Omnidirectional Mode
Omnidirectional mode picks up sound equally from all directions. This mode helps capture group conversations, roundtable discussions, or ambient sounds. The downside is that it also picks up background noise, so it's only ideal for solo recordings if you're intentionally capturing a full-room soundscape.
3. Cardioid Mode
Cardioid mode is the most commonly used setting on the Blue Yeti, and for good reason. It focuses on capturing sound directly in front of the microphone, rejecting noise from the sides and rear. This makes it perfect for voiceovers, podcasts, and other solo recordings where you want to isolate your voice from background noise. Cardioid mode provides the cleanest, most direct sound for most applications.
4. Bidirectional Mode
Bidirectional mode captures sound from the front and back of the microphone while rejecting noise from the sides. This mode is perfect for interviews, duets, or any situation where two people speak or sing directly across from each other. Like stereo mode, it's unsuitable for solo recordings but shines in two-person setups where balanced audio capture is required.
Switching between these modes is simple: just use the knob located on the back of the Blue Yeti to toggle between the four different settings, depending on your recording scenario.
Part 3: Enhance Blue Yeti Mic Volume and Clarity with DemoCreator's Noise Cancellation
Once you've optimized your settings and environment, you might still find that background noise or audio clarity needs some improvement. This is where noise-canceling technology like Wondershare DemoCreator can enhance the Blue Yeti's performance.
Using Wondershare DemoCreator's noise-canceling feature can help strike the perfect balance between increasing the microphone's volume and eliminating background noise. This technology filters out ambient sound while enhancing the clarity of your voice, making it especially useful for podcasting, streaming, or virtual meetings.
Advantages of Combining DemoCreator's Noise-Canceling Technology with the Blue Yeti
By using DemoCreator alongside the Blue Yeti, you can clean up your audio in real-time. The software's noise reduction settings allow you to capture only what you want—your voice—while cutting out extraneous (external) sounds.
Here's why combining DemoCreator with the Blue Yeti is a game-changer:
- Real-time monitoring: With DemoCreator, you can monitor and adjust your sound levels while recording, ensuring you never accidentally record distorted audio.
- Customizable noise reduction: Depending on your environment, you can adjust DemoCreator's noise reduction settings to fit your needs. Whether you're in a quiet studio or a noisy room, the software ensures that the audience only hears your voice.
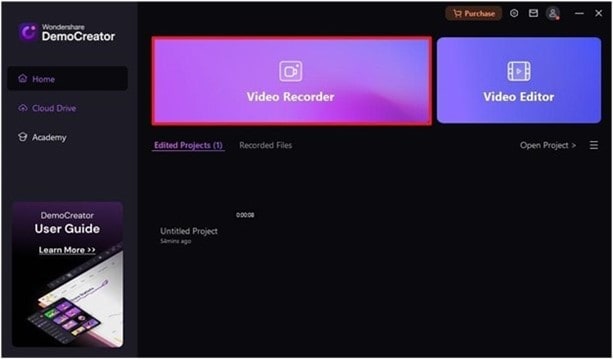
Step1 Get Access to the Video Recorder
Once you install the DemoCreator software on your computer, launch it and select “Video Recorder” from the main interface.
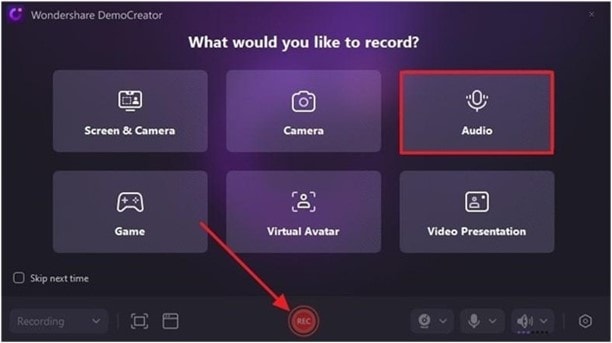
Step2 Choose Audio and Hit Record
In the new interface, select “Audio” and click on the “REC” button to start recording your audio.
Step3 Preview Recording and Move to Advanced Editing
Once you finish recording he audio, click on the stop button and preview the audio.
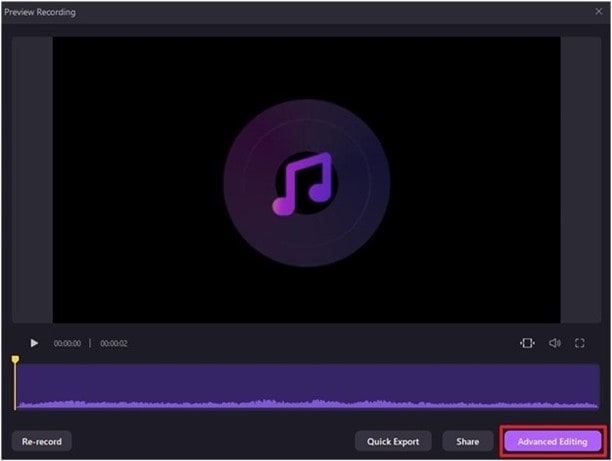
- After you preview the audio clip, click on “Advanced Editing”.
Step4 Drag Audio to the Timeline and Make Adjustments to Save to Device
Next, drag and drop the recorded audio to the timeline. Then, navigate to the “Magic Tools” tab and select “AI Voice Cleaner” to enhance the recorded audio clip.
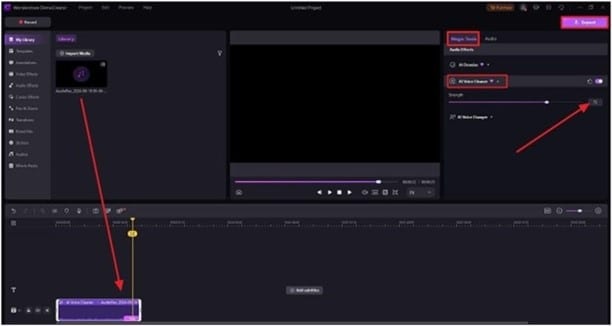
Step5 Export Audio File
Finally, click on the “Export” button at the top-right to save the recorded audio clip to your device’s local storage.
Conclusion
Learning how to use a Blue Yeti mic properly can drastically improve the quality of your recordings. From adjusting the gain settings and positioning the mic to selecting the right mode and using noise-canceling software, there are several steps you can take to enhance your audio quality. By following these guidelines, you can make your Blue Yeti sound better, ensuring clear, professional audio for podcasts, videos, and virtual meetings.
FAQs
-
How do I get my Blue Yeti mic to work?
To get your Blue Yeti microphone working, plug it into your computer using the USB cable. The device should automatically install the necessary drivers. Open your audio settings and select the Blue Yeti as your input device.
-
How to connect a Blue Yeti mic to a PC?
Connecting a Blue Yeti mic to a PC is straightforward. Use the USB cable to plug the mic into an available USB port. Go to your computer's sound settings, find the input devices, and select the Blue Yeti. You are all set.
-
What is the best way to use a Blue Yeti microphone?
The best way to use a Blue Yeti microphone is to set it to Cardioid mode for solo recordings, adjust the gain to avoid clipping or distortion, and position the microphone 6-12 inches from your mouth. Use a pop filter to reduce harsh plosive sounds like 'P' and 'B.'


