Annotations provide context for how something actually works. It helps the audience to understand what you’re offering to them. Using them will illustrate the design and how it will work in an active setting.
You can add an annotation to your videos. It's a bit time-consuming, but it'll give an exact idea to the viewers. To do this, you'll need software; premiere pro. Now you'll be thinking about how to use it.
In this article, we'll explain how to add annotation with premiere pro. We will also give a complete guide on using alternative software to add an annotation.
Let’s get started.
In this article
Premiere Pro
Premiere Pro is video editing software for creating great video content fast. It is a software application for video editing from Adobe Systems. It is used to edit videos, commercials, and other films, television, and online videos.
Premiere Pro includes audio editing functionality. This comprehensive video editing software application is available individually or as part of the Adobe Creative Cloud set of applications.
Moreover, it is used in conjunction with After Effects and Photoshop on creative projects. You can use this software on Mac OS or Windows computers.
Why you should add annotation with Premiere Pro
Whether you’re a beginner, switching platforms, or a self-taught editor that wants to learn to save time by understanding, Premiere Pro is for you. Learn how it works to start editing efficiently and professionally.
You can use this software in video production firms, news stations, marketing professionals, and design firms. Those working in roles such as video editors, production managers, marketing managers, and multimedia designers all use this tool to create and edit video content. It is developed by the software development firm Adobe Systems.
It is a leading industry editing software for filmmakers & media creators. You’ll save your time by eliminating the need for transcoding footage, seamless integration with other industry-standard programs like Photoshop and After Effects, and a sophisticated but familiar interface. A recent study revealed that over 90% of the world’s creative professionals use Adobe Creative Cloud.
If you are a beginner to Premiere Pro, you may need to know how text and title creation features can be used.
How to add an annotation in premiere pro
Many people find Premiere Pro one of the most robust software platforms, with a wide range of font selection options and text styles. It allows you to get some text and title templates from websites and animate titles to create a unique view.
The steps about how to add titles and text in Premiere Pro are mentioned below:
Step1 Import File
Open this software to build a new project: Click to open Premiere Pro on Windows or Mac. Then click File at the top > New > Project. Name your project, and then click OK. Import media by Double click on the left corner library. Then you need to drag your desired video file to the Premiere Pro timeline.
Step2 Adding text tool
Go to the top toolbar and click on Titles; a drop-down menu will appear from where you can select New Title > Default Still. A new title window will be displayed on your screen. Here you can find details about the video's width, timebase, height, and aspect ratio. Adjust settings and then press OK.
Step3 Text settings preview
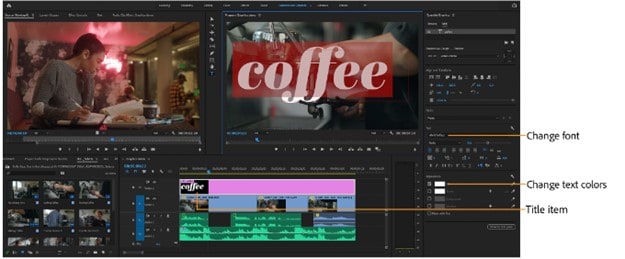
A pop-up window will appear on the right with a comprehensive collection of title designs. This tools panel will help easily select Type color properties, spatial transform properties, type alignment buttons, style fields of font, font family, and the selection tool. Here you can
- Enter a line of text
- Change the text color, font, position, size, and so on
- Change text color
- Change text position
- Change the transparency
- Text animation
- Change text alignment
Step4 Apply texts to timeline
After that, you just need to drag titles on a video clip available on the timeline. It's when you need to apply desired animation effects to your video clip. Users can also prefer adding more than one text overlay to every video clip.
Step5 Export video
In the end, if you are satisfied with the text, click File > Export > Media. You can also adjust the format and preset to do basic settings. Post it to Facebook, YouTube, and Vimeo directly. Then click Export in the right corner.
Premiere Pro annotation alternative
You can also use alternative software, Wondershare DemoCreater, to add annotations to your videos hassle-free.
Let's show you the details of how to use DemoCreator to add an annotation.
Wondershare DemoCreator

DemoCreator is a screen capturing and editing tool that allows you to capture whatever happens on your screen without hassle. It is a free and web-based software that offers multiple features.
Let's discuss this in detail.
Features of DemoCreator:
● Presentation Demo Mode
It allows you to present your PowerPoint, training, tutorial, and more. You can also add annotation, and a whiteboard when presenting.
● Record screen
It lets you record your screen activities whenever you want.
● Record with microphone
You can also record your audio with a microphone.
● Record with Webcam
With Webcam, you can record any video, whether a presentation, webinar, tutorial, or gaming video. You can capture a screen with a camera with this software.
● Cut/trim
You don't have to edit the whole video. It allows you to use the excellent feature of this software; cut/trim to keep the desired portion of the content.
● Combine
It enables you to combine multiple videos to create one.
● Add Captions
It lets you interact with the audience effectively by adding captions. In this way, deaf and those who speak another language will be able to understand the context of your video.
● Add Annotation
You can also annotate your content to highlight some essential points to the viewers for better understanding.
● Add Stickers
Videos should be entertaining so that audience doesn't get bored quickly. For this purpose, this software has prepared a variety of stickers with animation effects such as education, game, gif, etc. Add it into your videos and make your content compelling.
● Add Transitions
People attract more to natural things. It enables you to give your content a natural or relaxed look by adding transitions such as fading, blur, evaporation, etc.
● High-resolution videos
It provides you with high-quality videos.
● Record multiple screens
It enables you to record multiple screens simultaneously without any hassle.
● Record any video
It lets you create any video with DemoCreator, such as Promotional, Instructional, Testimonial, Interviews, Tutorials, Record lectures, Etc.
● Drawing tool
It lets you draw on your screen while recording, such as a pen, arrow, circle, highlighter, etc.
● Voiceover
You can record your screen while playing and add voiceover if you're a gamer. This way, you can show the world your gaming skills.
● Green screen technology
With the advanced and fantastic feature of DemoCreator, Green screen technology allows you to change the background.
● Virtual Webcam
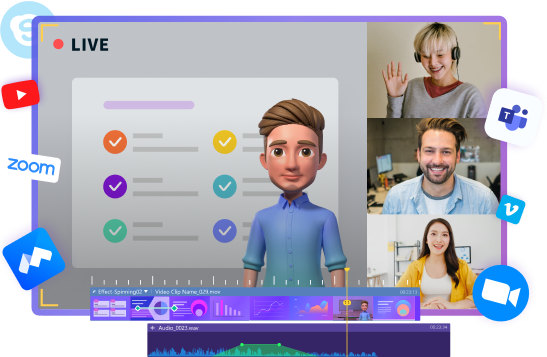
You can present virtually if you don't want to be in the video while recording demo videos. You can add the avatar of your choice and record the screen.
How to apply annotation with DemoCreator
1. Automatic video annotation/live video annotation
DemoCreator allows you to record your screen activities. You can annotate the screen while recording. For this, you'll need to visit the Website of Wondershare DemoCreator. Download the software and then install it. After installing, launch this software.
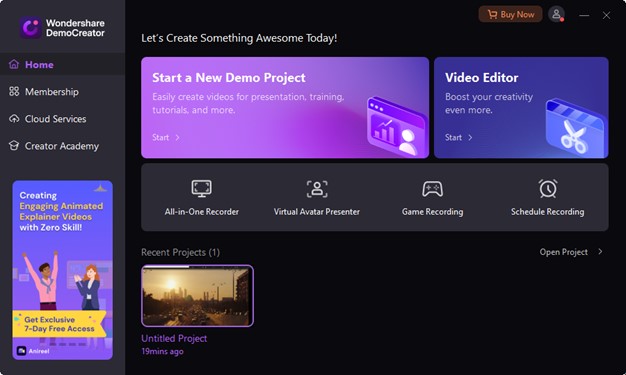
Then click on "All-in-One Recorder" Adjust the area; enable a microphone or Webcam if you want. After that, click on the big red button to start the recording. While capturing the screen, you'll see a recording bar. There will be many options to annotate the screen, such as
- Pen
- Highlight
- Text
- Circle
- Rectangle
- Arrow
- Line
Please select any of them to annotate the screen while recording it.
2. How to add text
You can add text to your videos. It will help let your viewers know what your video is about. You can also add a call to action (CTA) to encourage your audience to click on a link or a product page. It is helpful if you are creating marketing videos for social media.
You can easily add text through DemoCreator. For this
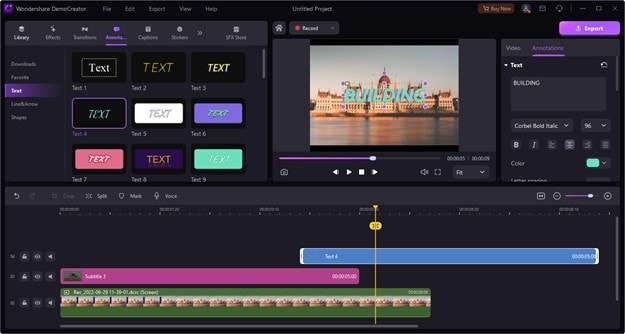
Open DemoCreator. Click on “video editor" to open the editor interface. It has four functional areas: media library, timeline, preview window, and properties window.
Go to the media library and import files from the computer by clicking the big + icon. Drag and drop it from the media library to the timeline.
From the top toolbar, click on "Annotation" to add text. There you will see options like text, Line&arrows, and shapes. Click on the text, and it will open the formats. Select the designs of your choice and write what you want to add to the reader.
3. How to add an opener
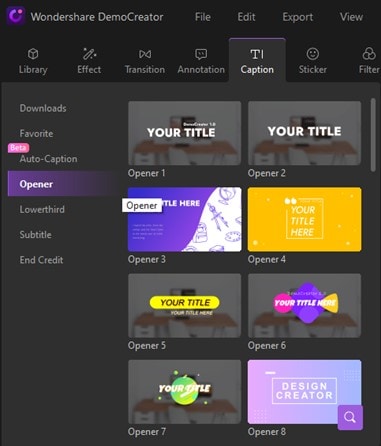
The opener is a caption that we add at the start of the videos to give the users idea about the videos. It consists of the introduction and title of the video.
You can add an opener to your videos through DemoCreator without any hassle.
Next to the annotation, you'll see the option of "Captions." Select it. You'll see multiple options such as auto-caption, opener, Lower-third, and End-credit. Click on "Opener," and it'll open a variety of formats. Please choose the desired option and add it to the video.
4. How to add lower third
The lower third is a text title or graphic overlay placed in the lower region of the screen. It is placed in the “title-safe area,” the part of the screen in which you can securely place graphics without them getting cropped.
In DemoCreator, you can add Lower-third in your videos effortlessly.
For this, select captions>Lower-third. You'll see different styles. Select one to add to the content.
5. How to add subtitle
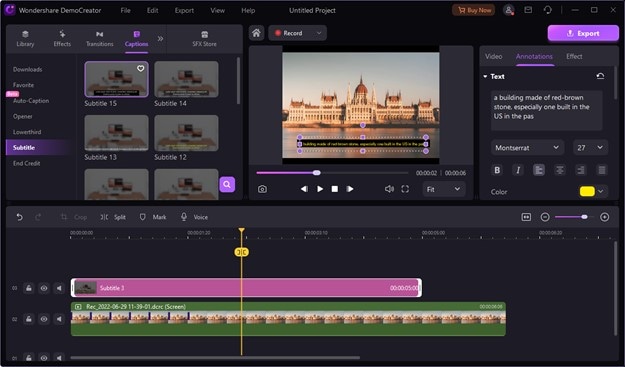
Some people watch the content and listen to it as well. But deaf people are unable to understand what's going on in the video. If your viewers aren't visual learners, they're not going to get as much out of your video. That's where subtitles come in so that everyone can understand the context.
In DemoCreator, you can add subtitles by clicking captions>Subtitles. Please choose the format of your choice and then add it.
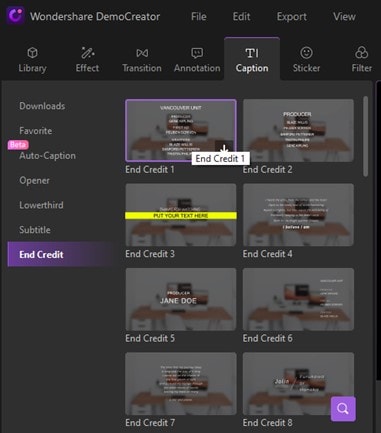
6. How to add end credit
End credits inform the viewers which studio or production companies were involved in making the content. They show the names of the major stars in the cast. The end credit appears after the film's last scene and lists everyone involved in the production.
Through DemoCreator, you can add it quickly. Click Captions>End Credit. Please choose your favorite format and add it to the film.
Conclusion
Premiere Pro is a video editing tool that offers powerful editing capabilities, many effects, audio editing tools, and a customizable editing interface. You can add annotation and captions to your videos to make them engaging.
Through captions, you can make your content more appealing. Your audience will quickly get your perspective as it will boost their attention. It also helps to increase the accessibility of your content.
You’ll need editing software to add annotations and captions to your videos. Premiere Pro is easy to use but becomes laggy sometimes, which can waste your time. The best alternative to it is Wondershare Democreator, as it is a screen capturing tool that offers multiple editing features. It's straightforward to use. It allows you to annotate the screen while recording.
Download this software and make your content more interesting for the viewers.
An essential demo-making tool that helps learners, educators, freelancers, and gamers to take idea-sharing to the next level.
