
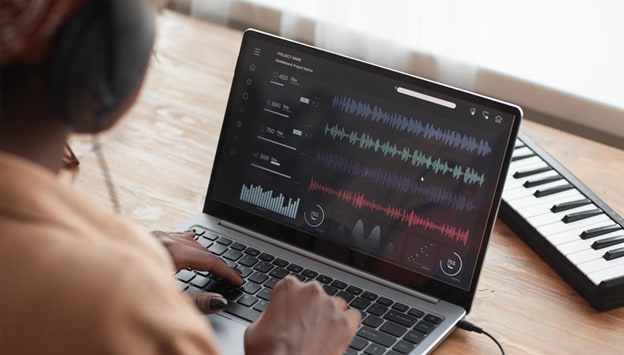
If you're publishing on YouTube, a little background music goes a long way in keeping viewers hooked!In this guide, we’ll walk you through how to insert background music in a video, how to sync audio seamlessly, and how to adjust volume levels for a polished final product. With the help of Wondershare DemoCreator, a beginner-friendly video editing tool, you can effortlessly add background music to videos and enhance your content professionally.
In this article
Part 1: How to Choose the Right Music for Your Video
Here are five essential tips to help you select the best music for your project. Start by matching the music to your content's purpose: use upbeat tracks for energetic vlogs or product demos, subtle instrumentals for tutorials to avoid distraction, and cinematic scores for dramatic storytelling. Always align the tempo with your video's pacing—fast cuts pair well with high-energy beats, while slower scenes benefit from mellow melodies. Most importantly, ensure the music supports your message without overpowering key moments like voiceovers. Stick to royalty-free sources (like YouTube's Audio Library or DemoCreator's built-in tracks) to avoid copyright issues. Finally, test multiple options—the right track should feel natural and elevate your video's impact. Remember, great music doesn't just sound good; it makes your entire production more professional and compelling.
Part 2: How to Add Music to a Video Legally & Effectively
Before learning how to add a song to a video, it’s crucial to understand music licensing laws to avoid copyright issues. Using copyrighted music without permission can lead to demonetization, content removal, or even legal consequences. To keep your videos safe, here’s how to legally source royalty-free music for your projects.
1. Use Copyright-Free Music Libraries
There are many platforms offering free and licensed music for content creators. The YouTube Audio Library provides a variety of free tracks that can be used in YouTube videos without restrictions. Epidemic Sound offers a large collection of high-quality tracks with commercial licensing. Websites like Bensound provide both free and premium music for different video styles.
2. Understand Licensing Terms Before Using Music
Music licensing varies depending on the source. Creative Commons (CC) Music allows free use but often requires attribution to the creator. Royalty-free music involves a one-time purchase, allowing unlimited usage in multiple projects. Licensed music requires special permissions or payment for commercial use, meaning you must buy a license or obtain direct approval.
3. Avoid Using Copyrighted Music Without Permission
Many new creators mistakenly use popular songs in their videos, assuming it’s allowed. However, YouTube’s Content ID system automatically detects copyrighted music and can flag, mute, or demonetize your content. To prevent this, always check the music source and use legally approved tracks.
4. Use Wondershare DemoCreator’s Built-In Music Library
To make sourcing music easier, Wondershare DemoCreator provides a built-in library of royalty-free tracks that can be directly added to your videos. This feature eliminates the risk of copyright claims, allowing you to use high-quality background music without worrying about legal issues.
5. Verify Music Licensing for Commercial Use
If you plan to use music for monetized content, advertisements, or brand promotions, make sure the track is cleared for commercial use. Some platforms offer free music for personal projects but require a license for business-related content. Always read the terms of use and choose the appropriate licensing option to avoid legal troubles.
Part 3: How to Add Music to a Video with DemoCreator: A Step-by-Step Guide
Adding background music to a video doesn’t have to be complicated. Wondershare DemoCreator is an intuitive video editing tool that makes it easy to import, edit, and sync music seamlessly. Whether you need to add background music for a tutorial, vlog, or presentation, DemoCreator offers a built-in music library, advanced audio mixing features, and user-friendly editing tools to create professional-quality videos. With its drag-and-drop functionality, customizable sound effects, and precise volume control, even beginners can enhance their videos effortlessly.
Step 1Preparing to Add Music
To begin, open Wondershare DemoCreator and load your video project. Navigate to the Audio Library, where you’ll find a selection of royalty-free music tracks that can be used directly within your video. If you prefer to use an external music file, make sure it is in a supported format (MP3, WAV, or AAC). Selecting the right track that aligns with your video's mood is essential for creating a cohesive viewing experience.
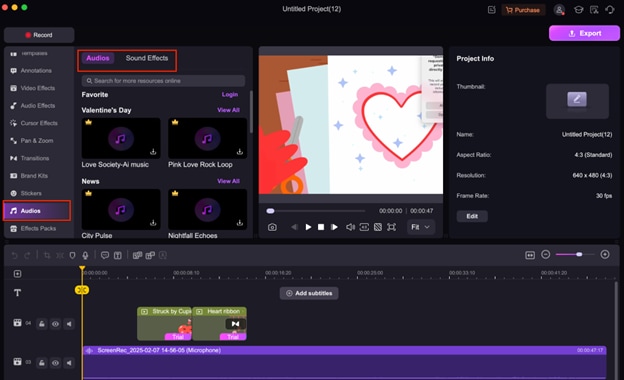
Step 2Accessing Music Resources
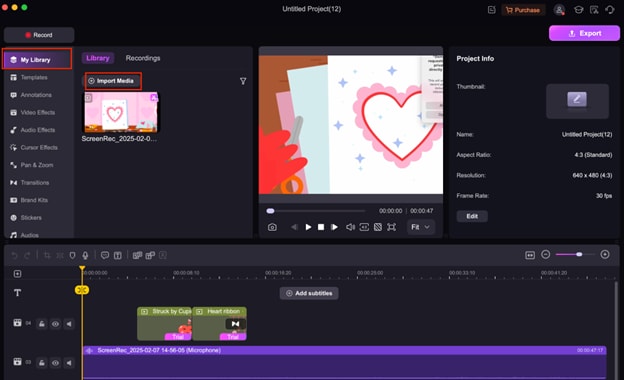
DemoCreator provides multiple ways to add music to your video. If you’re using its built-in audio library, browse through the available soundtracks and preview them before selection. If you have your own music, click on Import > Add Music File and choose your audio file from your device. Once imported, the file will appear in your media library, ready to be added to your timeline.
Step 3Adding Music to Your Video
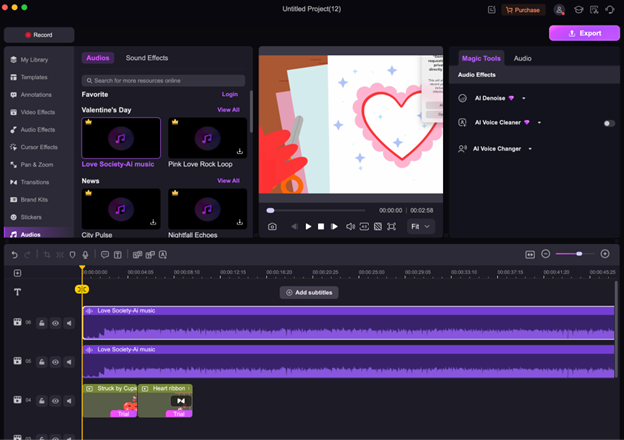
Once you have selected your music, drag and drop it onto the audio track in the timeline. You can position the music file precisely where you want it to start playing within the video. If your video is longer than the music track, you can loop the track or extend it using DemoCreator’s seamless audio editing features. If the music should start at a specific scene, adjust its placement accordingly for a smooth transition.
Step 4Editing and Syncing Music
To make your music sync perfectly with your video, DemoCreator allows you to trim, cut, and align your audio track with the visuals. You can use waveform analysis to match beats with transitions, ensuring that your background music complements the on-screen action. Additionally, use the fade-in and fade-out effects to create natural audio transitions, preventing abrupt starts or stops in the music.
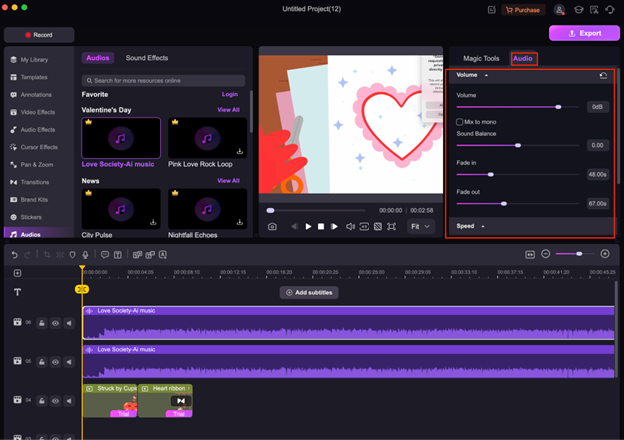
Step 5Adjusting Audio Levels
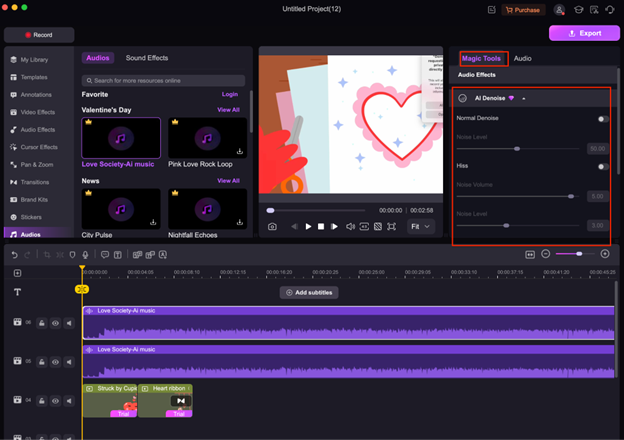
Balancing background music with narration or dialogue is crucial to ensure clarity. DemoCreator’s Audio Mixer allows you to adjust volume levels for each track, preventing background music from overpowering the main audio. If your video has voiceovers or important speech, reduce the music volume to maintain a clean and professional sound mix. The tool also provides AI noise reduction options to remove unwanted background noise from recordings.
Step 6Final Touches and Export
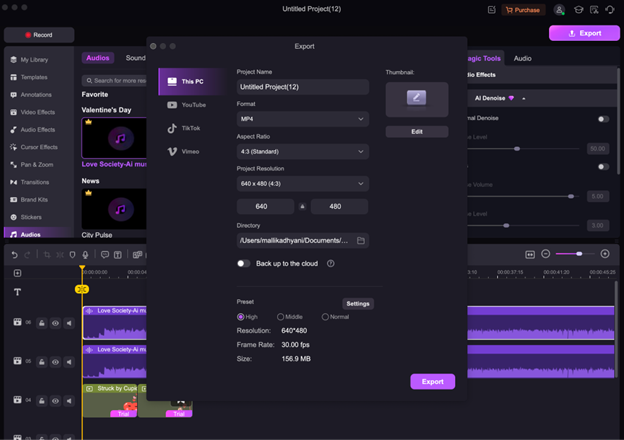
Before finalizing your video, play it back to check the music timing, transitions, and overall sound balance. Adjust any last-minute elements such as volume tweaks, additional sound effects, or alternative background tracks if needed. Once you’re satisfied, click on Export, select the appropriate video format, and ensure that the audio settings are optimized for high-quality playback. Now, your video is ready to be shared on YouTube, social media, or any other platform with perfectly synced background music.
Part 3: Tips For Final Audio Checks
Before finalizing your video, it’s important to review and fine-tune the audio to ensure clarity, balance, and a smooth listening experience. Here are some essential tips to help you achieve professional-quality sound in your videos.
- Check Volume Levels – Ensure background music doesn’t overpower dialogue or main sounds.
- Listen on Different Devices – Test the audio on headphones, speakers, and mobile devices.
- Ensure Smooth Transitions – Use fade-in and fade-out effects to avoid abrupt music cuts.
- Remove Background Noise – Apply noise reduction to eliminate unwanted sound distractions.
- Balance Multiple Audio Tracks – Adjust voice, music, and effects to create a clean mix.
- Sync Audio with Video – Make sure music and effects align correctly with visuals.
- Check for Audio Distortion – Avoid overly loud or muffled sound that reduces quality.
- Use Captions/Subtitles If Needed – Ensure accessibility for viewers who may watch without sound.
Conclusion
Adding well-chosen, well-mixed background music to your videos enhances engagement, sets the mood, and creates a more immersive viewing experience. Whether you’re making tutorials, vlogs, or cinematic content, the right music can elevate your storytelling and make your videos more memorable. A carefully balanced audio mix ensures that the music complements rather than overpowers your dialogue, making your content sound polished and professional.
Don’t be afraid to experiment with different musical styles, tempos, and effects to find the perfect match for your video. Try adjusting audio levels, syncing beats to transitions, and incorporating creative sound effects to enhance the overall production quality.
For a seamless audio editing experience, Wondershare DemoCreator offers an intuitive platform to easily add, edit, and fine-tune music in your videos. With its built-in music library, volume control tools, and noise reduction features, DemoCreator ensures your videos sound as professional as they look. Start exploring its features today and create videos that captivate your audience!
FAQs
-
1. Can I use multiple music tracks in one video?
Yes, you can use multiple tracks in a single video by layering them on different audio tracks in Wondershare DemoCreator. Adjust the volume and transitions between tracks to create a smooth audio blend. -
2. What is the best file format for background music in videos?
The most commonly supported music formats for video editing are MP3, WAV, and AAC. WAV files offer higher quality, while MP3 files are smaller in size and widely compatible. -
3. How can I fade in or fade out background music?
Wondershare DemoCreator allows you to apply fade-in and fade-out effects to music tracks easily. Simply drag the fade handles in the timeline to create smooth audio transitions. -
4. What should I do if my background music is too short for my video?
If your music track is shorter than your video, you can loop the track, extend it, or use multiple tracks to fill the duration. DemoCreator provides tools to seamlessly repeat or blend tracks for a natural effect. -
5. Can I remove vocals from a song to use only the instrumental version?
Yes, some advanced tools and AI-based software allow vocal isolation to extract instrumental versions of songs. However, for copyright-free options, it's best to find royalty-free instrumental tracks in platforms like the YouTube Audio Library or Wondershare DemoCreator’s built-in library.


