If you're looking to bring your video projects to life, mastering panning and zooming techniques in Adobe After Effects is essential. These techniques not only enhance your storytelling but also add dynamic movement and focus to your videos. Whether you're a beginner or a seasoned editor, understanding how to effectively pan and zoom can elevate the quality of your work. This step-by-step guide will walk you through the process, from mastering precision zooms to creating smooth pans using the Ken Burns effect. Let's dive right in!
In this article
Part 1: Mastering Zoom In and Out in After Effects: Key Tips & Tricks
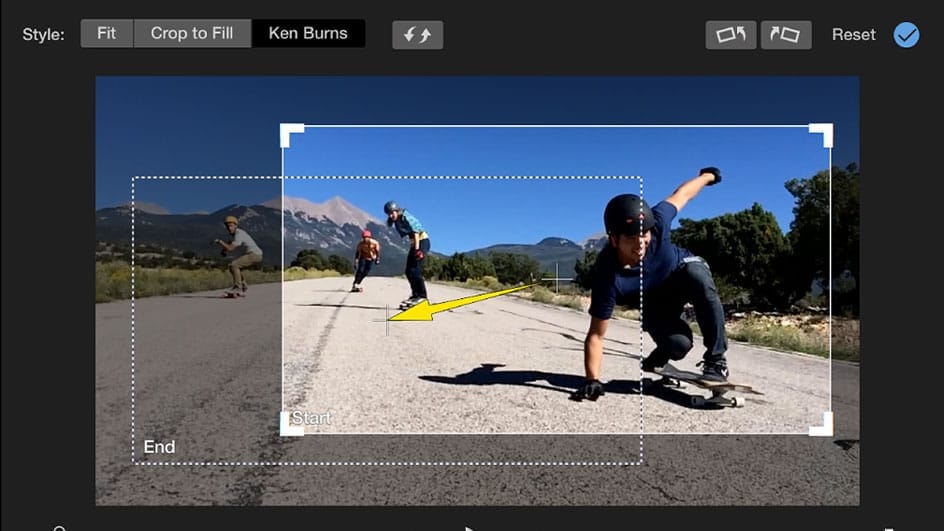
Achieving precise and professional zoom effects in After Effects requires a combination of technical knowledge and creative finesse. Here are some key tips and tricks to help you master the art of zooming:
1. Start by Setting the Anchor Point
The Anchor Point determines where the zoom will focus, and it is crucial for directing attention to specific parts of your frame. To set it correctly, do the following;
- Select the layer you want to zoom.
- Use the Pan Behind Tool (Y) to move the anchor point to your desired location.
- Ensure you set the anchor point before adding any keyframes to avoid unwanted movement.
2. Utilizing Keyframes
Keyframes are the foundation of smooth zoom animations. By setting keyframes for the Scale property, you can dictate when and how fast the zoom occurs. Here is how to do it;
Set your initial keyframe at the start of your desired zoom effect.
- Move the playhead to where you want the zoom to end.
- Adjust the scale property to create your zoom effect.
- Fine-tune the timing by adjusting keyframe positions in the timeline.
3. Enhancing with Easing
Easing adds a natural, smooth motion to your zoom. Here is how you can do it;
- Select your keyframes in the timeline.
- Right-click and choose "Keyframe Assistant" > "Easy Ease" for a basic smooth effect.
- For more control, use the Graph Editor to customize the easing curve.
4. Avoiding Zoom Blur
Avoid common pitfalls like Zoom Blur by keeping your zoom speed consistent and subtle. Abrupt changes can result in unwanted blur. Use the Graph Editor to fine-tune motion paths and speed for a polished look. These techniques will enable you to achieve precise and professional zoom effects effortlessly.
5. Optimizing Performance
For smoother previews and faster rendering:
- Use the "Region of Interest" tool to focus on the area you're zooming.
- Lower the preview resolution while working, then switch to full resolution for final renders.
- Consider using proxies for high-resolution footage.
6. Creative Applications
Experiment with different zoom techniques.
- Combine zooms with pans for dynamic Ken Burns-style effects.
- Use masks to create reveal zooms that gradually uncover parts of your image.
- Try zooming in on one element while zooming out on another for a parallax effect
Part 2 :How to Smoothly Pan and Zoom (Ken Burns effect) in After Effects
The Ken Burns effect is a popular technique that combines panning and zooming to create engaging visual narratives. It's widely used in documentaries and photo montages to highlight details and guide the viewer's eye. To apply this effect in After Effects, you'll work with the Position and Scale attributes.
Here is a detailed step-by-step guide to use the Ken Burns effect in After Effects;
Step1Import image first
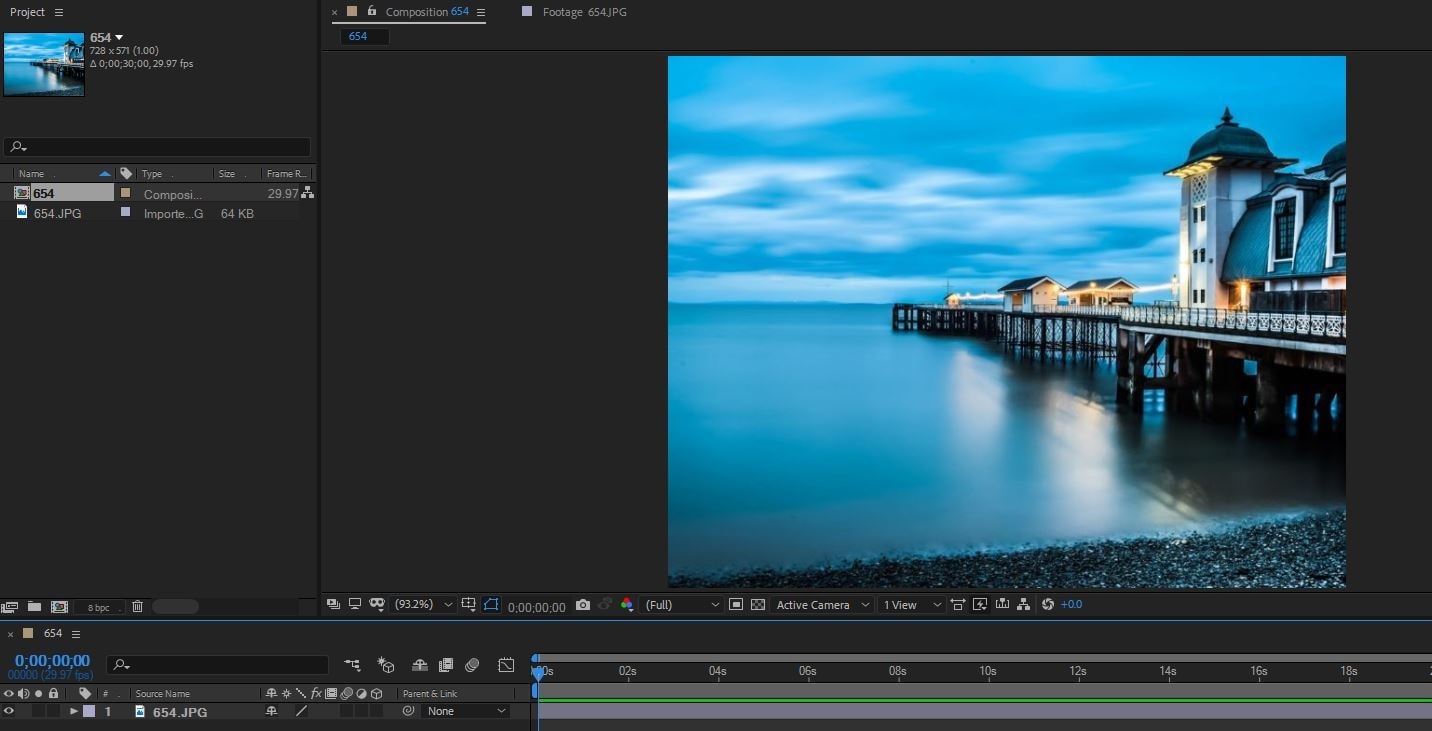
Run the “After Effects” program on your computer and start a new project. Then, click on “File” and import the file into the project file.
- It is advisable to use high quality images to prevent your video from looking blurry after it is zoomed.
Step2Scale and position the image
Press the S and Shift + P to get scale and position. Then click on the stopwatch icon next to “Position” and “Scale.”
- After that, move the playhead around 2-10 seconds. In this guide, we moved the play head two seconds ahead.
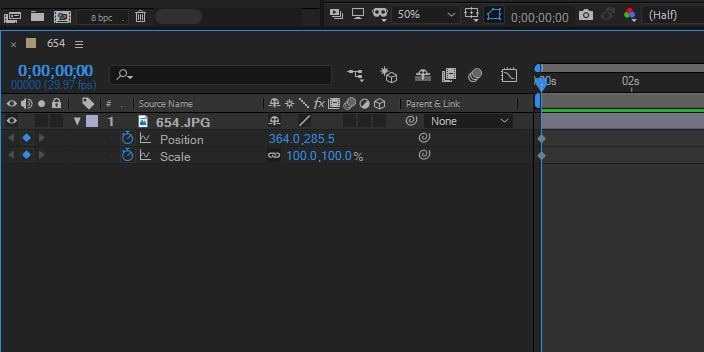
- After that, scale the image to a preferred direction. Then, click on the grey dot in the preview window to drag it in one direction.
Step3Save changes
Once you’re done, play the effect to preview it. Then, export the output file to your computer’s local storage.
Part 3: How to make a glitch effect in After Effects?
To create a glitch effect, duplicate your layer and apply the Turbulent Displace effect. Here are the steps to follow;
Step 1: Create “New Project” and import the “Video” you want to use to make a glitch effect.
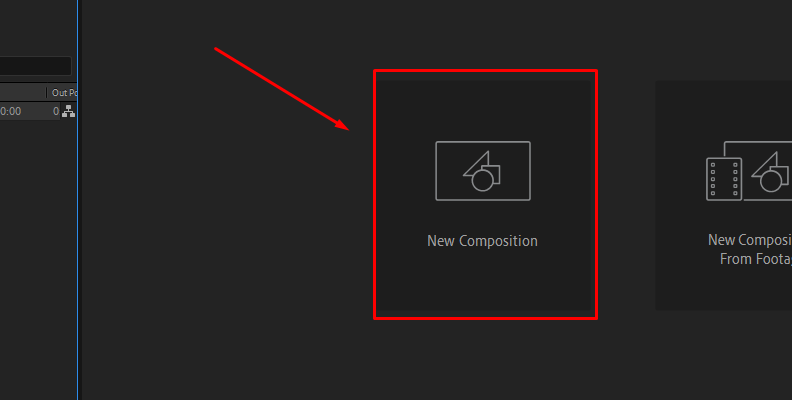
- Once you import the video, pre-compose the source video to change the composition source, adjust transform properties, etc., to the source image if you need to without affecting the glitch effect.
Step 2: Next, add the “BCC+ Video Glitch Effect”. To do this, select "Layer" "New" and "Adjustment Layer."
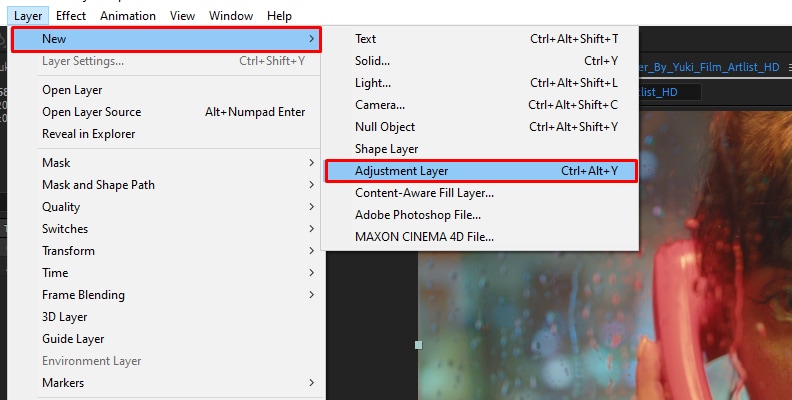
- Then, navigate to the Effects & Presets panel and use the search box to type "BCC+Video Glitch" or locate it under the BCC Stylize category in the effects library.
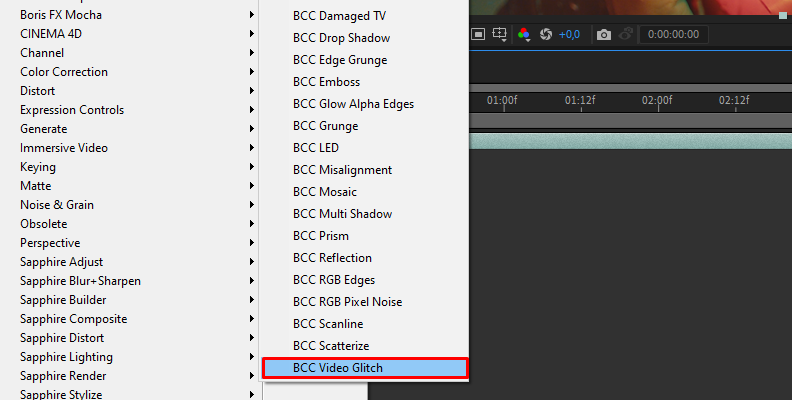
Step 3: Once you apply the effect, apply other relevant settings to make the video look more attractive. Then, save and export the video output file.
Bonus: A Simpler Way to Pan and Zoom— DemoCreator
While After Effects offers powerful tools, software like DemoCreator provides a more user-friendly approach to panning and zooming. DemoCreator is designed for creating quick and engaging video content with minimal effort. Its intuitive interface and pre-built templates make it accessible for beginners and professionals alike.
DemoCreator also offers additional features like annotations, transitions, and screen recording, making it a versatile tool for creating tutorials and presentations.
Overall all, DemoCreator streamlines the editing process, allowing you to focus on creativity rather than technical details. Its user-friendly interface and extensive features make it a valuable addition to any editor's toolkit.
Key Features
- Offers thousands of built-in creative assets, ranging from video to text and audio effects.
- Boasts many trendy templates that you can use to beautify your videos.
- Supports various sharing options, including popular social media platforms and YouTube.
- Built-in collaboration tools for teams to work on video projects together easily.
Steps to use DemoCreator to Pan and Zoom videos;
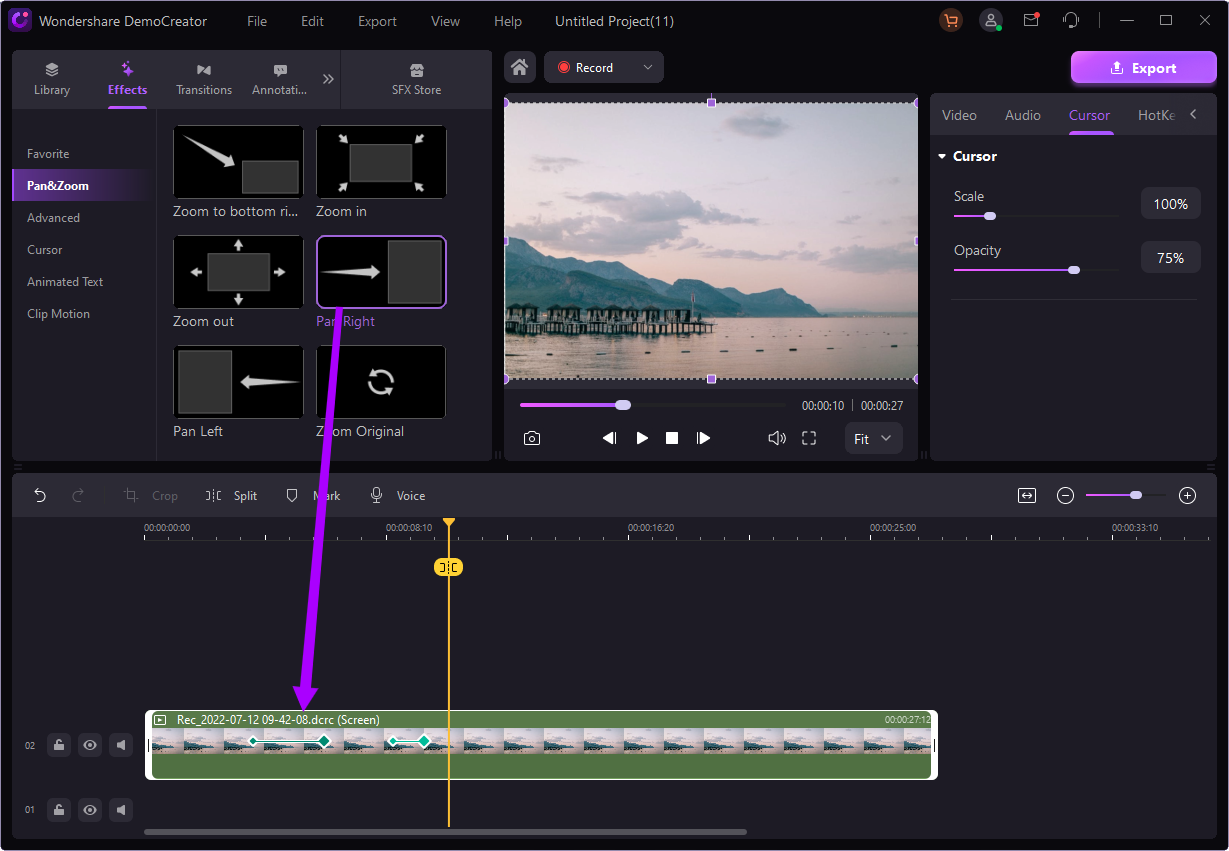
Step 1: Launch “DemoCreator” on your computer and import the video or image(s) that you’d like to use to pan and zoom.
Step 2: Drag and drop the uploaded media to the softwar’s timeline.
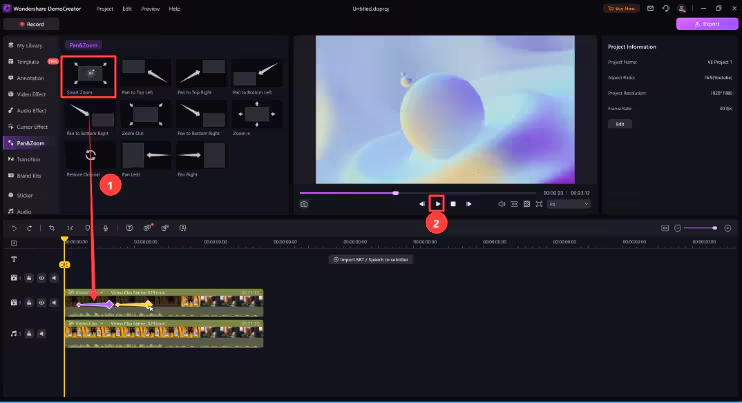
Step 3: Select “Effects” feature from the left side of the tool’s interface.
- Find the “Zoom In” effect option and drag and drop it onto your clip in the timeline.
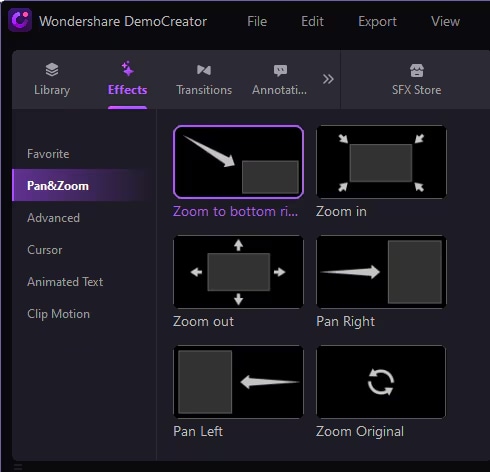
Step 5: Use the slider to adjust the effect according to your needs. Then, apply other edits like stickers and lots more to make the clip more captivating.
Step 6: Finally, preview the output and use the “Export” button to save the file.
Conclusion
Whether you're working on a professional video project or a personal montage, the pan and zoom effects can significantly enhance your storytelling abilities. Adobe After Effects provides powerful tools for precision and creativity, while DemoCreator offers a simpler, more accessible alternative. By incorporating these techniques, you can create engaging and dynamic videos that captivate your audience.
FAQs
-
What is the difference between the pan tool and the zoom tool?
The pan tool allows you to move the view of your composition without altering its content, while the zoom tool magnifies or reduces the view of the timeline or composition window without affecting the actual size of the content.
-
What is the pan and zoom effect?
The pan and zoom effect, often referred to as the Ken Burns effect, involves moving the camera smoothly across an image while simultaneously zooming in or out. This creates dynamic visual interest and highlights important elements within the frame.


