
Reversing videos is a popular editing technique that adds a creative and eye-catching effect to your content. In this guide, we'll show you how to reverse a video in CapCut step-by-step, making it easy to enhance your footage with minimal effort.
Whether you're a beginner or an experienced video editor, CapCut provides a user-friendly platform for reversing videos on your mobile device or PC. Additionally, we’ll explore why CapCut’s video editing is so popular and suggest Wondershare DemoCreator as the best alternative for those seeking advanced editing capabilities. Let’s dive in and learn how to reverse video in CapCut effortlessly!
In this article
Part 1: Why Reverse a Video?
Reversing a video can be one of the most fun and creative ways to enhance your footage. Whether you're editing for social media, making tutorials, or creating fun videos, the reverse effect can bring a fresh perspective to your content. In this guide, we’ll walk you through how to reverse a video in CapCut, step by step. Additionally, we’ll explore Wondershare DemoCreator as an alternative for those who require advanced video editing features.
Reversing a video is a powerful tool in video editing, and it’s widely used for various creative purposes. It can help:
- Highlight key moments: Reversing footage can bring attention to specific actions or create unique effects.
- Create creative effects: The reverse effect can add a touch of magic, as seen in many viral videos and ads.
- Add fun elements: Videos with reversed content are often more engaging and entertaining, perfect for social media platforms.
CapCut has emerged as a popular choice for many video editors, offering intuitive and user-friendly editing tools that make video reversal a breeze. CapCut’s reverse video feature is particularly favored by beginner editors for its simplicity and accessibility.
Part 2: When to Use Reverse Video Effects
The reverse video effect is a popular editing tool that can add a creative and dynamic touch to any video. It's widely used in various types of video content, making it an essential technique for anyone looking to elevate their editing style. Here are some key moments when reversing a video can be especially effective:
1. Social Media Content
Reversing a video is a trendy effect that can increase engagement on social media platforms like TikTok, Instagram, and YouTube. These platforms thrive on unique content, and the reverse effect often stands out. Whether you're editing a funny moment, a dance sequence, or a product unboxing, adding a reversed video can capture attention quickly.
2. Gaming Clips
In gaming clips, you can use the reverse effect to emphasize action sequences, highlight funny glitches, or showcase incredible moments in a creative manner. Reversing gaming videos often adds a unique twist and captures the viewer's interest.
3. Music Video Edits
Music videos often use reversed clips for artistic expression, adding an element of surprise and creativity. Whether you're editing a clip for a professional music video or just for fun, the reverse effect is a go-to tool for video editors.
4. Tutorials & How-To Videos
Reversing video footage can be particularly effective in tutorials and how-to videos, where you want to break down a complex process in a visually engaging way. For example, showing an action in reverse can highlight key steps and help reinforce the message, making it easier for viewers to follow along.
5. Time-Lapse & Transformation Videos
The reverse effect is often used in time-lapse and transformation videos to highlight the 'before and after' of a project. Whether you're showing a DIY project or a makeover, reversing the footage can reveal the transformation in a captivating and unexpected way. This visual surprise keeps viewers hooked.
Part 3: How to Reverse a Video in CapCut
Reversing a video in CapCut is a simple and fun way to add a creative twist to your footage. Whether you're a beginner or a seasoned editor, CapCut offers an intuitive platform to help you achieve this effect effortlessly. Here’s a step-by-step guide on how to reverse a video in CapCut:
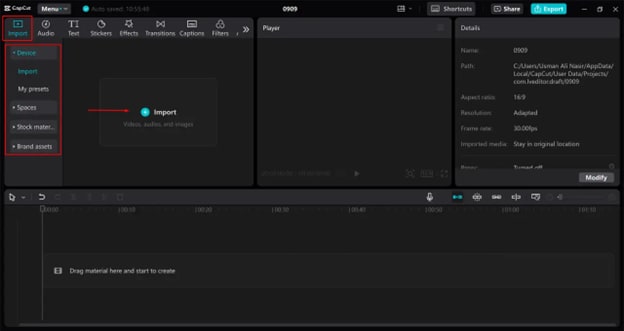
Step1Open CapCut and Import Your Video
The first step in reversing your video is to import it into CapCut. To begin, open the CapCut app on your mobile device or PC and create a new project by selecting the “New Project” option from the home screen. Once you’re inside your new project, tap on the “+” icon to add the video clip you want to reverse from your device’s gallery. After importing the video, it will appear on the timeline, and you’re ready to move to the next step of editing.
Step2Select the Clip to Reverse
Next, you’ll need to select the part of the video you want to reverse. If you want to reverse the entire video, you can skip trimming. Otherwise, tap on the video clip timeline to highlight it and isolate the portion you want to reverse.
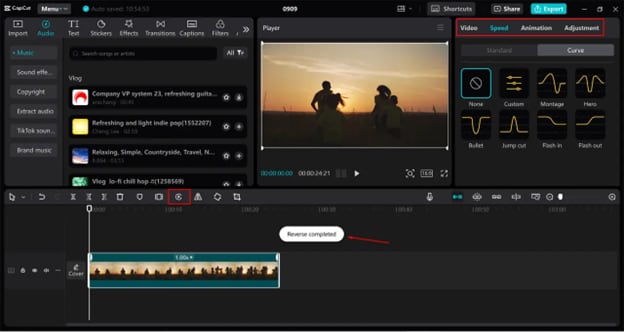
Tap on the clip in the timeline to open the editing tools. Scroll through the available editing options and locate the "Reverse" button. Once you find it, simply tap on it to apply the effect to your selected video clip. CapCut will automatically reverse the footage, making the video play backward. You can preview the effect by pressing the play button to see how the reversed clip looks.
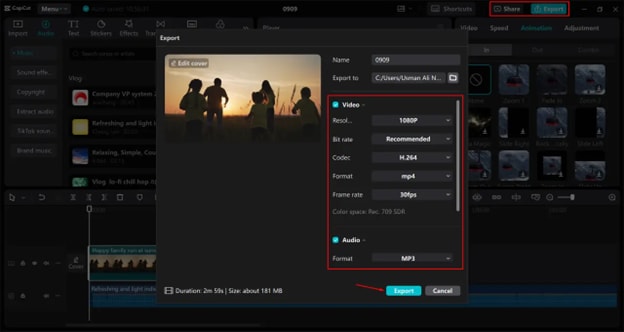
Step3Preview & Export
After applying the reverse effect, it’s important to preview your work to ensure it meets your expectations. Play the video to check if the reverse effect is working properly, and if the playback speed needs tweaking, you can adjust it. Once you’re happy with your reversed video, it’s time to export it. Tap the "Export" button located at the top right of the screen to begin the export process. Choose your preferred video resolution and format, then hit the "Export" button to save the video to your device. Your reversed video is now ready to be shared on social media or used in your projects.
Part 4: Why CapCut’s Reverse Feature is Popular
CapCut has become one of the top choices for video editors, especially beginners, due to its simple yet powerful editing tools. Here are some reasons why CapCut’s reverse video feature is so popular:
1. Ease of Use: CapCut is designed with simplicity in mind. The reverse video feature can be applied in just a few taps, making it accessible for anyone, regardless of their editing experience.
2. Free Access: CapCut is completely free to use, providing users with a powerful editing tool without the need for a subscription or hidden fees. This makes it an ideal choice for users looking for a cost-effective video editing solution.
3. Wide Range of Editing Features: In addition to reversing videos, CapCut offers a variety of other editing tools such as trimming, adding music, applying filters, and more. This makes it a versatile tool for various video editing needs.
4. Seamless Integration with Social Media: CapCut integrates seamlessly with platforms like TikTok, Instagram, and YouTube, making it easy to create and share content directly from the app. The reverse video feature, in particular, is perfect for adding eye-catching effects to your social media posts.
5. Fast Processing Speed: CapCut processes video edits quickly, allowing users to apply the reverse effect and see results almost instantly. This makes it convenient for content creators working under tight deadlines.
Part 5: DemoCreator – The Best Video Editing Tool For The Reverse Videos

While CapCut is an excellent tool for basic video editing, some users may find that they need more advanced features for their video projects. Wondershare DemoCreator is a powerful video editing tool that offers more precision and customization options, making it an ideal choice for creators who want to take their video editing to the next level.
Key Features of DemoCreator:
- High-Quality Reversal: DemoCreator ensures that your video’s resolution remains high even when applying effects. This means that you won’t lose any quality, even when reversing high-resolution videos, making it ideal for professional-level content creation.
- Precision Controls: With DemoCreator, you get greater control over the video speed, allowing you to fine-tune how quickly or slowly your reversed video plays. This feature offers more creative freedom compared to CapCut’s simpler speed adjustments, letting you achieve a more polished and customized result.
- Additional Editing Tools: DemoCreator provides a comprehensive suite of editing tools, including advanced audio editing, brightness adjustments, and the ability to add captions and transitions. This makes it a one-stop-shop for creators looking for all-in-one functionality without needing to switch between multiple tools.
- Multi-Track Editing: DemoCreator supports multi-track editing, which means you can layer different video, audio, and effects tracks. This is perfect for more complex projects where you need to combine several clips or add various effects simultaneously, including the reverse video effect.
- Customizable Effects and Filters: In addition to the reverse feature, DemoCreator provides a wide range of customizable effects and filters. Whether you’re adding motion blur, adjusting contrast, or applying special visual effects, you have the flexibility to personalize your video and create a more unique result.
Step-by-Step Guide to Video Editing in DemoCreator
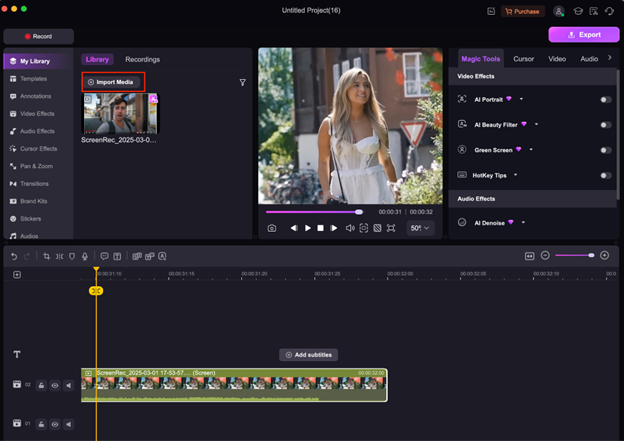
Step1Import Your Video
Open Wondershare DemoCreator and create a new project. Click on “Import Media” to upload your video files. Once imported, drag your video onto the timeline to start the editing process.
Step2Edit Your Video
Use DemoCreator’s editing tools to trim, cut, and arrange your clips as needed. You can also add text, transitions, effects, and adjust the audio to enhance your video. Play around with these features to refine your content and make it visually appealing.

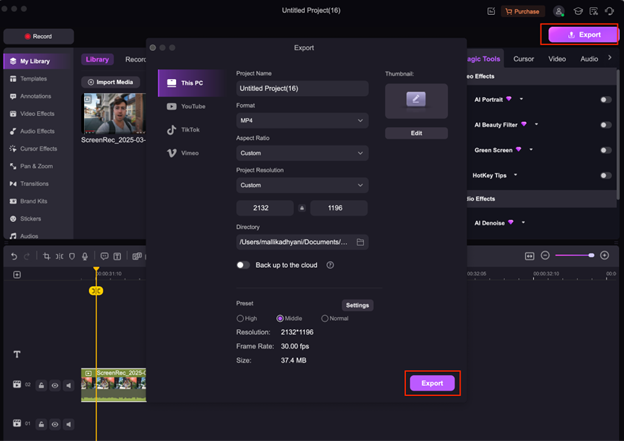
Step3Export Your Edited Video
Once you are satisfied with your edits, click on the "Export" button. Choose the desired file format, resolution, and other export settings, then click "Export" to save your video. This will generate a high-quality version of your edited video, ready for sharing.
Conclusion
In conclusion, reversing videos is a fantastic way to add creativity and fun to your footage. CapCut makes this process incredibly easy, offering an intuitive interface and seamless social media integration for both beginners and casual creators. However, for those seeking more advanced controls and editing options, Wondershare DemoCreator offers an excellent alternative, providing precision tools and high-quality reversal effects.
Whether you are a beginner or an experienced editor, you can easily reverse a video in CapCut and DemoCreator to suit your needs. As both platforms continue to evolve, DemoCreator will soon introduce more video reversal features directly within the app, enhancing its capabilities even further.
FAQs
-
Can I reverse multiple clips in a single video using CapCut?
Yes, CapCut allows you to reverse multiple clips individually. You can apply the reverse effect to each clip or section of the video as needed.
-
Can I add audio to a reversed video in CapCut?
Yes, CapCut lets you add or adjust audio even after applying the reverse effect. However, you may need to trim or synchronize the audio to fit the reversed video correctly. For more precise control over both video and audio, DemoCreator is a better option, as it allows for advanced audio editing and synchronization, ensuring the audio complements the reversed video perfectly.
-
an I use the reverse video effect on slow-motion footage in CapCut?
Yes, you can apply the reverse effect to slow-motion clips in CapCut, allowing you to create unique visuals by reversing slow-motion footage.


