
Wondershare DemoCreator
Essential demo-making tool that helps learners, educators, freelancers and gamers to take idea-sharing to the next level.

Online transactions have become the standard as technology has progressed. Almost everything is done online now, as a result also to the Pandemic's aftermath. Our shopping habits, attendance at classes and meetings, and a variety of other activities. Furthermore, people conduct business, market themselves, and communicate entirely online. Were forced to conform to the new societal norms as a result of this. In this article, we will explore why you will need an event presenter.
Online Presentation is one of the technical norms that we will discuss in this article. Presentations over the internet were already popular before the outbreak. You may have previously attended a number of them. But what is the significance of this? What are the benefits? What are the steps to creating one? We'll cover everything in this essay. Let us get this party started.
A virtual presentation is usually a speech or discussion that has been planned ahead of time. It is prepared beforehand. A virtual event presenter is in charge of hosting the event. It's not uncommon for a group of individuals to prepare for it. With all of its visual aids and infographics, it provides you with information. It presents a new method of communicating with various audiences. These talks are given in a variety of locations for various events.
Significance of virtual event presenters and presentations
The situation has altered. Expert tournaments will not be held on the same scale again until 2023. We may expect social separation and safety precautions to stay in place for years to come, even as events gradually return to in-person. As a result, virtual events will remain an important aspect of your event strategy for a long time.
Virtual events are a secure and efficient method to carry on with your event planning. Furthermore, virtual events offer numerous benefits to both organizers and attendees.
Virtual events meet people where they are. And they are effective. When you go virtual, you're taking your event to the homes and offices of anyone interested. There is no need for anyone to worry about finding time to attend.
Virtual events are effective because they provide a variety of attendance options. Because virtual events allow you to be more flexible with your time commitment. Offering a virtual or in-person event allows folks who might not otherwise be able to attend to do so. Even if it is only for an hour or two.
Virtual events are beneficial because they lower the financial commitment to attend. Attendees would no longer spend much to attend events. With lower overhead costs for virtual events, you can offer tickets for a lower or no cost for your audience. Lower ticket prices are yet another benefit for potential attendees, enabling individuals who otherwise would not have considered attending. Further, lower ticket costs help to break down barriers of knowledge and information.

How to use DemoCreator to edit your virtual event presenter
DemoCreator is a simple screen recording program developed by Wondershare Technology on its own. It's ideal for capturing PowerPoint presentations, lessons, and anything else that happens on your Windows screen. To edit, we'll use DemoCreator.
Voice-over
Making how-to and explainer films with voice-over is one of the most popular and inventive ways to do so. This is to make a video have lots of views on YouTube and other e-learning social media sites. It's a simple way to sell products and services without having to reveal your face. Educational, instructive, and informative videos frequently use voice-over.
You may easily make a compelling voice-over video. Here's a step-by-step tutorial on using the Wondershare DemoCreator program to make a professional voice-over video.
Step1 Get Wondershare DemoCreator Video Editor and install it.
Step2 Check to see if your recording device is properly connected to your computer.
If your recording device is a smartphone, attach it to your computer with a lightning wire. You must ensure that the cable is properly connected to both devices to avoid being interrupted when recording.
Step3 Select Quick Capture from the drop-down menu.
You'll need to conduct a fast capture with your Wondershare DemoCreator video editing software once your recording device is securely connected to the PC. To quickly capture your screen with the app, open it and select Quick Capture from the menu.
Step4 Turn off the screen recording feature.
The default setting for screen recording in Wondershare DemoCreator video editor is full screen, but you may alter this by dragging the border to vary the size of the region, then clicking + dragging the red circle that appears on your PC screen to move your recording zone. Using the short key combination Shift + F, you can return to full-screen mode.
Step5 Turn on the microphone recording
To activate Mic recording in Wondershare DemoCreator video editing software, go to audio configuration and choose between your computer and microphone as the source of audio recording. To prevent audio recordings, select the 'Don't Capture' option next to the Computer icon.
Step6 Start Recording
To begin recording with Wondershare DemoCreator, press the F10 key on your keyboard to begin recording the screen of your device. You can also stop the recording by pressing the same key. It's worth noting that screen capturing takes roughly 3 seconds to begin and that the F9 button can be used to pause recordings. Keep these points in mind when you use the app. When the recording is finished, it will save to the designated destination automatically.
Select auto caption language
All of the videos in the timeline will be transcribed once you press the "Start to Recognize" button, which will take up your entire account length. So, before you begin the transaction, double-check the video you added to the timeline.Save the video
To export your video, click the export option.
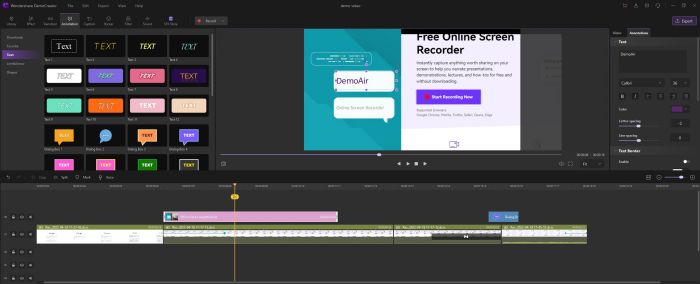
Annotation
By adding text, a dialog box, a line, an arrow, a doodle, or a form to your annotations, you may send essential messages to your visitors. You'll learn how to Add/Remove Annotations, Copy and Paste Annotations, and Customize Annotations in this section.
● Annotations can be added or removed.
Switch to the Annotation tab and choose a category from Text, Dialog box, Line&Arrow, Sketch, and Shapes to add an annotation to your video. You can now preview the annotation by double-clicking it and dragging it to the timeline or Preview Window.
Select an annotation on your Timeline or in the Preview Panel and press the Delete key on your keyboard to remove it. You can also delete the annotation by right-clicking on it and selecting Delete.
● Annotations can be copied and pasted.
Simply right-click an annotation on the timeline and pick Copy from the sub-menu to copy it. Then move the Playhead to a new spot on the timeline, right-click it, and choose Paste from the sub-menu.
● Annotations can be changed.
The Properties Panel on the right allows you to customize your annotations by changing the settings or changing particular characteristics such as text content, text border, text-shadow, transform, shape, and behavior (for text animation).
Shape - Fill/Border: Go to the Properties Panel under the shape option to adjust the color, opacity, and border size of the annotations' shape. Changing the Duration of an Annotation: To change the duration of an annotation, drag the annotation's left or right edge on your timeline.
Stickers
Stickers are useful for conveying emotions or telling stories. You'll learn how to add stickers, change the Sticker, and receive more stickers in this part.
● Add
For example, you might wish to include an animated heart in the instructional.
Switch to the Sticker tab in the left Tools panel and select the Animation category.
Hover your mouse over the stickers to see a preview and select your favorite. Drag it to the place on the timeline where you want it to appear.
● Modify the Sticker
Transform - Resize/Rotate/Re-position: Go to Properties Panel > Transform and use the parameters to resize, rotate, and re-position the sticker. Similar changes can be performed directly in the Preview Panel. Simply choose the sticker and make changes to the blue bounding box.
● Get more Stickers
If the default stickers don't match your needs in certain situations, use the Tools Panel to search for the theme and download additional materials from the Effect Store. The supplied stickers will show in the Sticker Library (Sticker > More) once the template has been downloaded.
Get the Wondershare DemoCreator application and install it.
So there you have it.

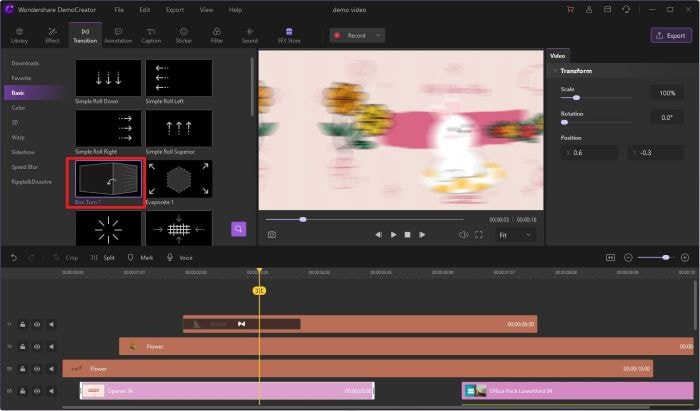
Video Transitions
Video transitions create a tone for improved engagement and provide a storyboard for your video fragments. It keeps your viewers glued to your videos. We'll go over how to apply transition effects to your videos in this section of the article. This will set our films apart from those of our competitors.
Step1 Open the media file and import it.
Now that you're in the Wondershare DemoCreator interface, select the Import icon, which will take you to your PC's file explorer. Choose the files and video clips you'd like to include in your video creation.
To add the files to the DemoCreator's media section, click the open button.
Step2 Remove any unneeded video segments.
The beauty of Wondershare DemoCreator is that after you add your video clips to the timeline, which is the editing area for your video clips, you may trim and crop them.
You can edit the chosen video clip into small fragments by selecting it and cutting it into small clips. You can also trim the video clips to the length and period you want them to appear in your main video.
Step3 Incorporate transitions
Simply go to the Transitions menu on the left side of your software interface and do the following:
Select your preferred transition. You may now preview the completed video and correct any issues with the synchronization of the clips and transition effects after adding the transition effect to your video clips.
Step4 Editing the video
Simply choose the video clip within the timeline you want to polish with this software's editing features to lead into the edit settings of your video clips. You now have several options available on the right side of the screen, including Transform and Composition.
Step5 Add the music and adjust the timer.
The music you've added to your video production is now the most important aspect of your final editing process. Wondershare DemoCreator has made it simple and convenient for you.
You can add your selected music files to your videos at the same time as the video clips and incorporate them into the timeline. You may also drag and clip the audio file to match the video activities and ensure that it is fully synchronized with the time.
Animations
You can add text animations to your films by going to the Annotations menu on the left and selecting the best option.
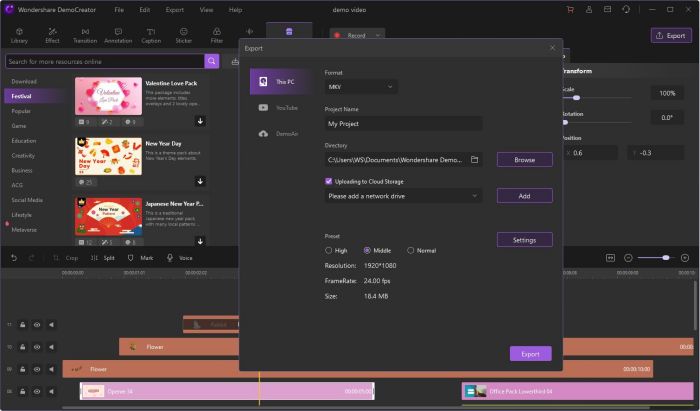
Export Video to Local
Click the export button in the top right corner to save your video to your computer. Then choose the format and other video options. You can also rename the video and save it to a different location on your computer. DemoCreator currently supports WMV, MP4, MOV, AVI, GIF, and MP3 as output formats.
Conclusion
DemoCreator is a multi-purpose program for screen recording and video sharing. This software can record screens at up to 120 frames per second. In your virtual event presentations, this is a very useful tool. This assists the visual presenter in effectively communicating messages and information. We should bring the perfect instruments with us as we go forward with the new norms.
Related FAQs
1. What is closed captioning?
As explained earlier, closed captions in a video can be enabled or disabled as required, and can even be formatted for improved visibility or to match the theme of the video. Closed captions for a video are saved in an independent file, typically with the *.srt extension.
2. How to deal with the auto-caption process failure?
While making auto-captioning, you can try to stop the transaction process if the program fails to recognize it. Then launch and sign in to the software again and check your transaction time.
 Secure DownloadSecure Download