
You’re probably looking for ways on how to take a screenshot on Android or record the screen on your Android phone or PC. You can capture a screenshot or take a video of the screen to show someone what you want them to see – be it an error message, a picture, or a tutorial to do something.
Let’s get started.
Why Need to Take Screenshots and Record the Screen on Your Android Device
Screenshots or screen recordings are useful in many instances. Below are some of the reasons why you need to take video of the screen or capture a screenshot on your Android device.
#1 Taking screenshots can be helpful when you want to save important information or share something with your friends.
#2 Screenshots are useful if you want to show someone exactly what you can see on your screen – for example, something that might be hard to describe in words. If a picture is worth a thousand words, then a screenshot is worth ten thousand.
#3 You'll need to take a screenshot when you want to capture a picture of what's on your screen. This is especially handy if you're trying to report a problem or error with your computer, for example, if a website isn't working properly or an app keeps crashing. That way, you can send the screenshot along with a description of the problem to whoever needs to solve it. It's an easy way to explain the issue rather than trying (and probably failing) to explain it in words.
#4 If you're a content creator, it's almost certain that you'll have to record your phone screen at some point. Whether you are recording gameplay or making a screencast for a tutorial, the process to take video on screen is easier than on Android devices.
How to Take A Screenshot of Your Screen on Your Android Device
Screenshots allow you to capture what's on your screen and save it as an image. With a screenshot, you can quickly share a picture of your screen – for example, something funny or interesting that you found online – and save it for future reference.
The method to take screenshots on nearly all Android devices is similar. However, some Android devices or smartphones have different methods to capture screenshots. It’s easy to capture a screenshot of the screen on your Android device; all you need to do is press the Power and Volume Down buttons simultaneously.
There are two common methods across different Android devices:
Method 1: Hold down the power and volume-down buttons for a couple of seconds.
Method 2: Swipe the screen with three fingers.
Method 3: Capture the Android Screen with Scrolling Screenshot
Method 1: Step-by-step Guide on How to Take Screenshots on Android with Some Buttons
Step 1: Unlock your phone and go to the screen on which you wish to take a screenshot.
Step 2: Press the Power and Volume Down buttons simultaneously.
Step 3: Wait for the screen to flash, which indicates that a screenshot has been taken.
[Notes for Method 2] If you're using Android 4.0 and above, the second method isn't available (though some manufacturers have introduced their own gesture shortcuts). Regardless, the first method works on all devices running Android 3.0 and above.
Method 3: Step-by-step Guide on How to Take Screenshots on Android with Scrolling Screenshot
You can take a scrolling screenshot only if you’re using Android 12 or above. Follow the below steps to capture a scrolling screenshot.
Step 1: Open the screen that you want to capture.
Step 2: Press the Power and Volume down buttons at the same time.
Step 3: At the bottom, tap Capture more.
Step 4: To select the content you want to capture, use the crop guidelines.
How to Find, Share & Edit Your Screenshot on Your Android Device
Find screenshot on your Android device
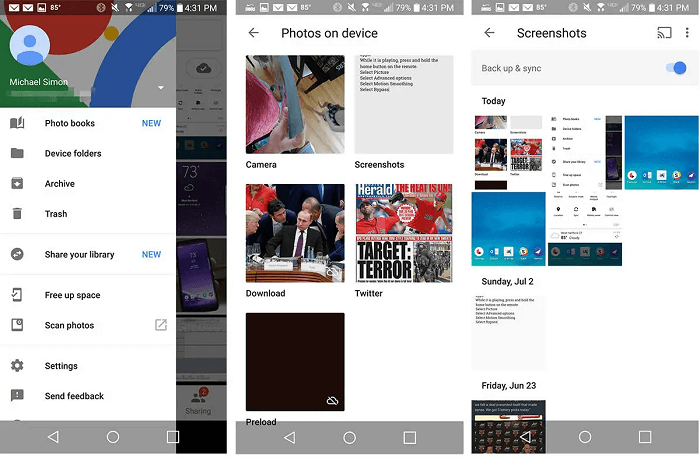
The screenshots you take will be saved in your phone's Gallery app under a separate folder named Screenshots. You can access them anytime you want.
Follow these steps:
- Open Gallery or Photos app on your device.
- Now tap Library.
- Go to the Screenshots folder and you can see all the screenshots you took on your device.
Share screenshot on your Android device
Generally, you take screenshots to show someone exactly what you see on the screen. In that case, you can share screenshots with others in different ways.
Here’s how you can share screenshots:
- From the Screenshots folder in the Library, open the screenshot you want to share.
- Tap the Share button.
- Select a medium you want to use for sharing the screenshot.
Edit screenshot on your Android device
You may need to hide some details from the screenshot or add something to it. In that case, you can edit screenshots on your device. Here’s how:
- Open the screenshot and tap the Edit button.
- Now, use the editing tools available in the editor.
How to Record Your Android Phone Screen
So, you want to take a video of the screen on your Android phone screen. Maybe you’re showing off a new game, or maybe you just want to record yourself playing with your new app. Either way, screen recording is an excellent tool in content creation.
Screen recording on your Android device was only possible with the help of third-party apps.
Luckily for us all, Google added a screen recording feature in Android 11, which means we can now record a video of the screen without having to use third-party apps or root our devices.
Here’s how you can record your phone screen:
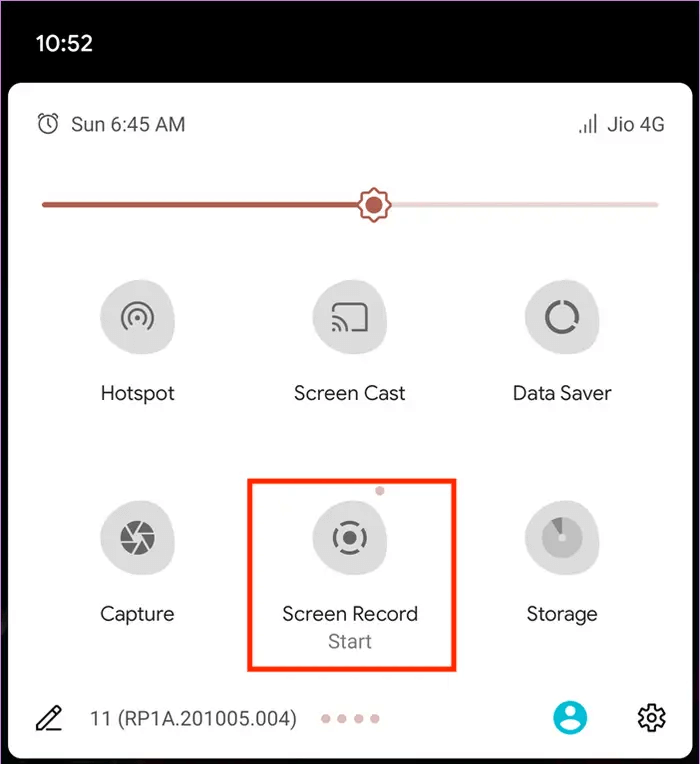
Step 1: Swipe down twice from the top of your screen.
Step 2: Tap Screen record and choose from No sound, Media sound, or Media sounds and mic.
It might not be right in front so swipe right to find it.
Step 3: Now, open whatever you want to capture in the screen recording and tap the Start button on the Screen recorder. The recording will start after the countdown.
Step 4: To stop recording, use the Stop button on the toolbar of the Screen recorder.
After you take a video from the screen, it goes to the videos folder in your media library. In most Android devices, screen recordings are available in the Movies folder in your gallery.
Find the screen recordings:
Step 1: Open the Photos app on your Android device.
Step 2: Now, tap Library and open the Movies folder.
Step 3: You can find all the screen recordings in this folder. Open whichever one you want to watch, share, or edit.
How to Record Screen on PC
Android devices let you take video of the screen and capture screenshots using built-in features. What if you need to record a PC screen? In that case, you need a professional screen recording tool like Wondershare DemoCreator.
Wondershare DemoCreator
DemoCreator is for every content creator, tutorial maker, game streamer, educator, or marketer who needs to capture their PC or laptop screen. Whether your screen recording needs are basic professional, Wondershare DemoCreator is equally impressive.

Steps to Record PC Screen with Wondershare DemoCreator
Wondershare DemoCreator has a user-friendly interface. Despite offering a range of recording modes and settings, it’s easy for beginners and professionals alike.
No matter what you’re doing on your PC screen, you can record it with DemoCreator using the below steps.
Step1Launch the software and select recording mode
First of all, you need to download and install DemoCreator on your computer. You can visit the Wondershare DemoCreator website to download it for your Mac or Windows computer. Once downloaded, run the setup and complete its installation.
Now, launch the program and select from available options. Select Start a Record Project to record the entire screen activity and configure settings according to your choice.

You can also select Record Screen if you want to quickly start with the default settings.
It has Record Game option to capture your gameplay.
Step2Adjust the screen size
After you’ve selected Start a Record Project, select an option in the dropdown menu of Capture Area. It lets you choose the area you want to include in the screen recording.
If you want to record a specific area, select Custom Area and set the screen size by moving the edged of the frame.
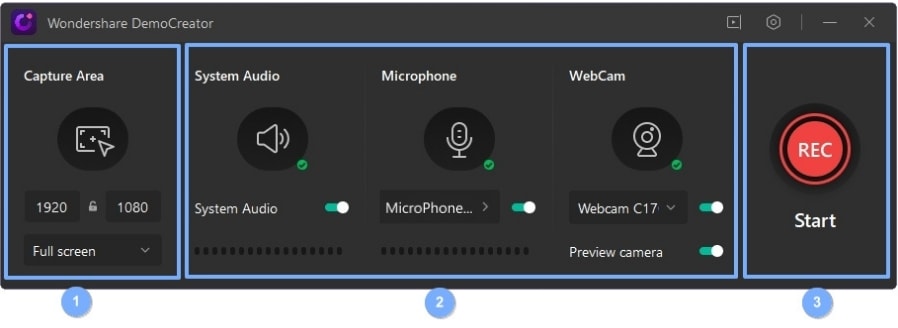
Step3Set up Audio and Camera Settings
DemoCreator records the System Audio and Microphone sound by default. However, you can disable them. You can adjust audio, microphone, and webcam settings to your discretion. You can adjust the sensitivity of your microphone by hovering the cursor over the dotted bar in the Microphone section.
Also, you can enable webcam recording to capture your facecam video.
Step4 Start recording
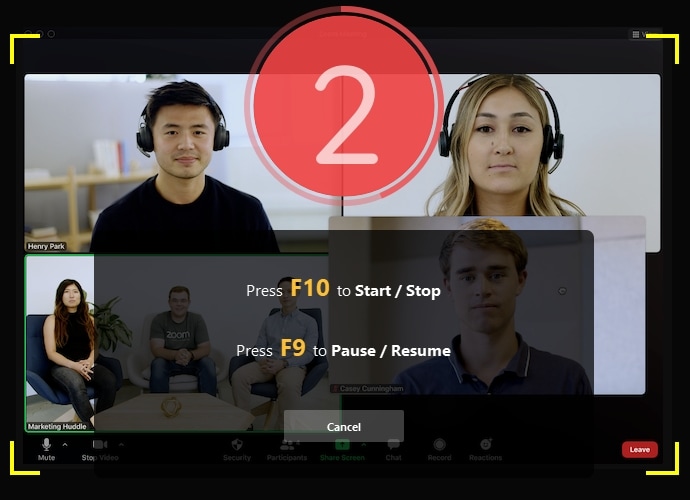
Click the REC button to start capturing the screen activity of the specified area. You can also press the F10 hotkey to begin the recording.
The recording will begin after a countdown of 3 seconds. At any time during the recording, you can press the F9 key to pause and resume the recording. Click the Stop button or press F10 to stop the recording.
The recording video will open in the DemoCreator editor where you can do professional-level editing.
Windows 11 / Windows 10 / Windows 7 (64 bit OS)
macOS 10.13 - macOS 12(Apple M1 compatible)
Write in the End
The methods above should cover all your bases and help you take screenshots or record screens on your computer and Android devices when necessary. The next time you find yourself in a situation where you need to grab a screenshot on the fly, you’ll be ready to grab and go without having to worry about the process. Enjoy!