Video conferencing has been one of the most popular activities online. With most organizations doing remote work, it is ideal to hold meetings and conferences online. Microsoft Teams makes it possible for you and your co-workers to meet any time of the day in real-time. But, if meetings become monotonous and boring, you can spice them up with camera filters.
Snapchat has a camera app called Snap Camera. You can use its desktop version on Windows 10 and macOS. With Snap Camera, you can add filters and effects on yourself when you are online. Snap Camera is compatible with Microsoft Teams, so imagine what endless fun you have during meetings with filters on your screen.
Using the Snap Camera filters on your Microsoft Teams meetings only takes a few steps. You can transform into a cute animal or add quirky effects on yourself.
Set Up Snap Camera on Your PC
The Snap Camera app is not exactly like the app on your Apple or Android devices, but it isn’t all that different either. Figuring it out will be simple.
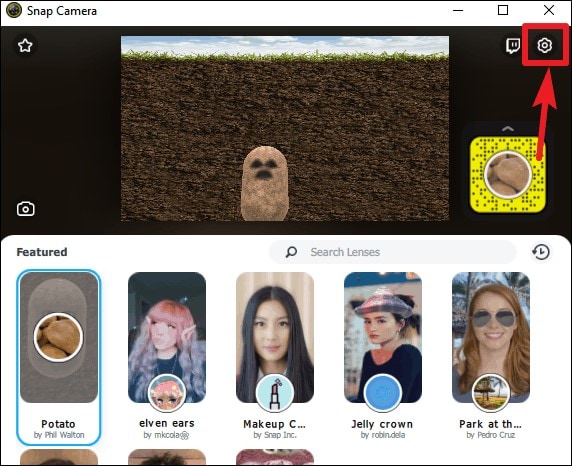
Launch the Snap Camera app on your computer. It should display the camera stream right away. If not, you may have to configure the app to use your computer’s webcam. Go to the settings of the app by clicking on the ‘settings’ (gear) icon on the top right of the screen.
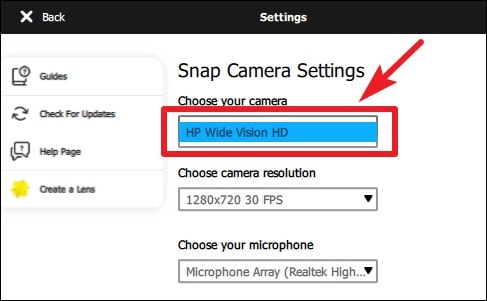
Then, under the ‘Choose your Camera’ option, select your computer’s webcam if it isn’t already selected.
Select a filter you want to use in your Zoom or Teams video call in the Snap Camera app. The most used and popular filters of Snap Camera are displayed under the ‘Featured’ section of the app, but we suggest you go check out the ‘Top Community Lenses’ section too.

You may minimize the app after selecting a filter. You can even close the app, just don’t quit it completely. Keep it running in the background.
Using Snap Camera in Microsoft Teams
Open the Microsoft Teams app after setting up the Snap Camera app on your computer.
In the Teams app, you will have to set the Snap Camera as your preferred camera device. You can change these settings during a call, or before.
Step1 Set Up First
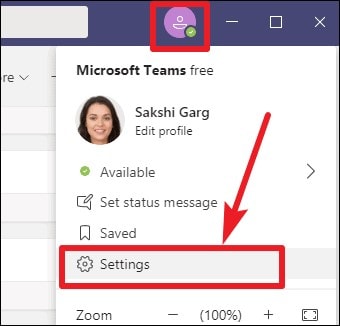
Click on the ‘Profile’ icon on the Title Bar in Teams app, and select ‘Settings’ from the menu.
Step2 Select Devices
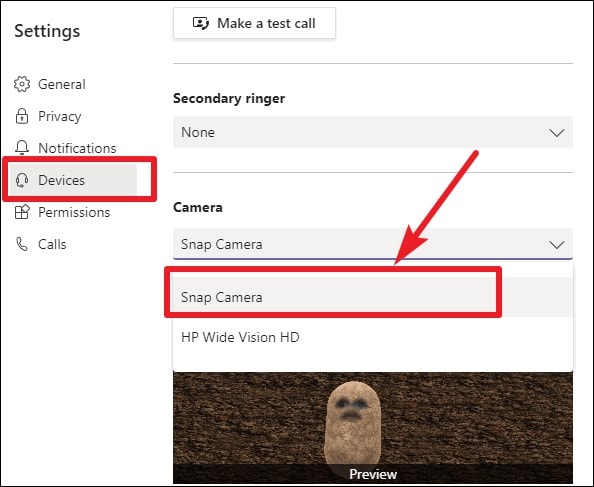
In settings, click on ‘Devices’ on the left to go to device settings. Scroll down and click on the drop-down menu under the ‘Camera’ option, and select ‘Snap Camera’ from the list.
Step3 Select Snap Camera During an Call
If you have already joined the call, don’t worry. You can switch to the Snap Camera stream during an ongoing call as well. In the call, click on the ‘More options’ icon (three-dot menu) and select ‘Show Device Settings’ from the menu.
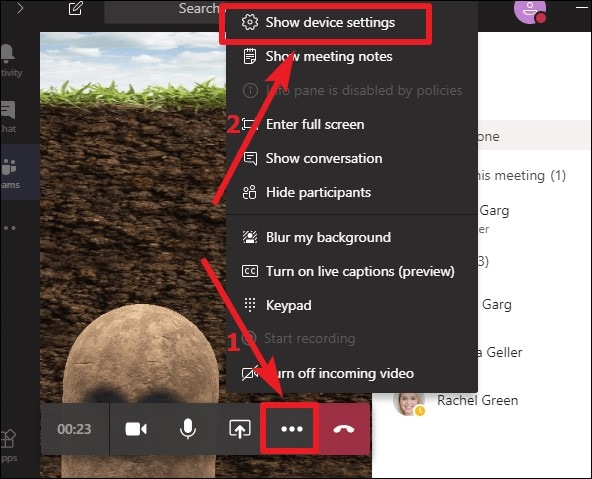
Step4 The Device Setting
The Device Settings screen will open on the right side of the screen. Go to ‘Camera’ and select ‘Snap Camera’ from the drop-down menu. You will only have to change these settings the first time you use Snap Camera with Teams. The settings will stay the same until you change them again.
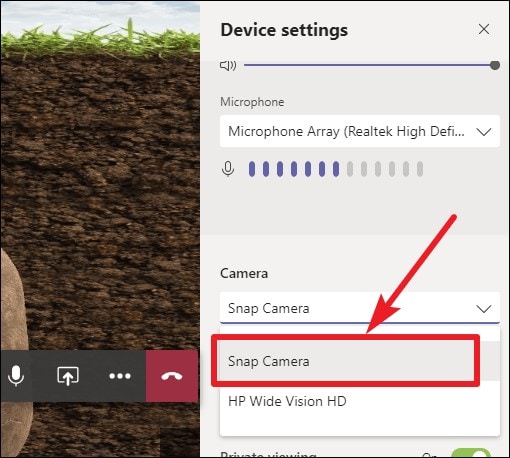
And that’s it. That’s all you need to do to use Snapchat filters in your Microsoft Teams meetings and video calls. You can even turn yourself into a potato if that’s what you want, just select the potato filter from the Snap Camera app. But please don’t do it during serious meetings. We don’t want you to get in trouble.
And if you don’t want to get stuck as a potato, you can switch back to a normal camera at any moment from within the teams. Click on the ‘Switch Camera’ button on the lower-right corner in the video call in Microsoft Teams to switch back to the normal camera.
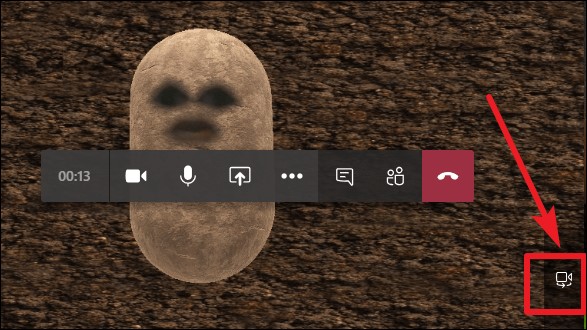
Click on the ‘Switch Camera’ button to switch back to the normal camera.
Conclusion
Snap Camera app can provide the much-needed uplifting we all need in these dire times by being the source of some comic relief in our meetings and video calls. Become a potato, an elf, a matzo ball, or choose from literally hundreds of available filters to add some cheer to your Microsoft Teams or Zoom meetings. But please, don’t do it in any serious meetings that might get you in trouble.


