

While our world has been overshadowed by the global pandemic, more and more people are seeking practical solutions for processing remote meetings like Zoom, Skype, and Bluejeans. Lucky, OBS is such an excellent screen recording software that provides functional recording ways for both Windows and Mac users.
One of the best tools that OBS offers is the virtual camera which can be added to video call software like Zoom, helping you create a custom scene from OBS. For more details, keep on reading.
More commonly known as a tool for streamers, OBS Studio also has what's known as a "Virtual Camera" built-in on Windows, Mac, and Linux. What this does is export whatever you have set up in OBS Studio to your system as if it were a webcam. And this means you can get really creative.
In this article
- How to Set Up Virtual Camera (Windows)
- How to set up an OBS virtual Camera on a Mac
- How to set up an OBS virtual camera in Zoom
- How to set up an OBS virtual camera in Teams
- How to set up an OBS virtual camera in Google Meet
- How to set up an OBS virtual camera on Skype
- How to add filters to your webcam in OBS Studio
- Summary
What is OBS Virtual Camera?
So, what is an OBS virtual camera? As the name suggests, the virtual camera in OBS is basically a virtual cam tool that can be used to replace your webcam feed in apps like Zoom, Skype, Google Meet, and more. It's part of OBS Studio, a video recording, and editing program. The OBS virtual cam plugin lets you use various kinds of media, like images and videos, as the camera output in these kinds of apps.
If you launch a Skype call with a friend using OBS virtual camera, for example, you can show them different content, like videos or even a live feed of your screen, instead of your usual webcam. It can also be used to display your webcam with special filters and enhancements. There are many different uses of the OBS virtual camera download.
How to Set Up Virtual Camera (Windows)
Step1 Install or update the program
The first step of the process is to download and install OBS Studio on your Windows device. If you're not sure how to install OBS, you can simply find it on the official OBS Studio website and download it for free. If you already have OBS installed, open it up and click Help > Check for Updates to update to the latest version.
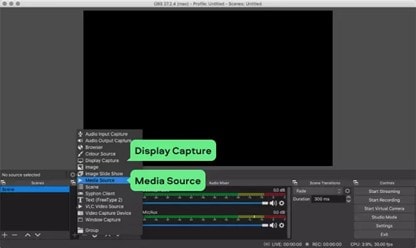
Step2 Add sources
The next step of the process is to add the sources you wish to use when using the virtual camera. OBS Studio allows you to add various sources to your virtual camera feed, like your current monitor display, a media source, or a connected webcam. To add sources, simply go to the Sources box in the bottom section of the screen and click the + icon. You can then choose sources like Display Capture or Media Source to add the various sources you want to show in your virtual cam.

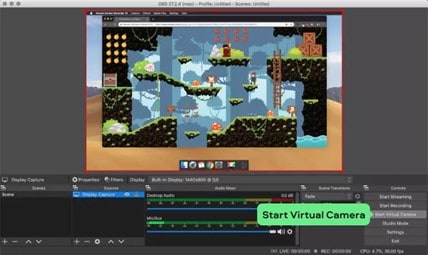
Step3 Start the virtual camera
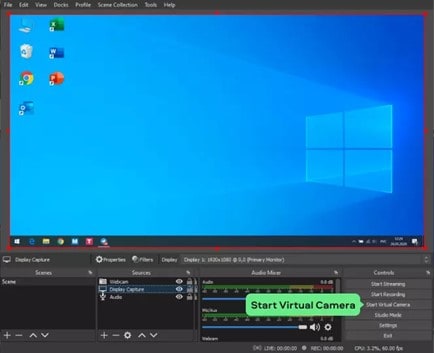
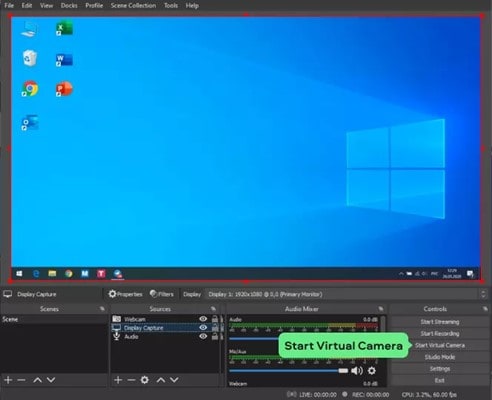
Once your scenes and sources are prepared and ready to go in OBS Studio, it's time to start the virtual camera. To do this, simply go to the Controls dock in the lower right section of the screen and click on the button marked Start Virtual Camera.

How to set up an OBS virtual Camera on a Mac
Step1 Get the latest version of OBS
There's no need to worry about installing a specific camera plugin to use the OBS virtual webcam on your Mac, as the virtual camera feature is built into the latest version of the software. So, to start the process, you just need to download and install the latest version of OBS Studio. You can download directly from the OBS site or open your already-installed app and click Help > Check for Updates.
Step2 Set up sources and scenes
The next step of how to set up the OBS virtual camera on Mac is to set up your various scenes and sources you wish to use later on in Zoom calls, Skype meetings, and so on. To do this, just go to the Sources box at the bottom and click + and then select a source you wish to add, like a Media Source or Display Capture.
Step3 Launch the camera
Once the sources and settings have all been configured, you can activate the virtual camera. To do this, go to the Controls section in the bottom right of the OBS window and click Start Virtual Camera to enable the cam.
How to set up an OBS virtual camera in Zoom
Step1 Download or update OBS Studio
Download OBS Studio from the official website and/or update it to the latest version on your device.
Step2 Open and configure the program
Open the program and start adding the sources and scenes you wish to show in your Zoom call.

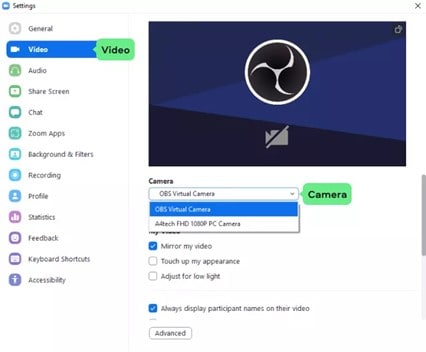
Step3 Start a Zoom meeting
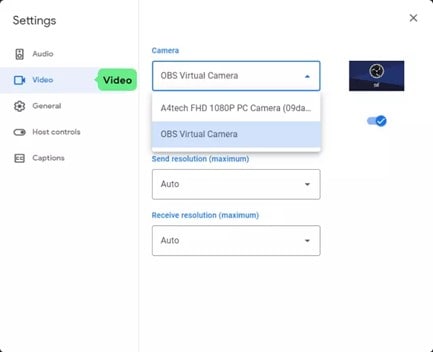
Once your OBS is set up as you like, start a Zoom meeting and set up the virtual camera as your webcam feed. To do this, go to Settings in Zoom and then click Video. In the Camera drop-down menu, select OBS Virtual Camera.
Step4 Sync with OBS
You'll now need to head back to OBS and click Start Virtual Camera in the bottom right to activate the virtual cam and sync with Zoom.

Step5 Use the virtual camera to share media
The OBS virtual camera in Zoom should now be set up and ready to display whatever you want to your fellow Zoom callers. You can then use the OBS window to switch between sources and show off different content or media to your colleagues or friends.
How to set up an OBS virtual camera in Teams
Step1 Download and install the program
Download OBS Studio from the official site and install it. If you already have it, use Help > Check for Updates to get the latest version.
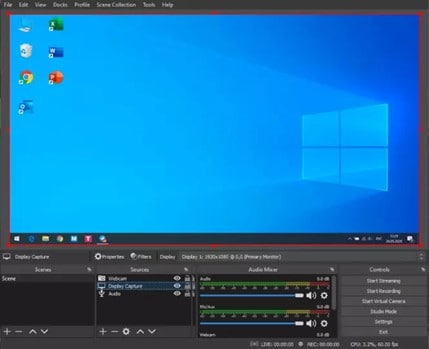
Step2 Set up sources
Next, open the app and prepare the source(s) you want to display. For example, you can add Window Capture as a source to be able to share a specific window with people in Teams, like a Google Chrome browser window.
Step3 Set up Teams
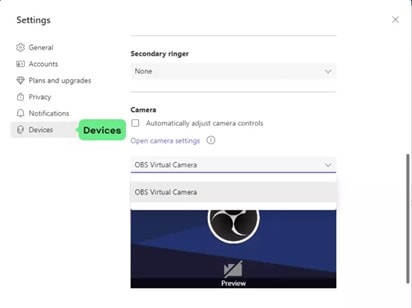
Open Microsoft Teams, head to Settings, then Devices, and select OBS Virtual Camera as the camera option you wish to use.
Step4 Launch the cam
Next, go back to OBS and click on Start Virtual Camera in the bottom right.

Step5 Start a call
Launch a meeting in Teams. All the meeting members will see your virtual camera feed instead of your webcam in the Teams meeting.

How to set up an OBS virtual camera in Google Meet
Step1 Install OBS Studio
The first step is to get OBS Studio set up on your device. Go to the official OBS site and download the latest version of the program. Follow the installation instructions to set it up.
Step2 Set up the app
Next, you'll want to set up the various scenes and sources to show in your Google Meet calls. To do this, click the + icon in the Sources box and add each source individually. You can add Display Capture, for example, to capture the feed from a connected display.

Step3 Open Google Meet
Next, go to Google Meet and head to the Settings menu. In the camera option, click on OBS Virtual Camera as your chosen camera. You should immediately see a static image showing your current OBS window.
Step4 Launch the virtual camera
Return to OBS and click on the Start Virtual Camera button in the lower right Controls section. This will begin the process of showing whatever sources you have selected in your virtual camera feed.
Step5 Start a call
Return to Google Meet, begin a call or meeting with your friends or colleagues, and they'll be able to see whatever you have selected for the virtual camera.

How to set up an OBS virtual camera on Skype
Step1 Set up OBS
The first step is to get OBS set up on your chosen device. You can download OBS Studio directly from the official OBS site and install it on your Windows or Mac system. If you already have OBS installed, just open it up, click on Help, then click Check for Updates to get the latest version.
Step2 Make sure Skype is updated
You'll also need to have the latest version of Skype to avoid any errors or issues. You can download the latest version from the Skype site or just open Skype on your device and check for updates.
Step3 Set up sources
Open OBS Studio and click on the + icon in the Sources box at the bottom. This is where you can add sources to show to your friends or family or other people on Skype. You can add various sources, like a Media Source, which lets you play a video file or show an image to people via your virtual camera feed.
Step4 Set up the camera
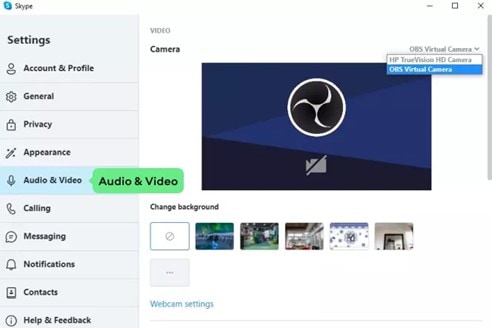
Next, go to Skype, click on Settings, then Calling, then Advanced, and click to Allow NDI Usage. Then go to Audio & Video in the settings menu and select OBS Virtual Camera from the Camera menu.
Step5 Launch the camera and start a call
Next, you can go back to OBS and click on Start Virtual Camera in the bottom right to activate the cam. Then, all you have to do is start a call on Skype and the person you call will see whatever you have chosen to share with them via the virtual camera.
How to add filters to your webcam in OBS Studio
Step1 Add webcam source
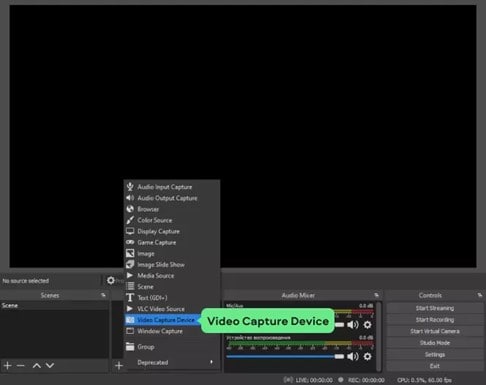
Open OBS and click on the + icon in the Sources box. Select Video Capture Device, click Create New, type in a name, and choose your webcam from the drop-down Device list. Then click OK to confirm.
Step2 Add filters
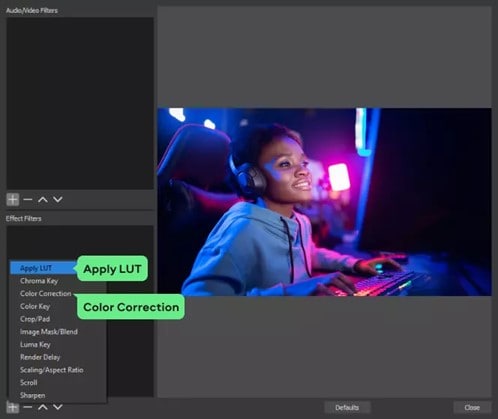
Right-click on your webcam in the sources menu and select Filters.
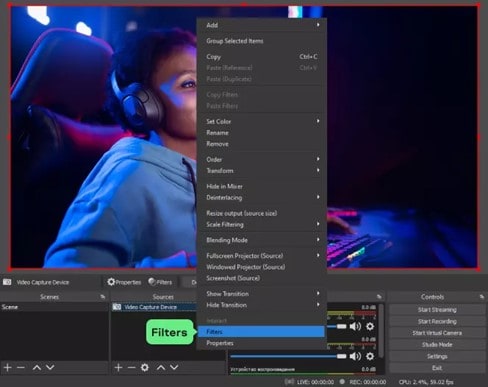
You can then use the Effects Filters menu to activate either the Color Correction filter or LUT filter. The color correction filter lets you manually adjust the color settings of your image however you like. The LUT filter allows you to add a standard lookup table filter to your feed. You can find free LUT filters on the OBS forums. Use the Browse button to find the file you want to use and then use the slider to adjust its strength.
Summary
There are lots of ways you can use the OBS virtual camera to take your Zoom, Skype, and other online calling experiences to a new level. We hope that this guide has provided the tips and steps you need to make the most of this feature in your favorite online calling app.


